AvatarStor Cloud Backup User Manual
Update instructions
This chapter documents the product changes of AvatarStor Cloud Backup.
Change type: < release > < add > < modify > < optimize > < deprecate > < delete > < fix > < known issue >
< Released date > /< Version number >
2024.9.18/V6.0.8
|
Function |
Change type |
Explanation |
Related Documents |
|
File backup and recovery |
< release > |
First public release |
|
|
SqlServer backup and recovery |
< release > |
First public release |
|
|
Mysql backup and restore |
< release > |
First public release |
|
|
Oracle Backup and Recovery |
< release > |
First public release |
|
1.AvatarStor Cloud Backup
AvatarStor Cloud Backup is a scheduled backup software product developed by Avatarstor, designed specifically for small and medium-sized enterprises (SMEs) as well as individual users. Positioned as a SaaS-level solution, it offers immediate usability upon registration, with flexible deployment and user-friendly operation. The product supports common file and database backups, as well as virtualization backups, covering most local and remote backup scenarios. It is the ideal choice for SMEs and individual users looking to establish comprehensive data security.
1.1 Basic concepts
|
Concept |
Explanation |
|
Tenants |
Users who use AvatarStor backup cloud. |
|
Client |
It is installed on the tenant's server that requires backup. It also refers to each server that needs to be backed up. This represents the "From" in the entire backup process of "From-What-To-Where-and-When." |
|
Server level |
Provides SaaS services for AvatarStor Backup Cloud. |
|
Page |
Front-end page for tenant registration, backup and recovery management. |
|
Storage |
The destination for writing tenant data. This represents the "Where" in the entire backup process of "From-What-To-Where-and-When." |
|
Instance
|
The database name installed on the client, along with its related path configuration and local login credentials, are essential parameters for the backup and recovery process. These parameters, combined, are referred to as an instance. The backup system needs the instance to identify which databases are present on the client. This represents the "What" in the entire backup process of "From-What-To-Where-and-When." |
|
Backup policy |
The specific data content of the backup, its running schedule, data retention period, and other parameters are collectively referred to as the backup strategy. This strategy encompasses all the parameters of the backup process "From-What-To-Where-and-When," along with the method for managing data expiration. |
|
Scheduled time |
The moment when the strategy is triggered. This represents the "When" in the entire backup process of "From-What-To-Where-and-When." |
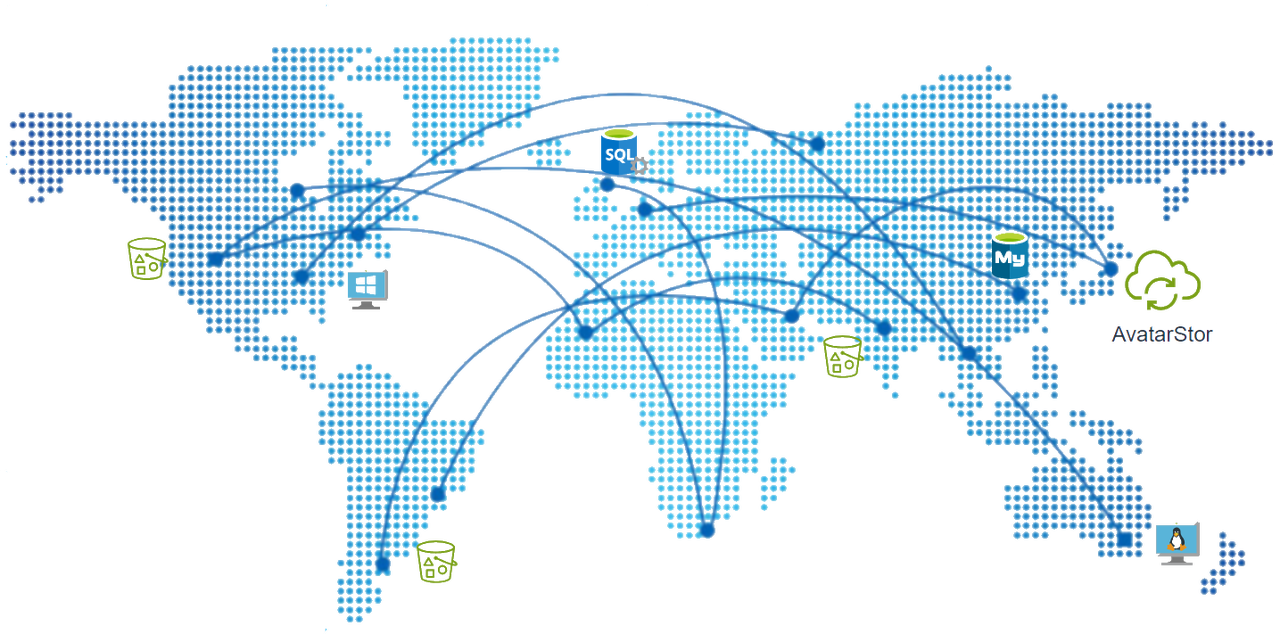
1.2 Technical architecture
Our technical architecture diagram:
1.3 Product advantages
Our core advantages:
SaaS service: Ready to use with any internet connection, always uninterrupted.
Secure and reliable: Unidirectional traffic, paired with firewalls to prevent attacks.
Easy deployment: Only requires client installation, no need for complex backup platform setups.
Simple operation: Entirely graphical interface, easy to get started in ten minutes.
Local and remote: Seamless integration to meet compliance requirements.
Object storage and disk: Fully supported both on-cloud and off-cloud.
1.4 Application scenarios
Common usage scenarios of our products:
Backup local data to the cloud
Backup cloud data to local
Backup local data to the local first, and then copy it to the cloud
Cloud backup data replicated to other clouds
1.5 Using restrictions
Our products generally have usage restrictions.
Our product is not a disaster recovery product and does not provide real-time backup and fault takeover capabilities.
32-Bit Win/Linux systems are not supported.
Old browsers such as IE are not supported, please use the latest version Chrome browser for the best experience.
Must have public network access capability. If the Client cannot access the public network, a transit machine can be deployed to map our SaaS service to the local. See FAQ 1 for details.
1.6 Environment requirements
The environment requirements for using this product client are as follows:
Public network access.
Server operating systems: Windows Server 2008 and above; Desktop operating systems: Windows 7 and above. Linux CentOS 6 and later versions. For more details, refer to the compatibility list in the appendix.
CPU: 4 cores; Memory: 8GB or more. Any products released after 2010 will be sufficient.
2. Account Registration and Login
2.1 Account registration
Use the Chrome browser to access https://avatarstor.com/cloud9/:
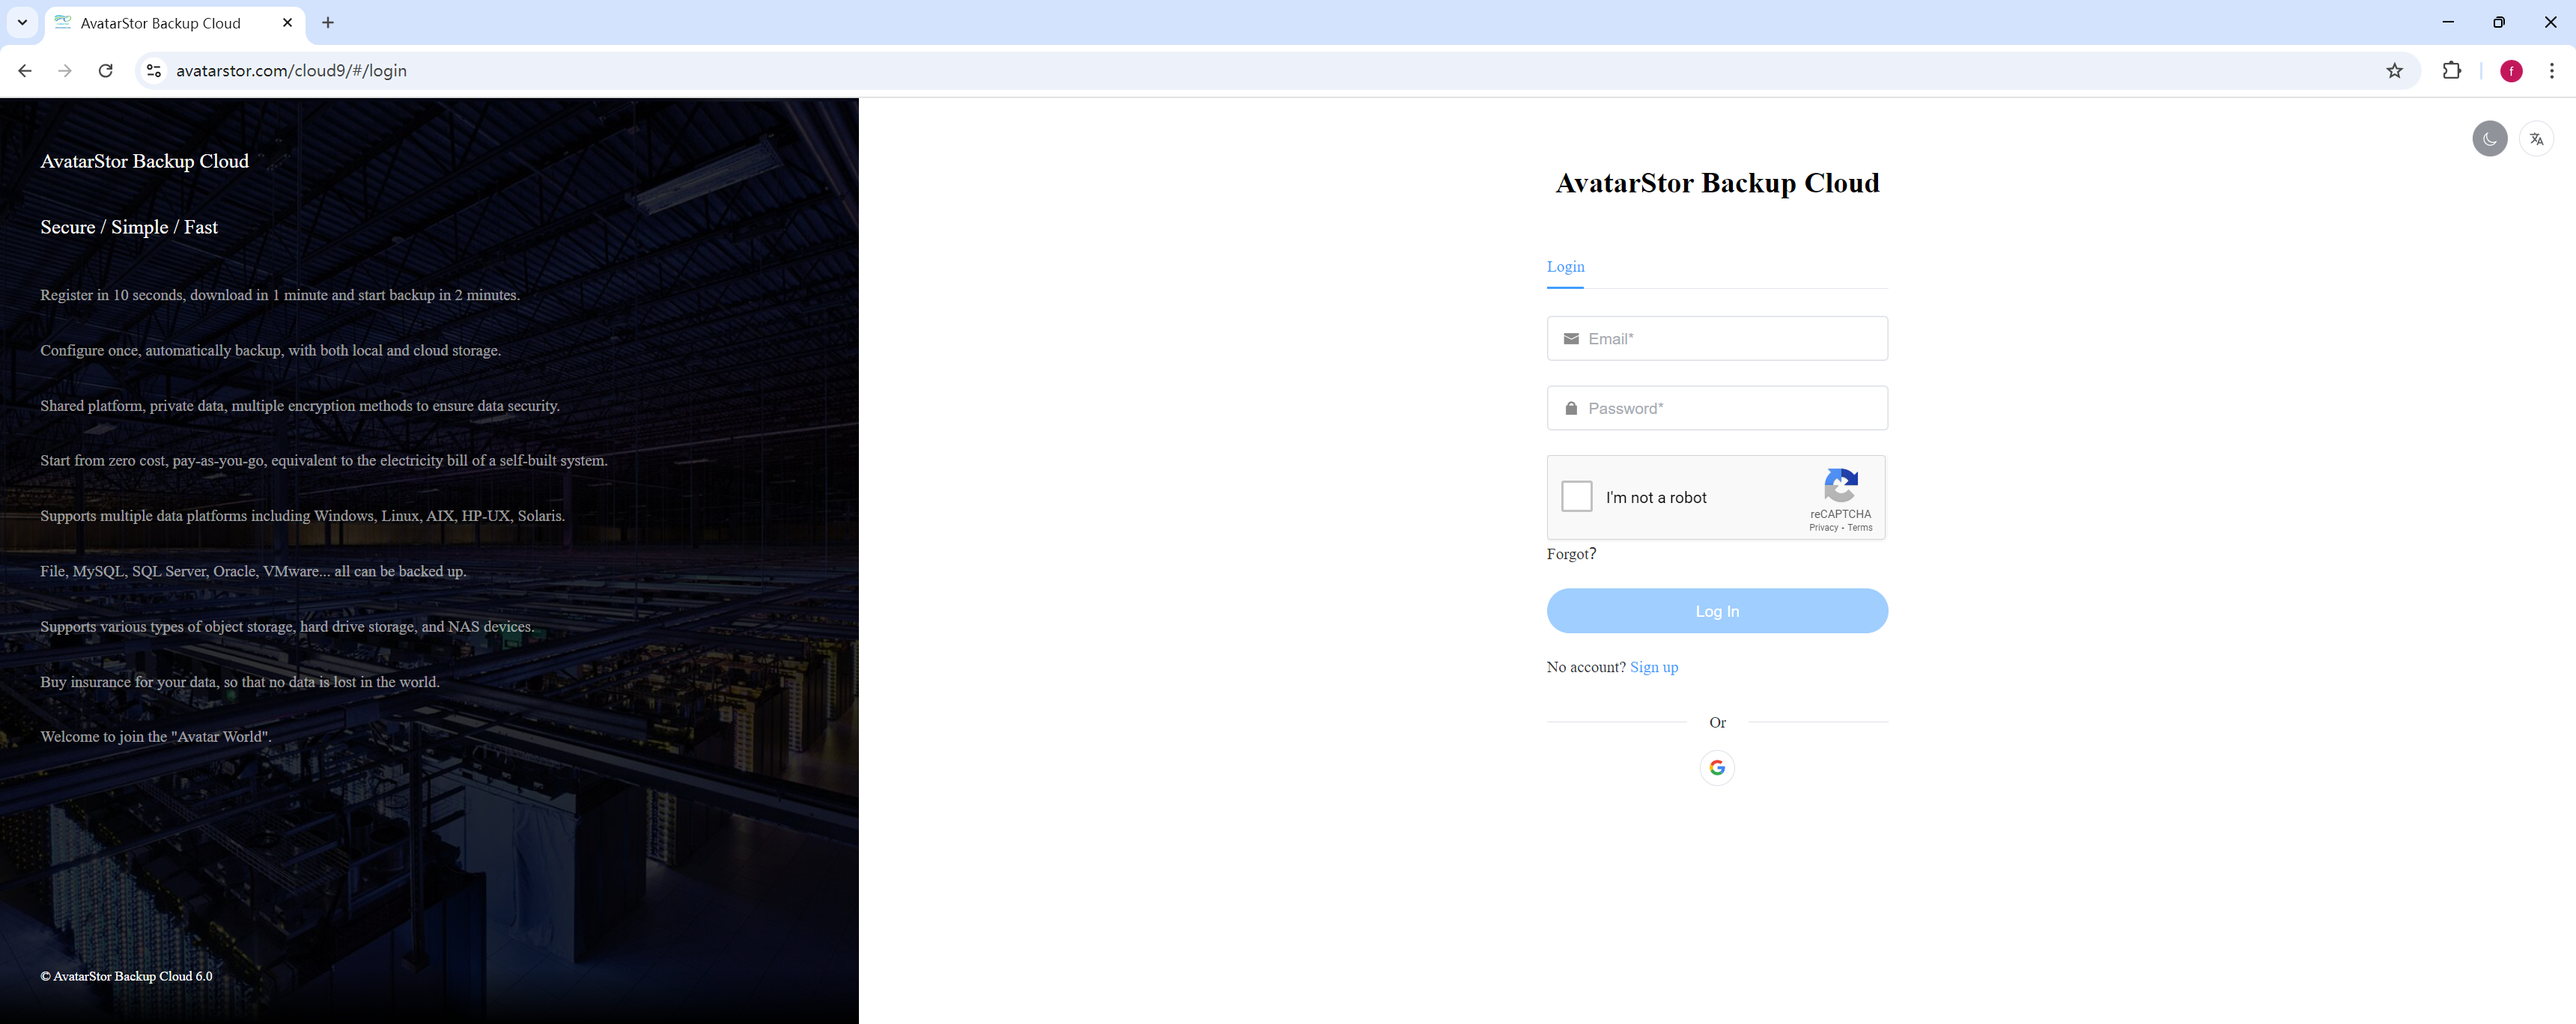
Click [Sign up]:
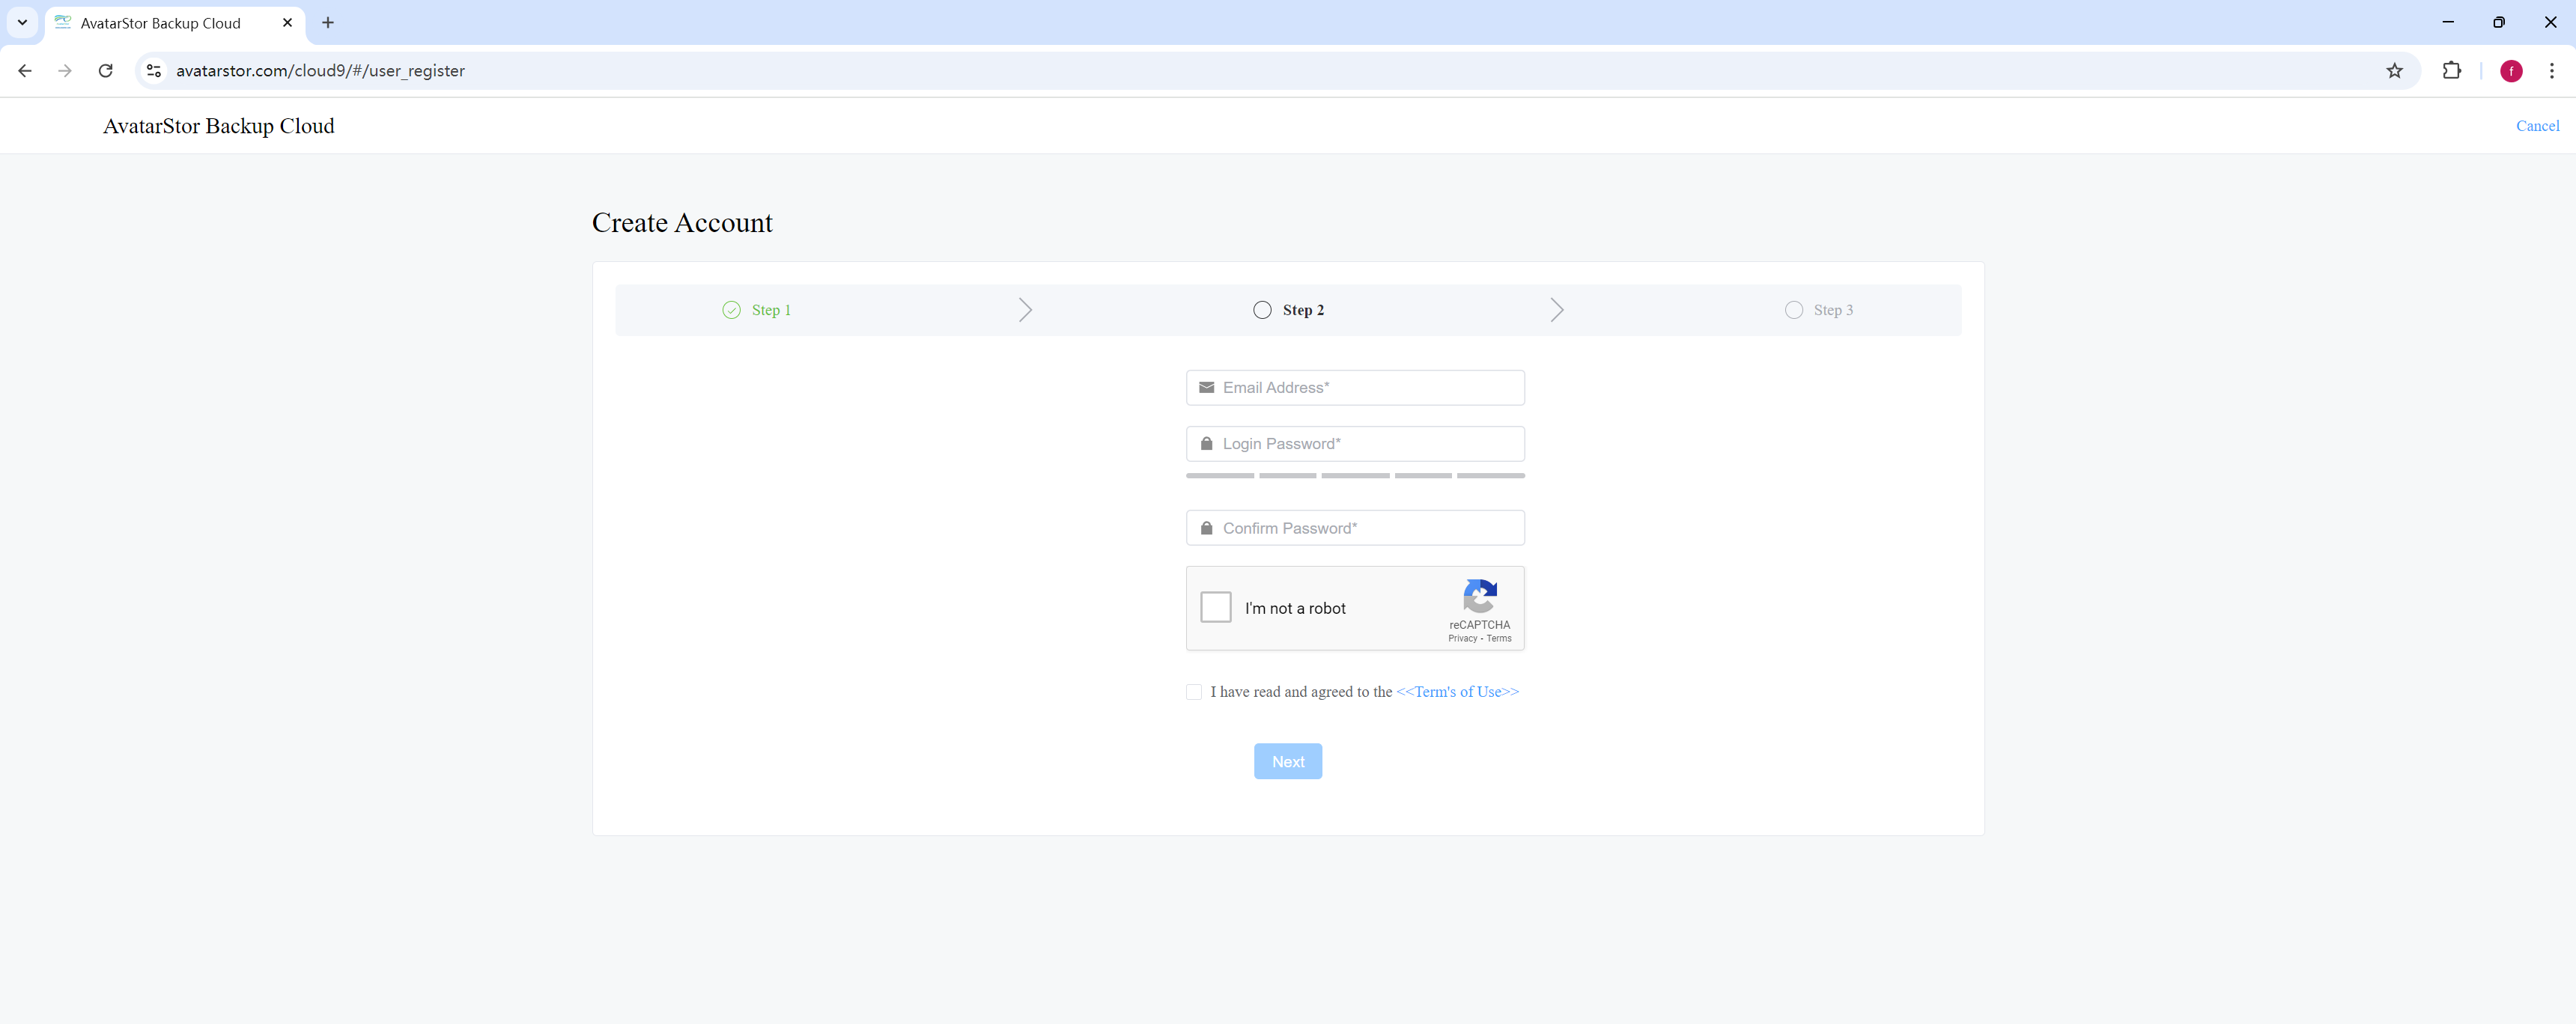
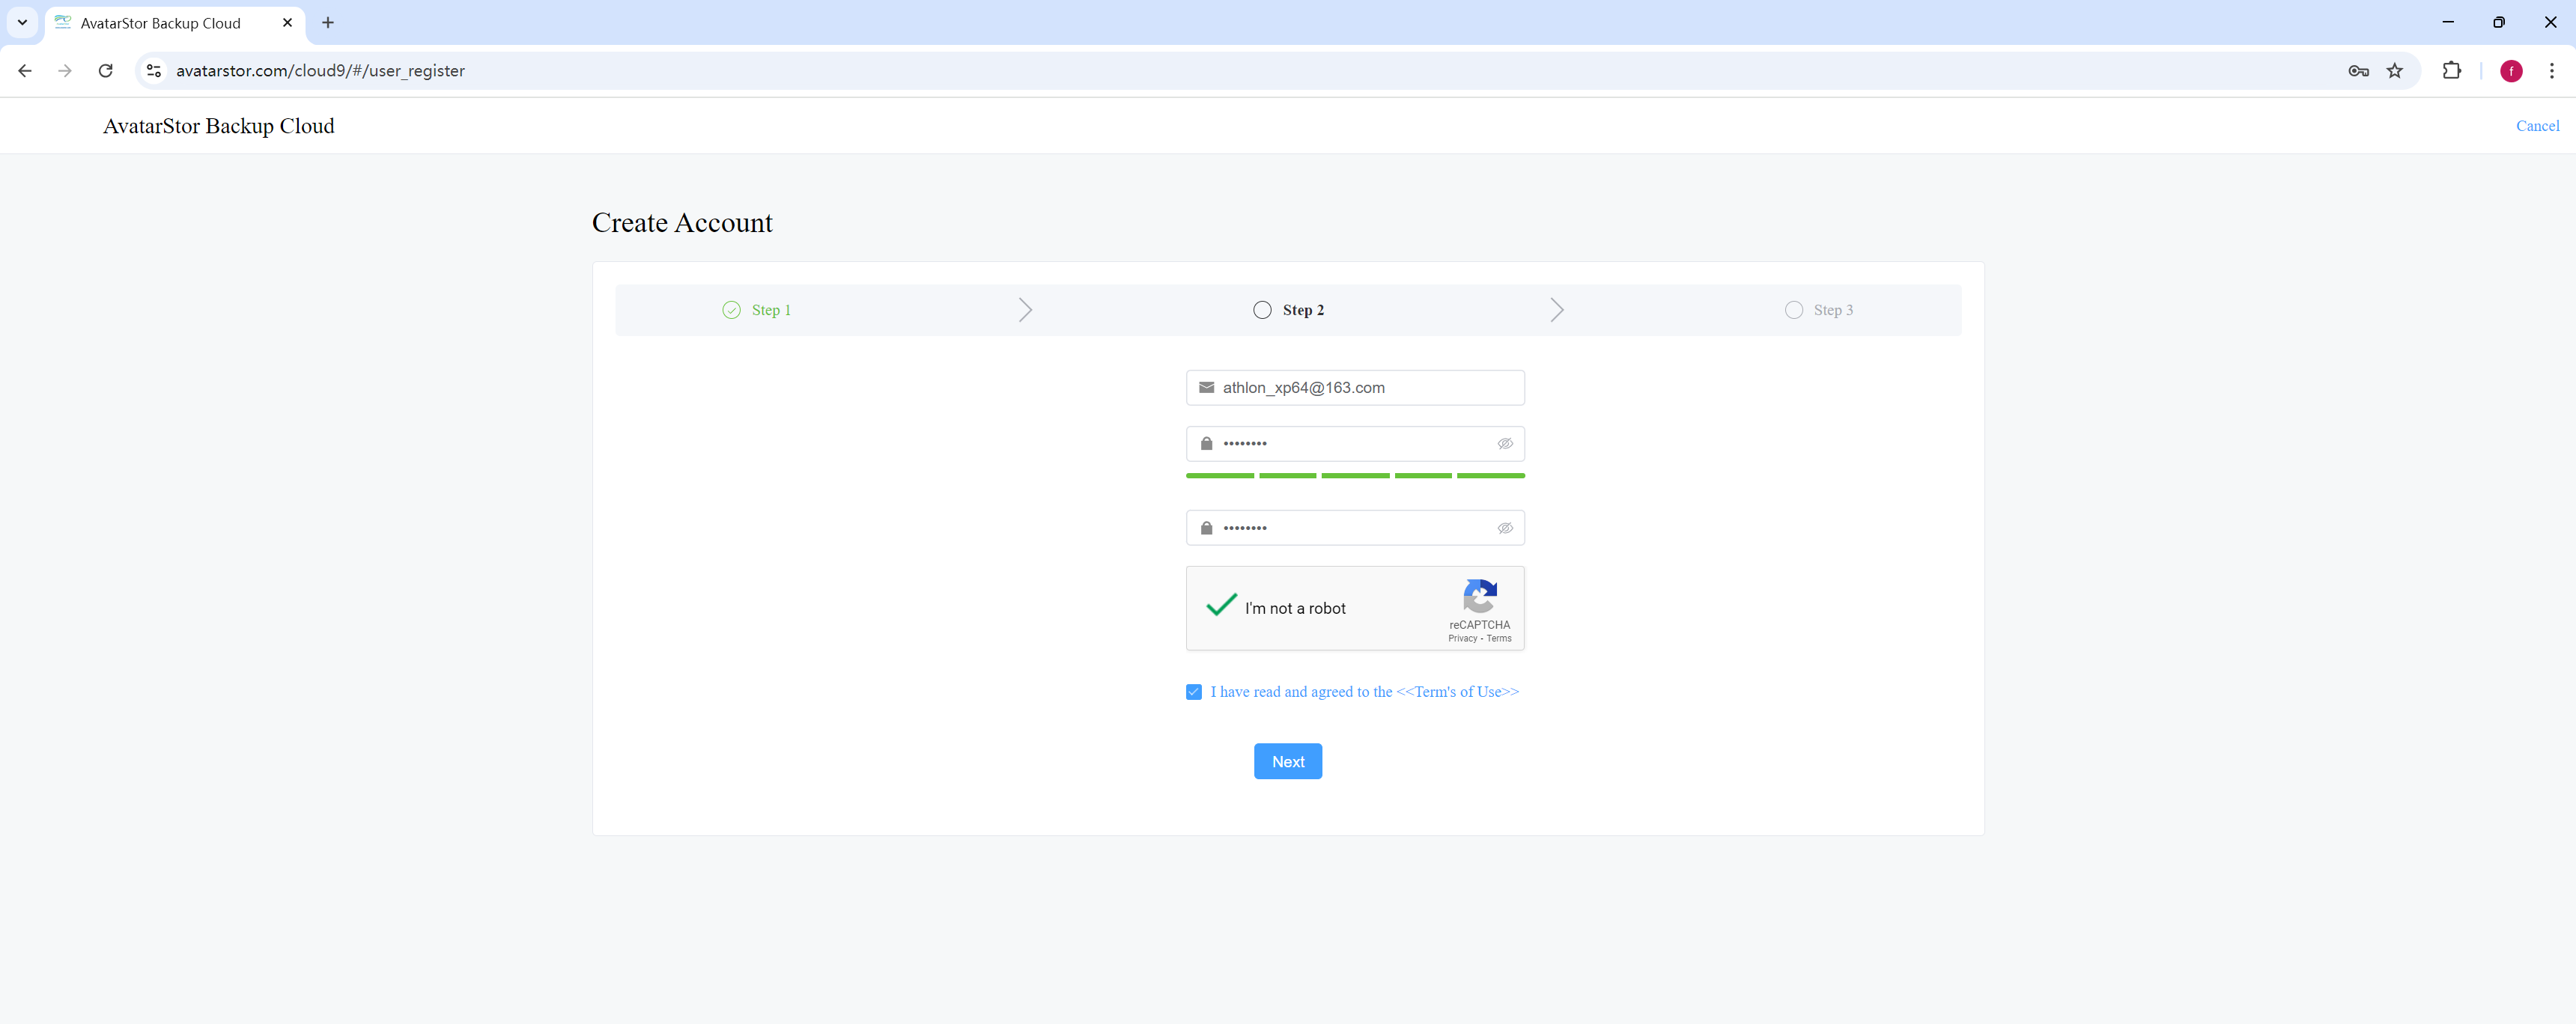
Please enter your frequently used email (it's recommended to use a real email). The password must be between 8-16 characters, and can only include letters, numbers, special characters, and underscores. Check the CAPTCHA and agree to the terms, then click [Next]:
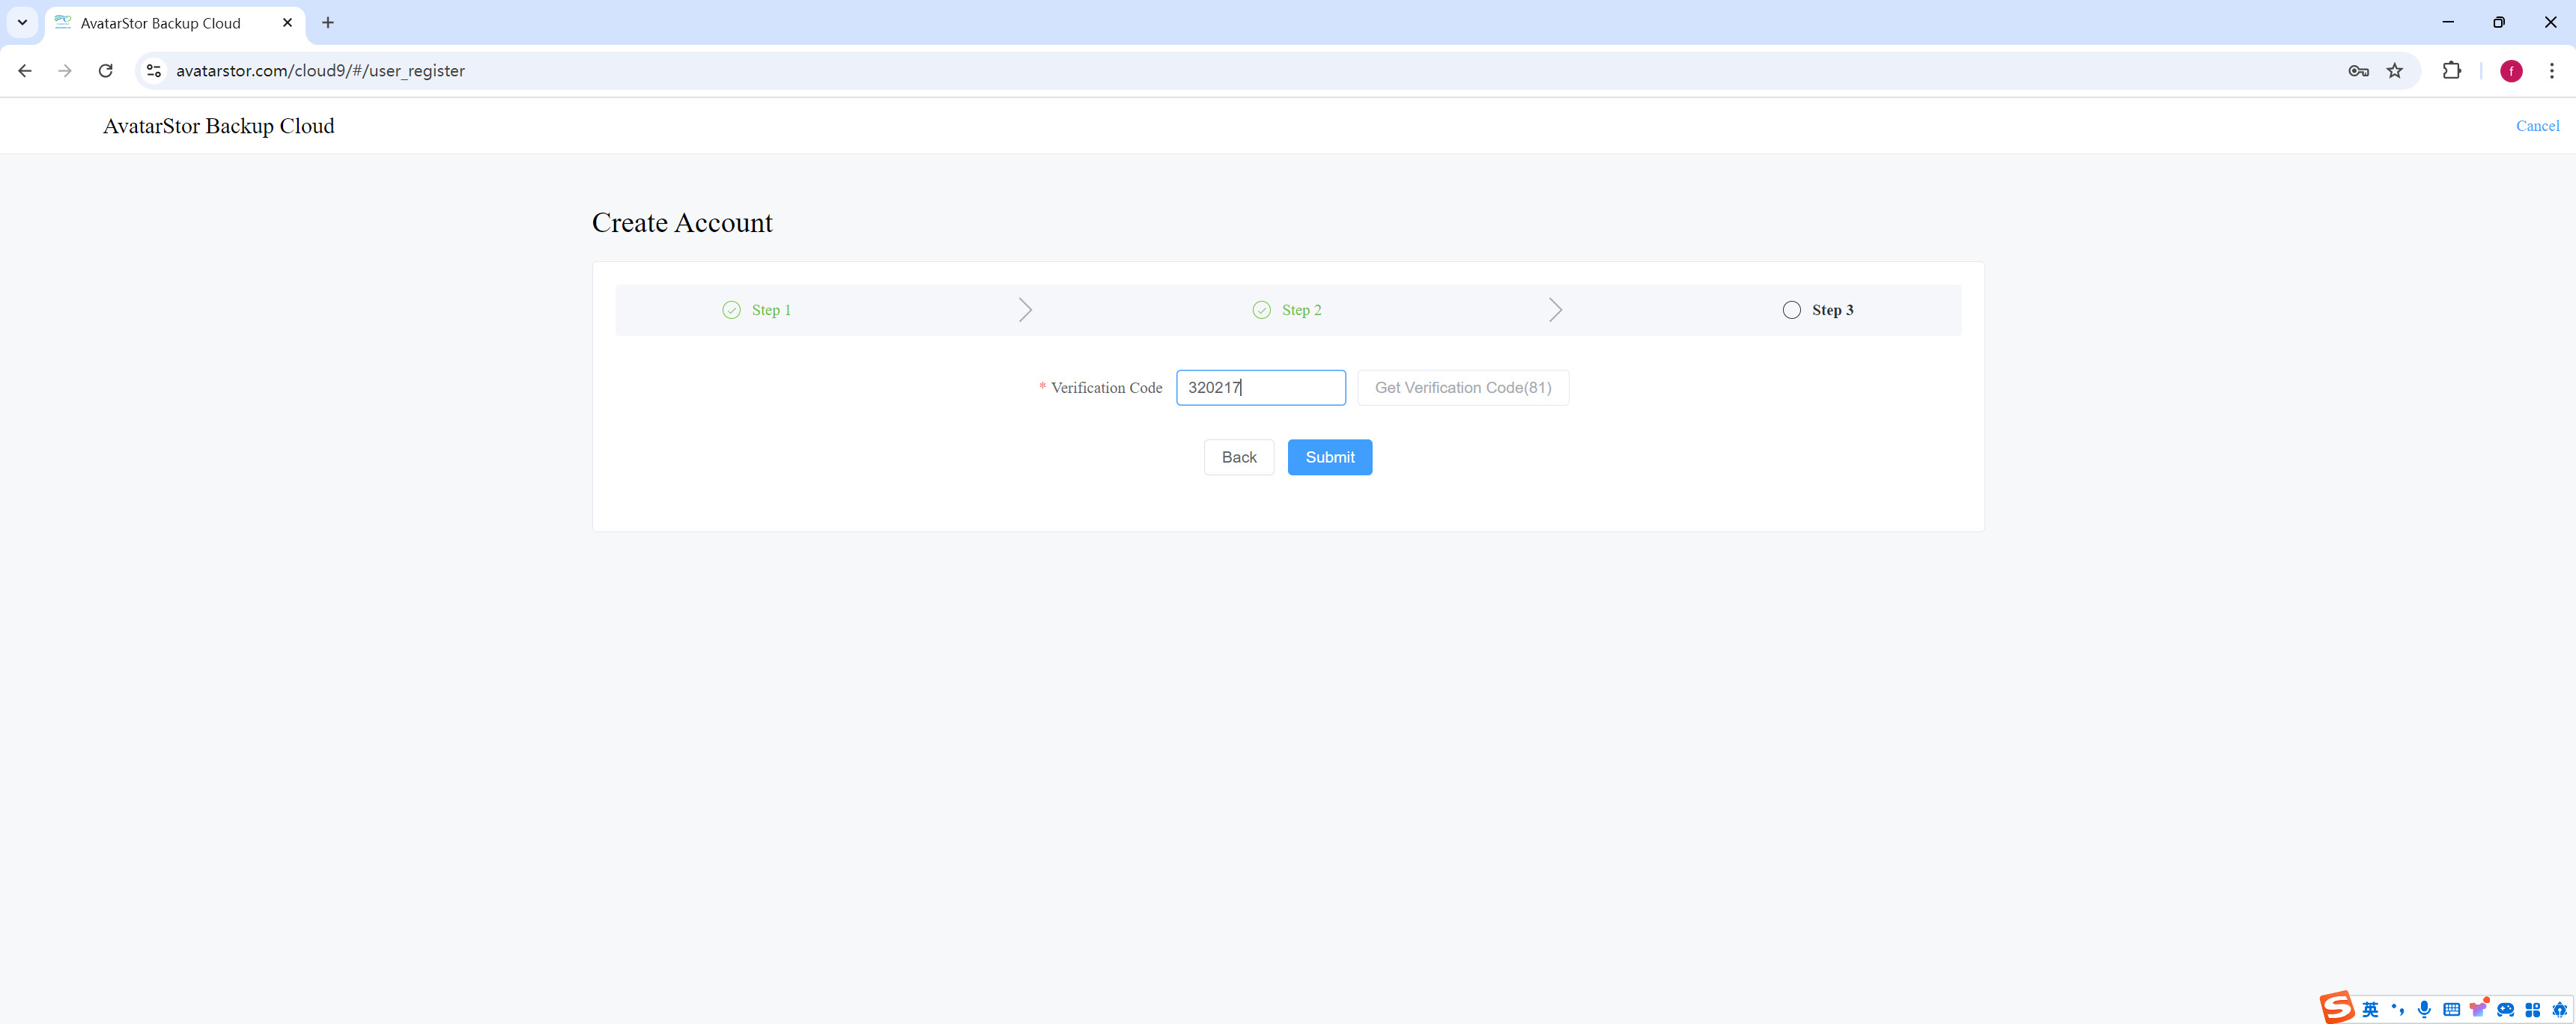
We will send a verification code to your registered email. After logging into your email to receive the code, click [Submit]:
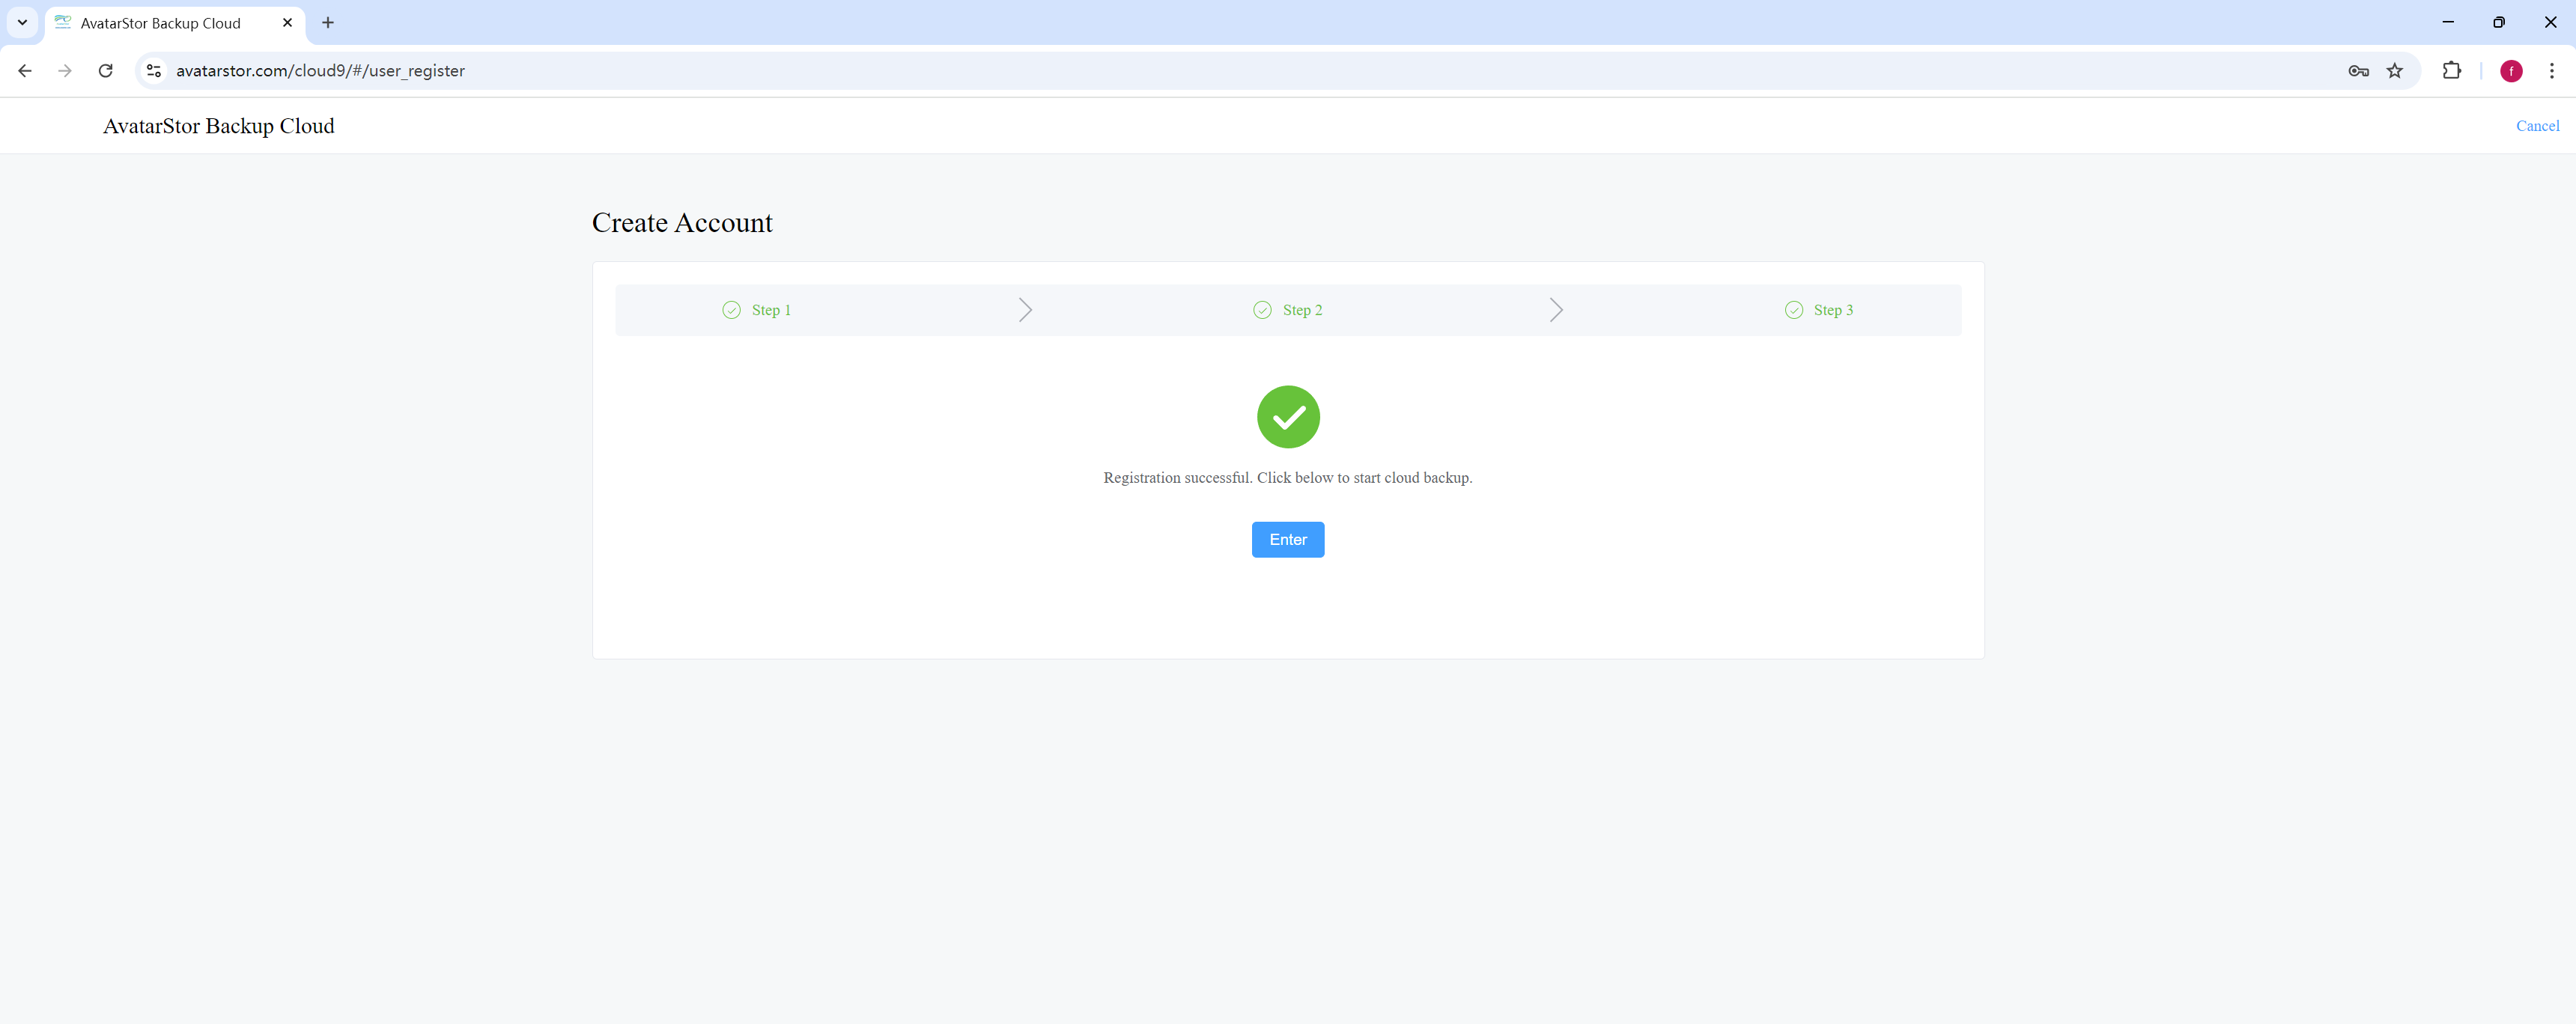
Account registration is completed:
|
Tip You can also directly click the Google logo at the bottom of the login homepage to sign in with your Google account. Your Google account will serve as your tenant account. |
2.2 Login homepage
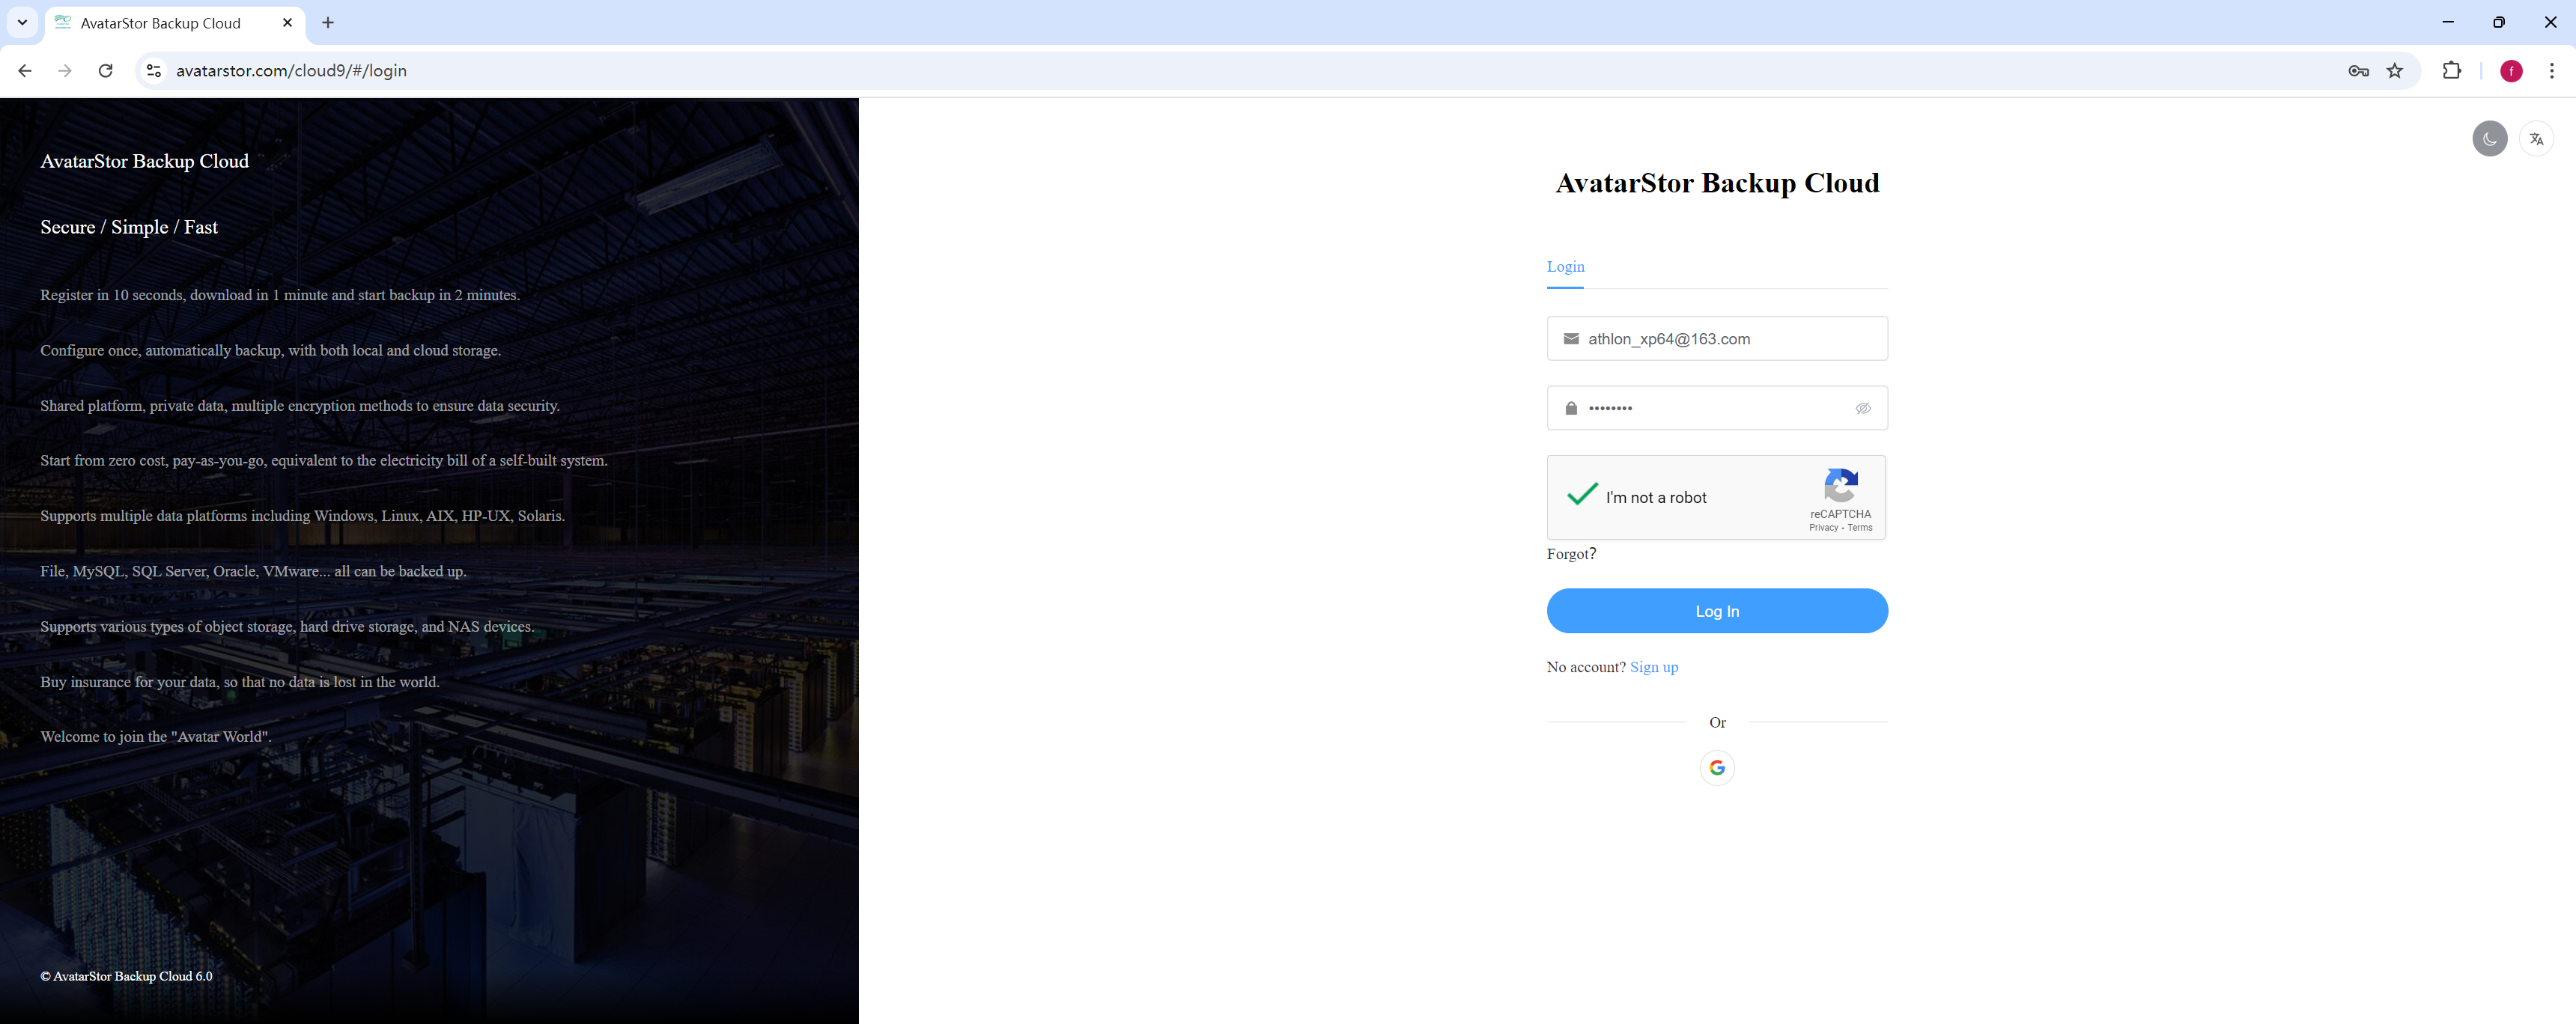
After completing the registration, return to the login homepage. Enter your email, password, check the CAPTCHA box or click the Google logo:
After logging in, you can view some statistics for the current tenant on the homepage console, including backup data volume, storage usage, job success and failure distribution charts, and daily data growth trends.
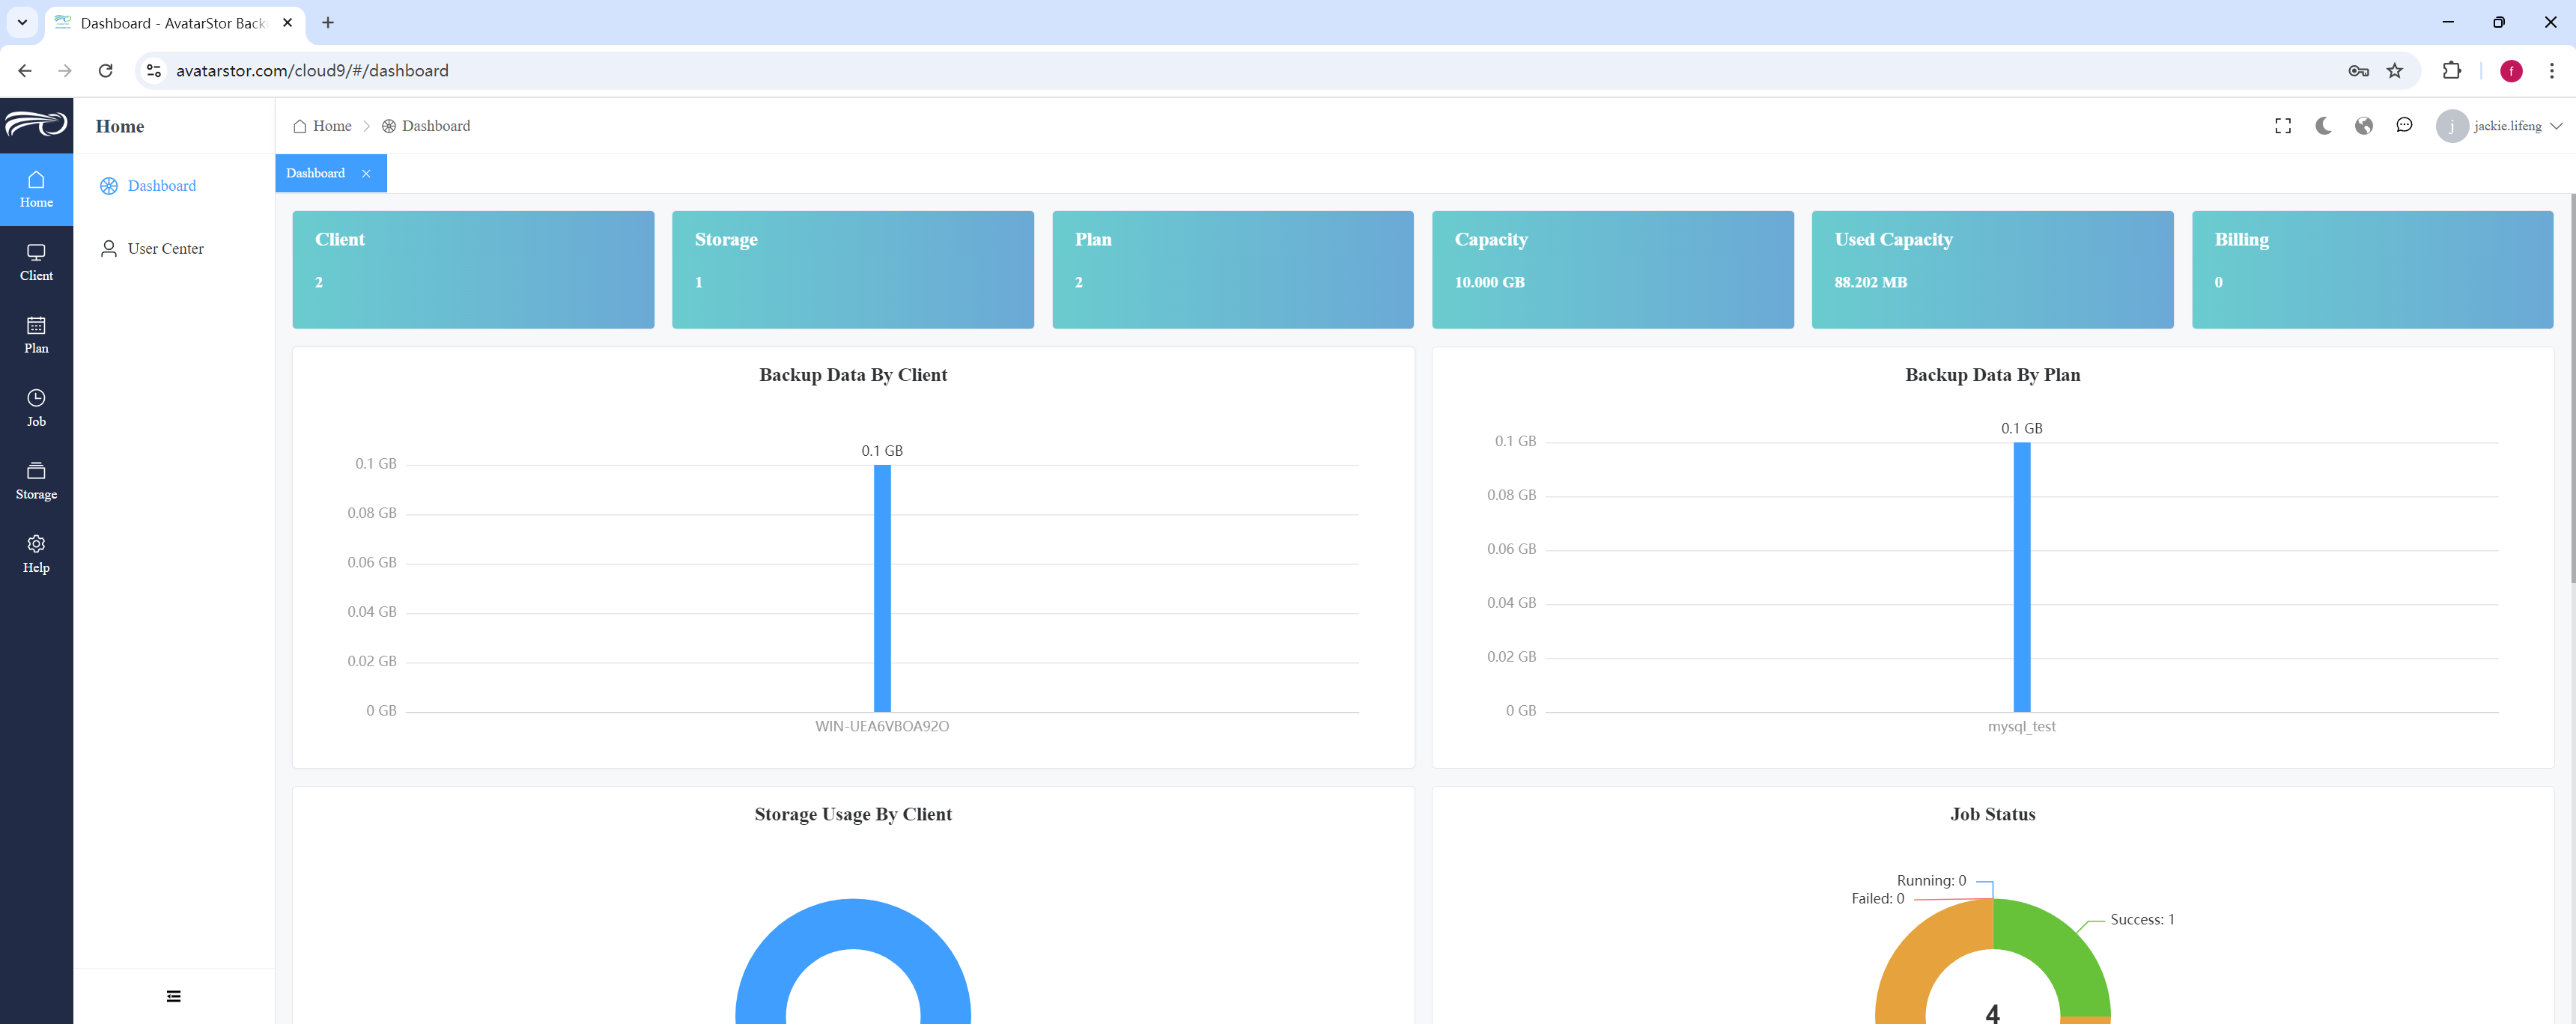
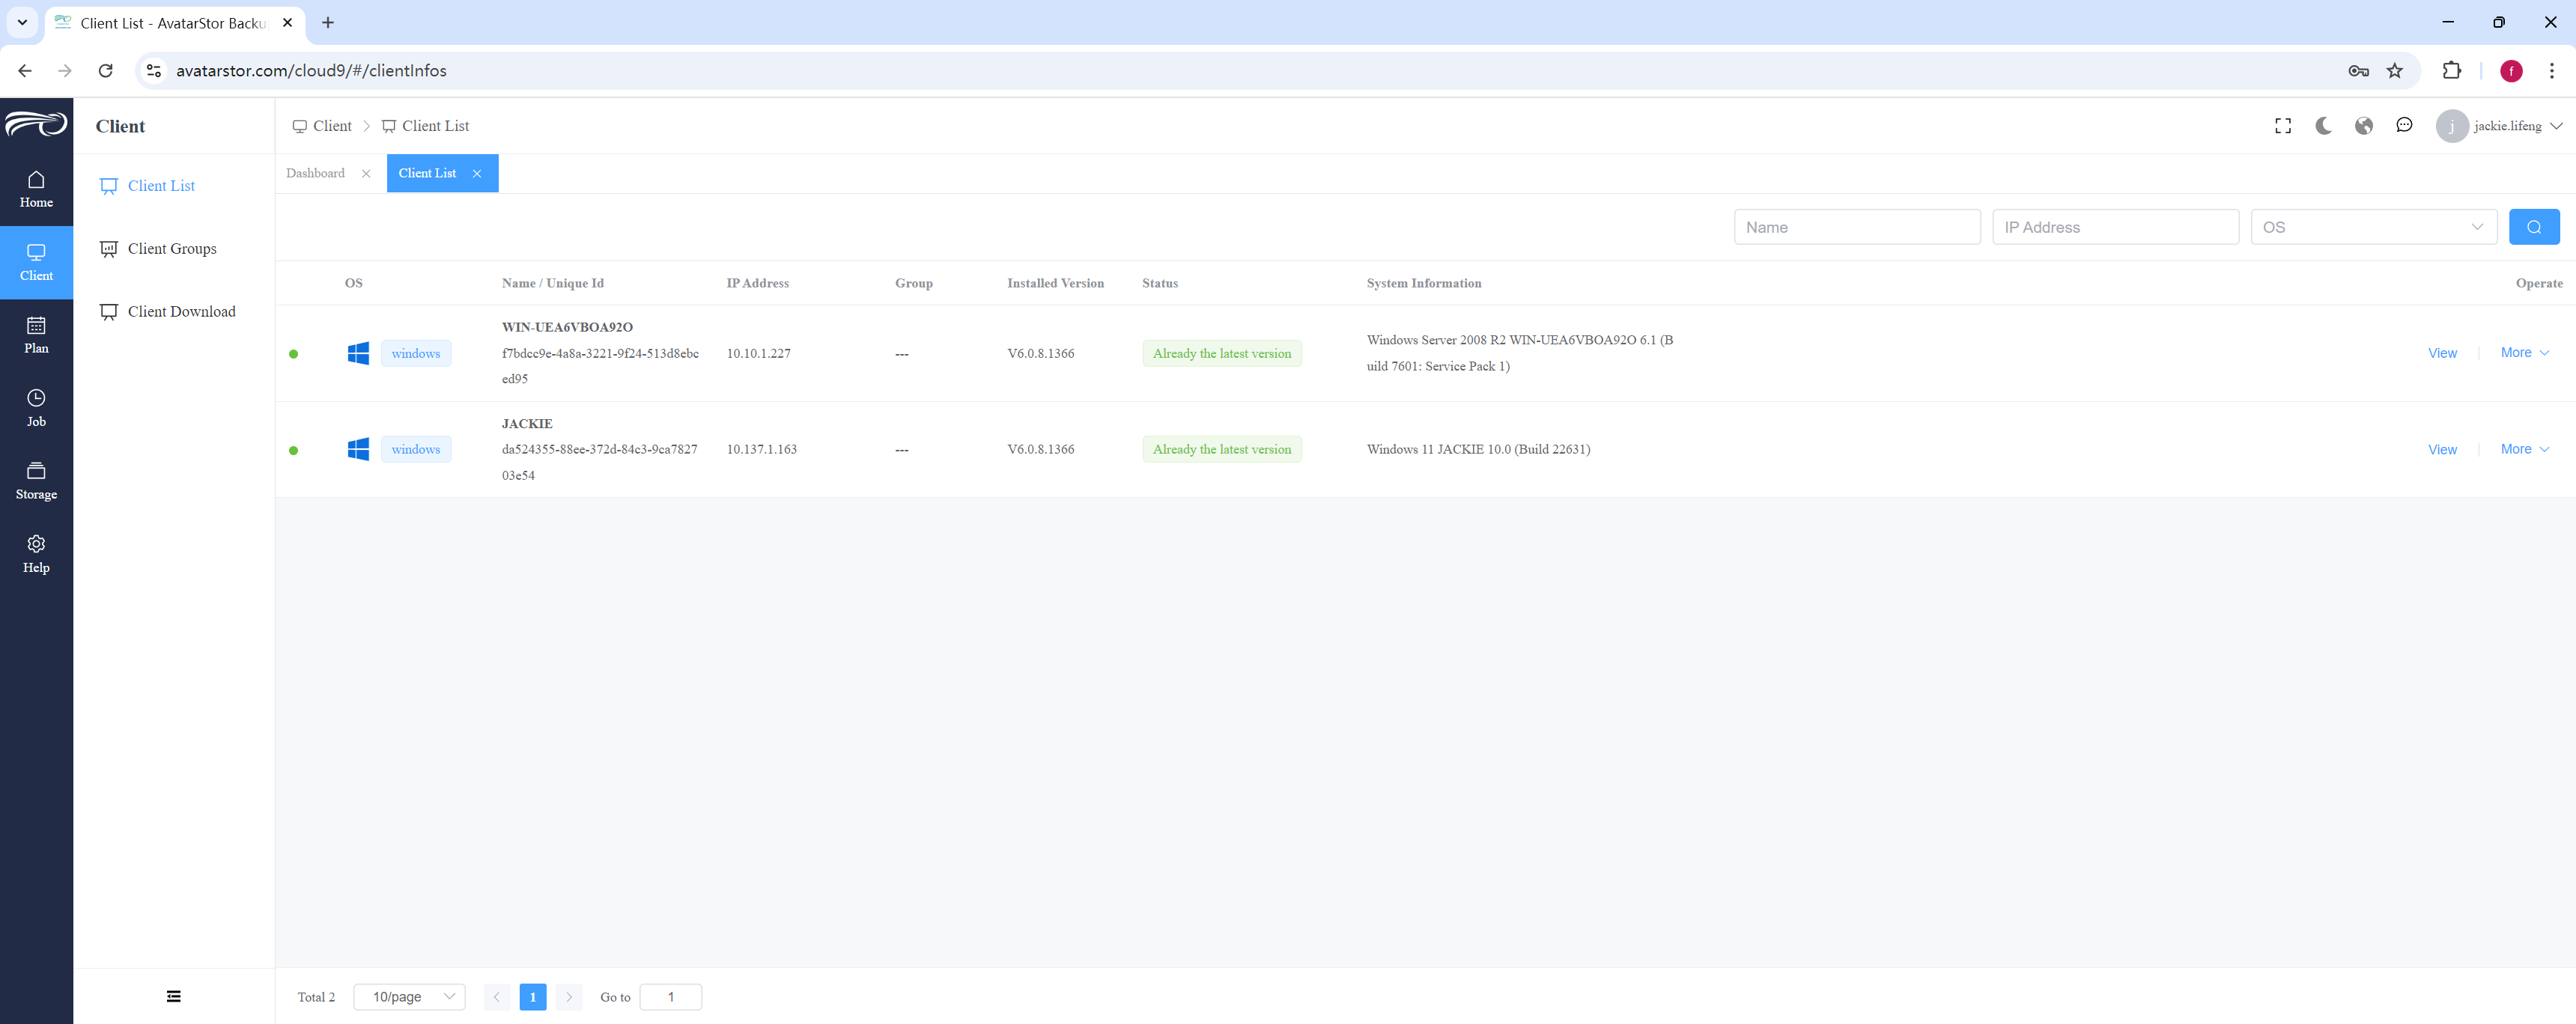
By clicking the rectangular display box, you can directly navigate to the corresponding management interface. For example, click [Client]:
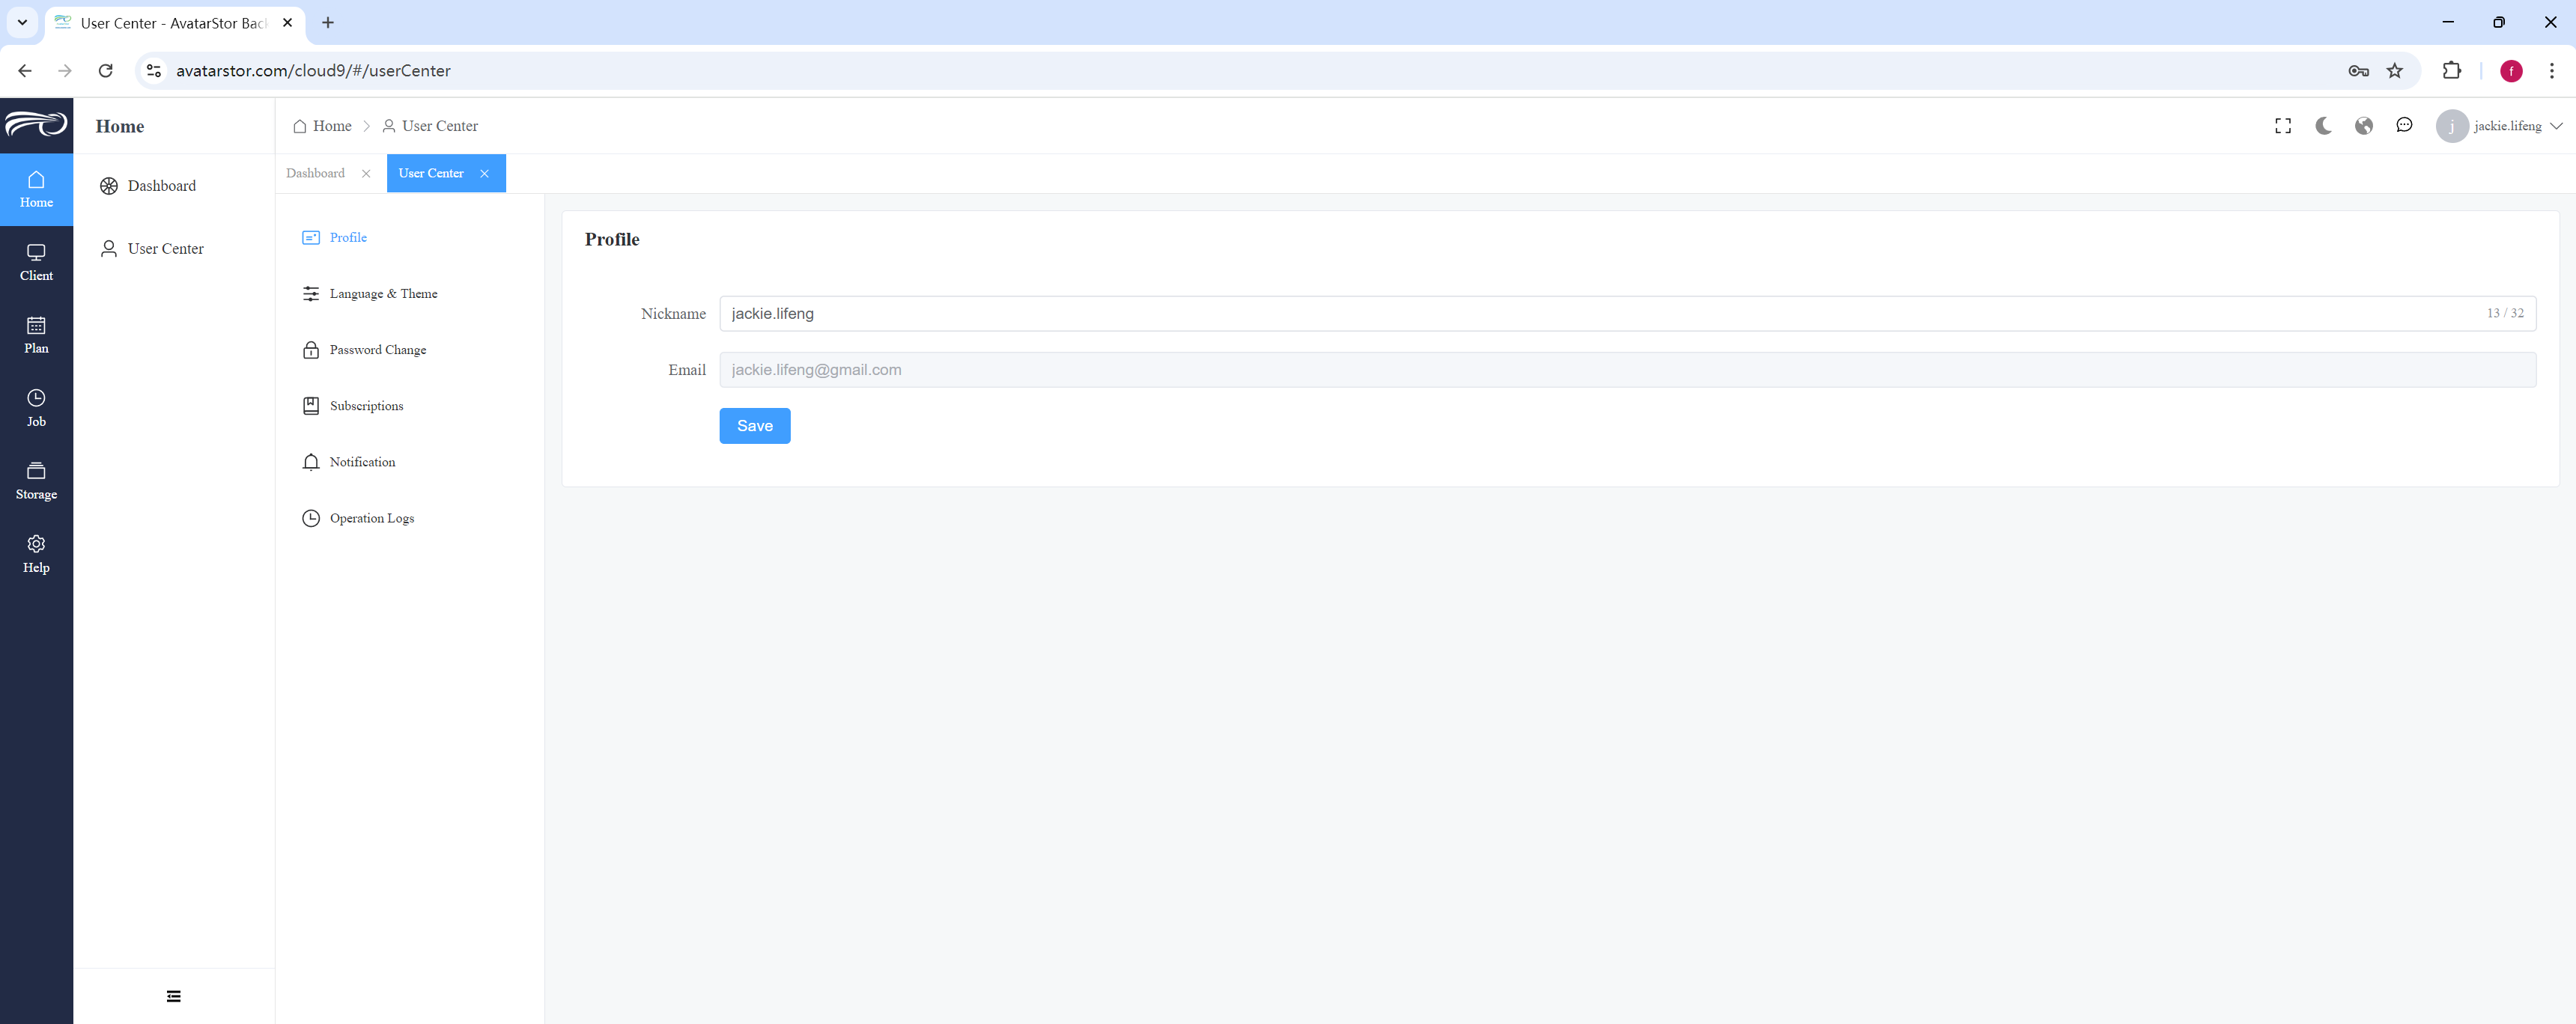
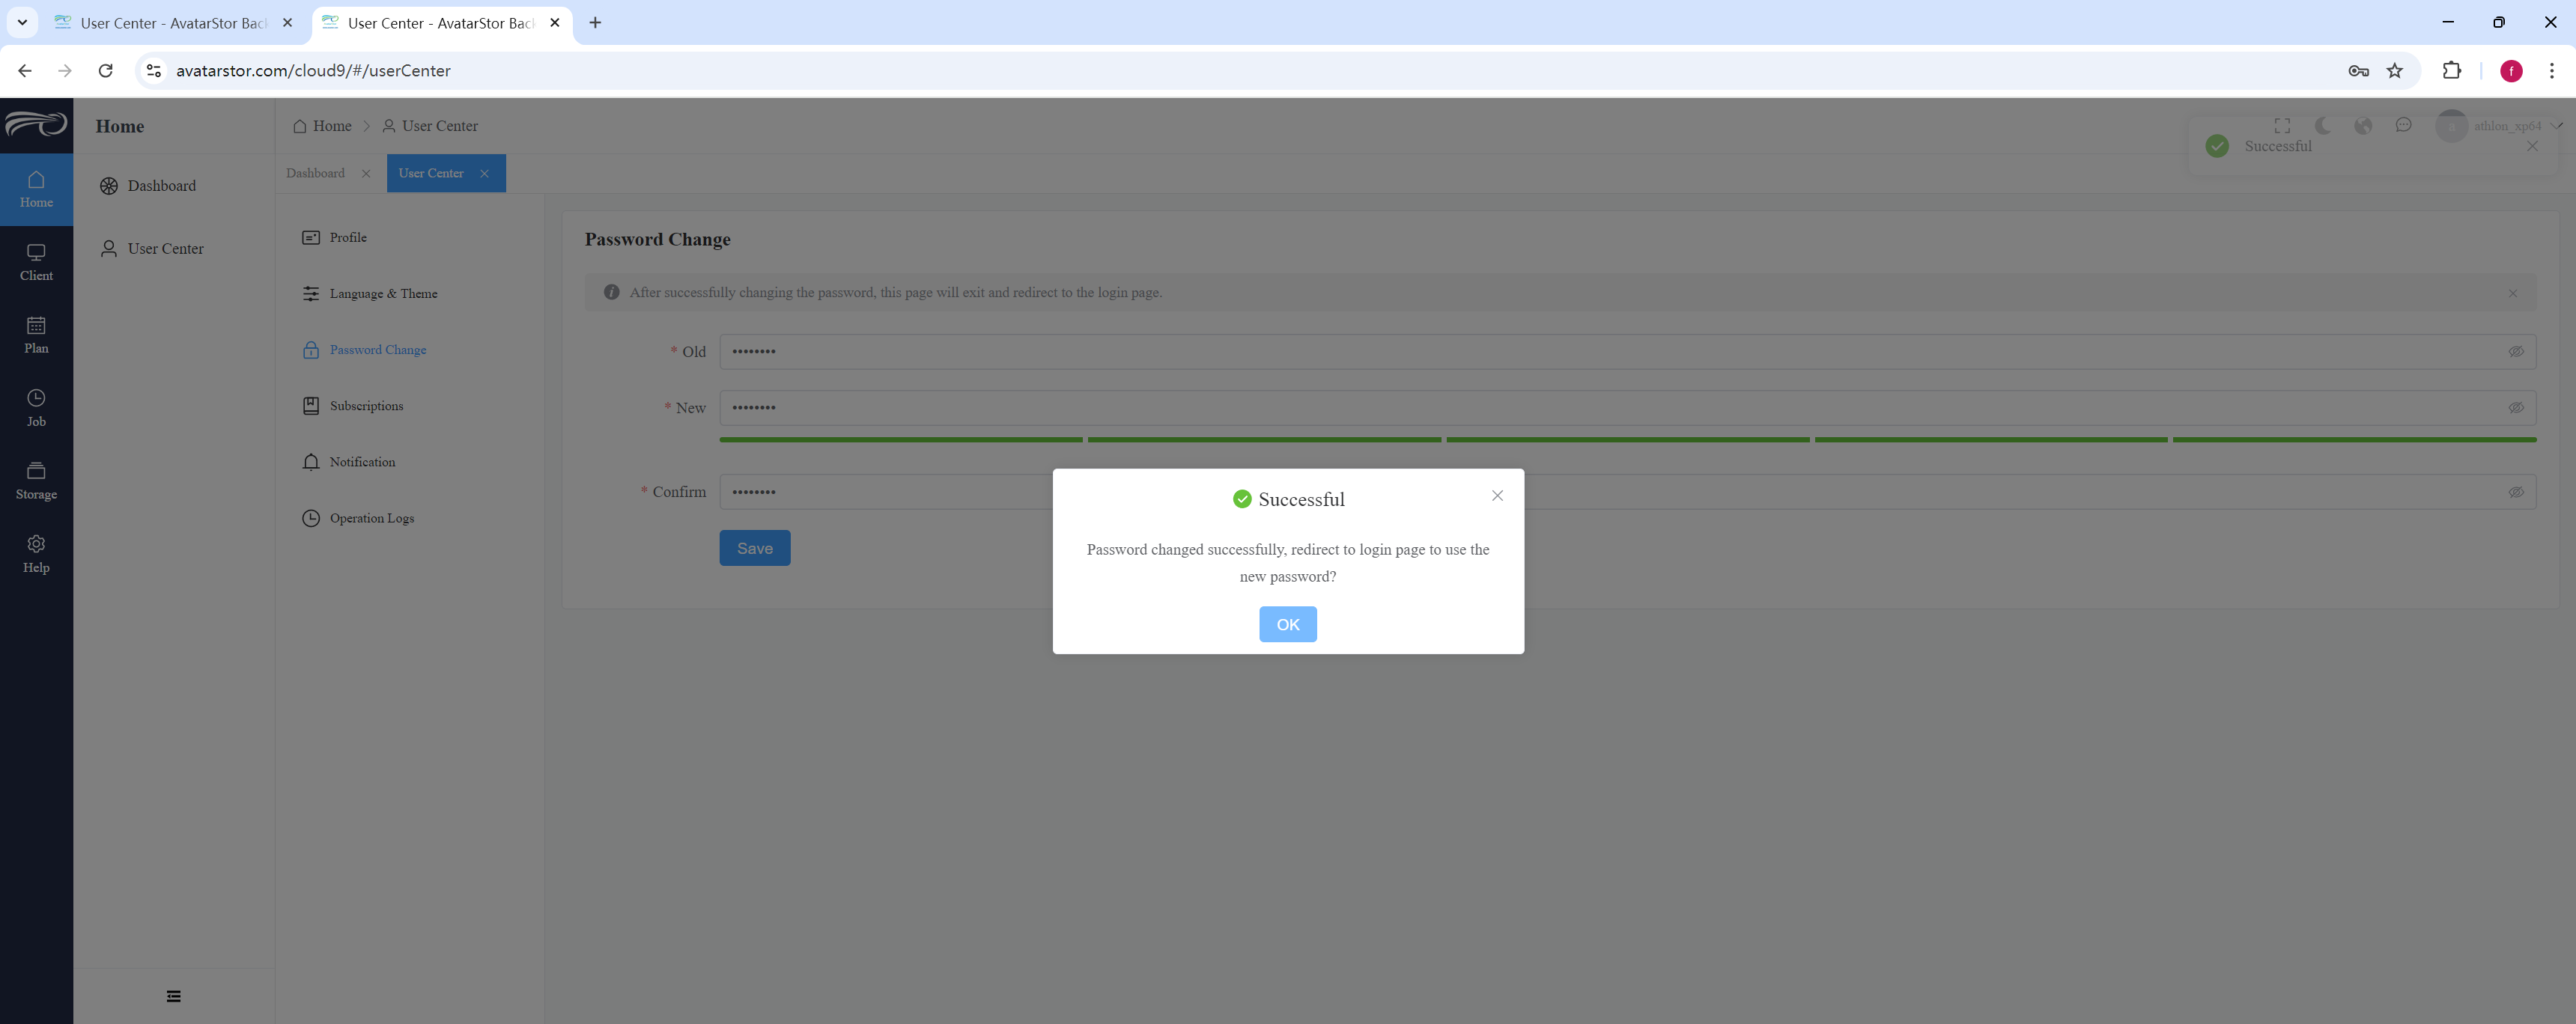
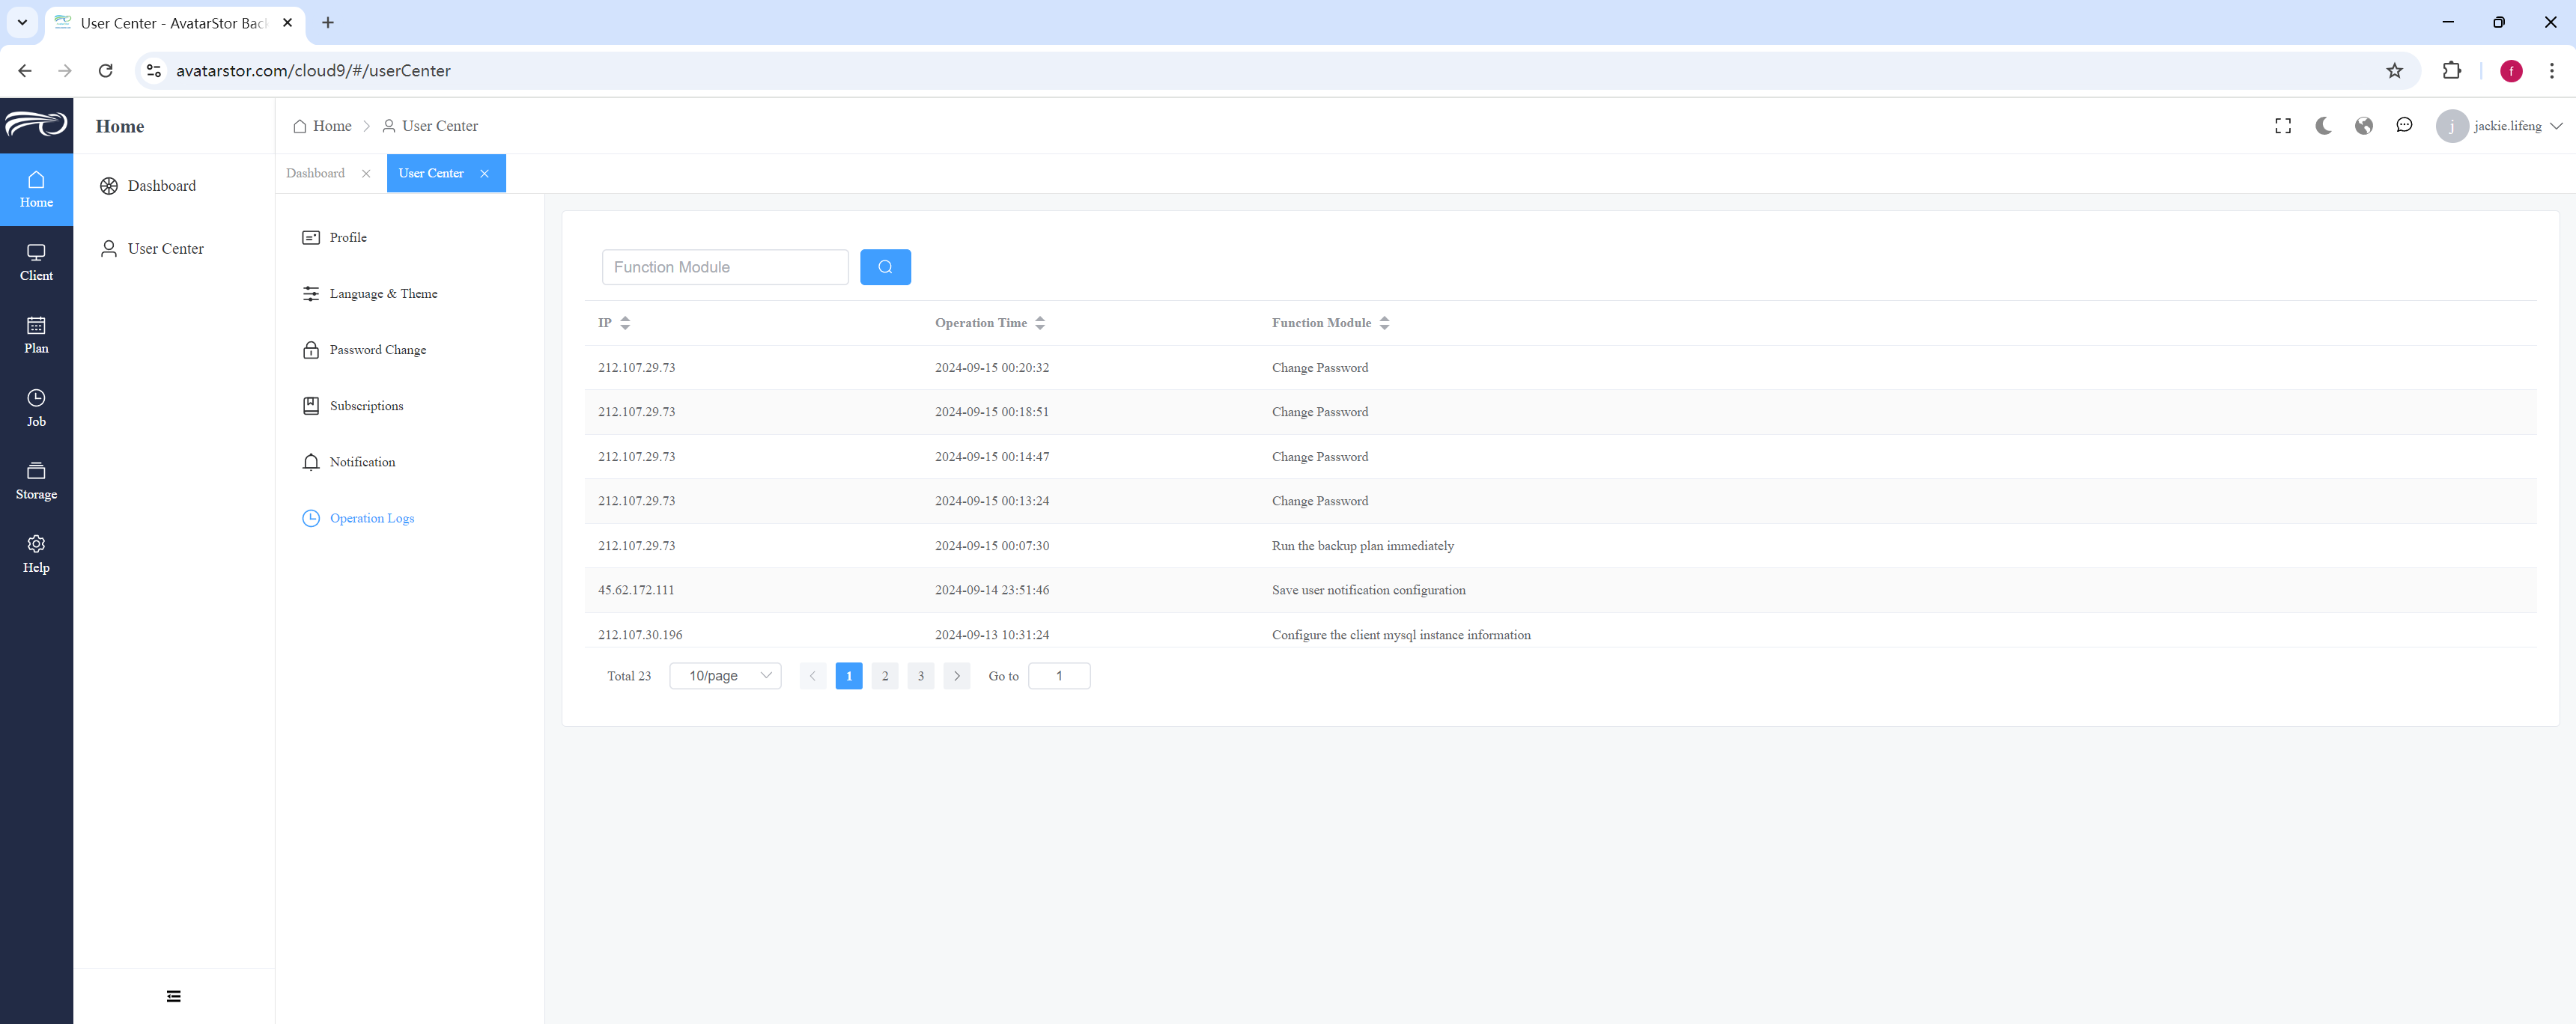
[Home]-[User Center], here are [Profile] [Language & Theme] [Password Change] [Subscriptions] [Notification] and [Operation logs]:
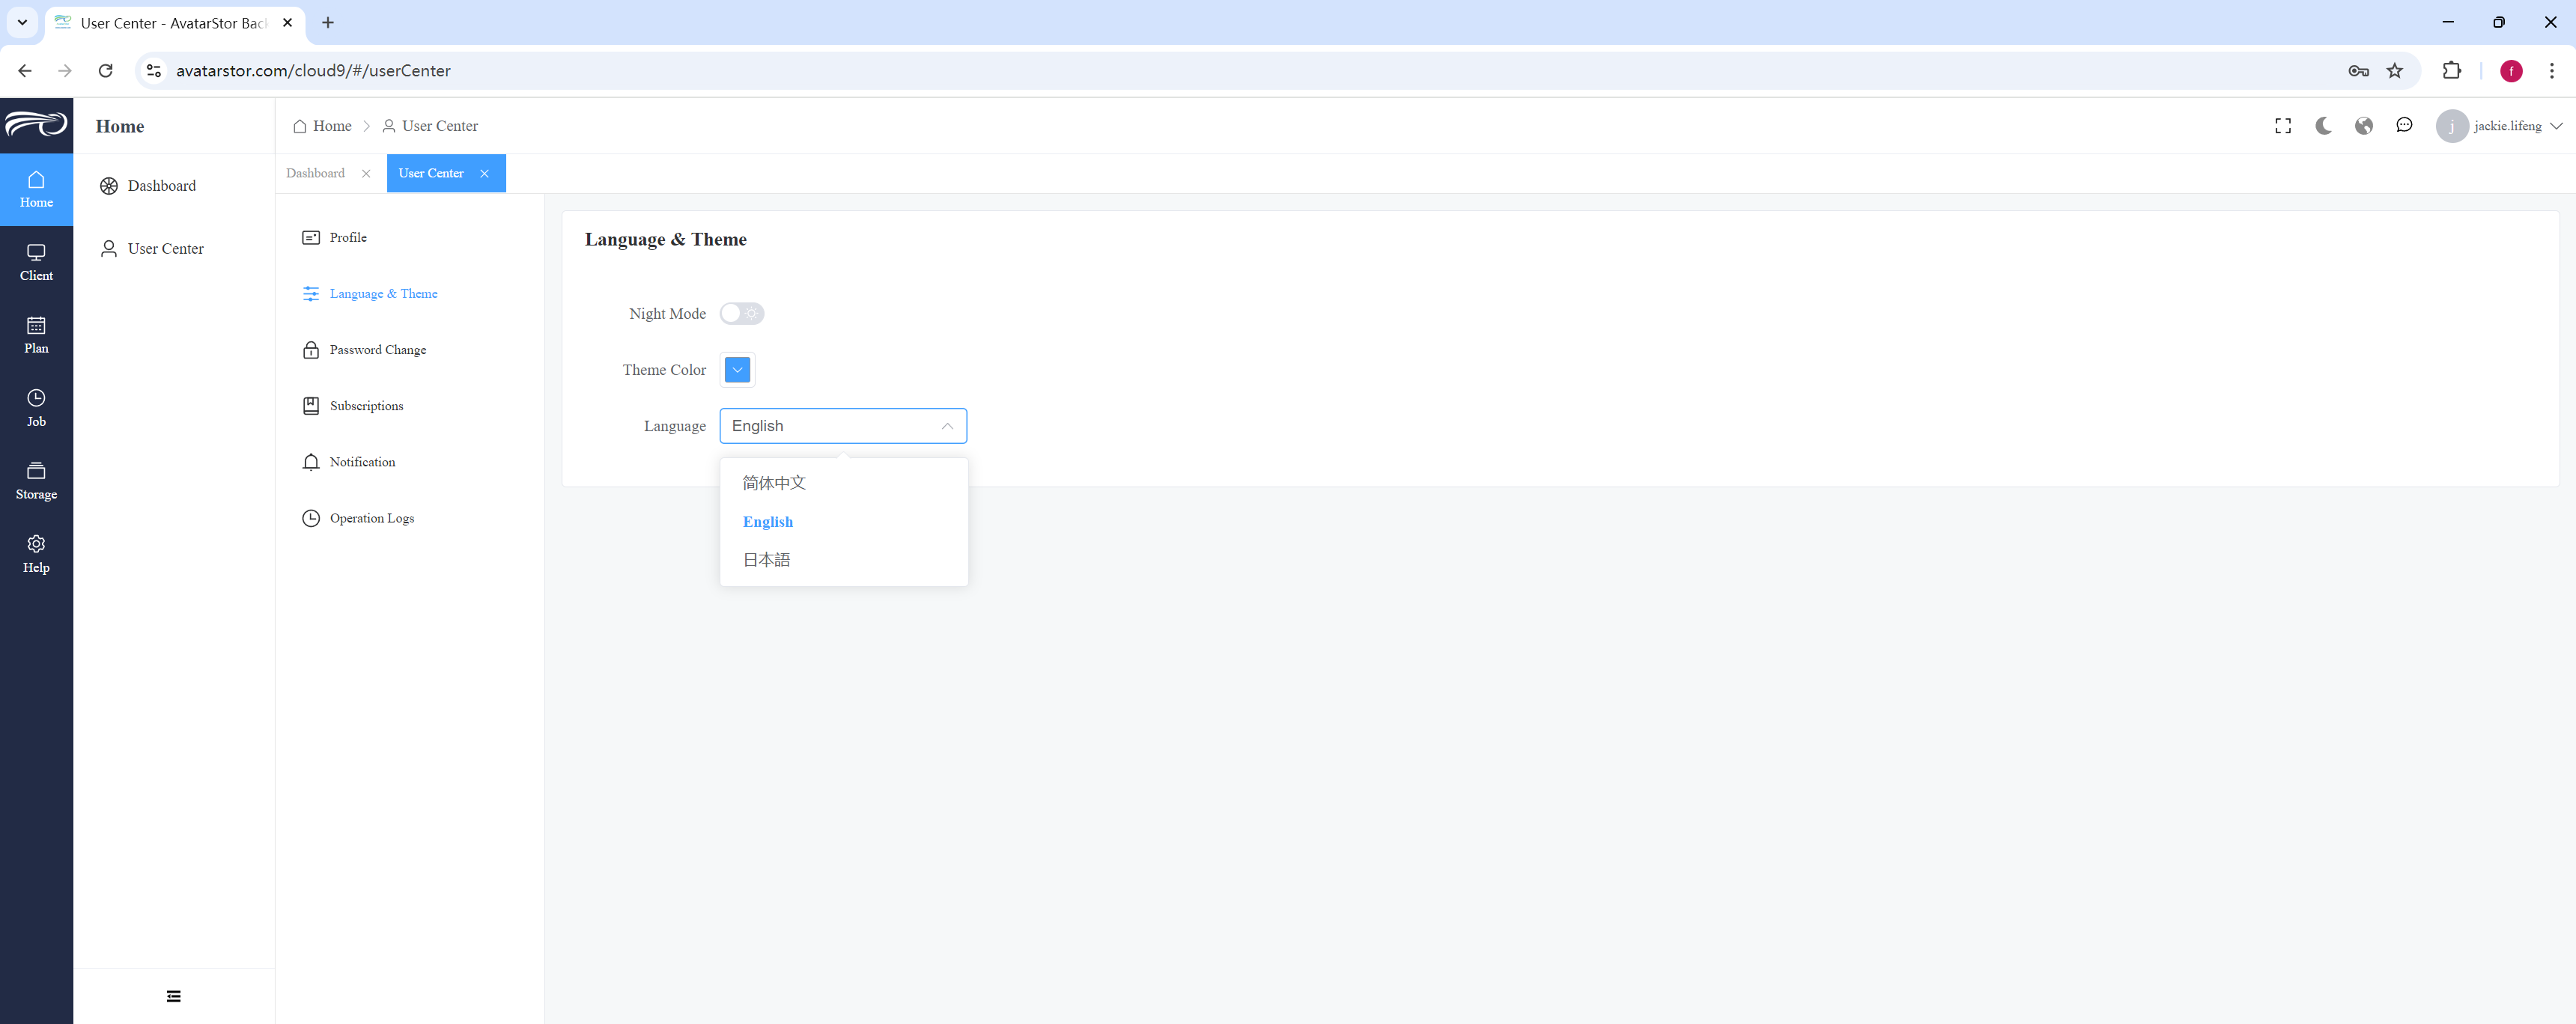
Click [Language & Theme] to switch language preferences. Currently, Chinese, English, and Japanese are supported.
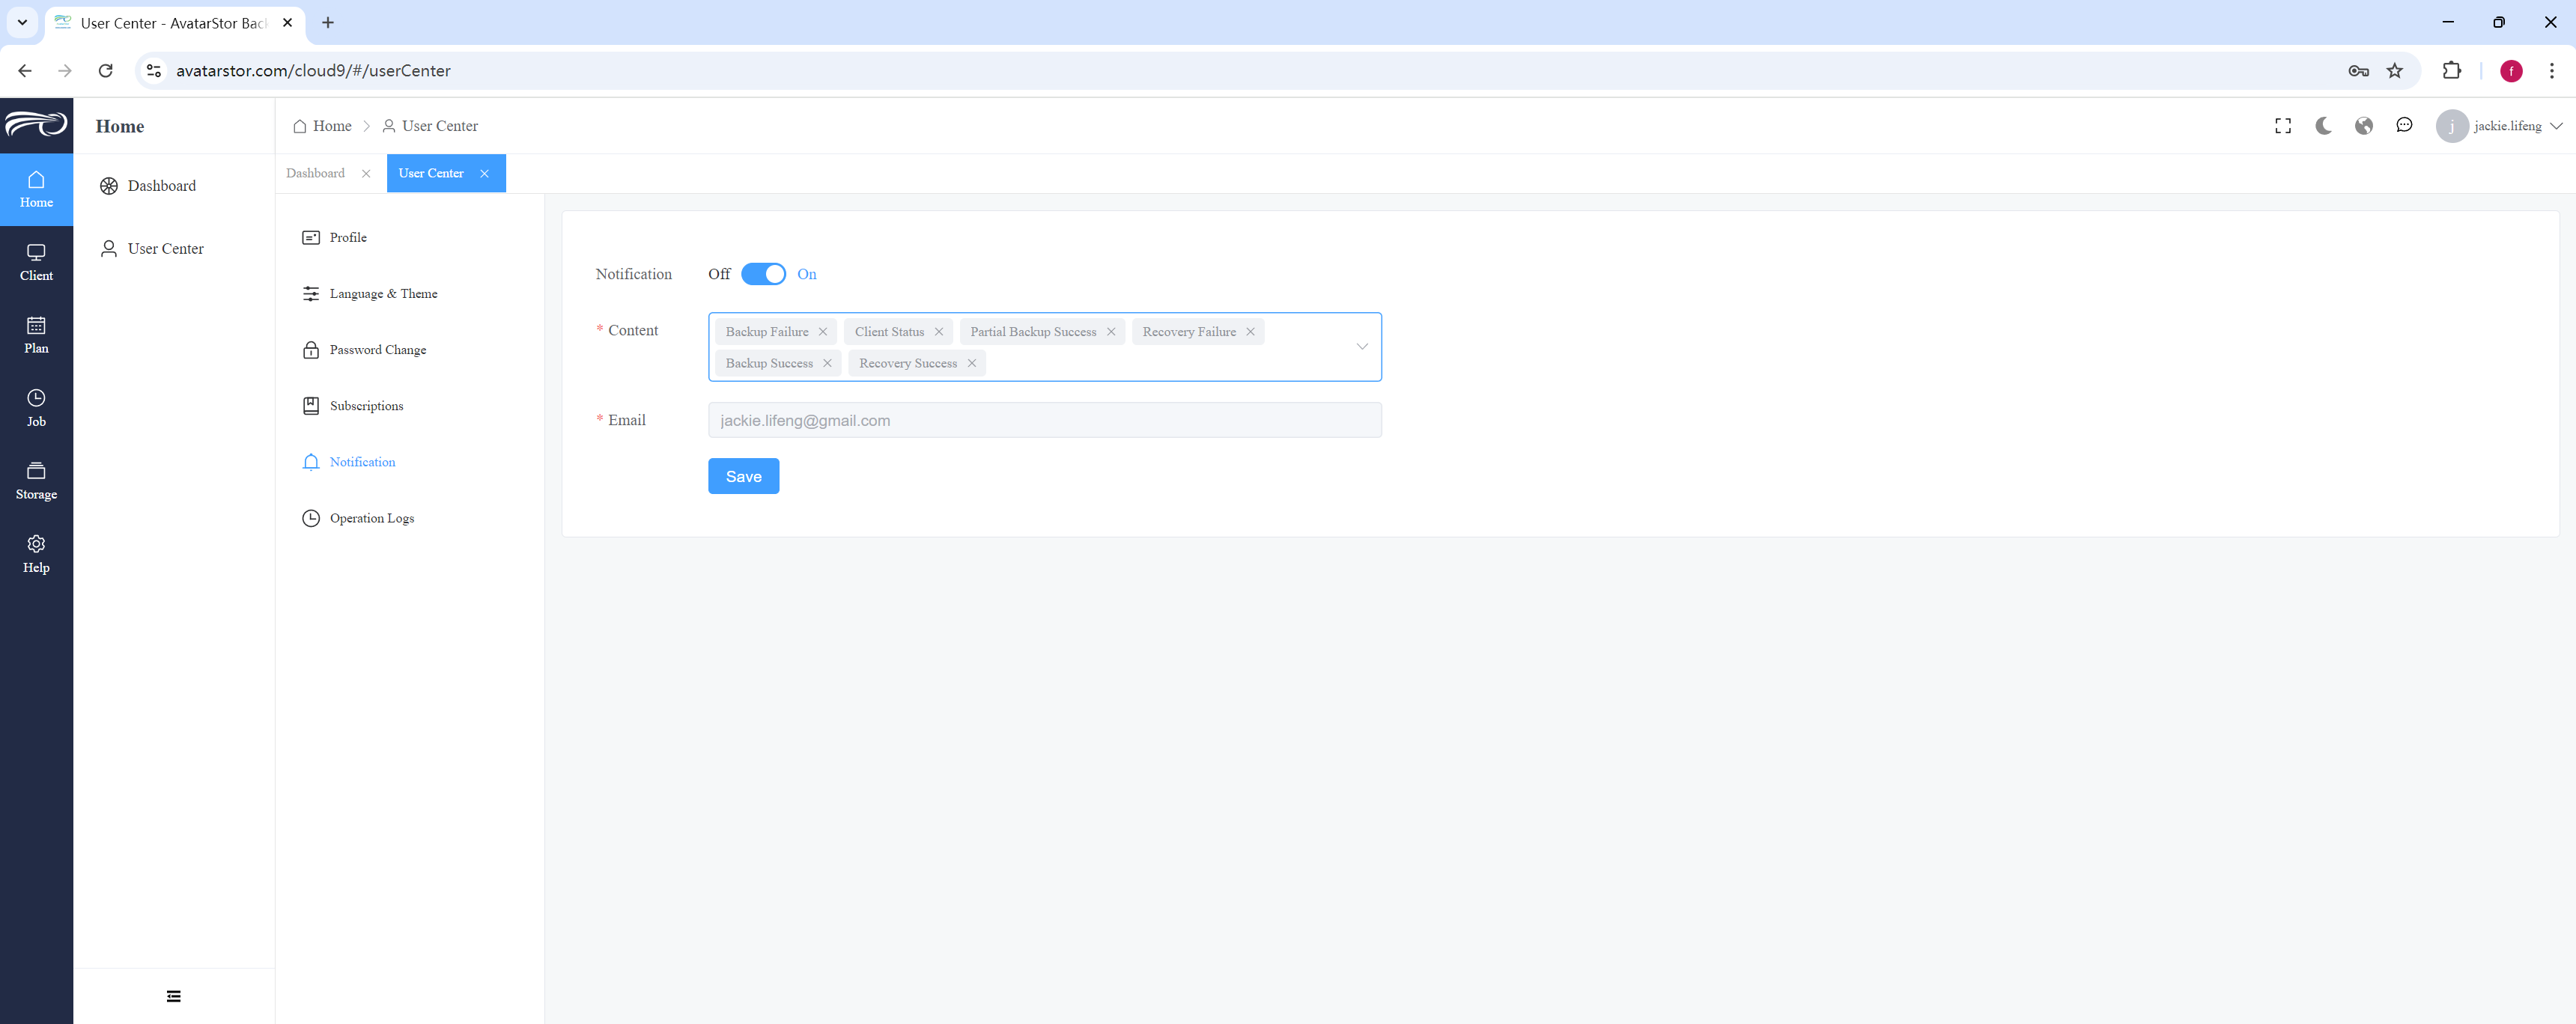
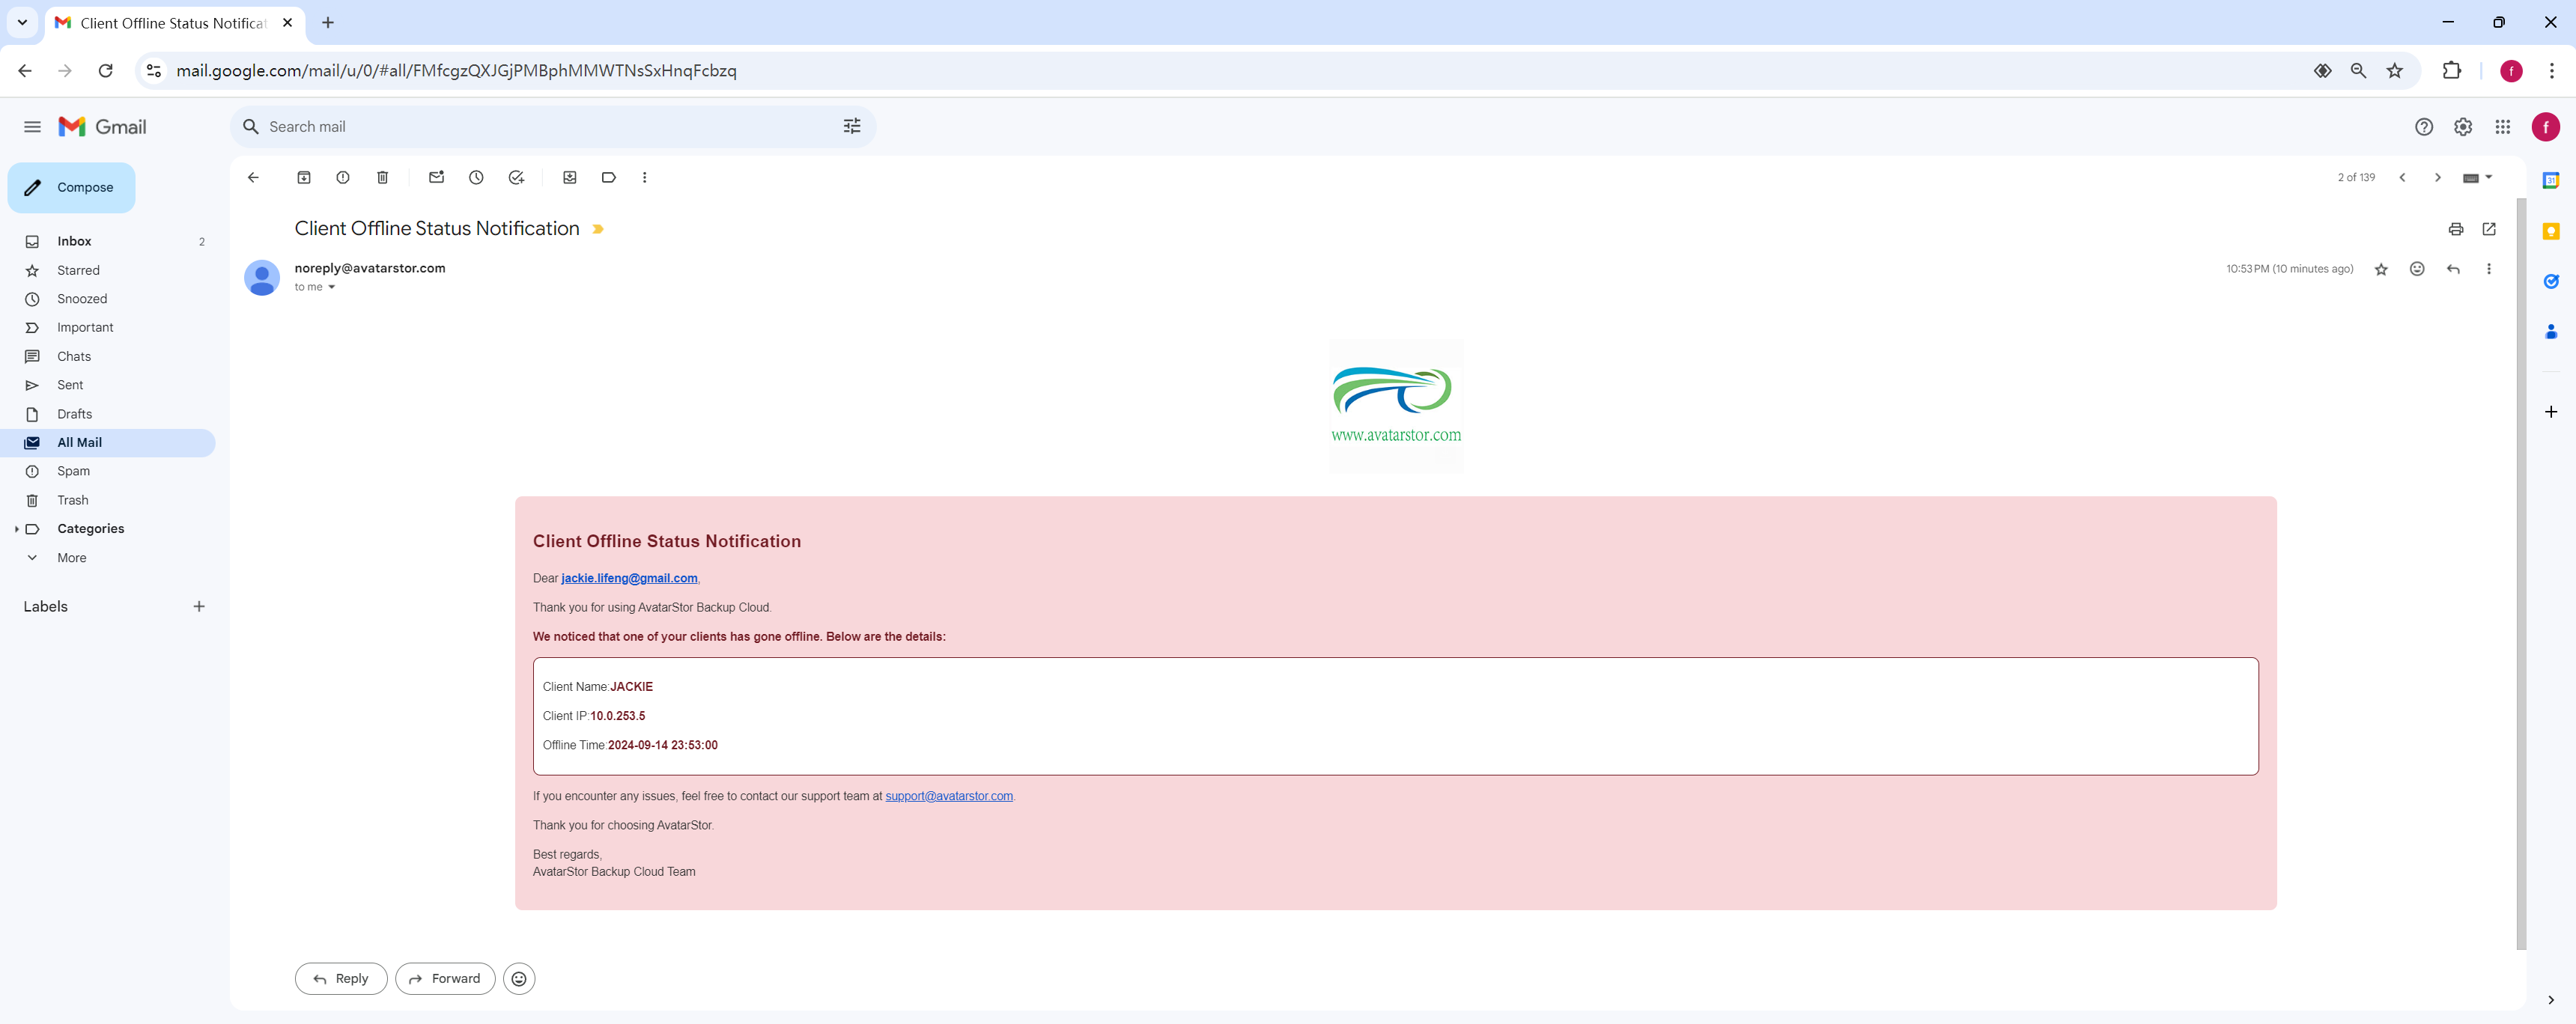
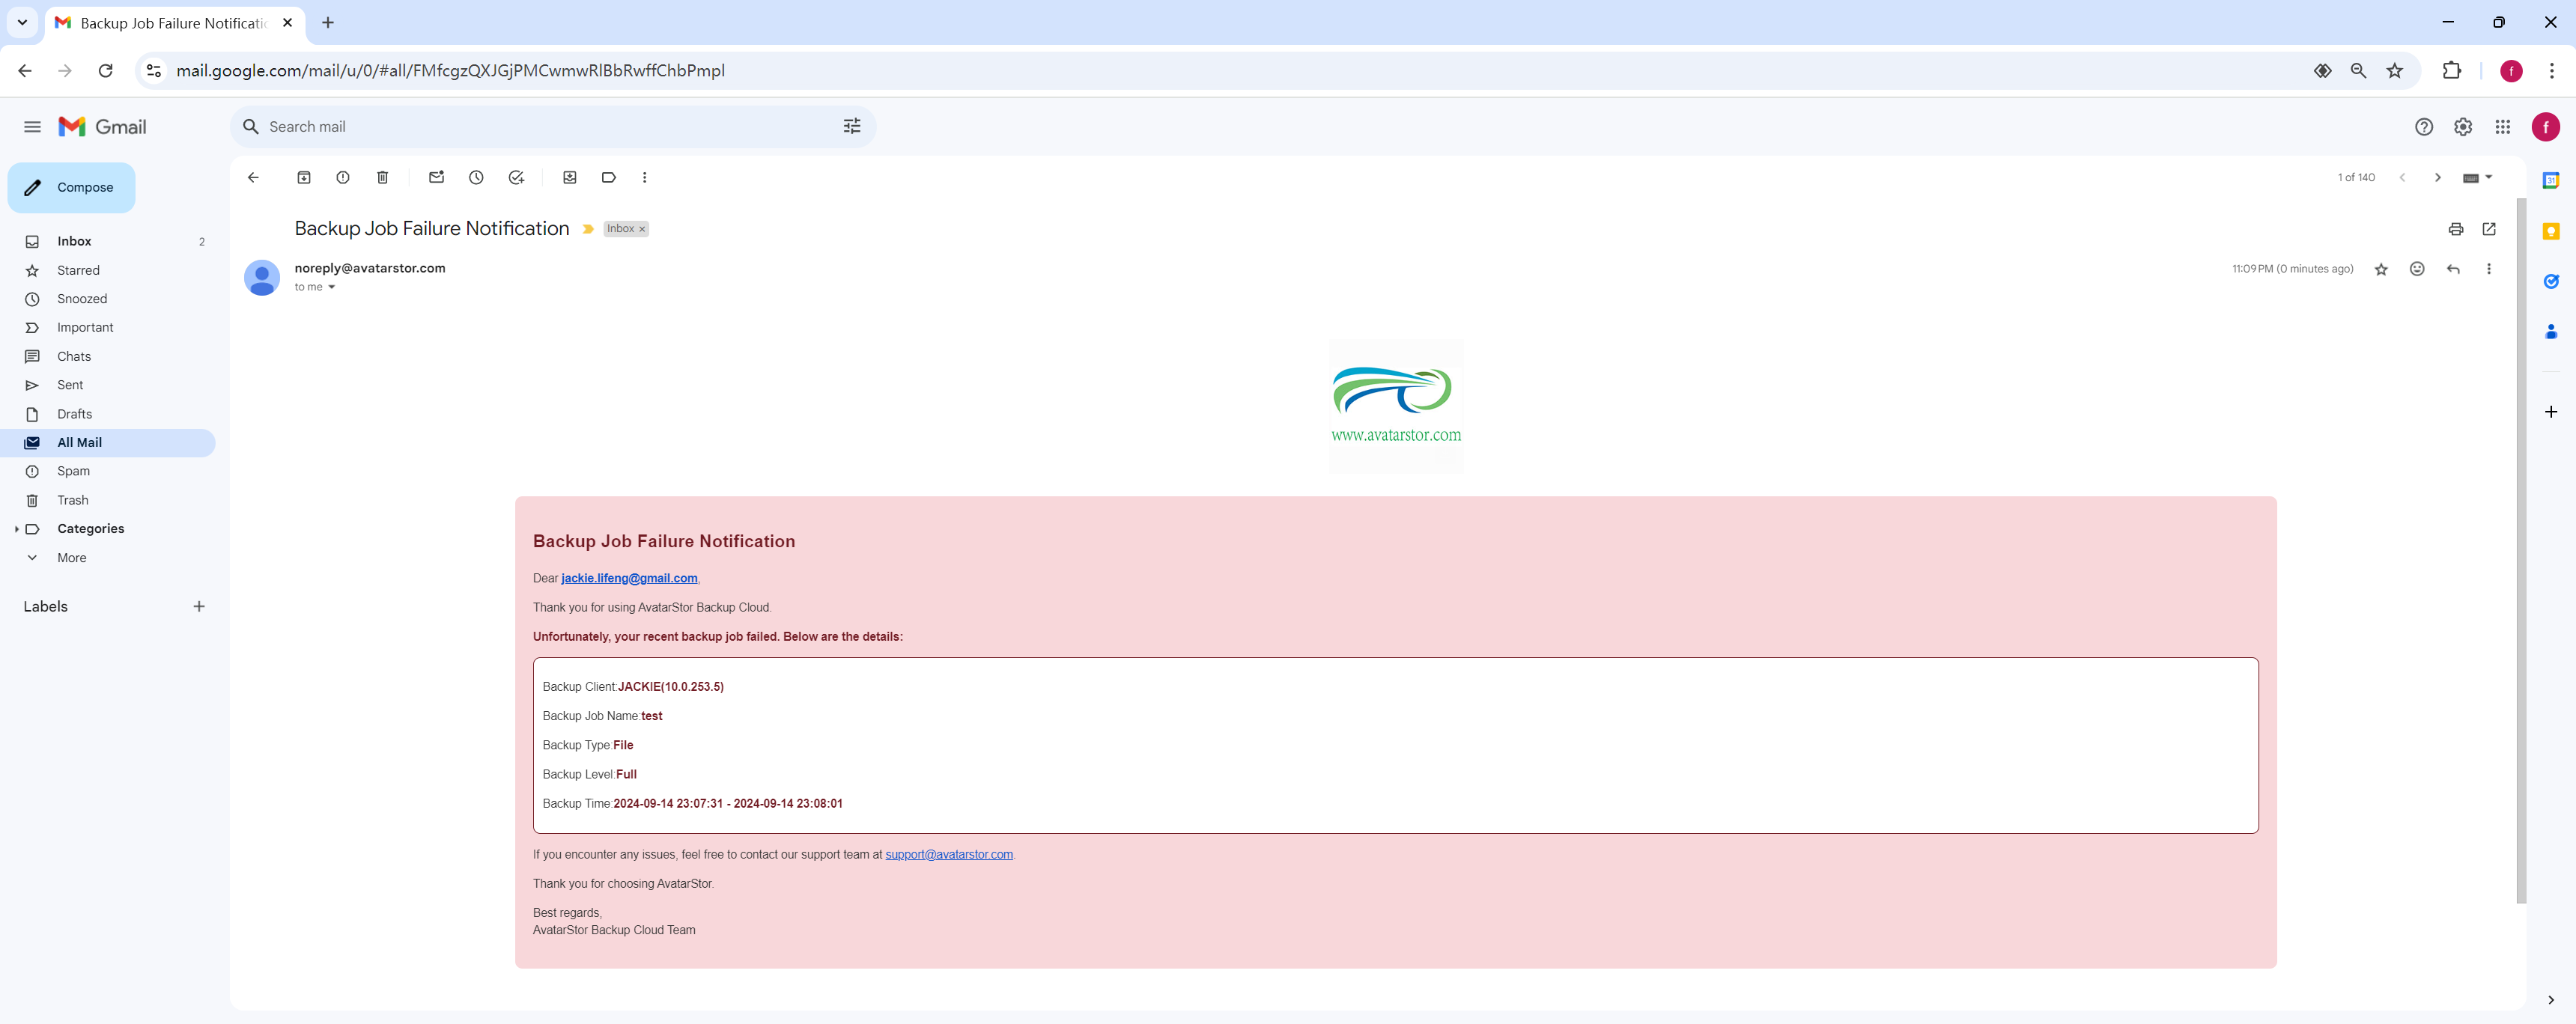
Click [Notification], where you can choose whether to receive notifications about backup job results to your specified email. There are various options such as "Backup Success Notification," "Backup Failure Notification," "Client Status Notification," and "Storage Status Notification," which you can configure in combination.
For example, if you select "Client Status" reminder, once the Client is offline, you will receive the following email message:
For example, if you select "Backup failure" reminder, once a backup job fails to run, you will receive the following email message:
[Password Change]:
[Operation Logs]:
2.3 Subscriptions
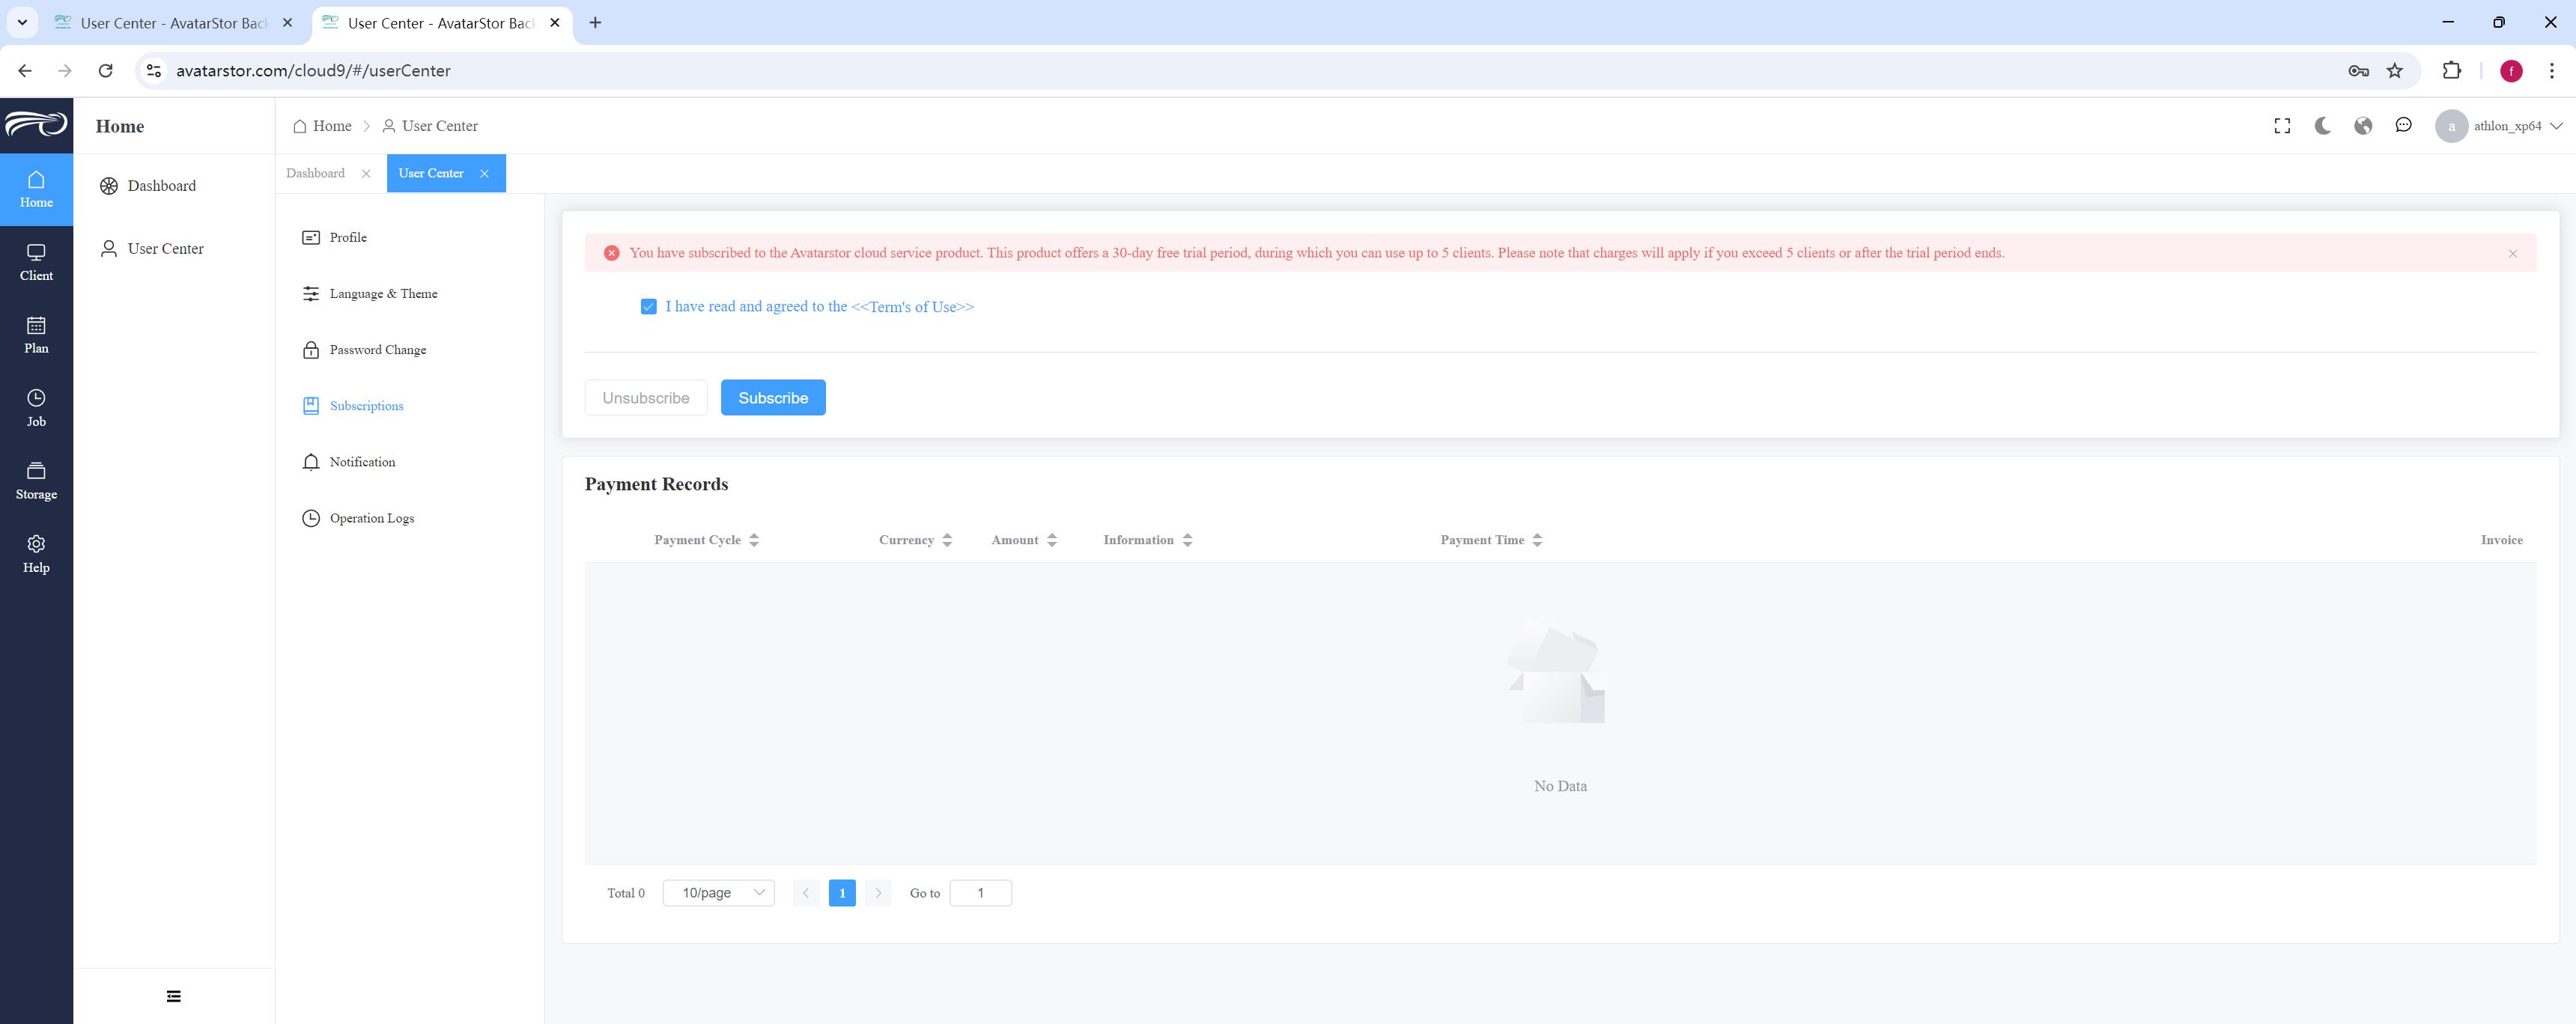
Once the user logs in, the first task is to activate a backup subscription by navigating to [Home] - [User Center] - [Subscription] on the left sidebar. The initial subscription includes 5 free clients, with no storage capacity or data type limitations, and no fees will be charged for 30 days.
After checking the "Agree to Terms of Service" box, click "Subscribe."
You will be redirected to the credit card binding page.
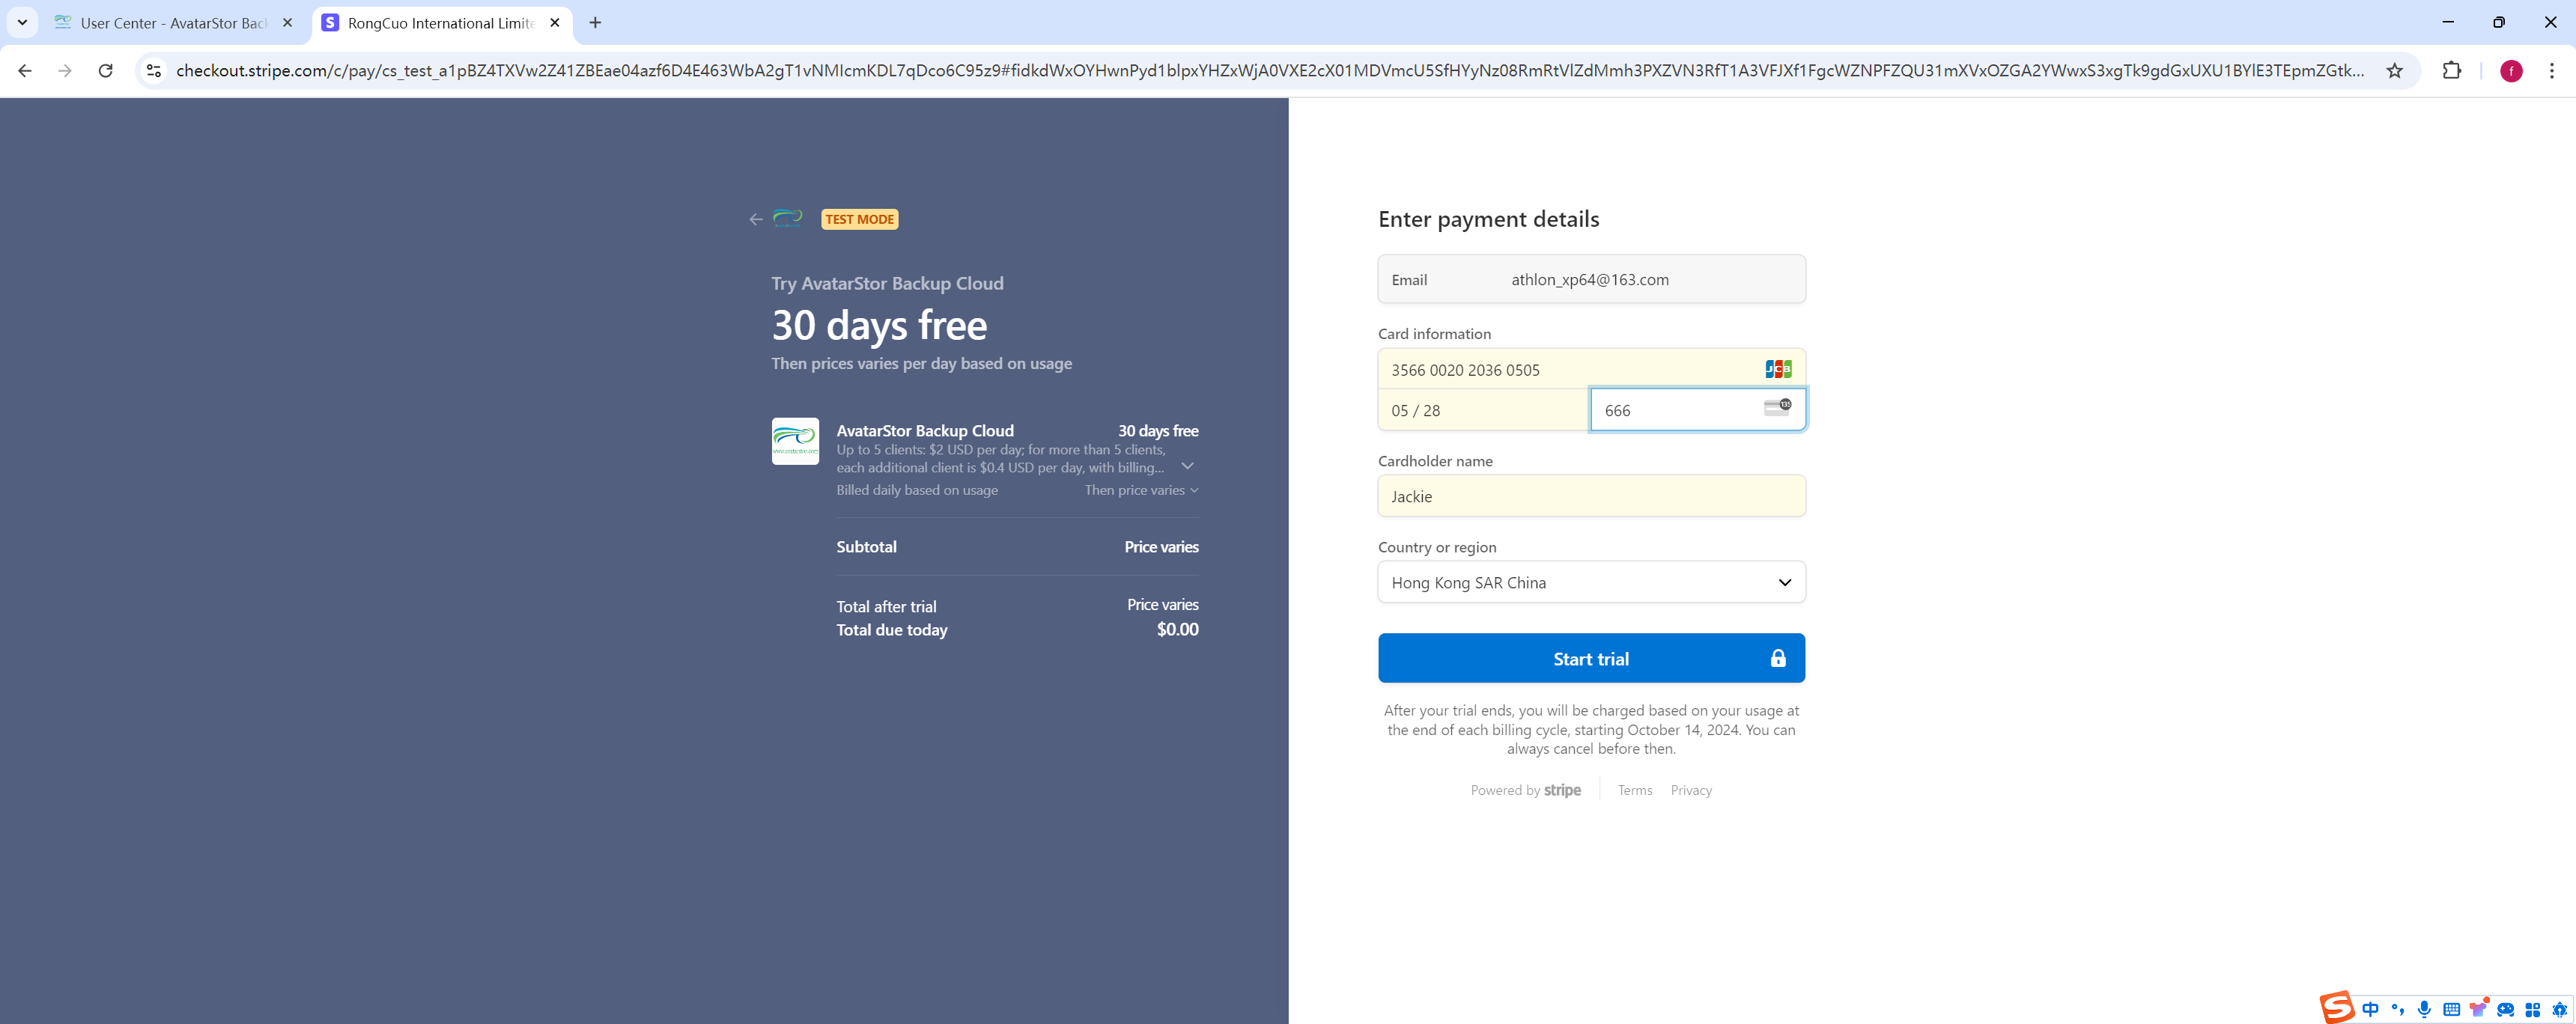
After completing the credit card information, click "Start" to begin experiencing AvatarStor's cloud backup service.
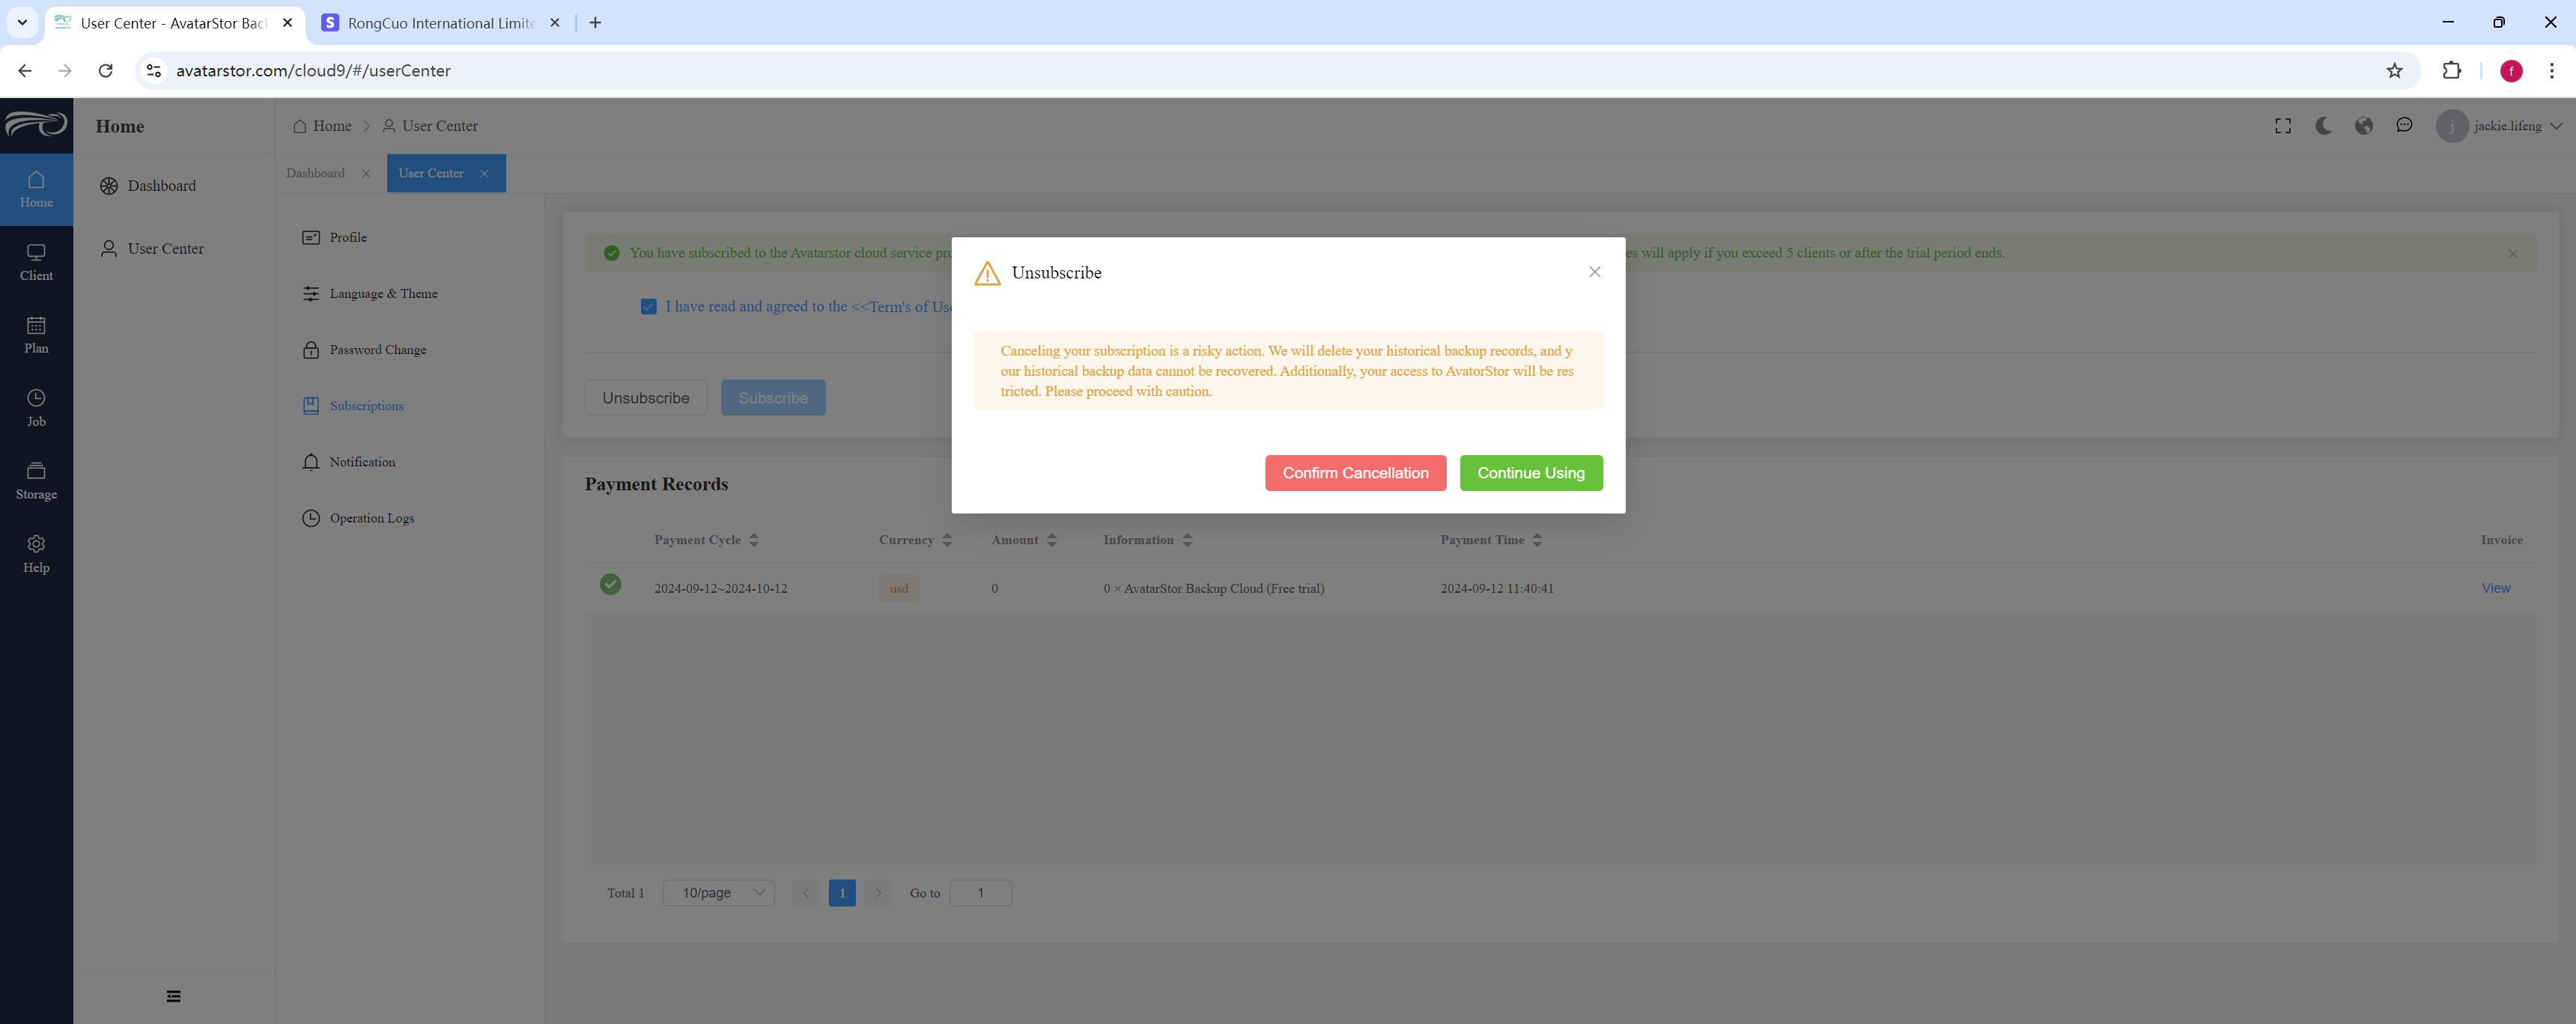
If you no longer wish to use AvatarStor's cloud backup service, you can click "Unsubscribe" at any time.
|
After unsubscribing, you will not be able to resubscribe for two weeks. |
3. Client Installation and Management
Client download
Visit https://avatarstor.com/cloud9/#/clientDownloads
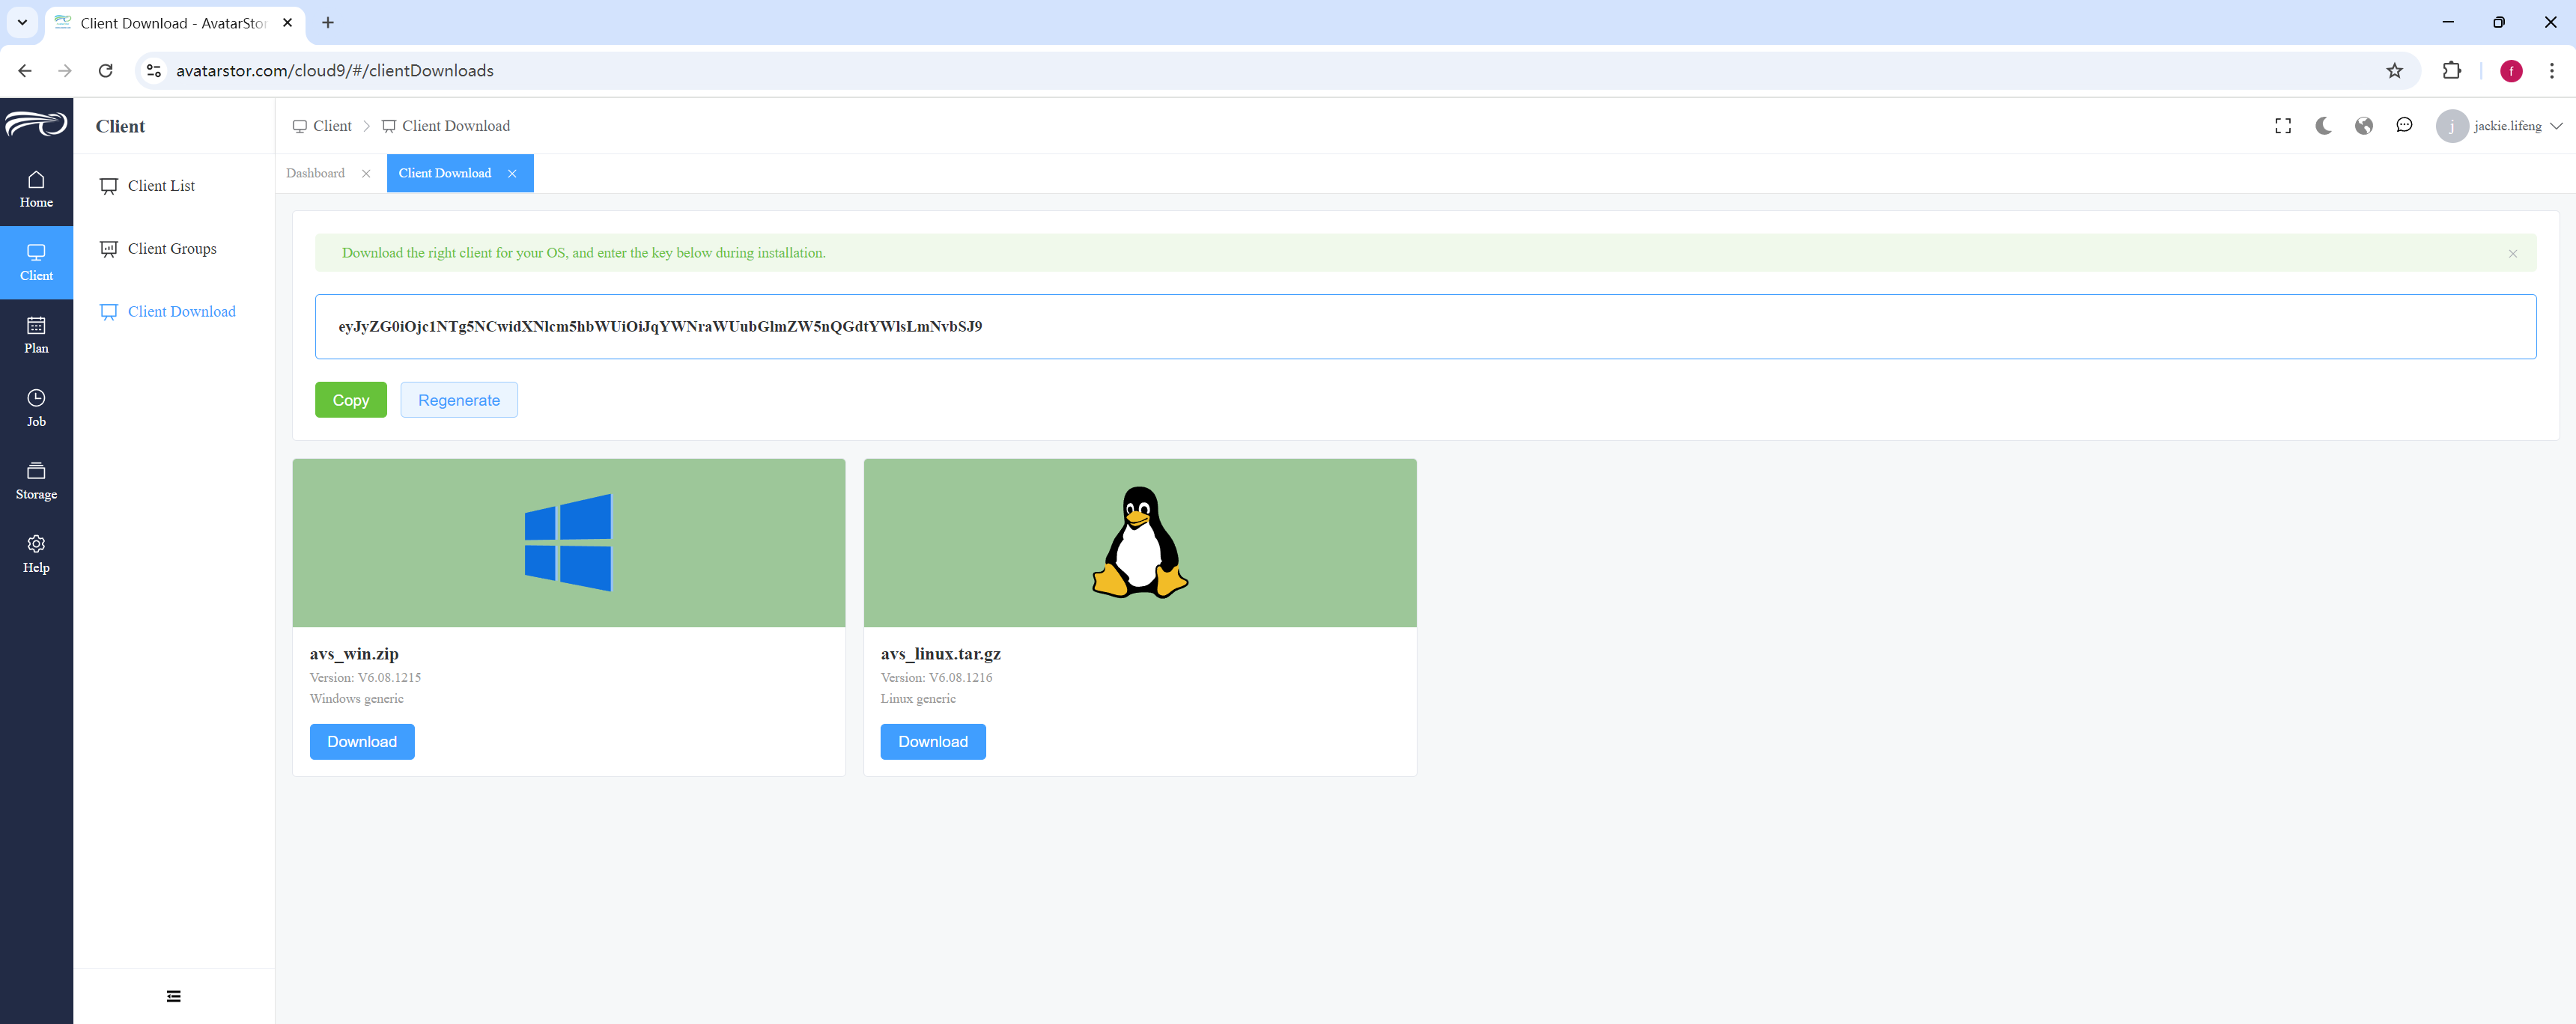
Select the appropriate client version according to your needs and click [Download].
|
Tip Please compare the MD5 values of the downloaded installation package. |
3.1 Windows
3.1.1 Installation
Double-click the installation package and follow the prompts.
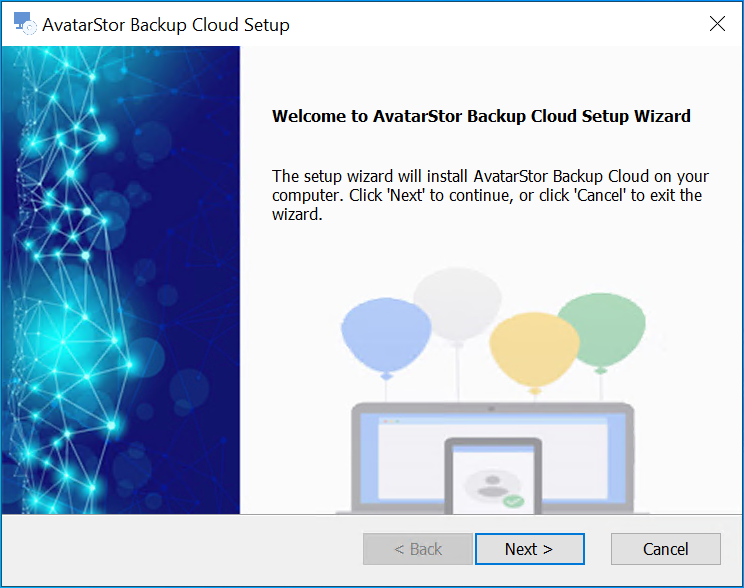
Click [Next]:
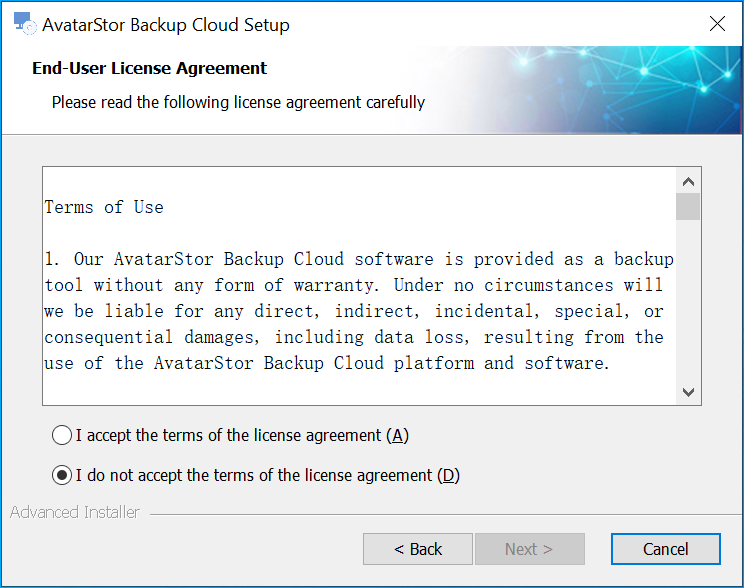
Accept the license terms and click [Next]:
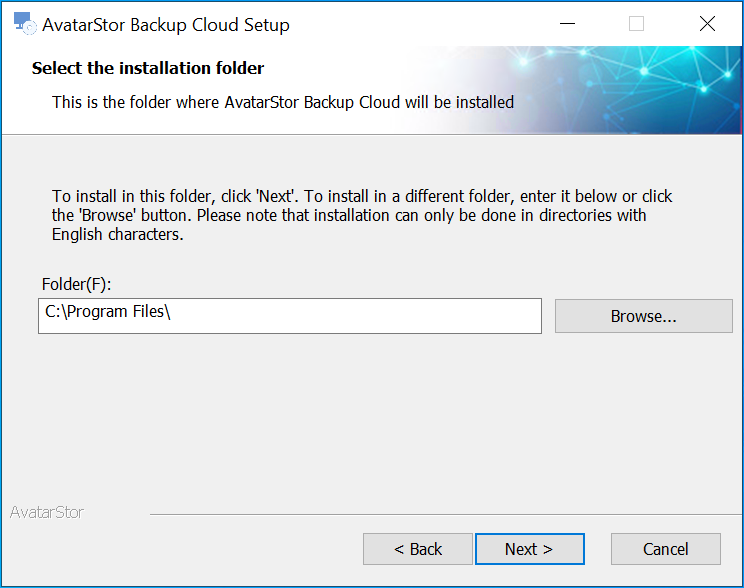
|
The installation path is limited to a combination of English letters, numbers, underscores, and spaces. Installation in directories with Chinese or other language characters will fail and roll back. |
Click [Next]:
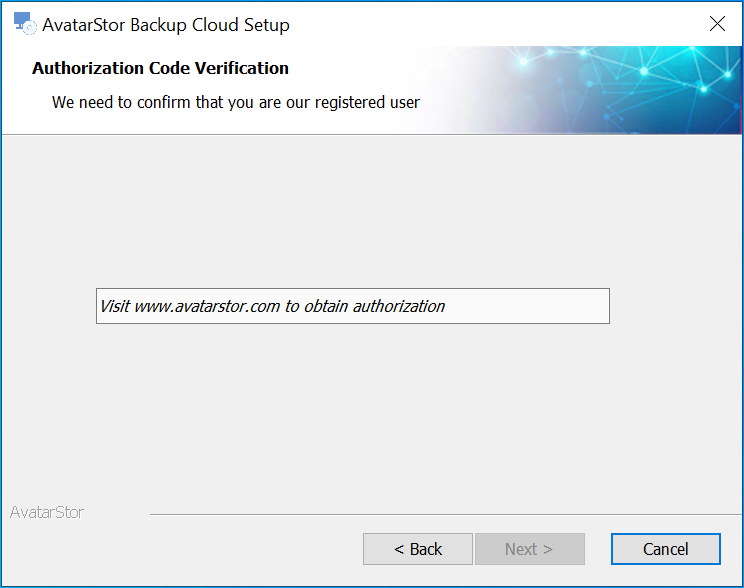
At this point, return to the client download page and copy the key:
Paste the key and click [Next]. The installer will automatically validate the key, and if successful, it will proceed to the next step:
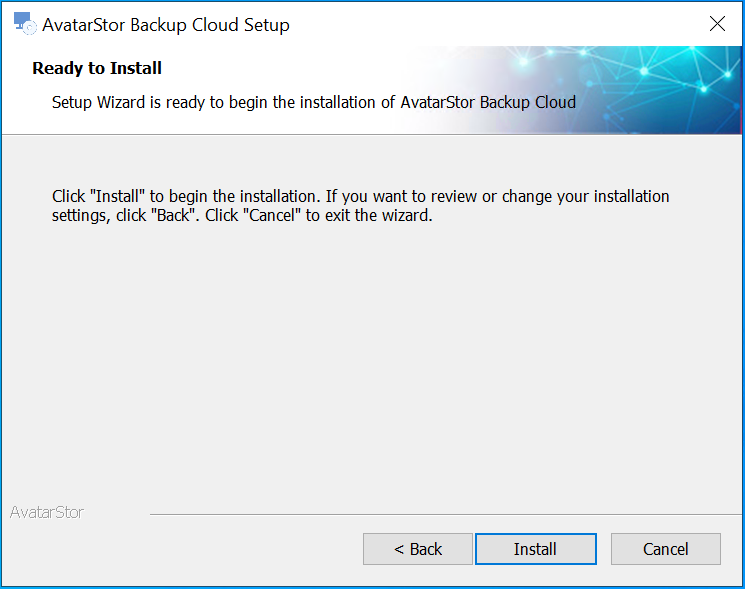
Click [Install]:
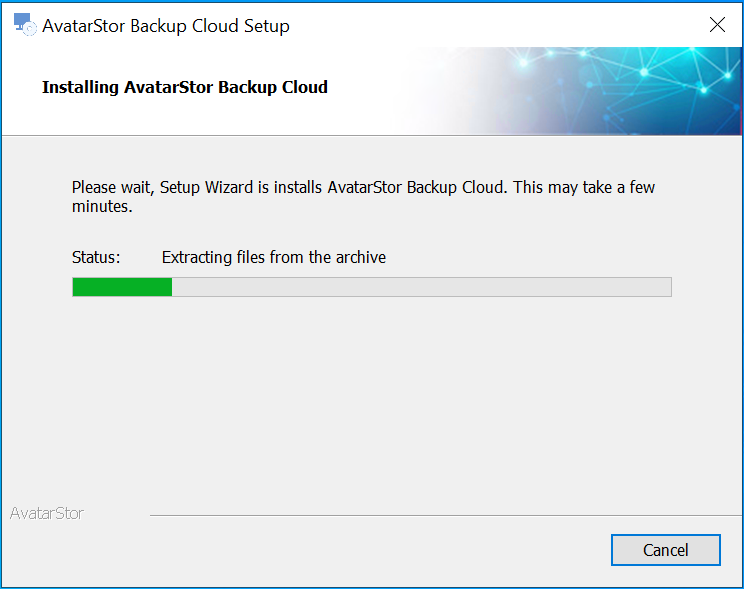
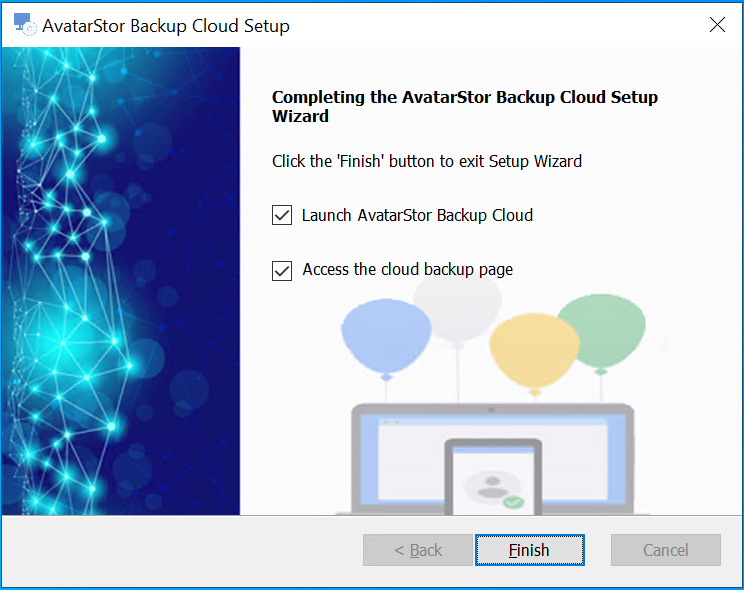
Click [Finish] to end the installation.Optionally, you can choose to open the AvatarStor Tray Management Tool and the Console Home Page.
3.1.2 Backup Service Management
Double-click the desktop icon to run (if you selected to run AvatarStor Backup Cloud at the end of the installation, you can skip this step):

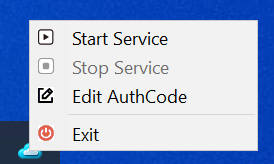
Minimize to the system tray in the bottom-right corner, then right-click and select [Start Service] to start the backup service:
|
AvatarStor Backup Cloud consists of five services: AvsDB, AvsAgent, AvsMaster, AvsClient, and AvsStorage. During the startup or shutdown process, the cloud icon will briefly turn red. It will turn blue once all five services have fully started or stopped. If the cloud icon remains red for an extended period, it indicates that one or more of these services are in an abnormal state. |
You can view these backup services in Windows System Services. Press Windows + R, then enter services.msc:
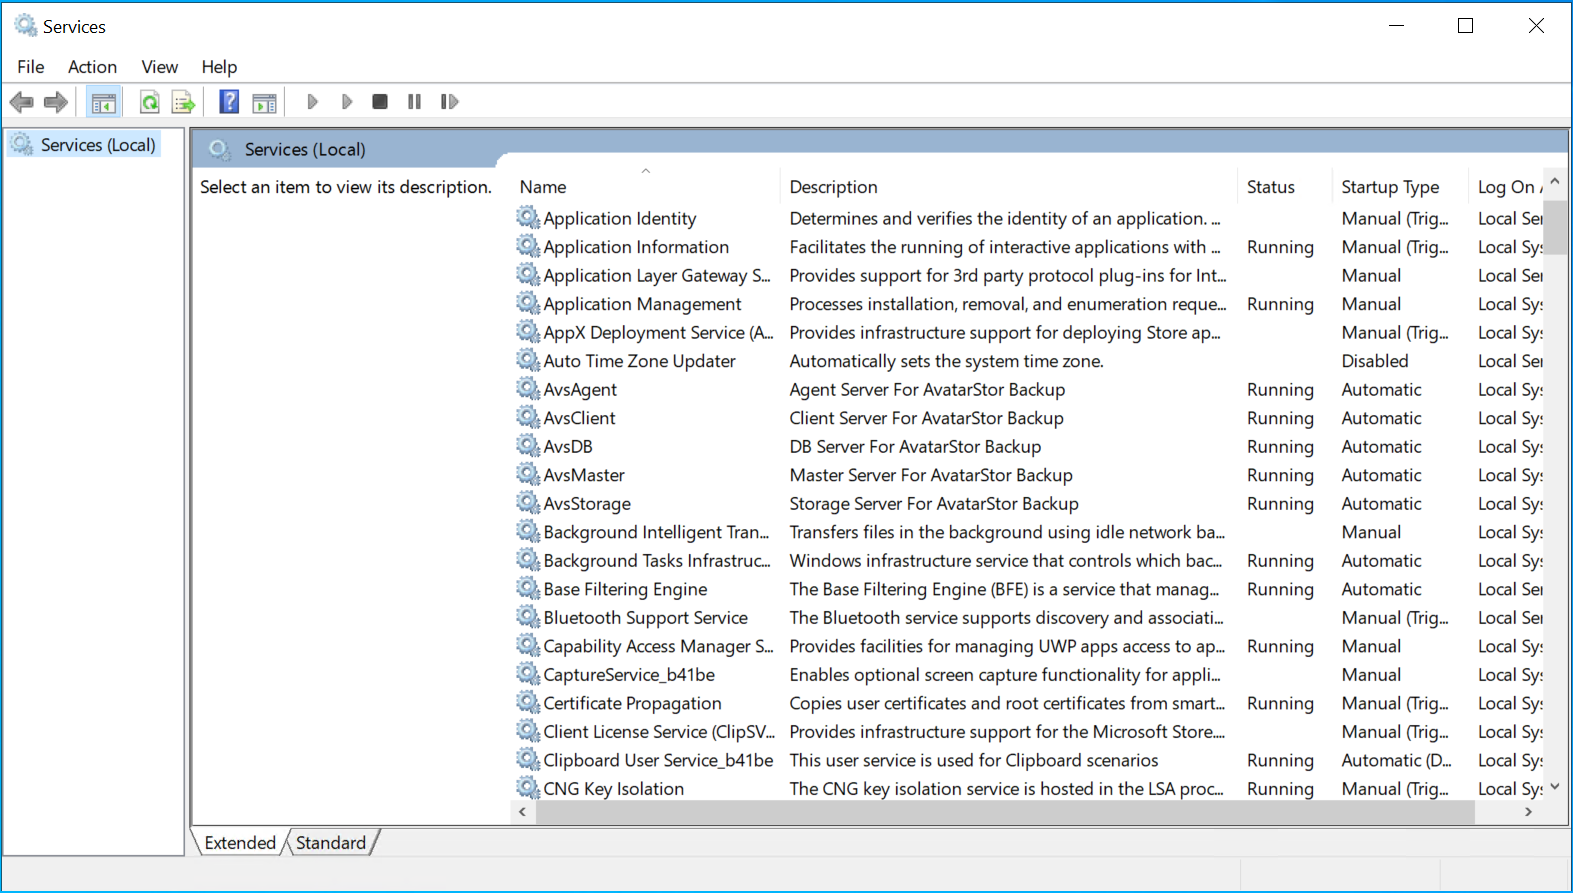
You can also use an administrator account to open Command Prompt or PowerShell and execute avsmgt start, avsmgt stop, or avsmgt status to start, stop, or check the status of the services:
|
PowerShell |
You can also start individual services using a command like the following example:
|
PowerShell |
|
Note that if you start or stop services individually, AvsDB must be started first, followed by AvsAgent, and then the other three services. The service_name is not case-sensitive. |
3.1.3 Uninstallation
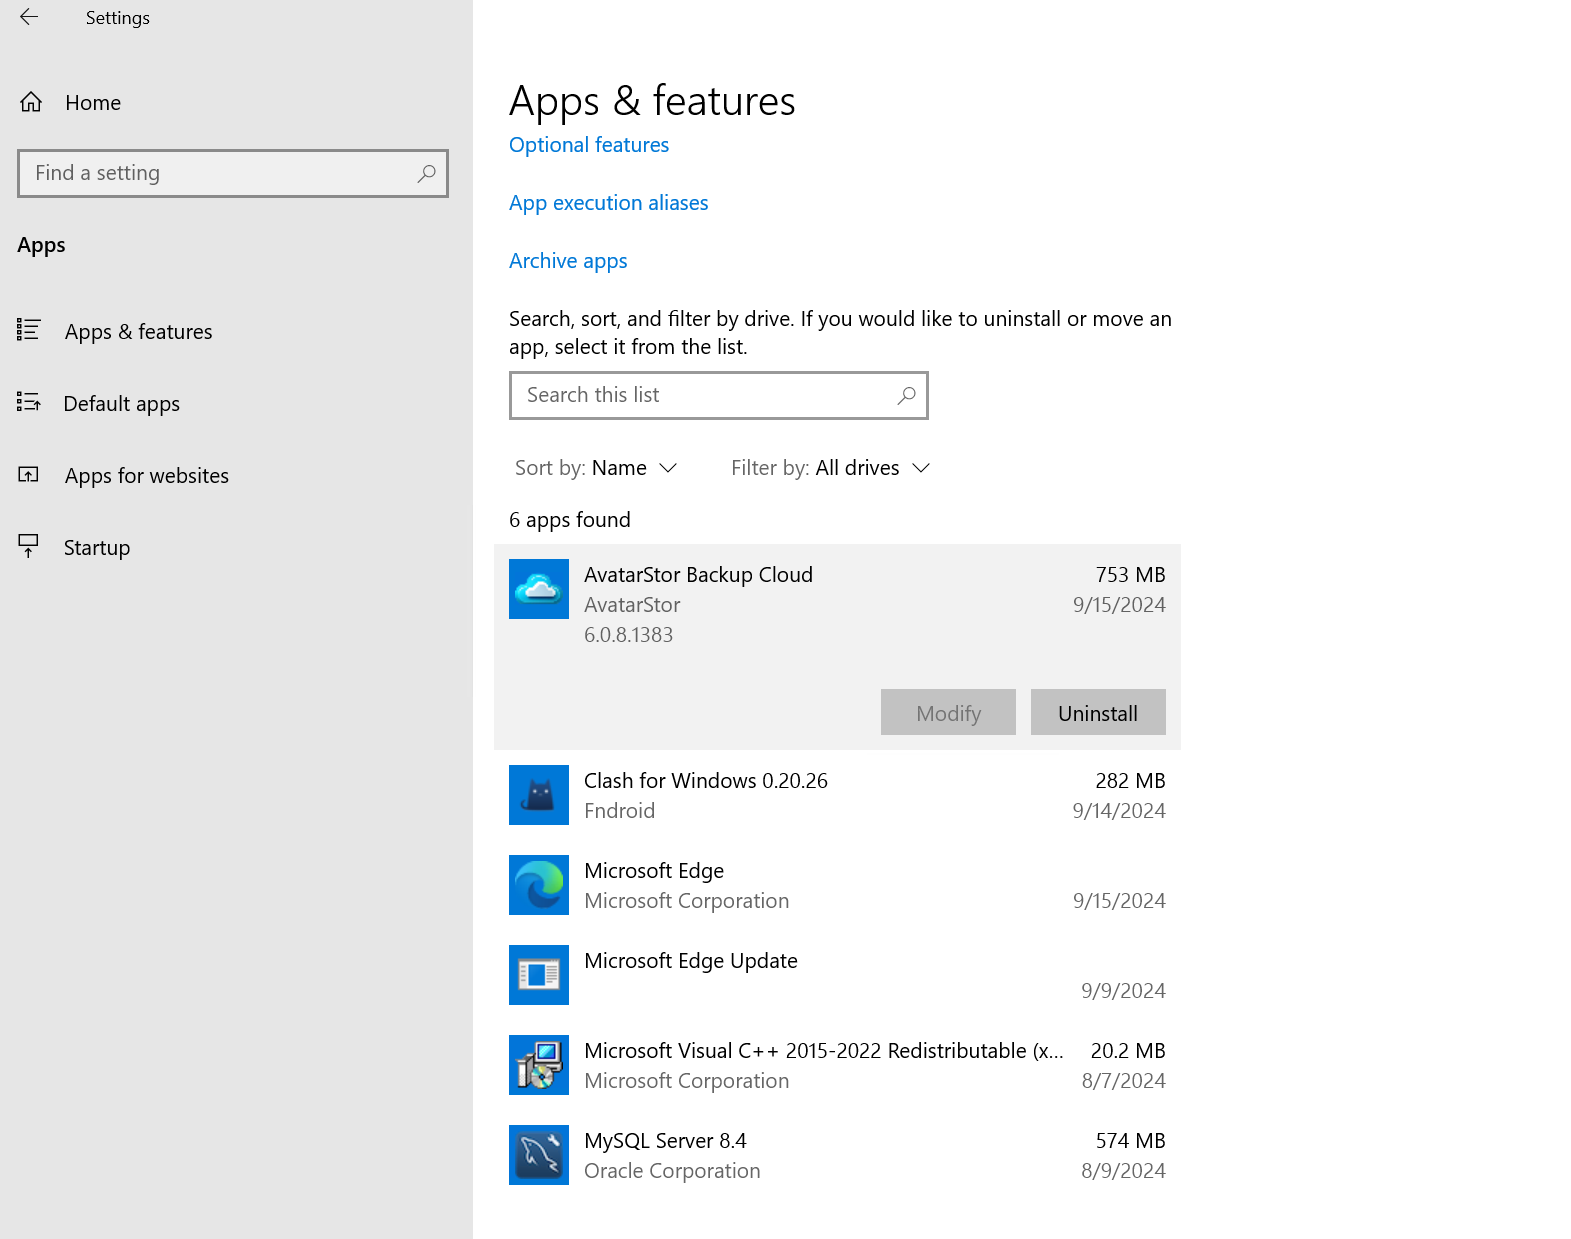
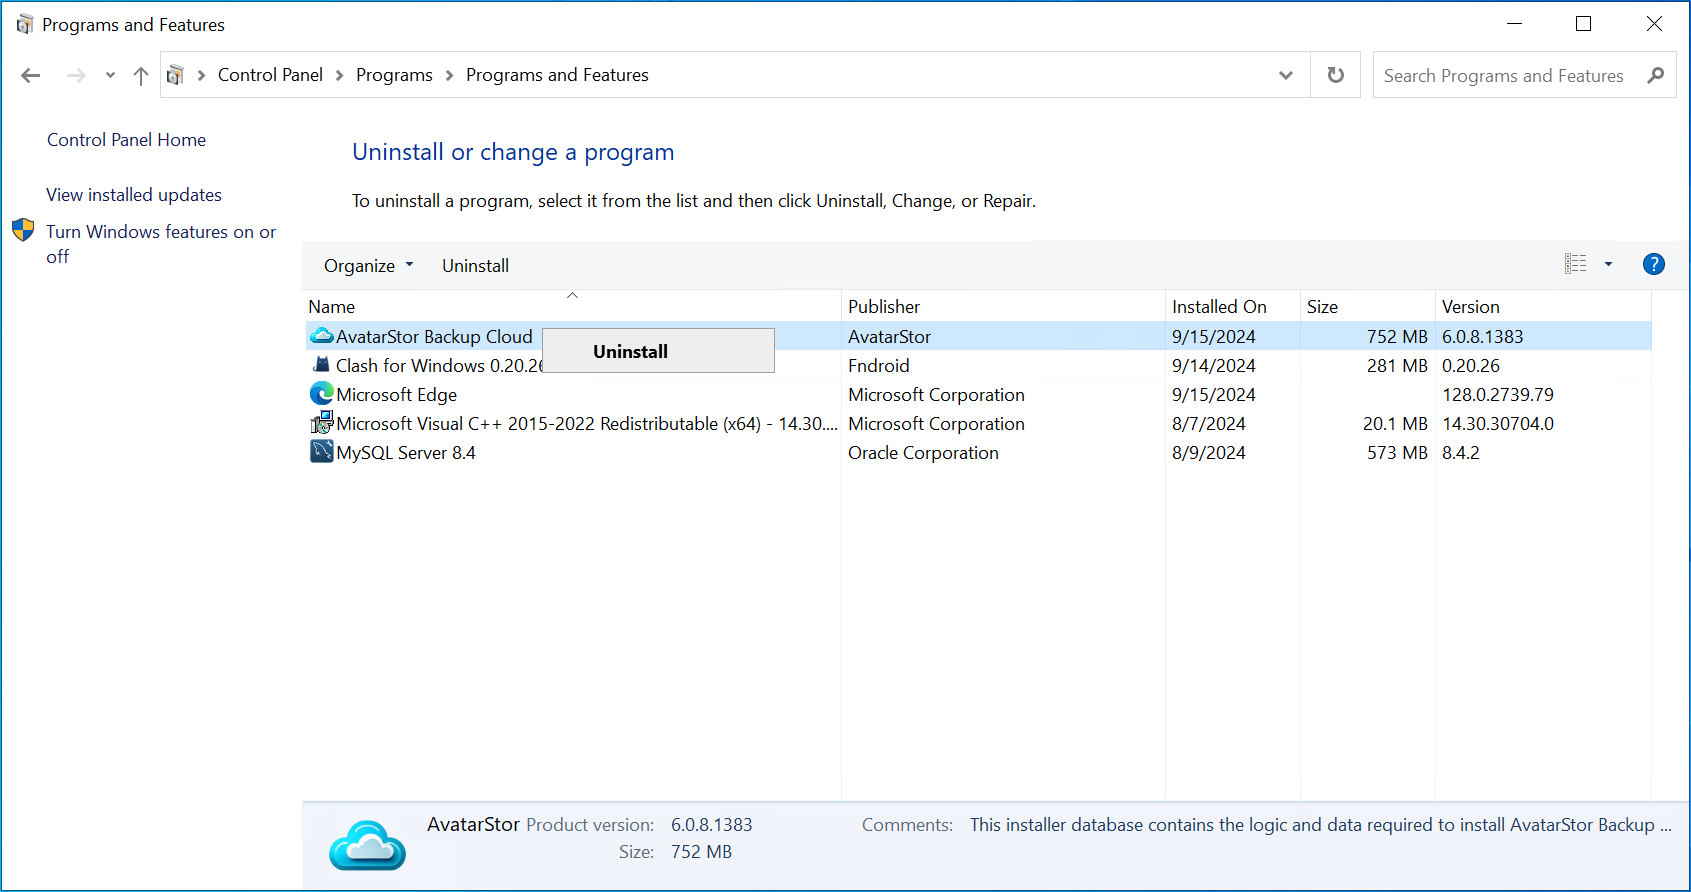
From Windows [Settings] - [Apps & Features], or Control Panel [Programs] - [Uninstall a program], find the AvatarStor icon, click [Uninstall], and follow the prompts to complete the uninstallation:
Or:
3.2 Linux
3.2.1 Installation
Use wget to download the installation package (or you can download it directly from the webpage and then upload it):
|
Bash |
Unzip:
|
Bash |
Install to the default path /usr/local/avs. Please make sure to copy your activation code from the download page in advance:
|
Bash |
If you don't want to activate it during the installation process, you can also activate it later.
|
Bash |
|
Tip To download the installation package via the command line on Linux, you will need wget. If your Linux system does not have the wget package installed, follow the instructions below: Debian/Ubuntu: apt install wget CentOS/RHEL: For CentOS 7/8: yum install wget For CentOS 8/9: dnf install wget Other Linux Distributions: Generally, use: sudo install wget Replace <package-manager> with the package manager used by your distribution, such as apt, yum, dnf, pacman, zypper, etc. After installation, you can run the following command to check if the installation was successful: wget --version |
3.2.2 Backup Service Management
Start and stop the Linux system service, execute [installdir] scripts/avs.sh:
|
Bash |
3.2.3 Uninstallation
In the Shell, execute [installdir]uninstall.sh as the root user:
|
The default installation directory is:/usr/local/avs/ |
|
Bash |
3.3 Client Groups
In the left navigation bar, go to [Client] - [Client Groups]. Here, you can manage your client groups by giving them a group name, adding a description, and selecting ungrouped clients from the left. Click the right arrow to move them into your new client group. This helps you efficiently manage a large number of clients.
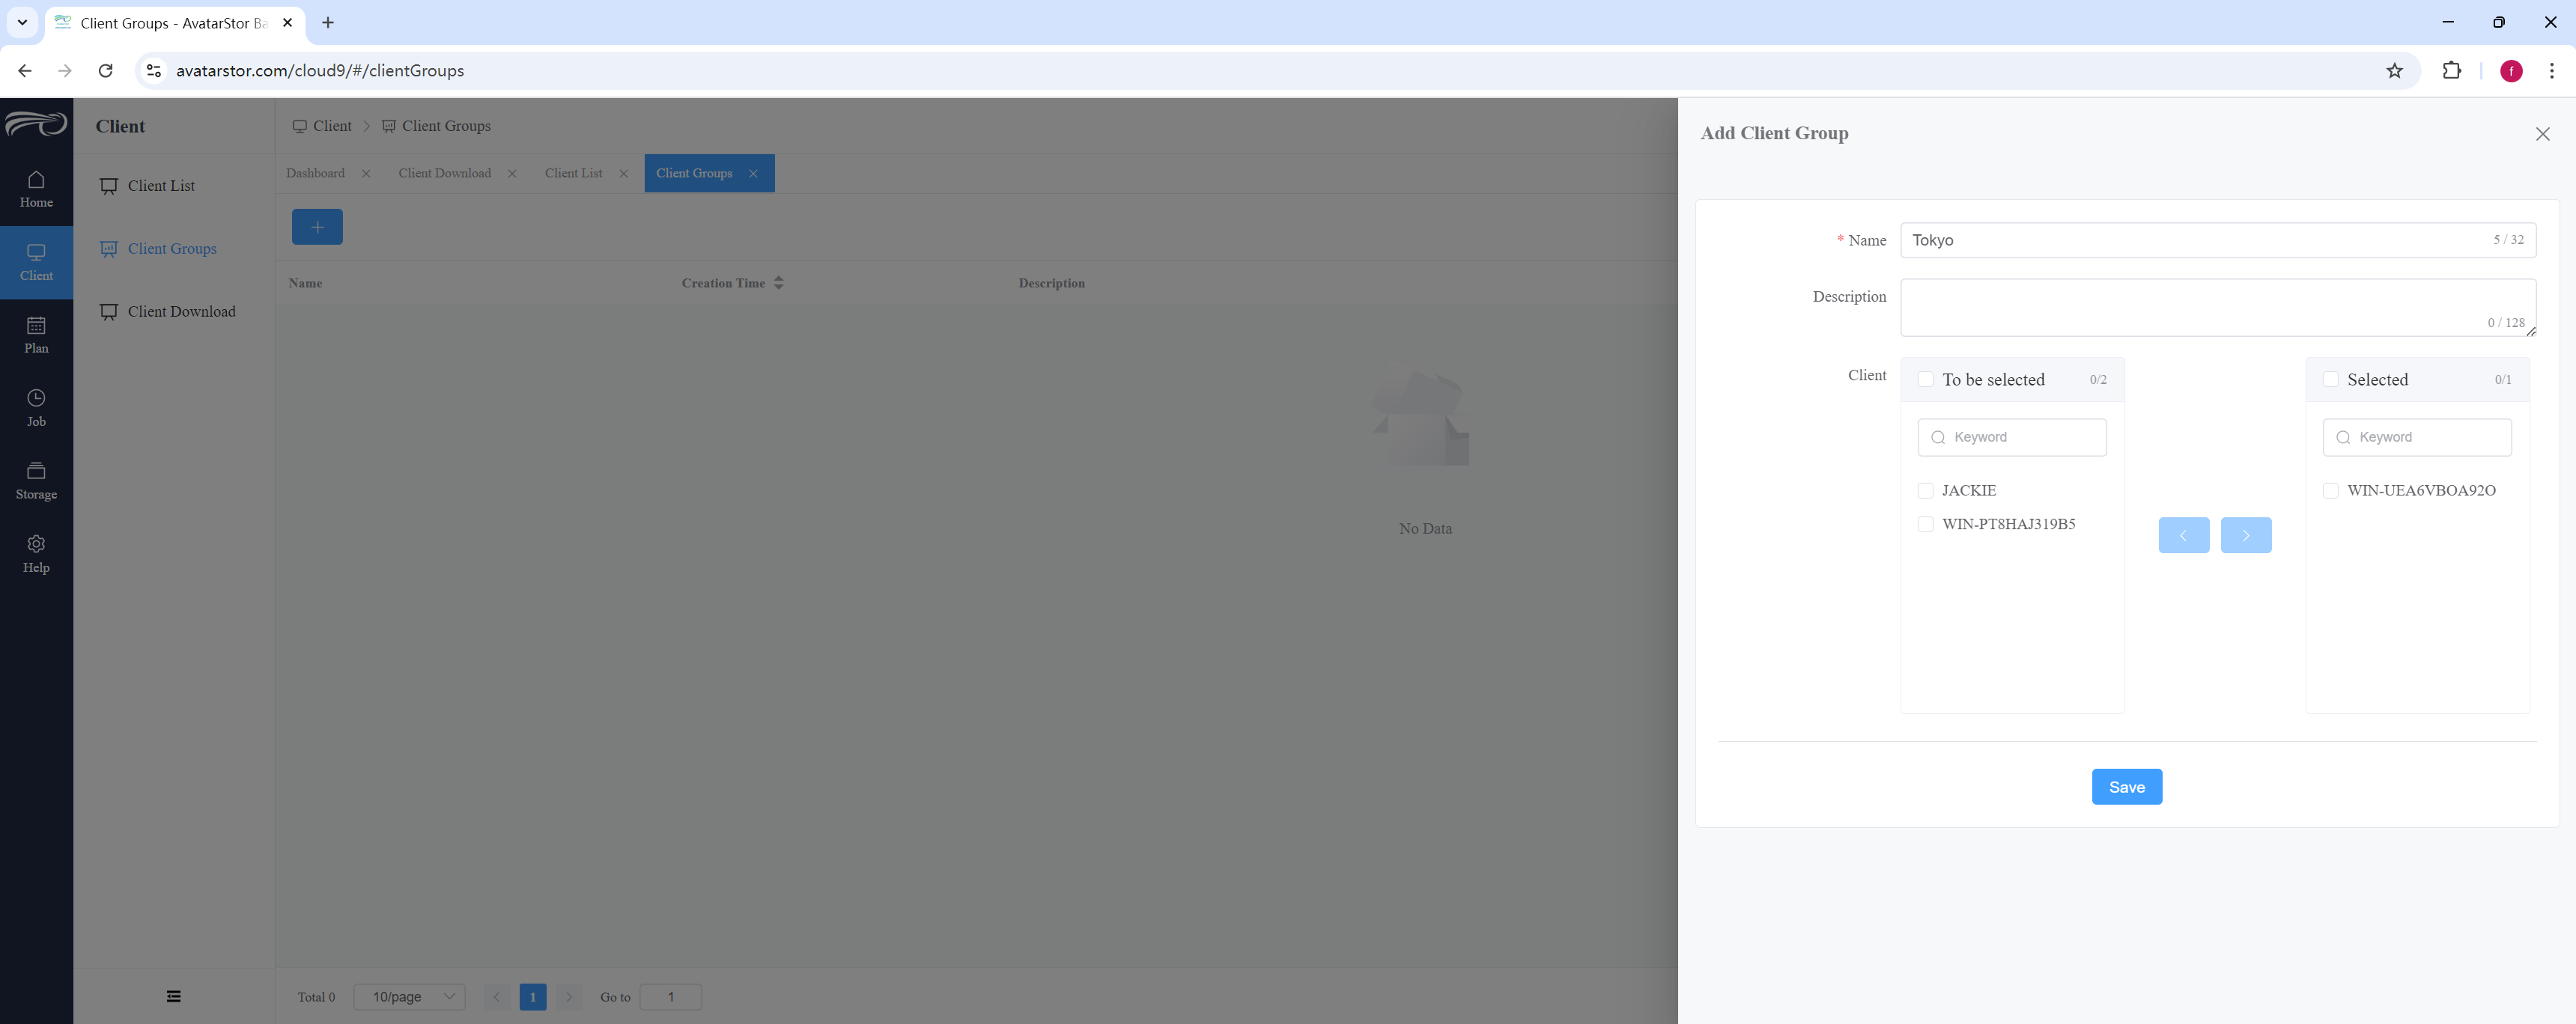
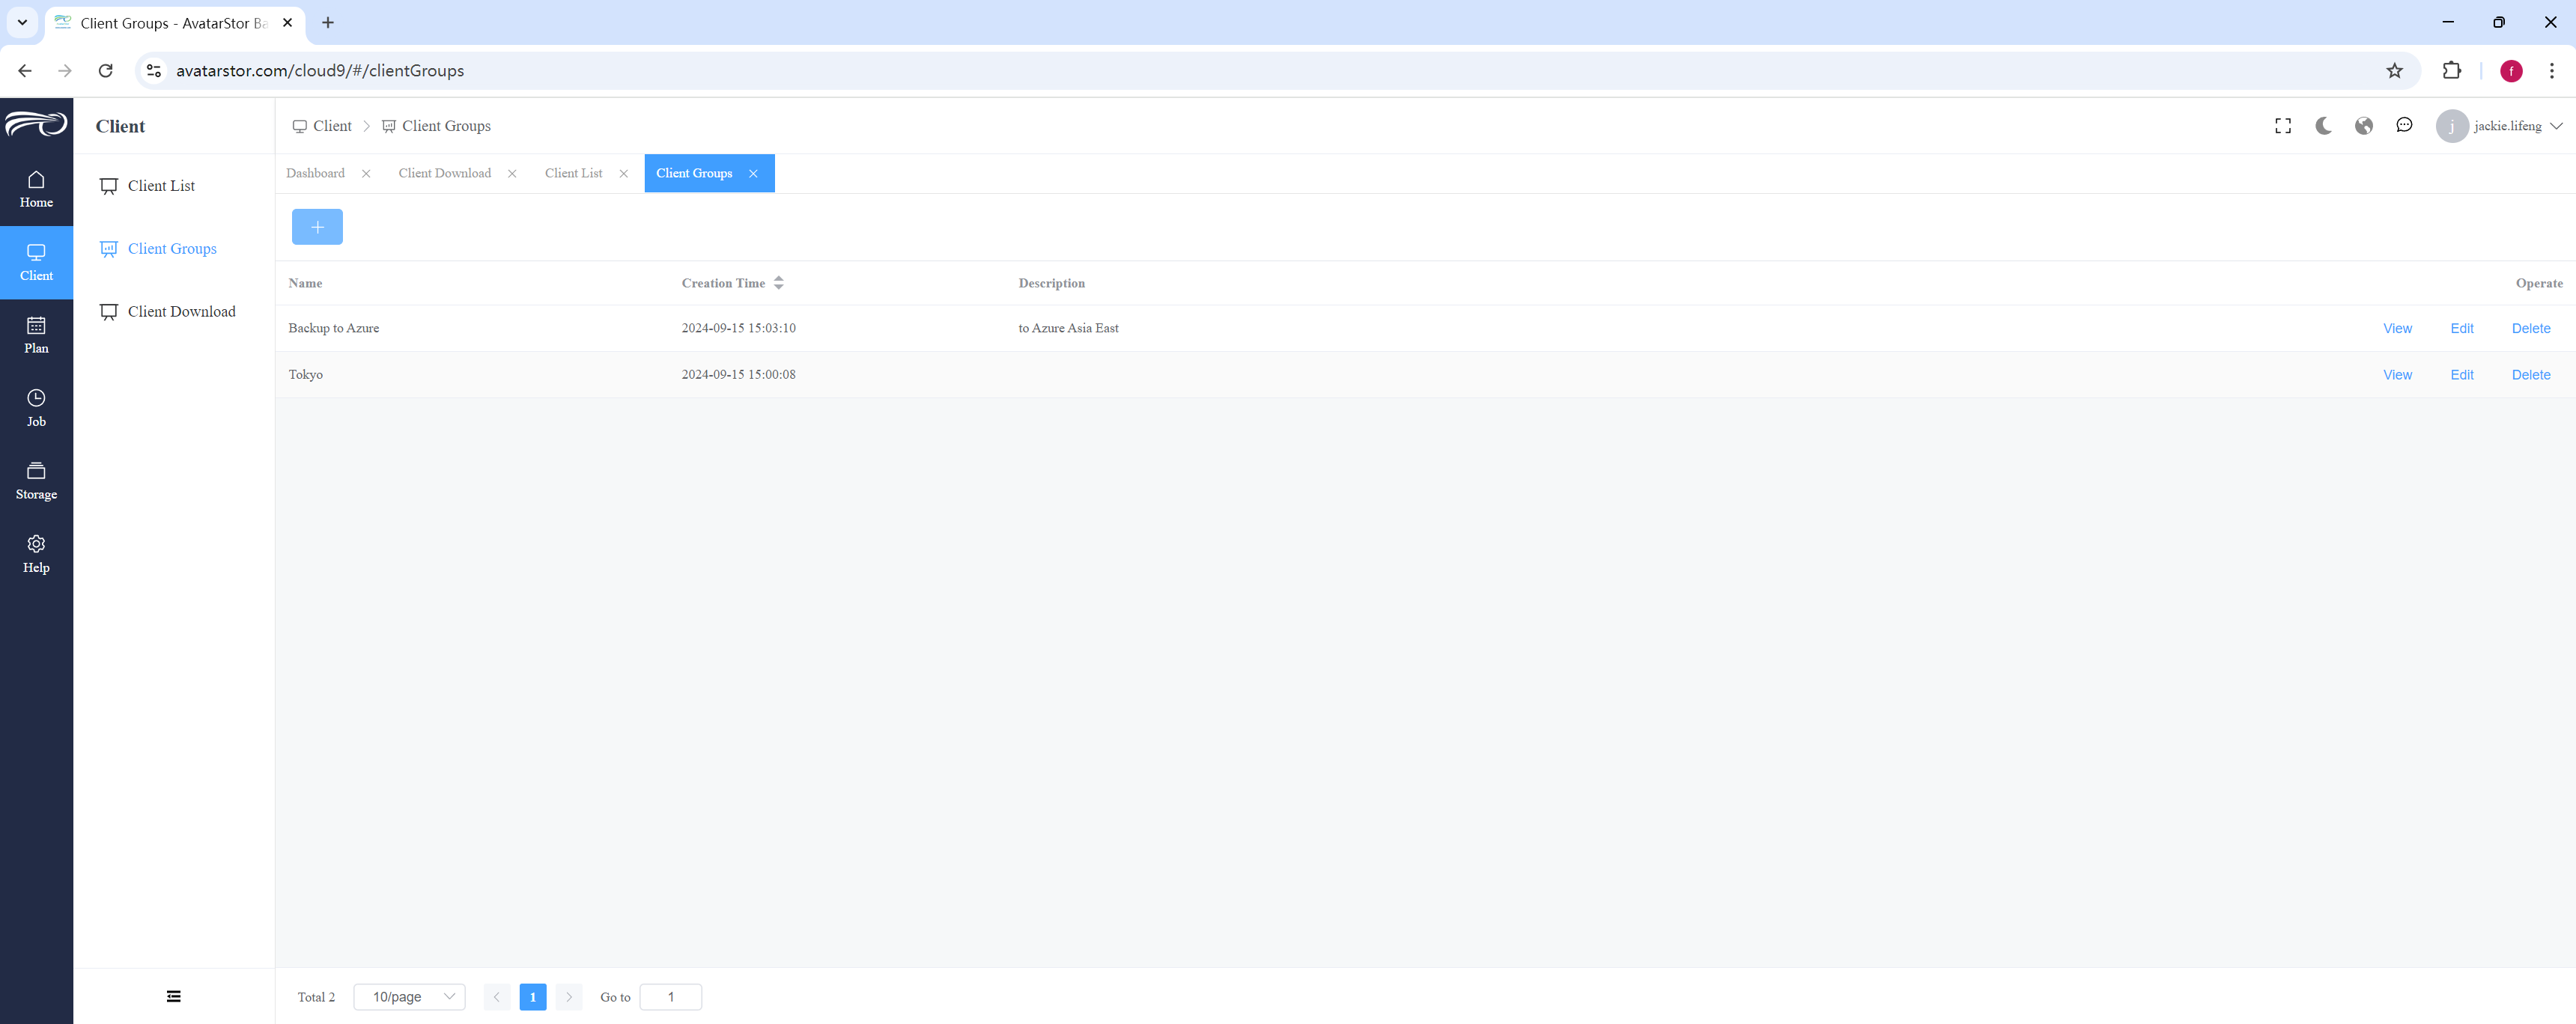
As shown in the diagram, we recommend classifying your clients based on the location of the backup target storage. Of course, this is just one way to manage your clients. You can also group clients by IP address range, operating system type, or data center cabinet number, among other methods.
3.4 Client Upgrade
When a new version of the client is released, we will also provide patches for older versions. In the left navigation bar, go to [Client] - [Client List] - [Status] to see a notification about the new client version:
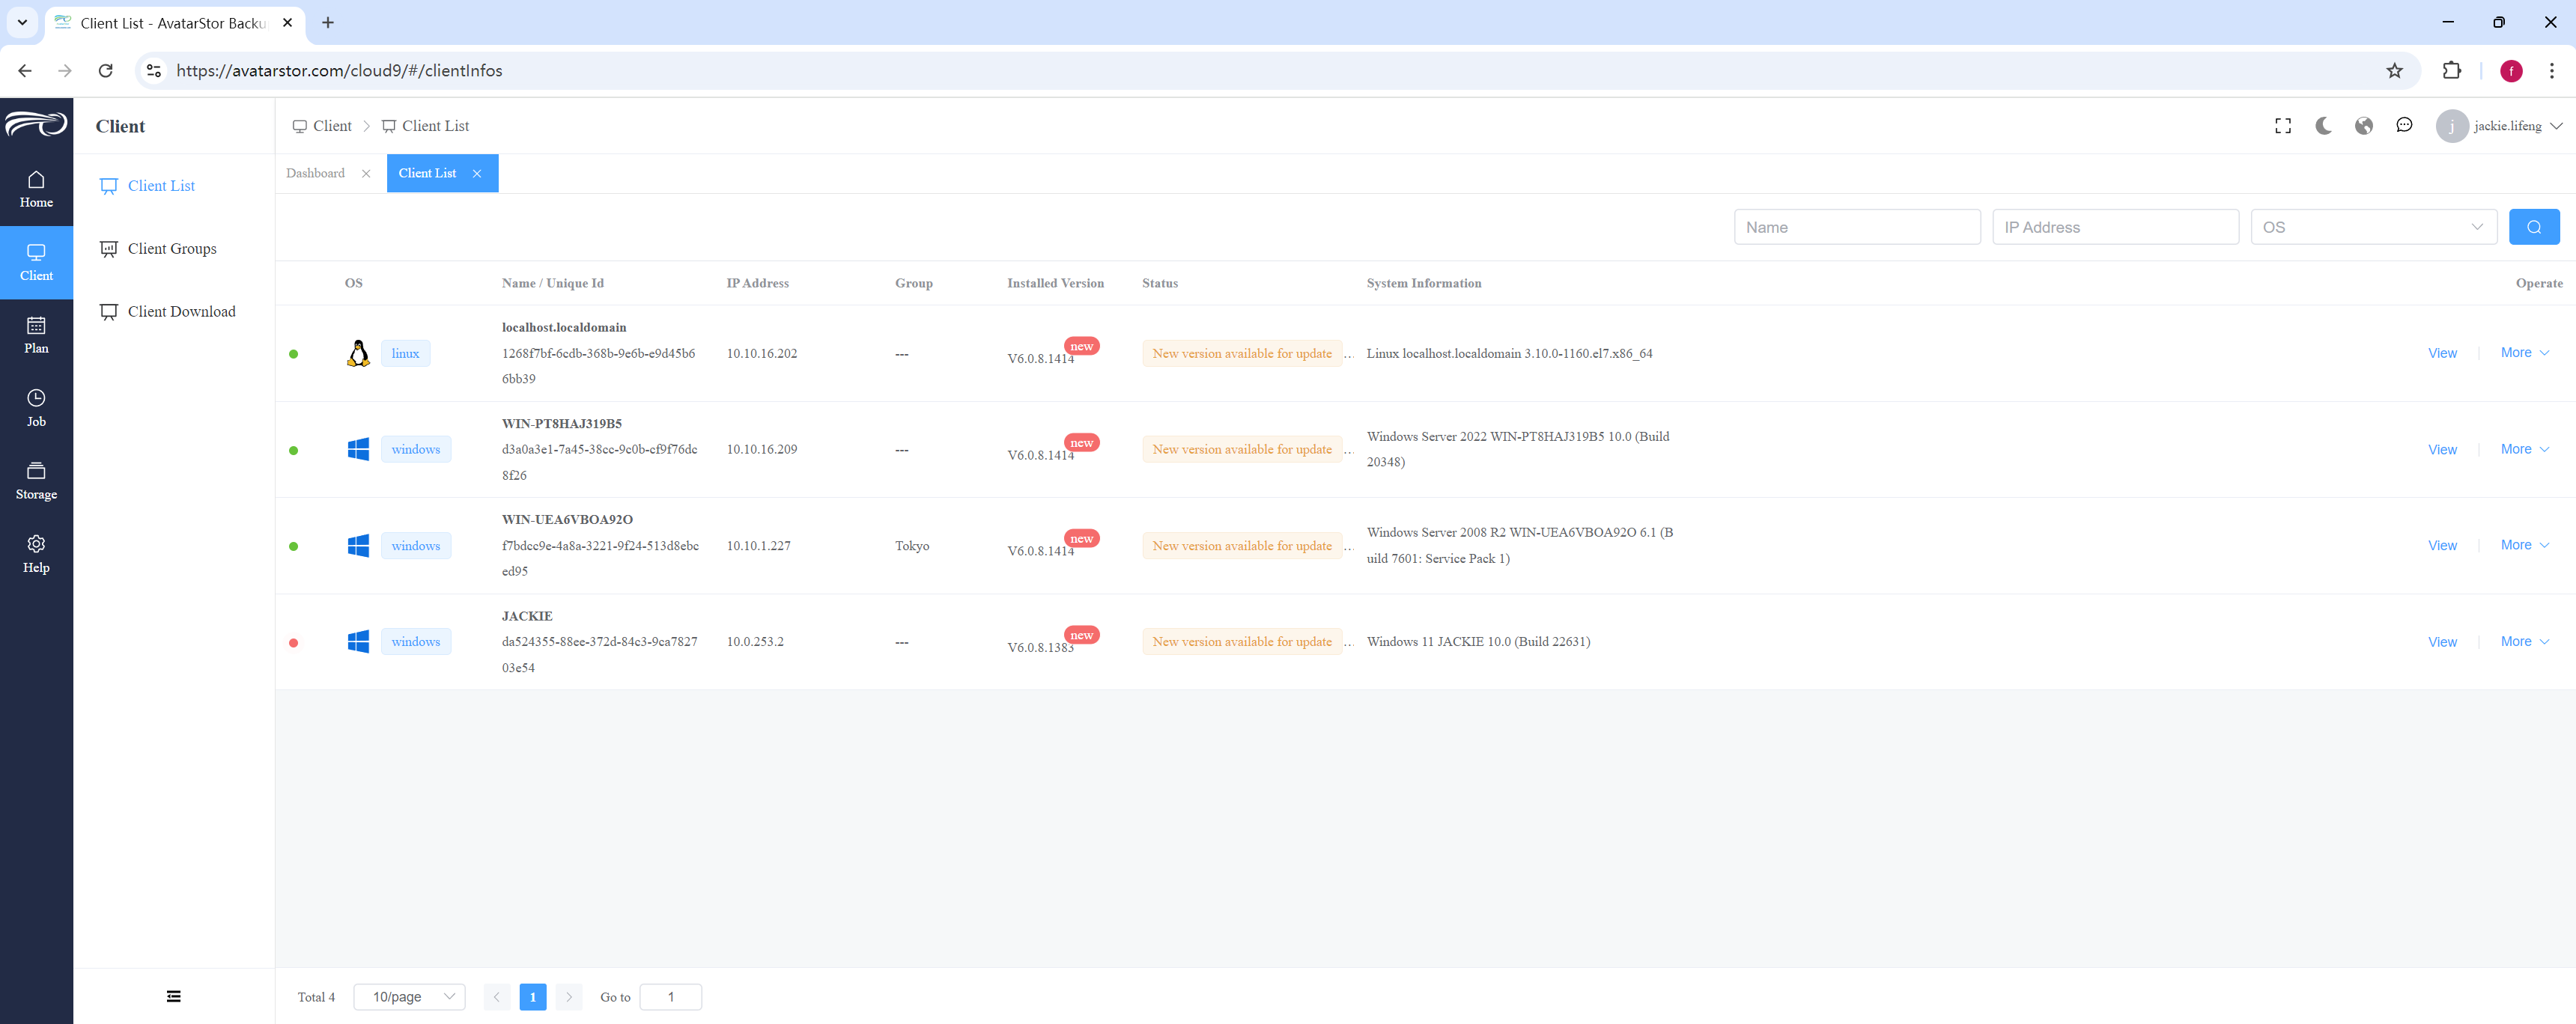
Click on [More] - [Upgrade] on the right side to upgrade the client online. The upgrade takes about 1-2 minutes, during which the client will briefly go offline. Once the upgrade is complete, the client will come back online.
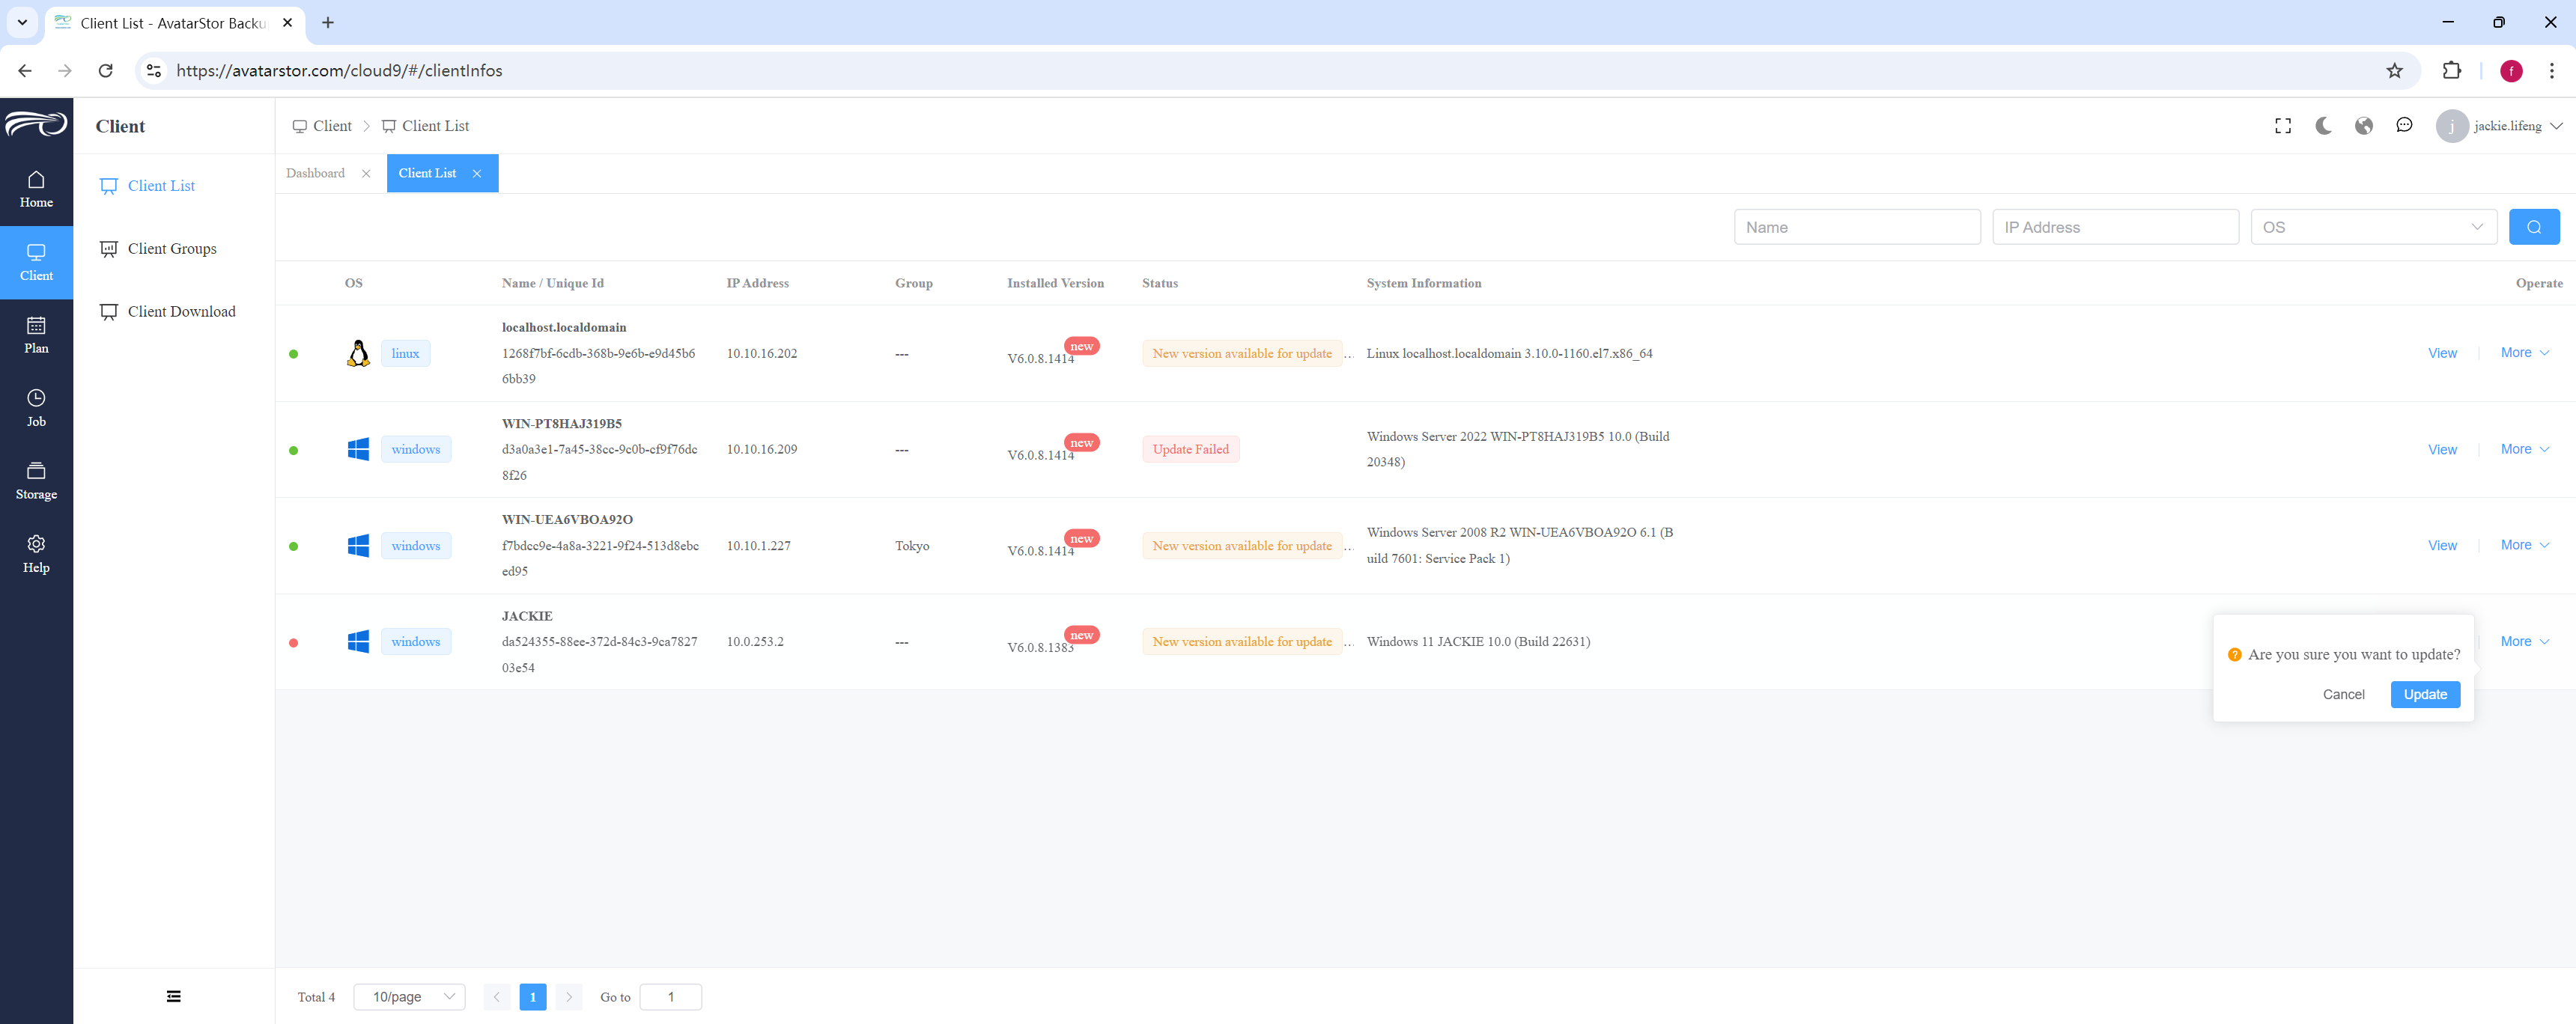
During the upgrade, the client services will stop and restart, so please avoid upgrading the client while any jobs are running.
3.5 Client Rebuild
If the upgrade fails due to reasons such as network issues, you can simply uninstall the current client, then download and install the latest version. After installing the new client, you will be prompted to rebuild it:
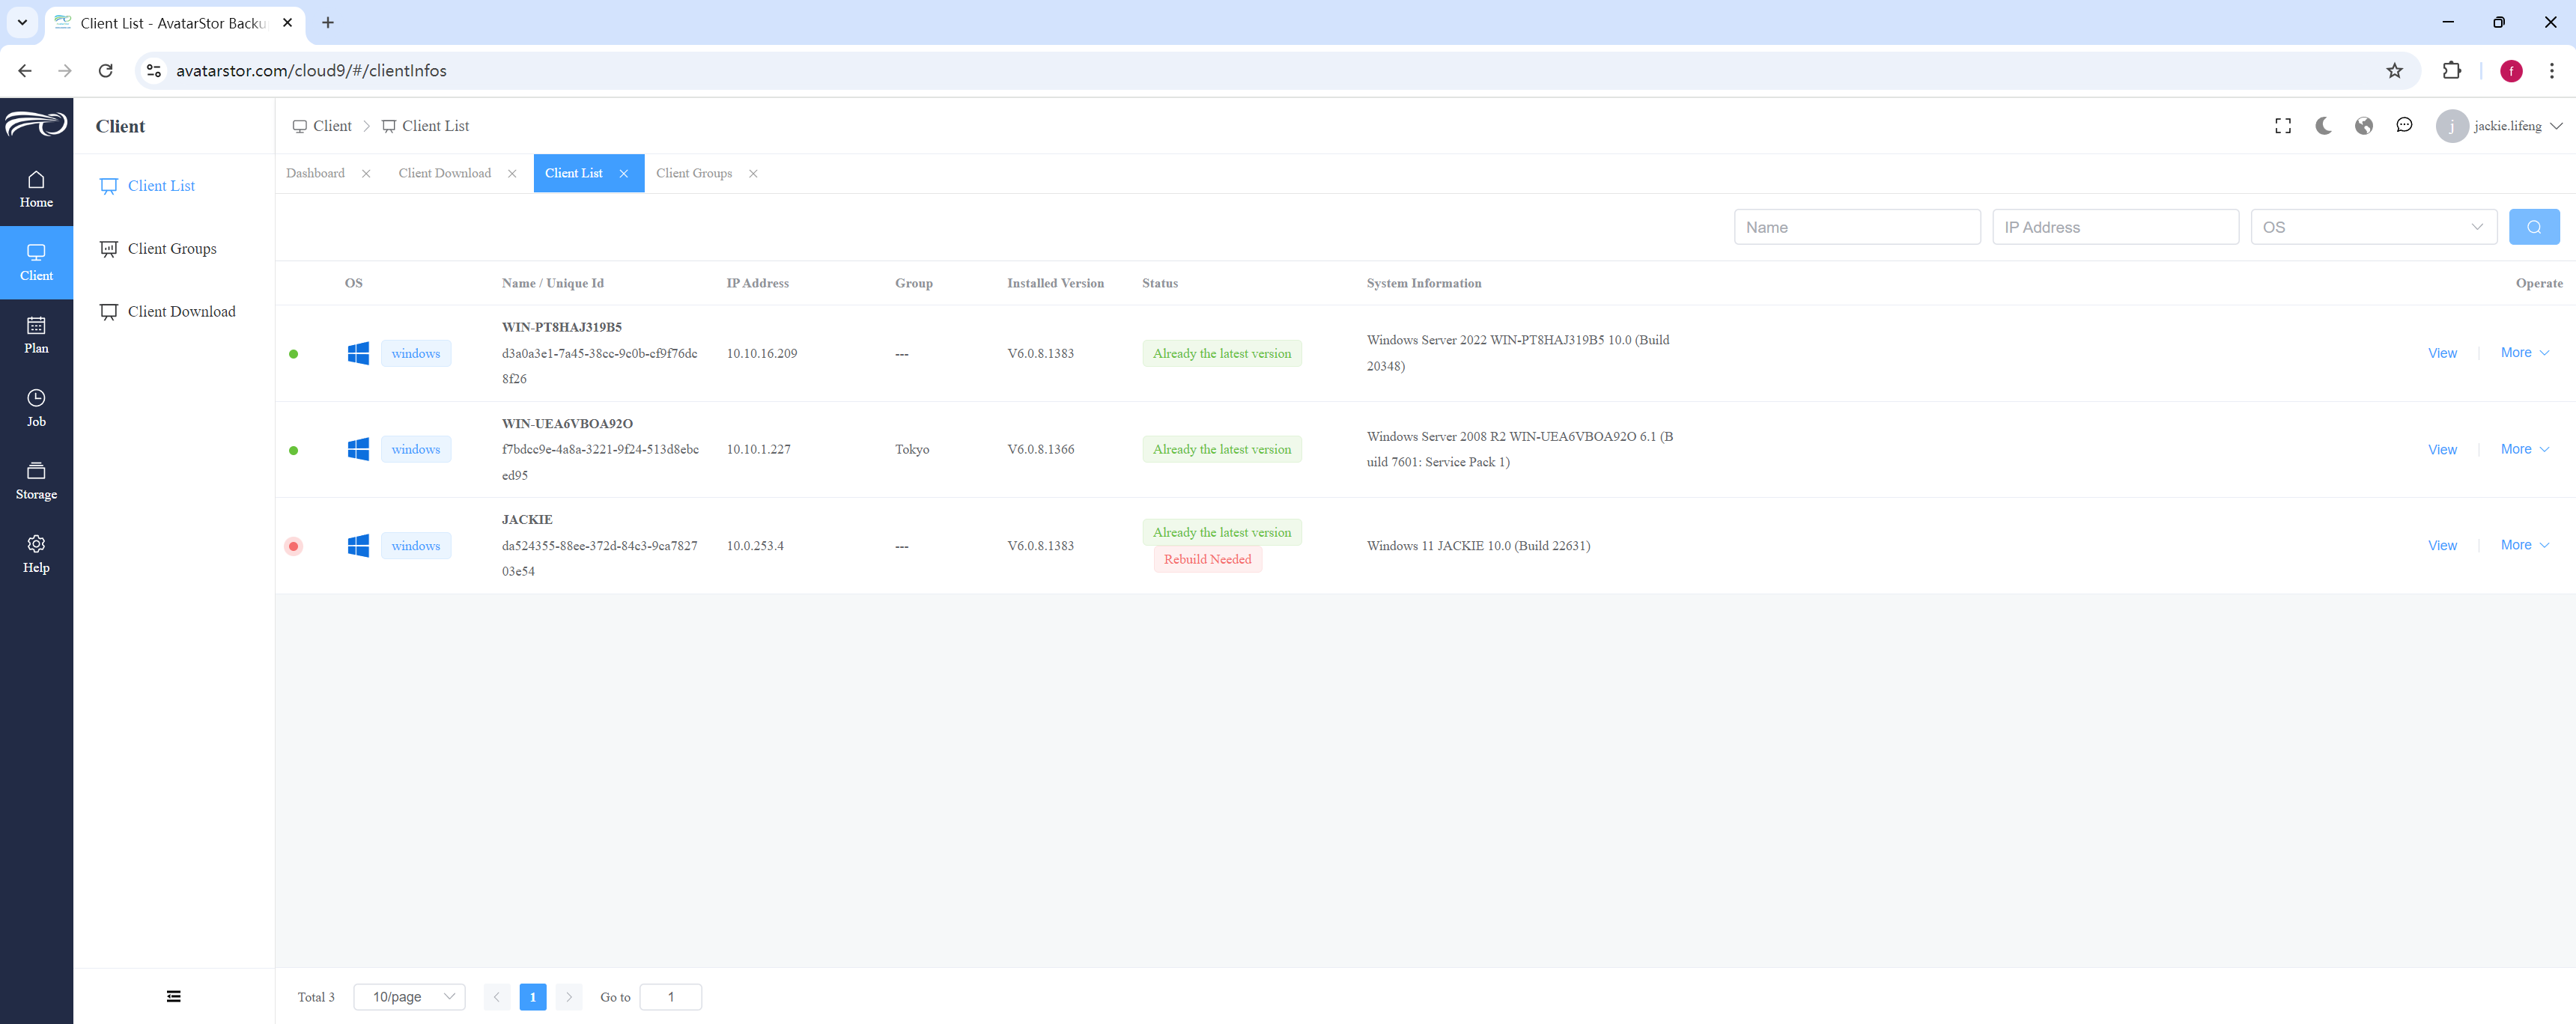
Click on [More] - [Rebuild] on the right side, and after a short wait, the relevant configurations from the previous client will be synced down(Of course, you can also choose to discard the previous configurations (including schedules, instances, and storage) and let this client start fresh as a completely new client):
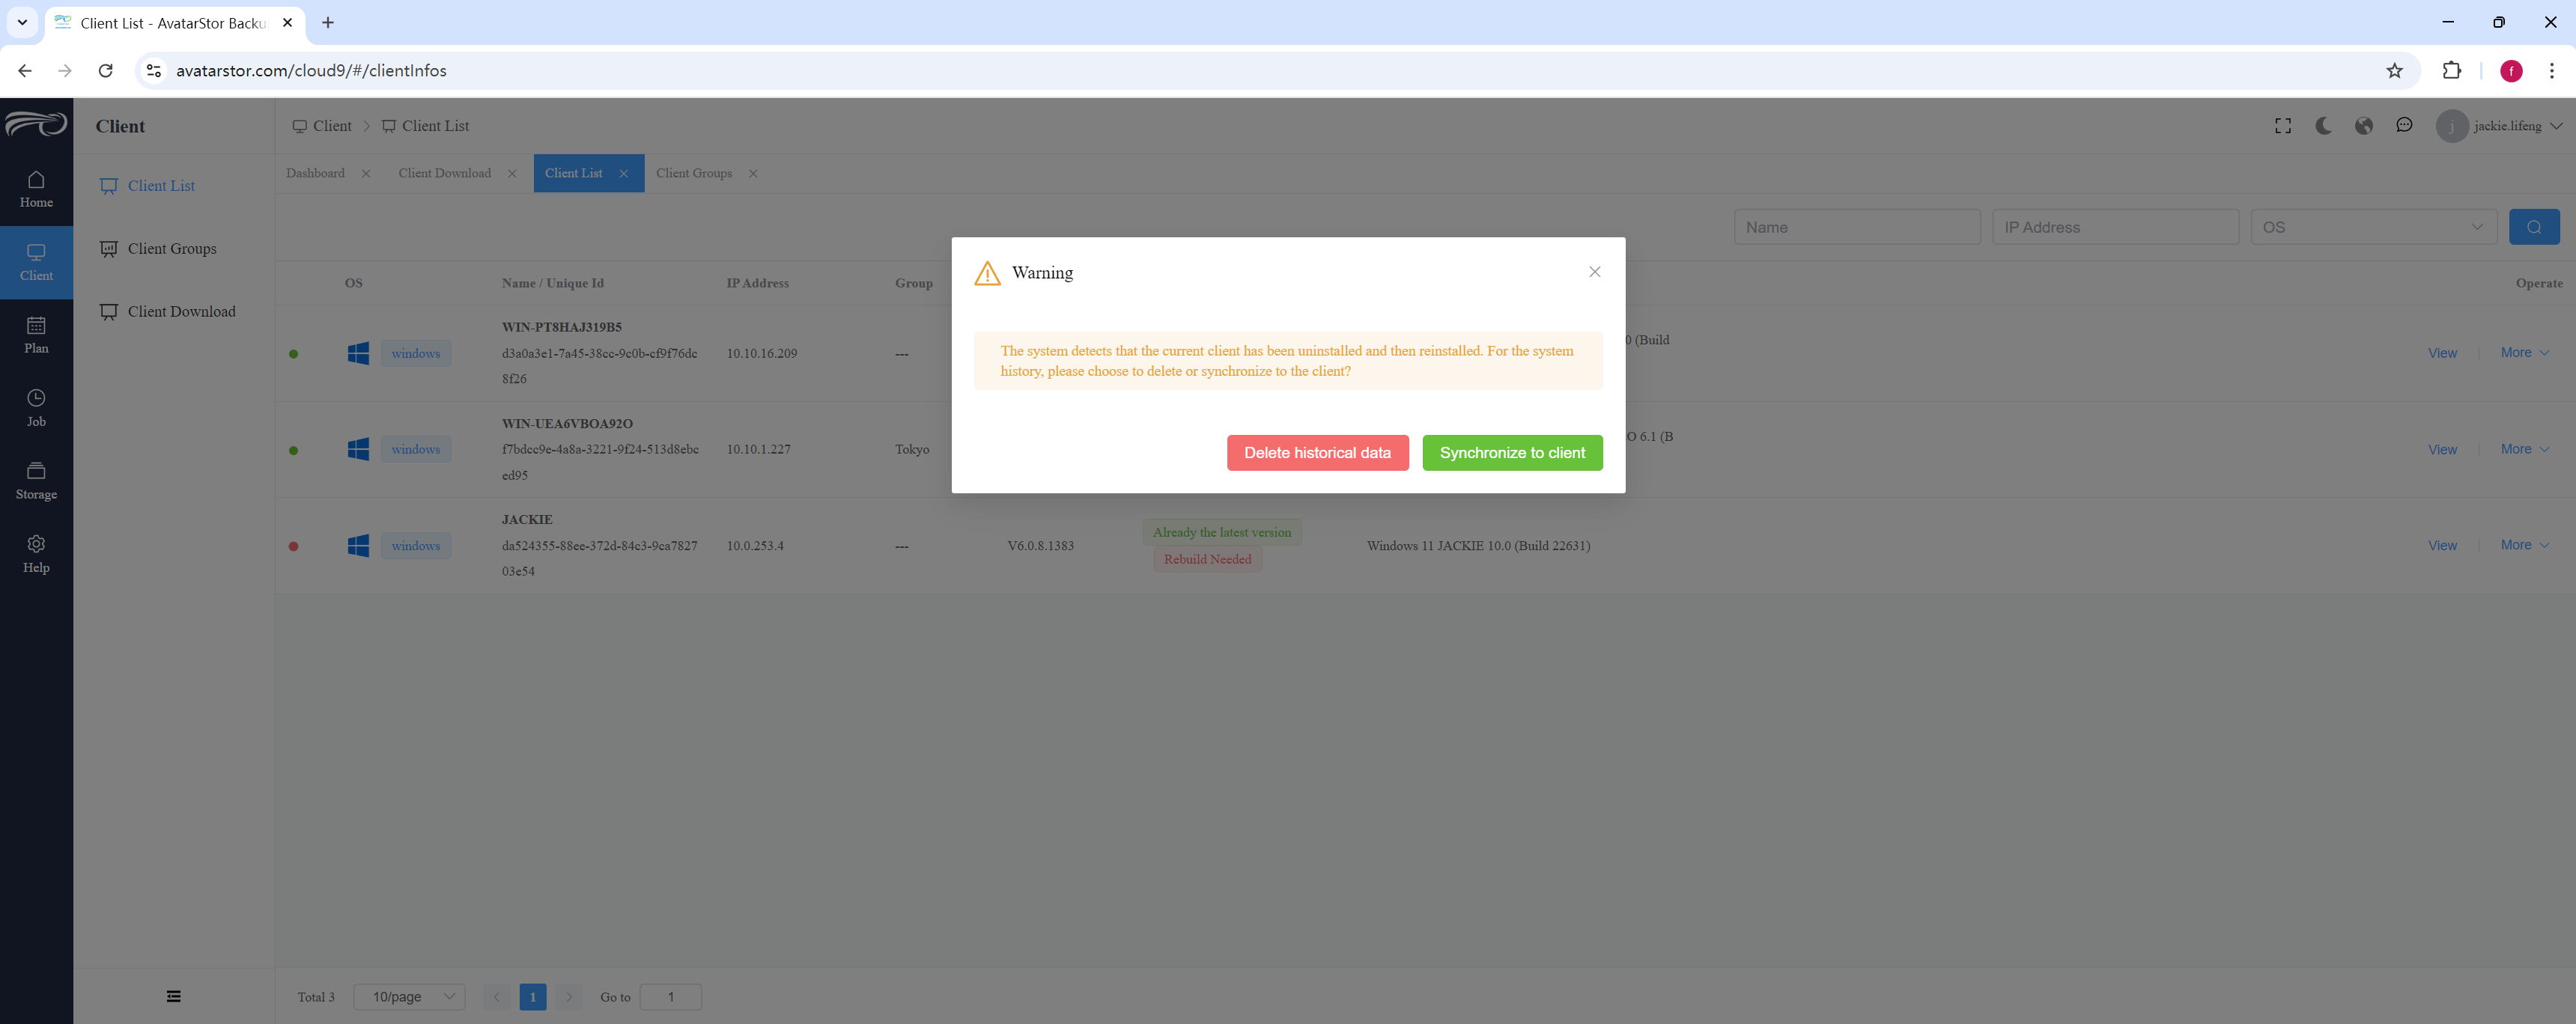
The rebuild process can take anywhere from a few seconds to a few minutes, depending on the amount of previous configuration data. Once the rebuild is complete, the client will automatically come back online.
3.6 Client Instances
Configuring instances is a necessary step for the backup system to understand the types of data sources installed on the client. Apart from file backups, any other backup type must have instances configured first; otherwise, the backup system will not recognize the types of data sources on the client.
If you forget to configure instances in this section, you can also configure them during the subsequent plan configuration process. AvatarStor performs automatic instance scanning by default, but users also have the option to configure instances manually.
3.6.1 Scan instance
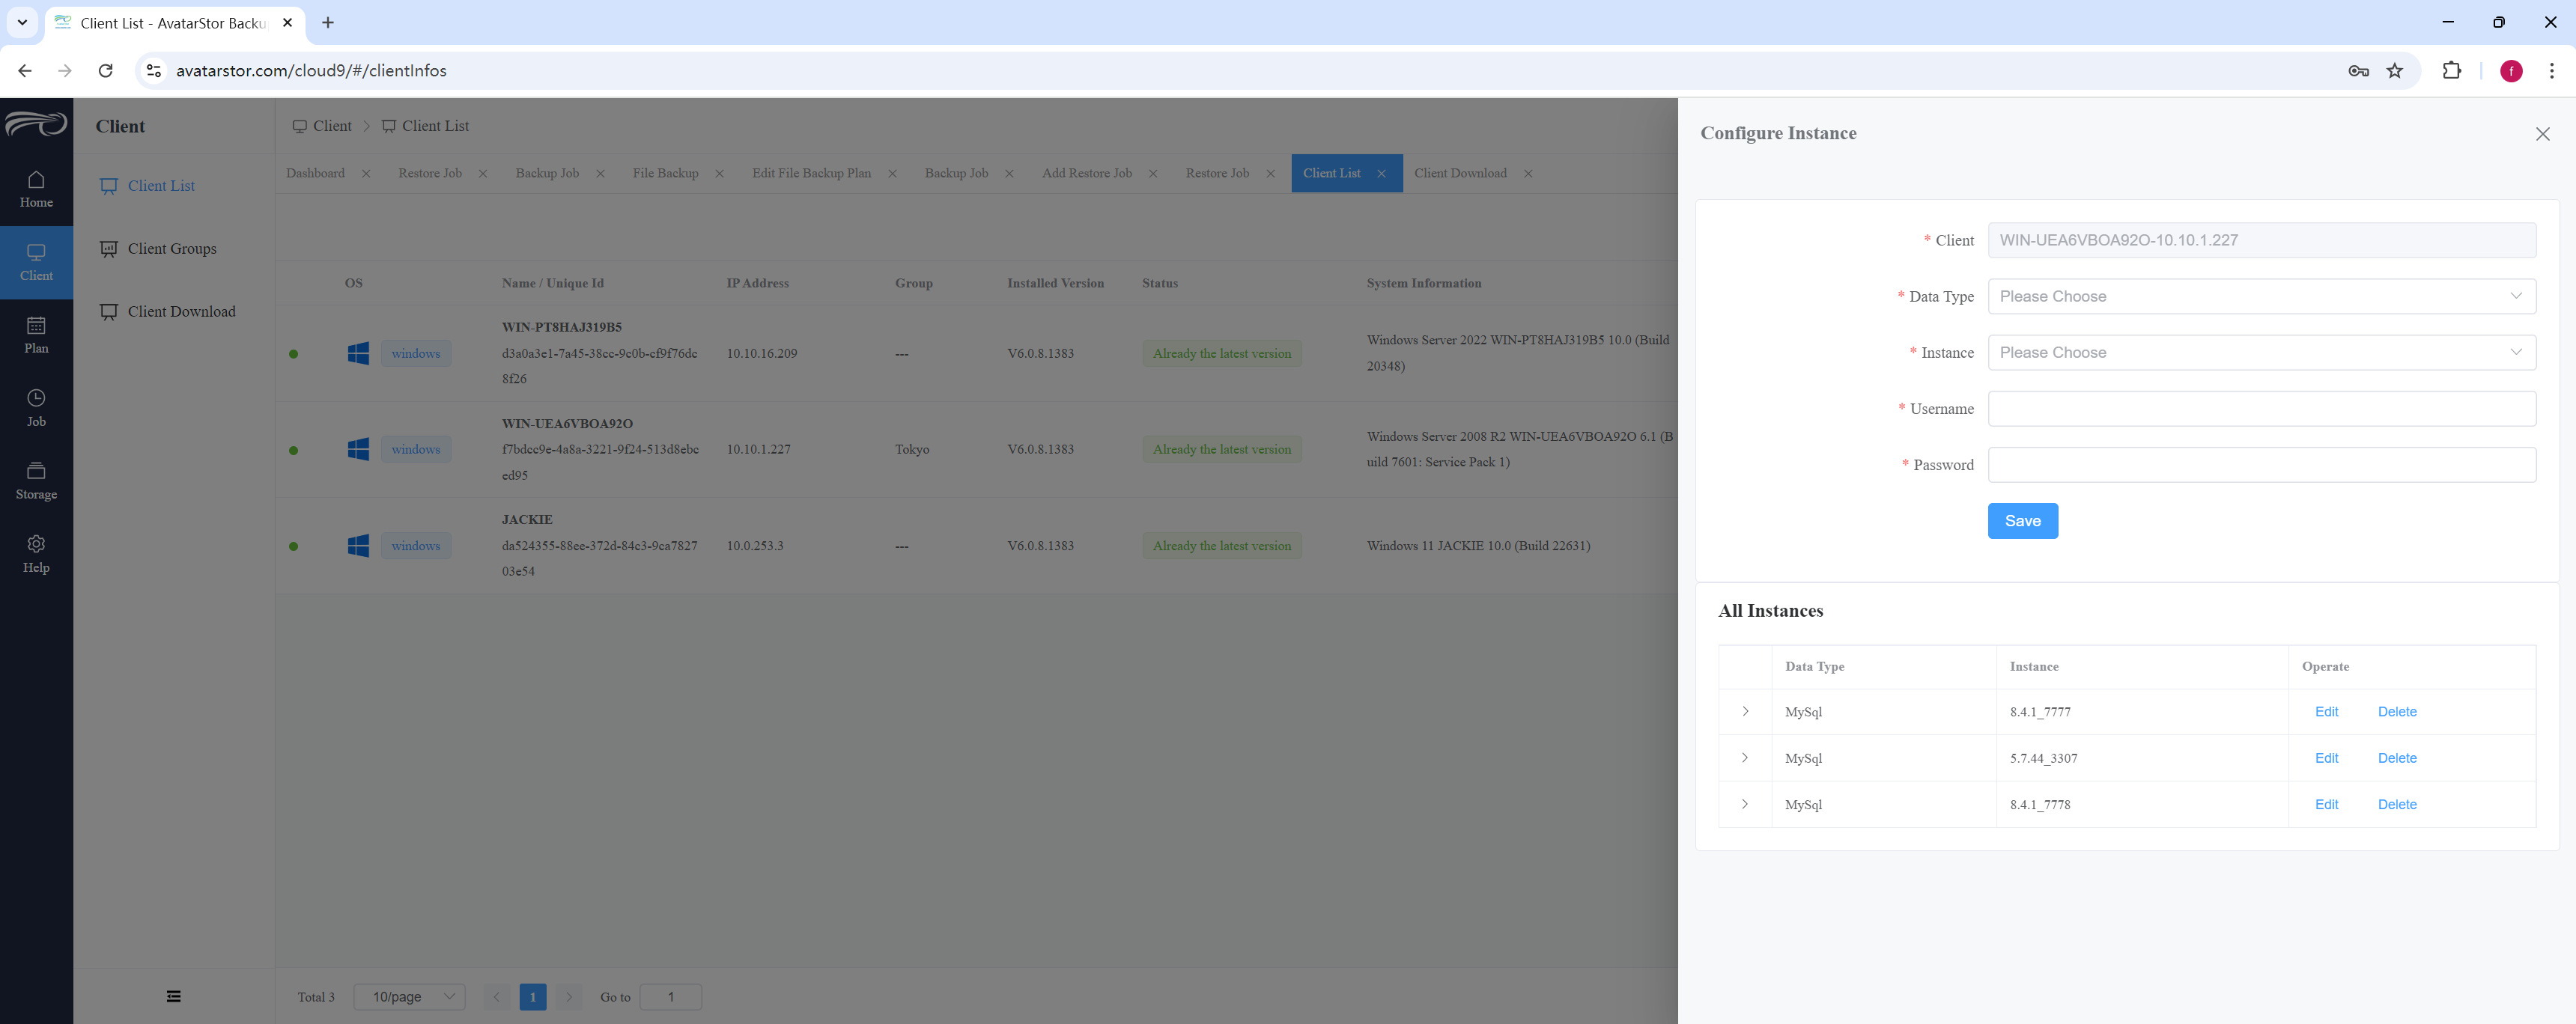
Visit https://www.avatarstor.com/cloud9/#/clientInfos. From the left navigation bar, go to [Client] - [Client List], select a client, and then click [More] - [Configure Instances] on the right side:
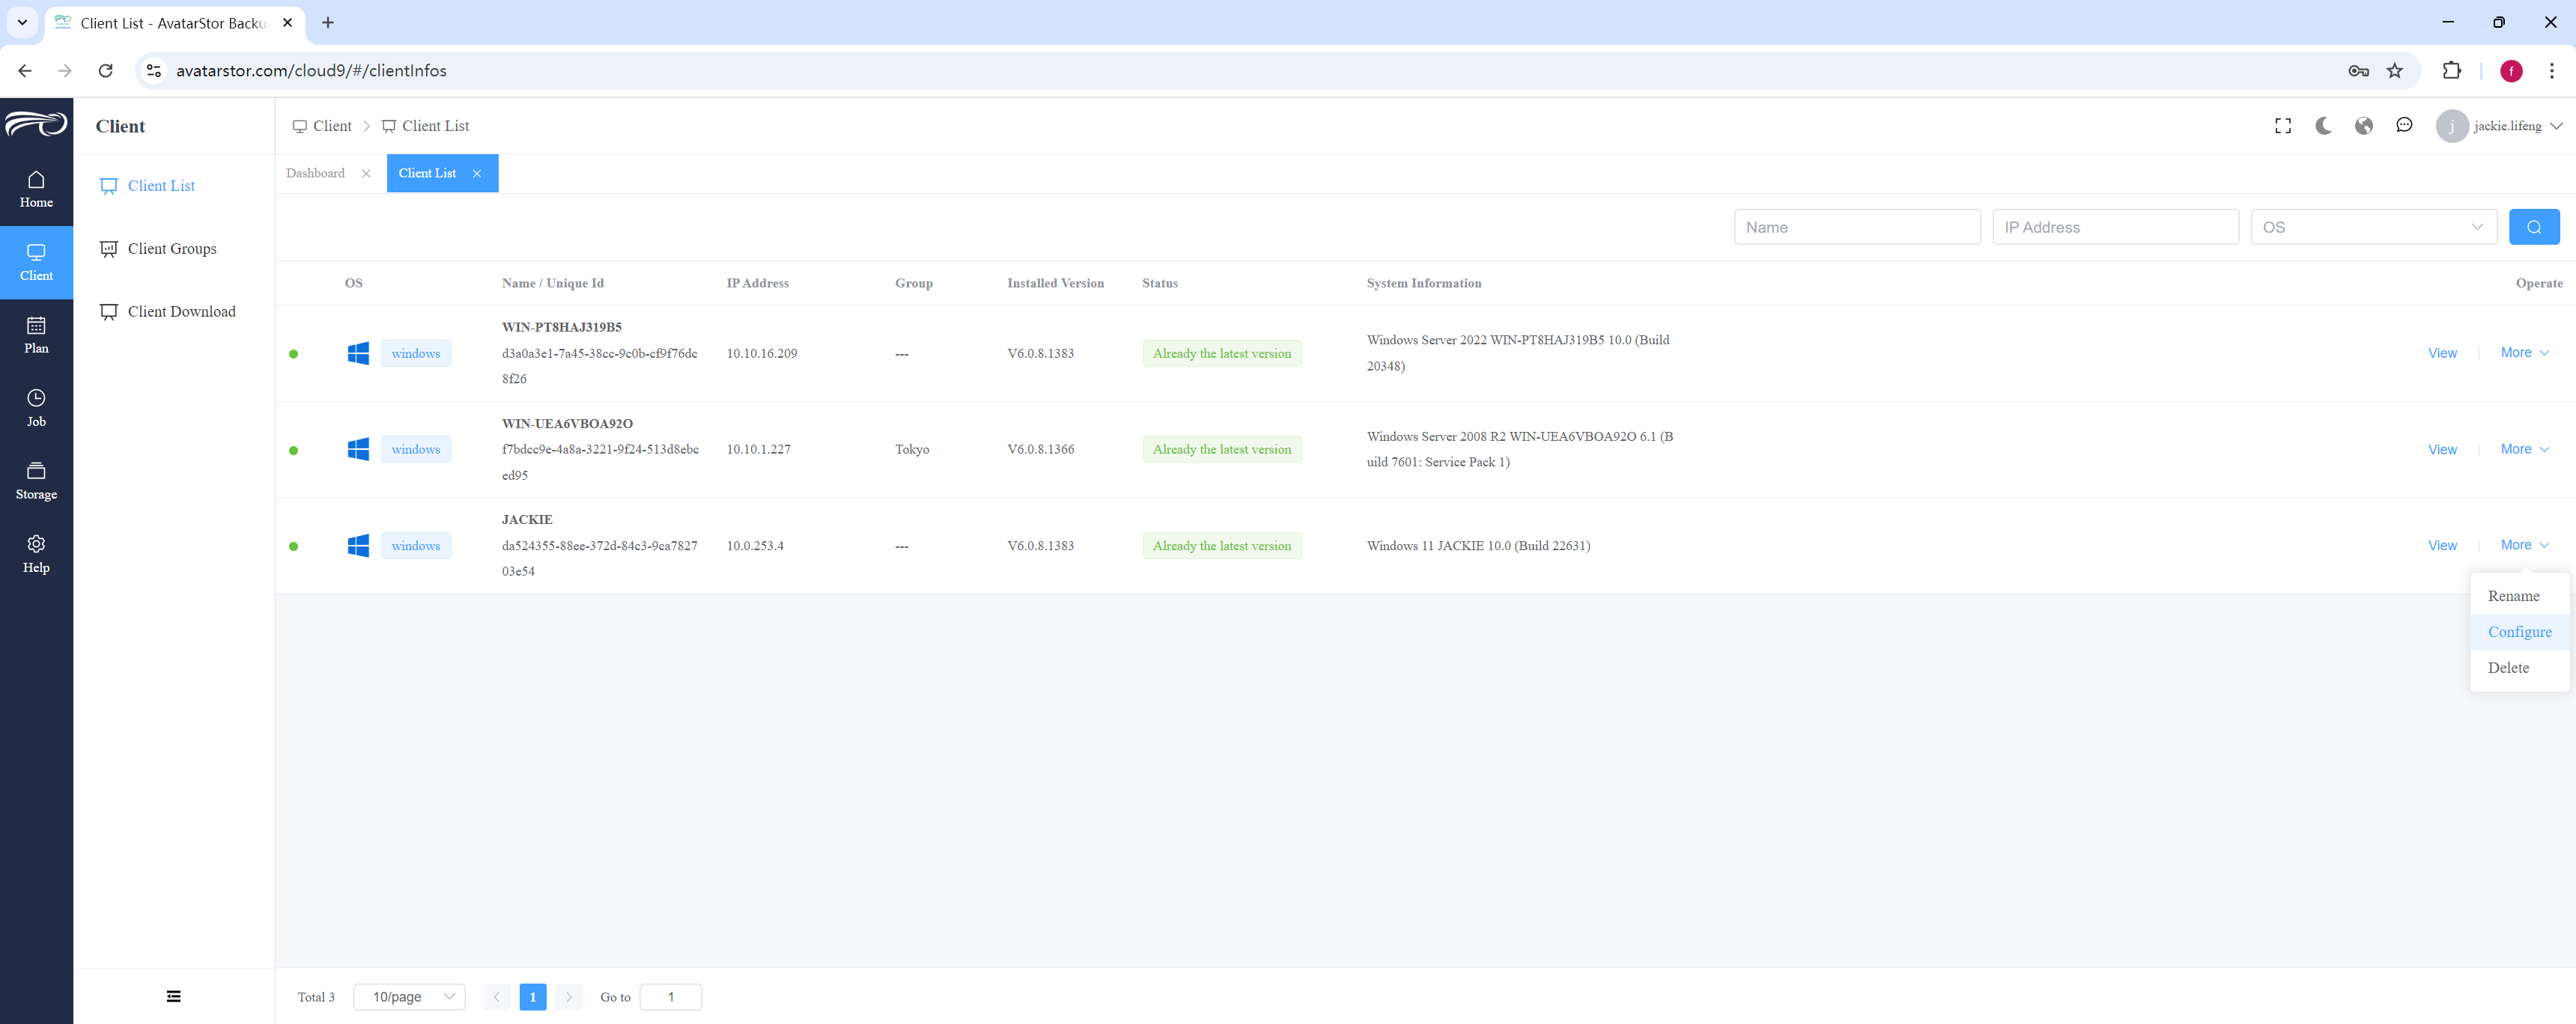
Based on the database type on the client, select the appropriate plugin. Currently, MySQL, Oracle, and SQL Server are supported.
For example, if you select MySQL, after a short wait, all MySQL-related instances on that client will be automatically scanned.
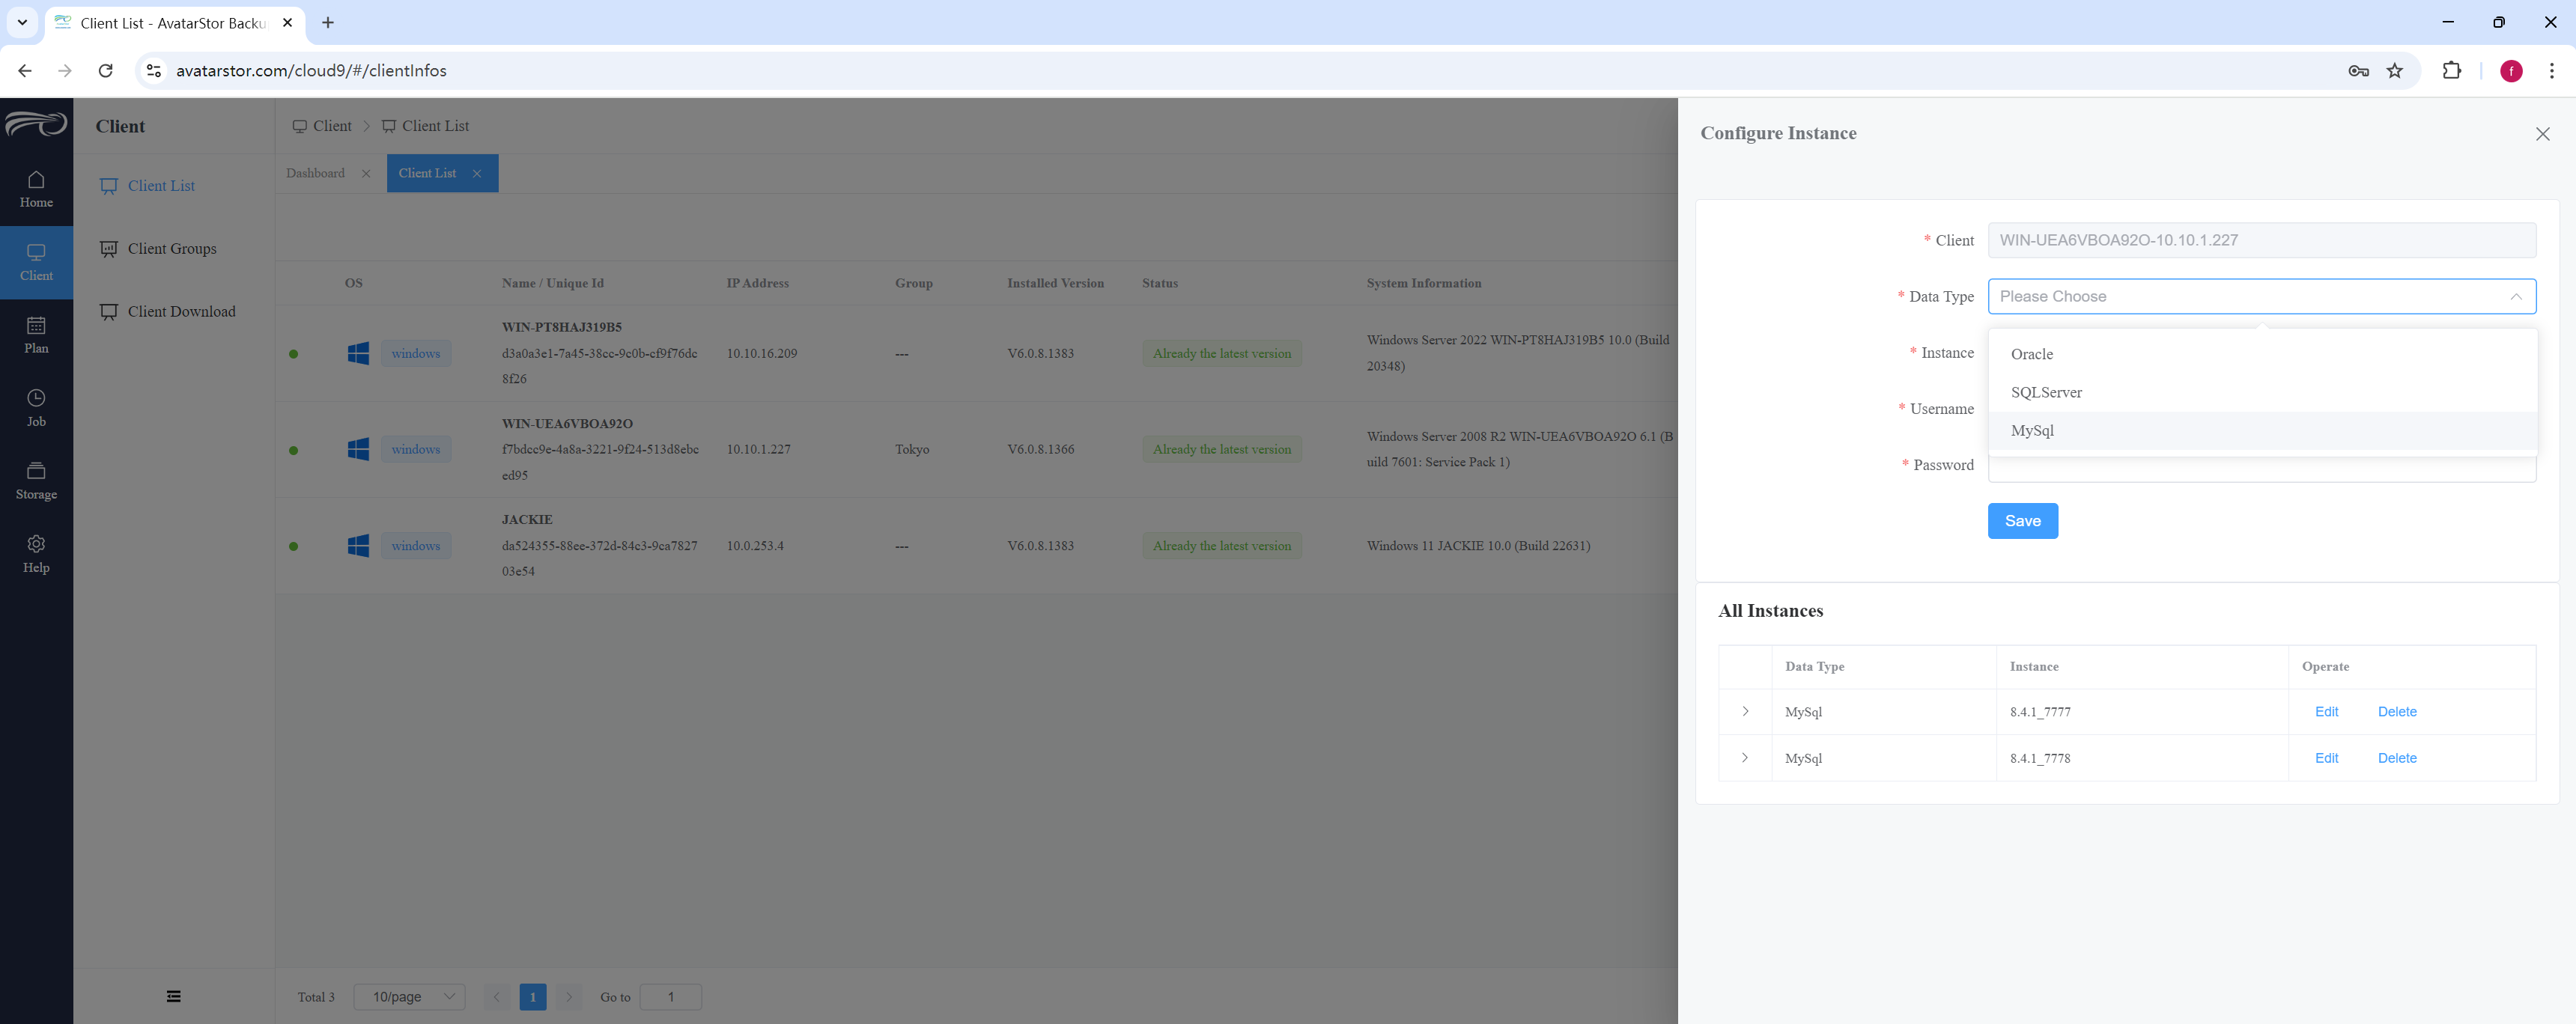
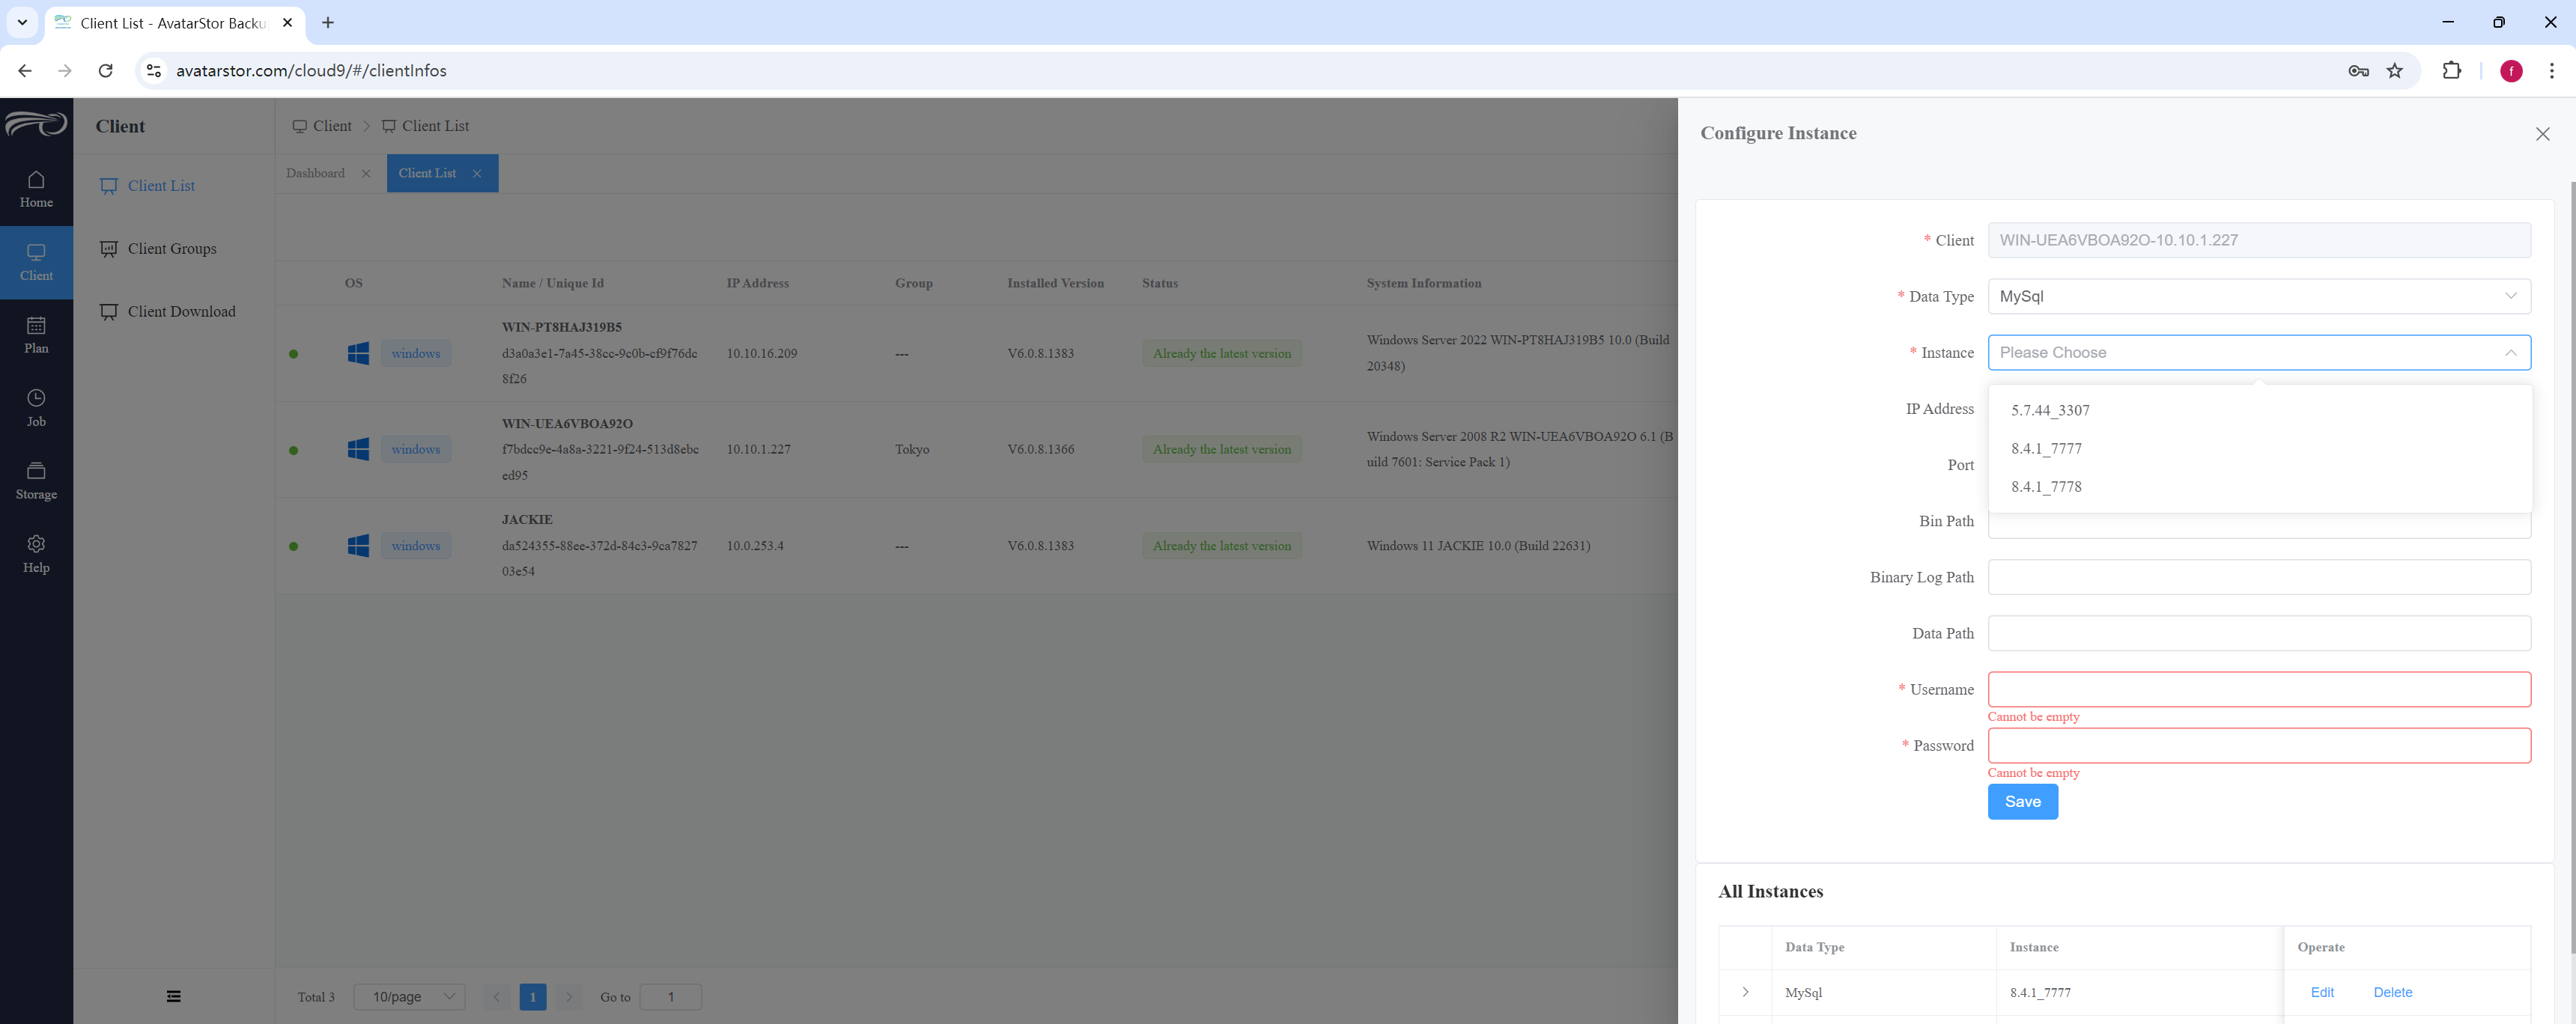
|
Tip If the client has multiple MySQL instances or different types of databases installed, you can select from the drop-down menu under [Instance Name]. |
|
Tip If you're not satisfied with the scan results, you can manually input the values you believe are correct. Currently, the scan results have over 90% accuracy. If you find any inaccuracies, please email us at [email protected] so we can continue to improve our service. |
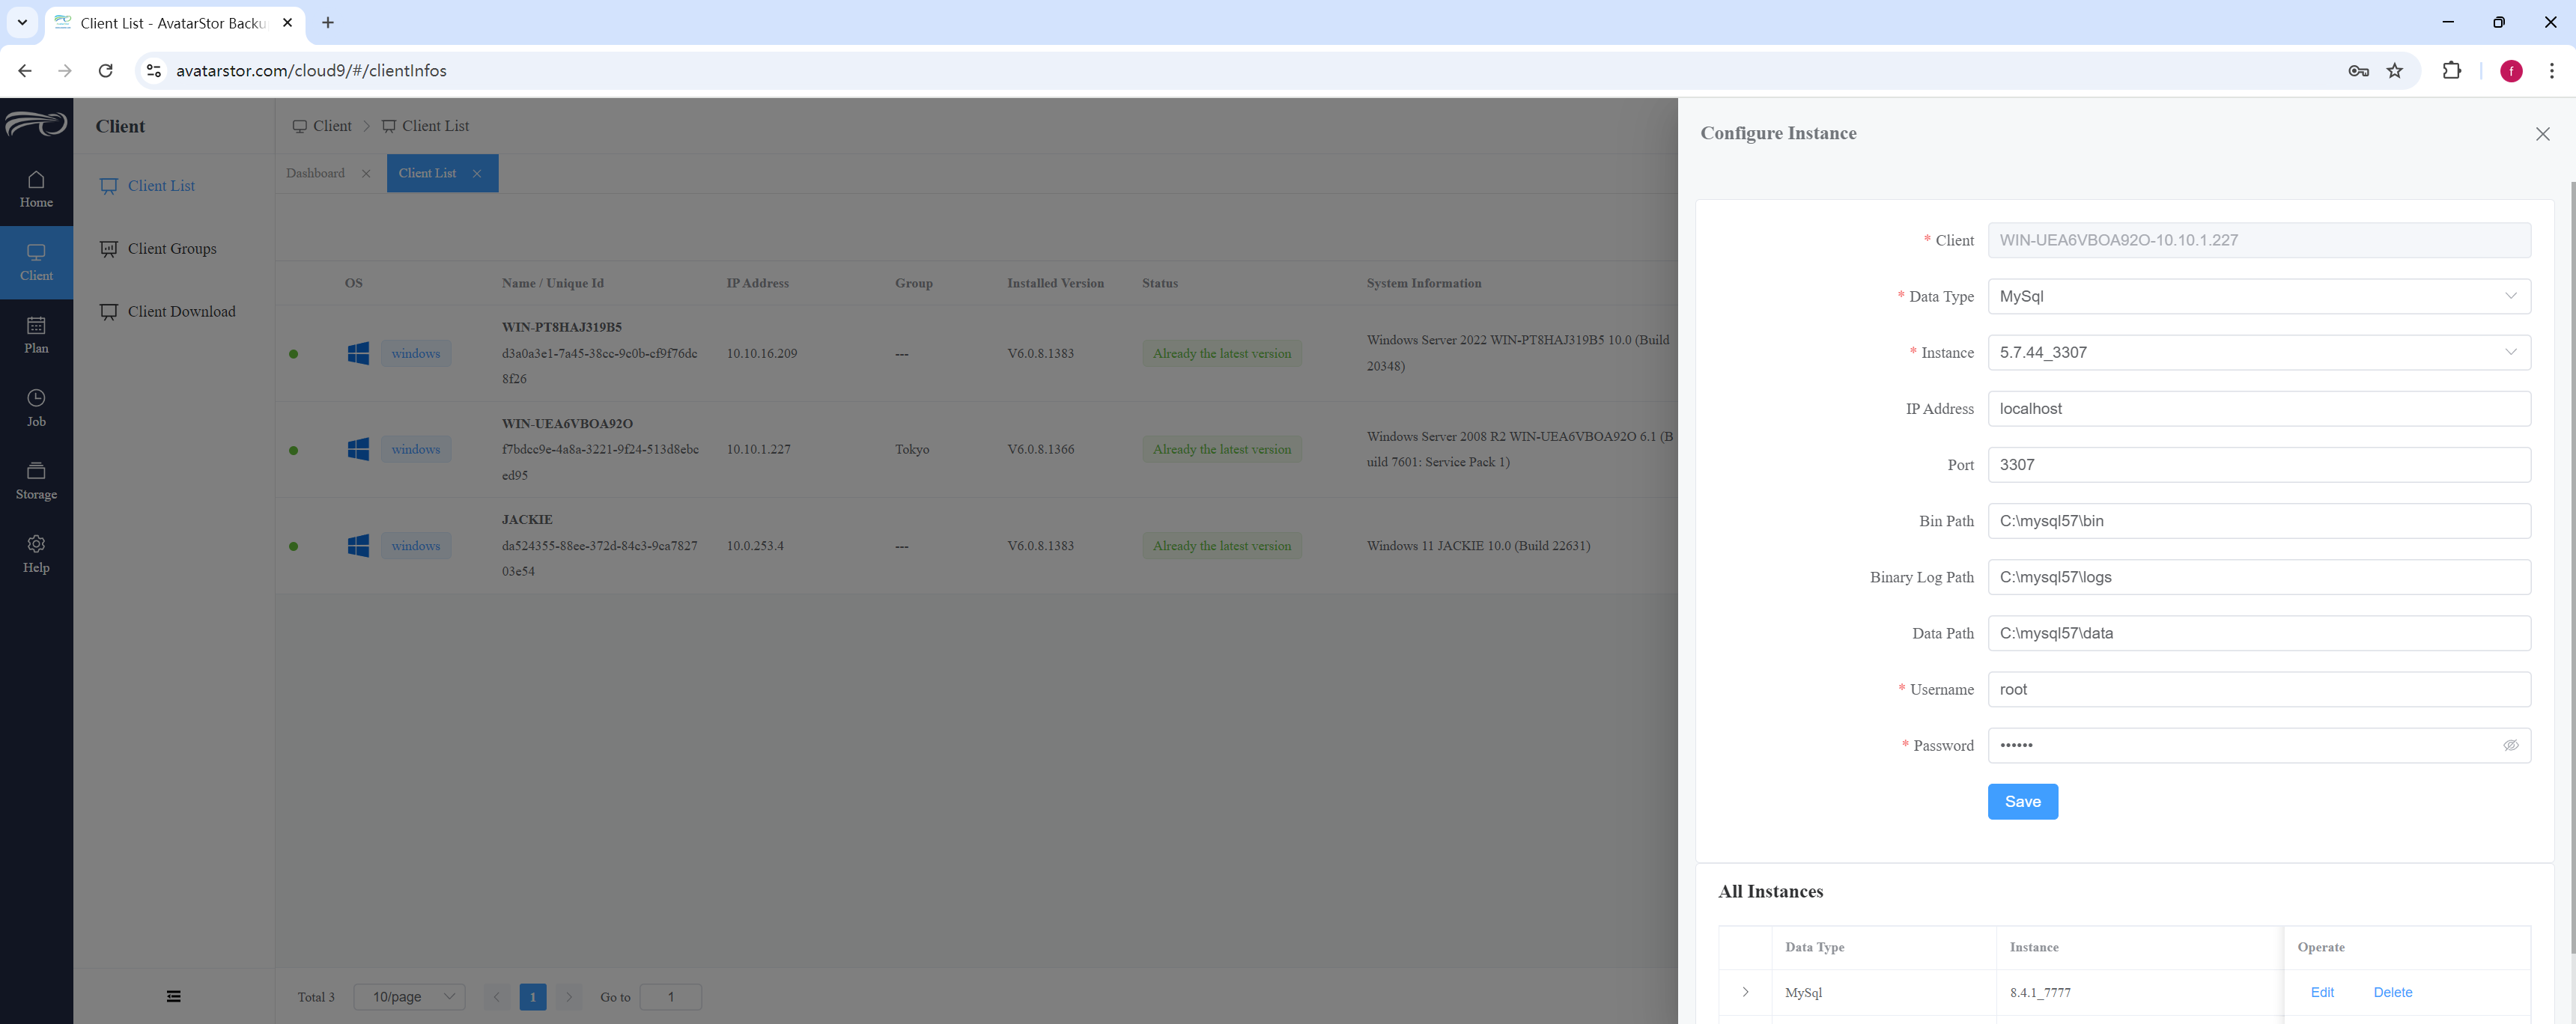
Enter the account and password, then click [Save] to complete the MySQL instance configuration.
|
Note that in the MySQL account password system, the account is formatted as “user”@"host". The accounts root@localhost and root@"ip" are two different accounts. Here, we need the root@localhost account and its password. |
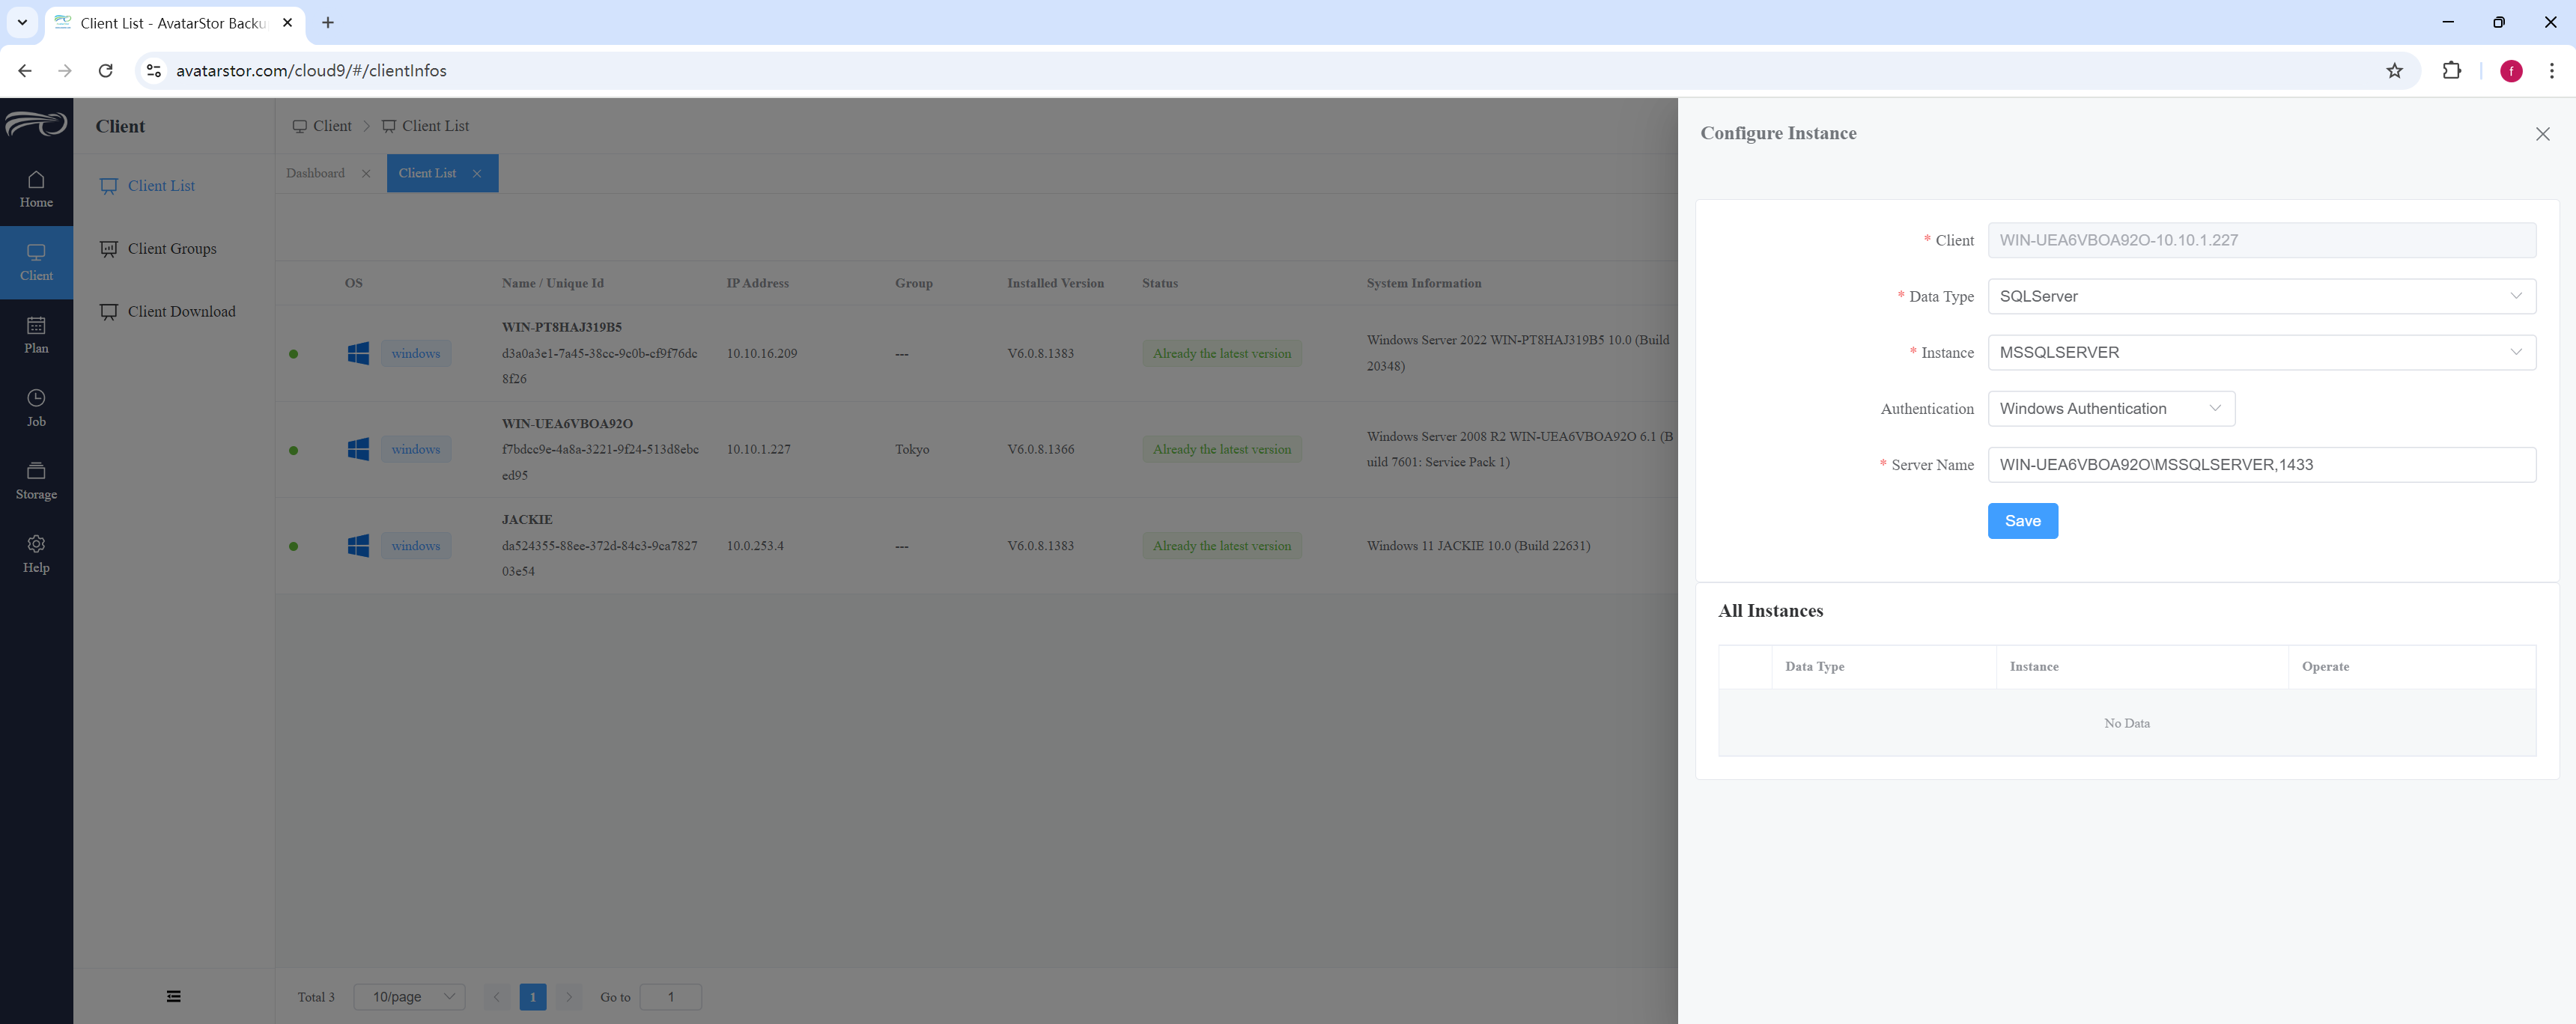
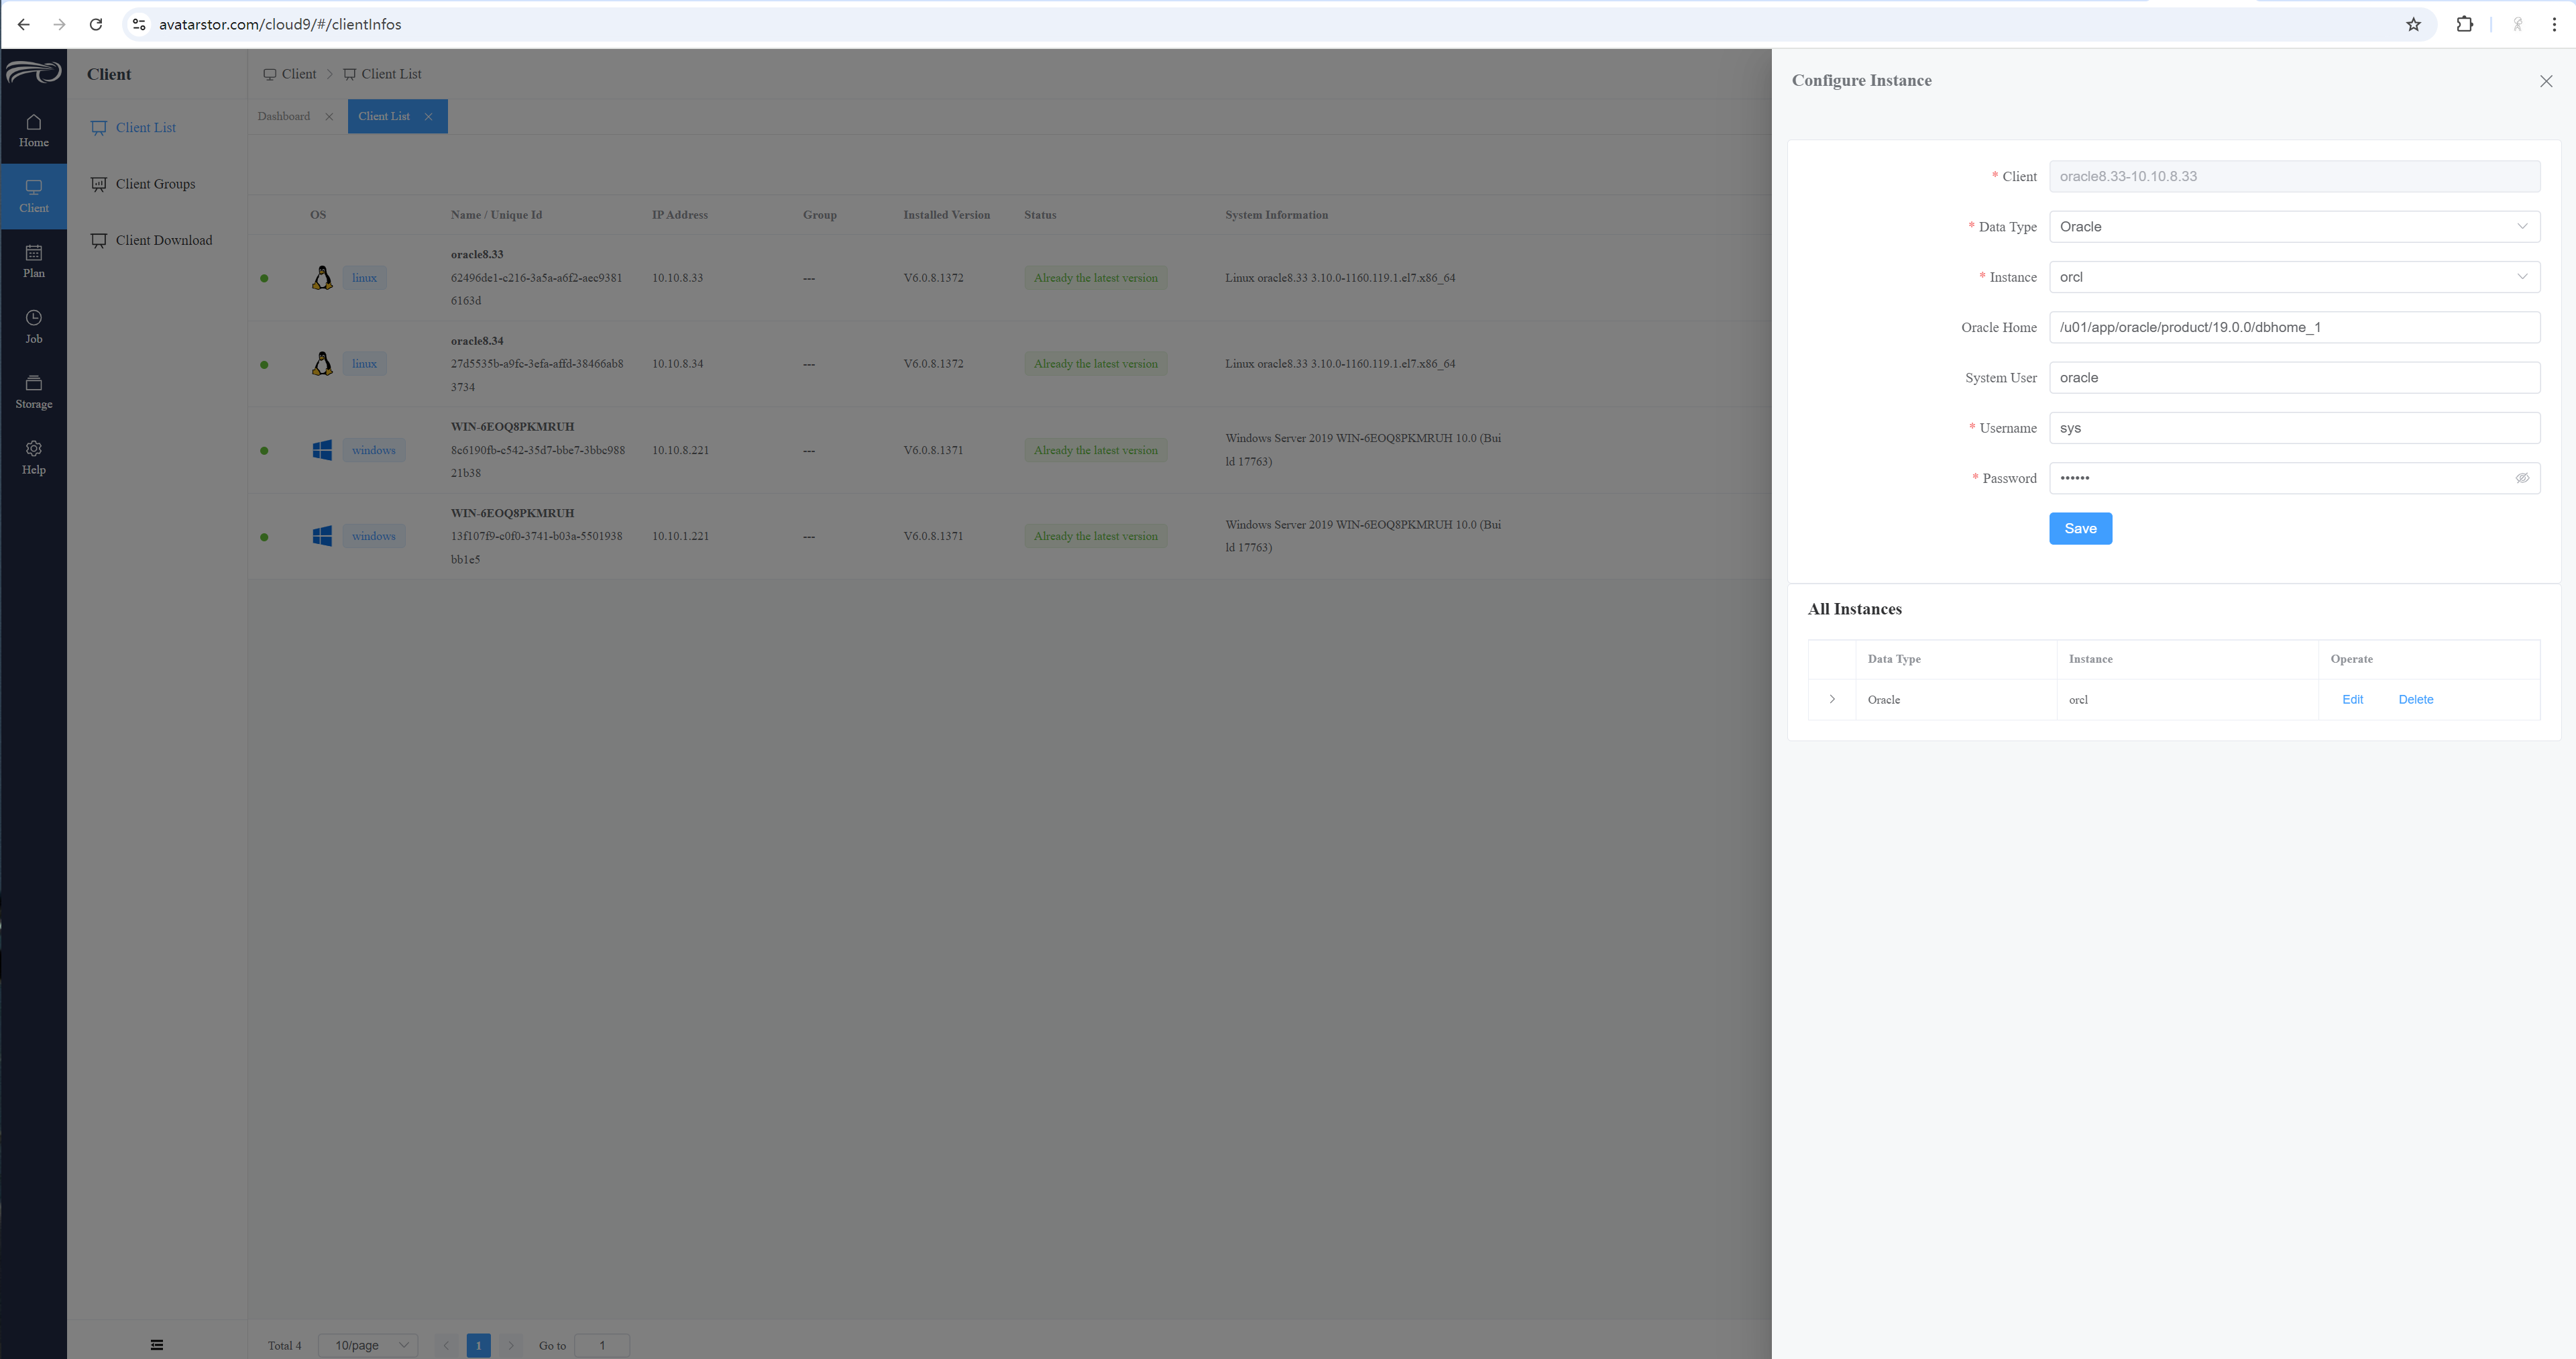
The configuration process for other instances is similar and will not be repeated here. Below are diagrams related to the scanning of other types of data sources:
Sqlserver:
Oracle:
3.6.2 View instances
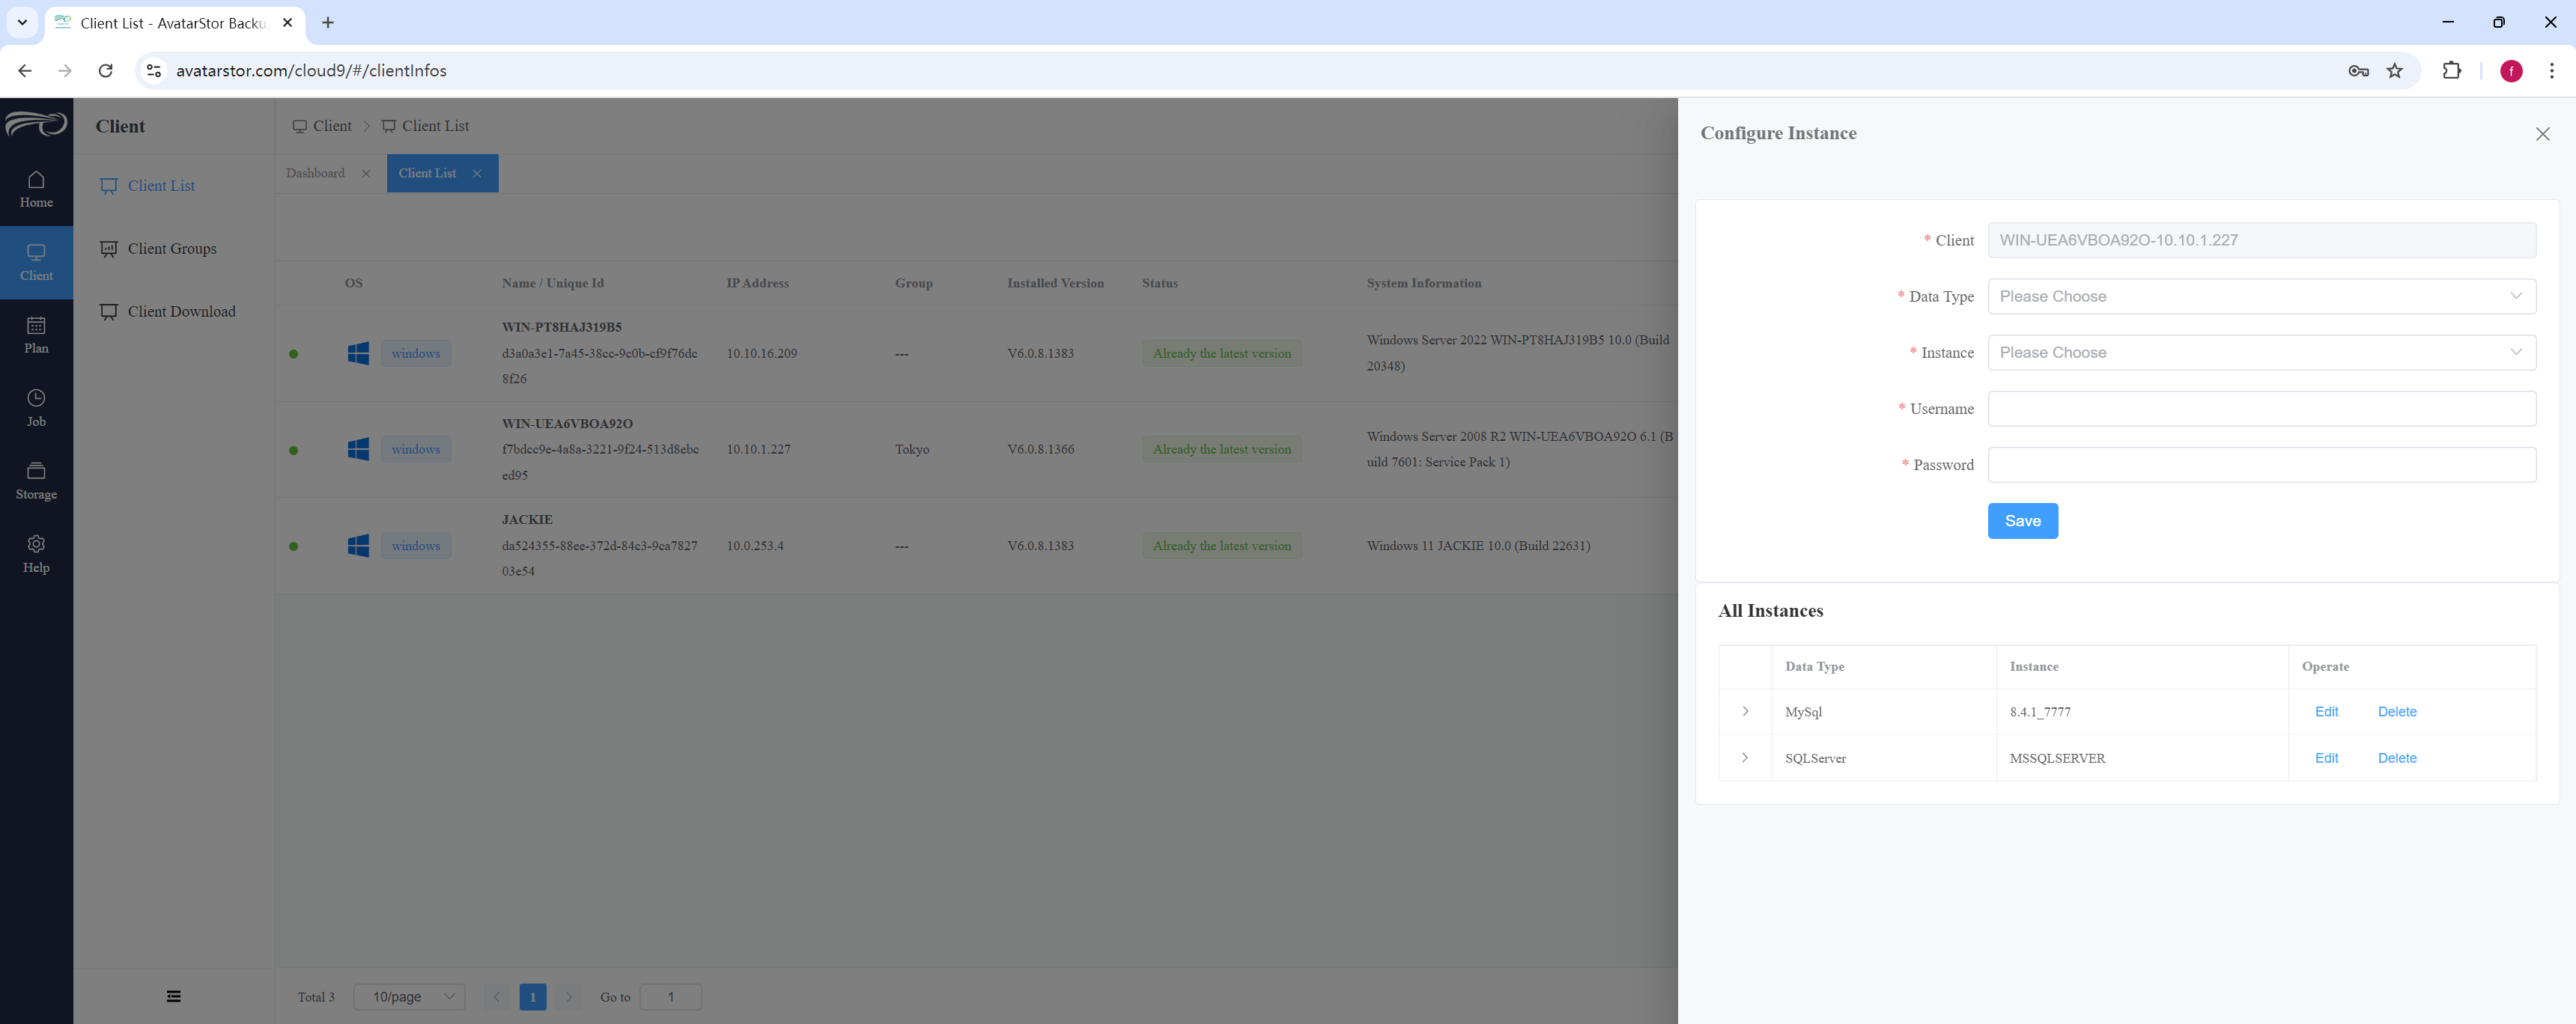
From the left navigation bar, go to [Client] - [Client List]. Click [More] - [Configure] on the right side. In the [Configured Instances List] below, you can view the details of the instances that have been configured for the current client:
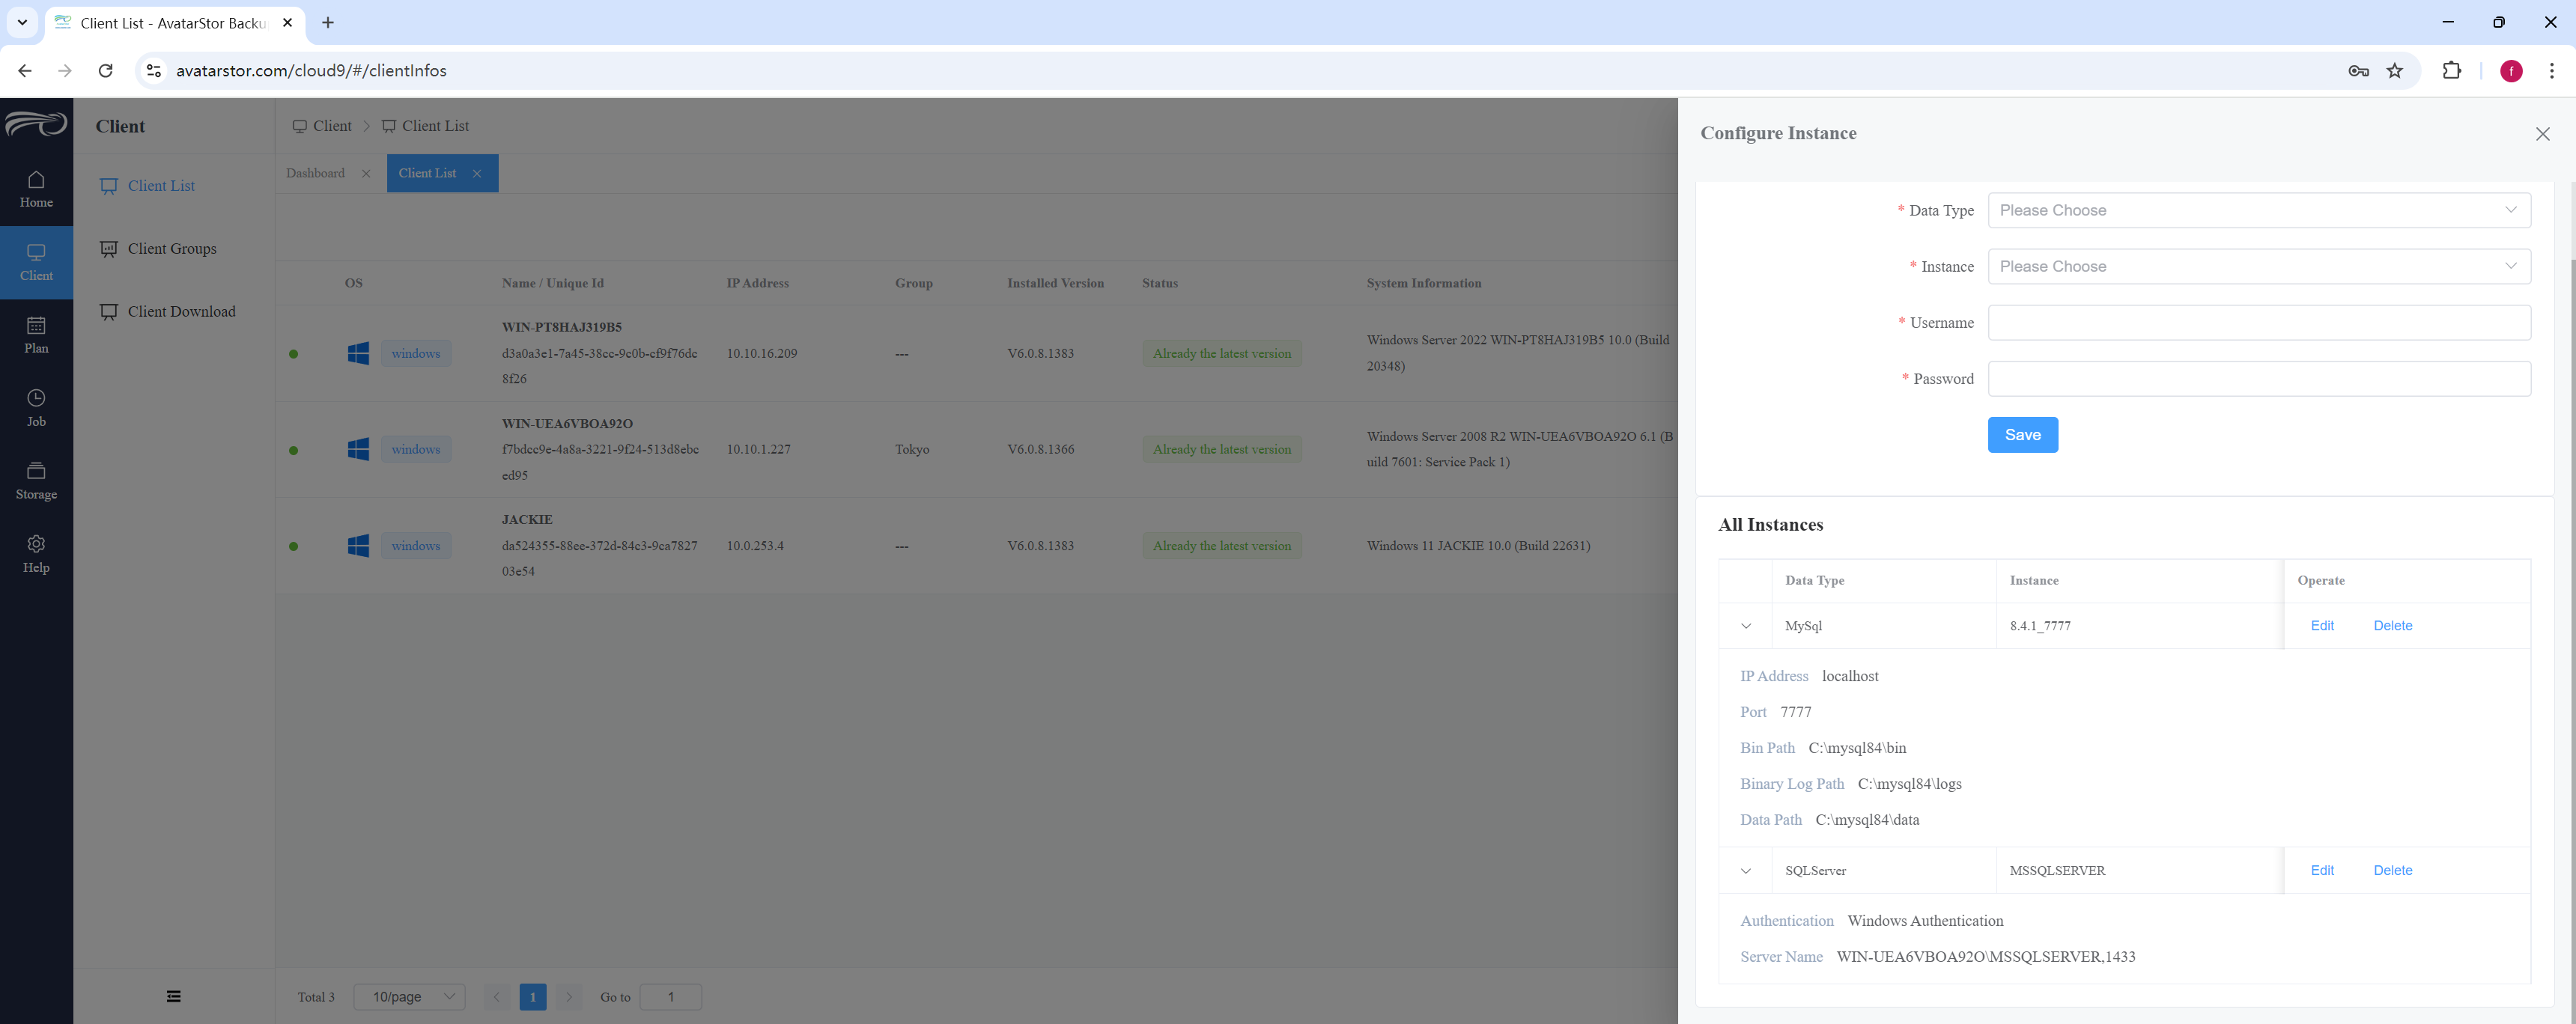
3.6.3 Modify instance
If instance information changes, such as updated account credentials or changes in database ports, you need to reconfigure the instances. Reconfiguring an already configured instance will overwrite the previous configuration.
To update instance details, go to [Clients] - [Client List] - [More] - [Configure] - [Configured Instances] - [Edit]:
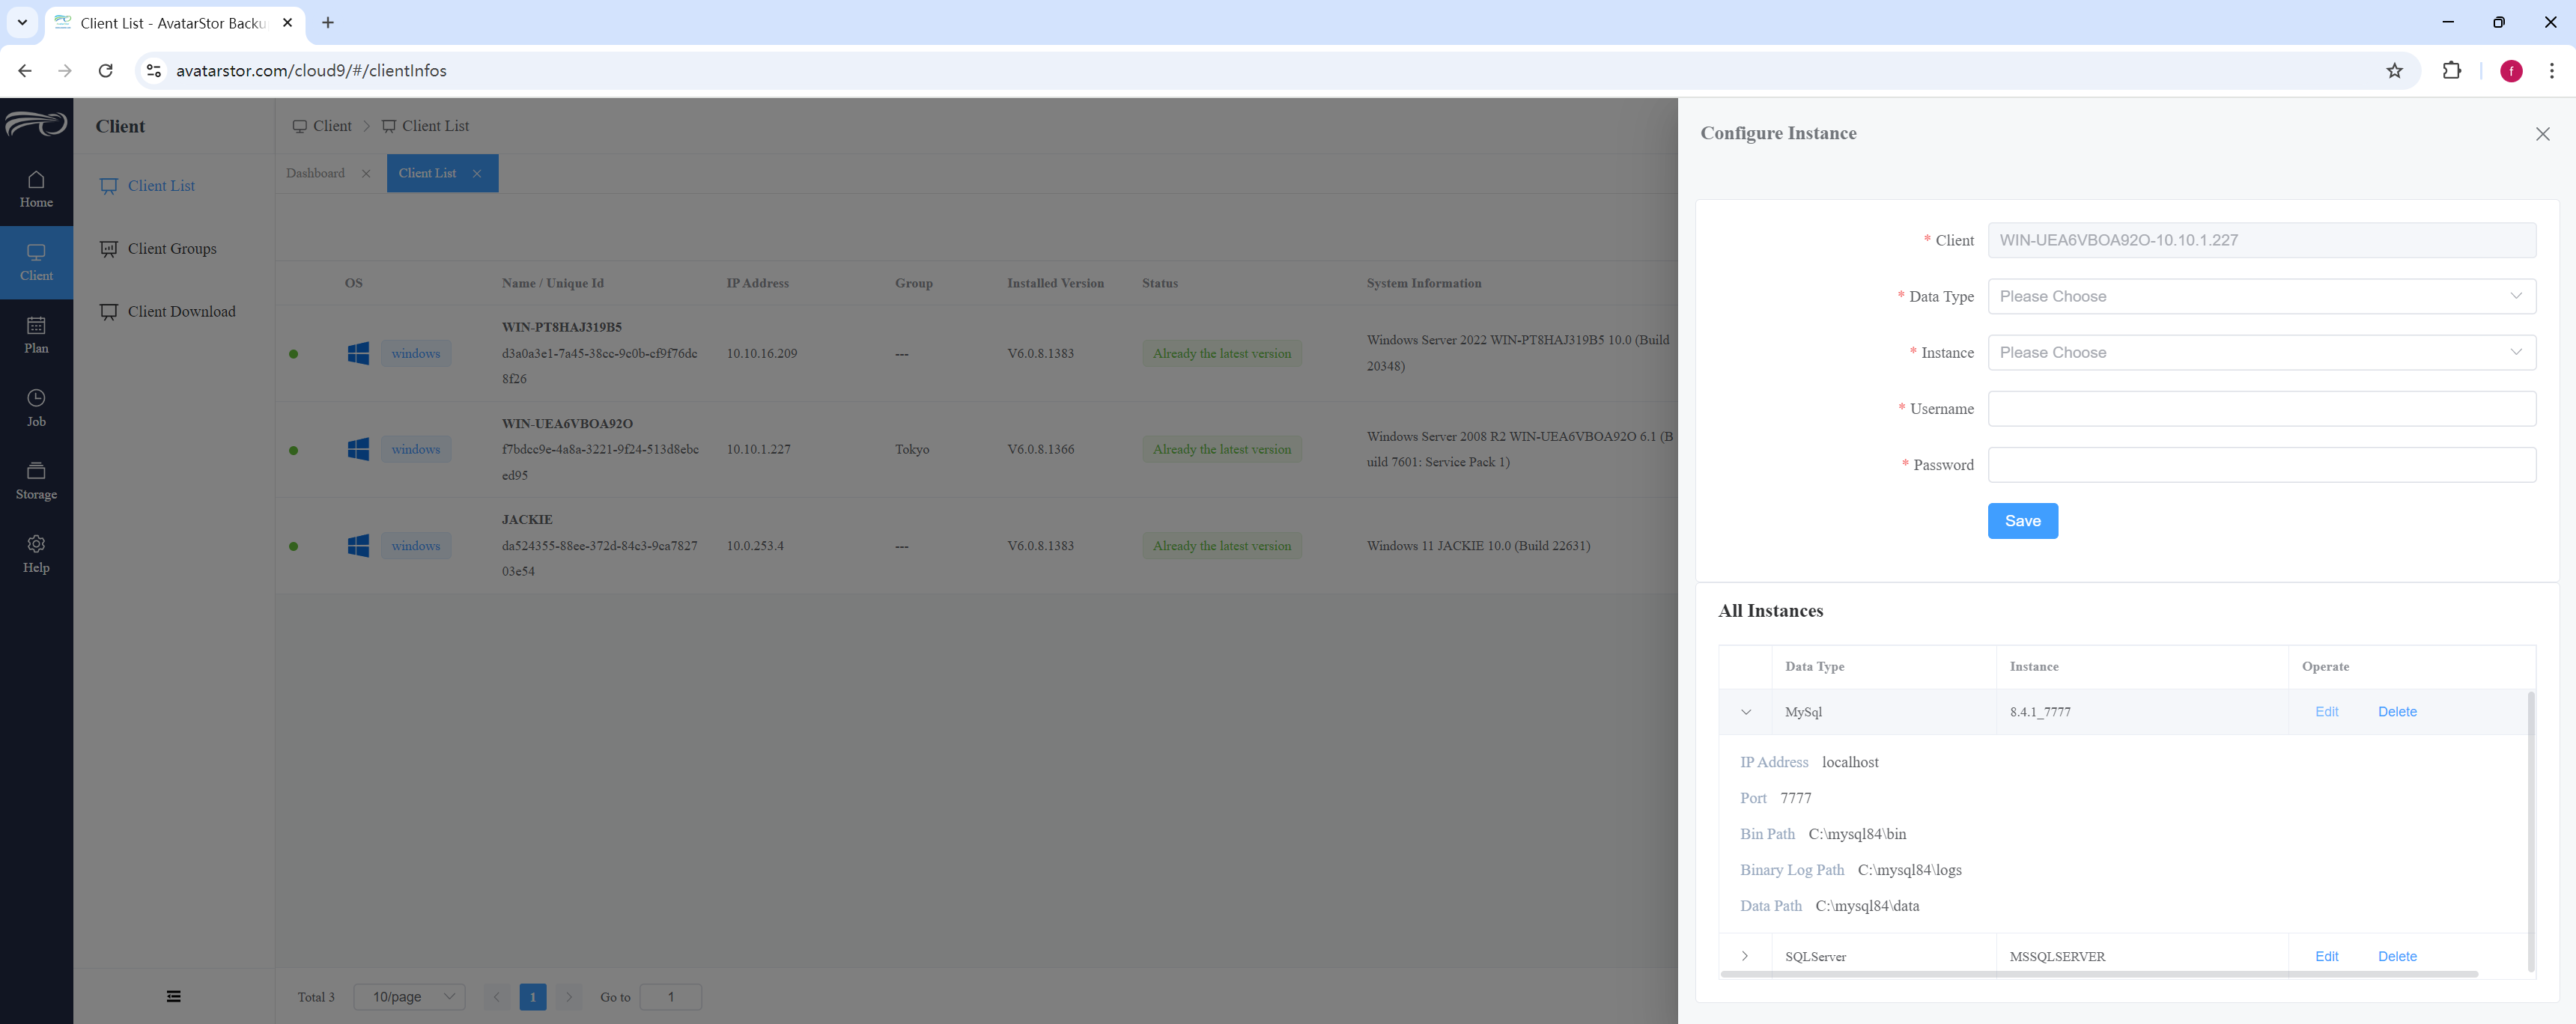
|
Tip If an instance is modified, the policies related to that instance must also be modified. |
3.6.4 Delete an instance
To delete an instance, go to [Clients] - [Client List] - [More] - [Configure] - [Configured Instances] - [Delete]:
4. Plan and Job
A backup plan encompasses the entire "From-What-to-Where-and-When" chain. The client represents the "From", the instance corresponds to the "What", and storage refers to the "Where". Since the configuration process for different types of plugins is highly similar, we will not introduce the plan configuration strictly according to the step-by-step wizard. Instead, we will first explain the common steps, followed by a description of the differences for each plugin type at the end.Sections 1-5 of this chapter will detail the configuration related to "When" and other advanced backup options. Finally, there will be a brief description of the backup and restore processes for different plugin types.
4.1 Storage Configuration
From the left navigation bar, go to Plans - [xx Backup], then click the "+" to add a new backup plan.The most important task in Step 1 is configuring the data written destination, i.e., the storage. Click the "+" sign on the far right side of the storage section to add new storage:
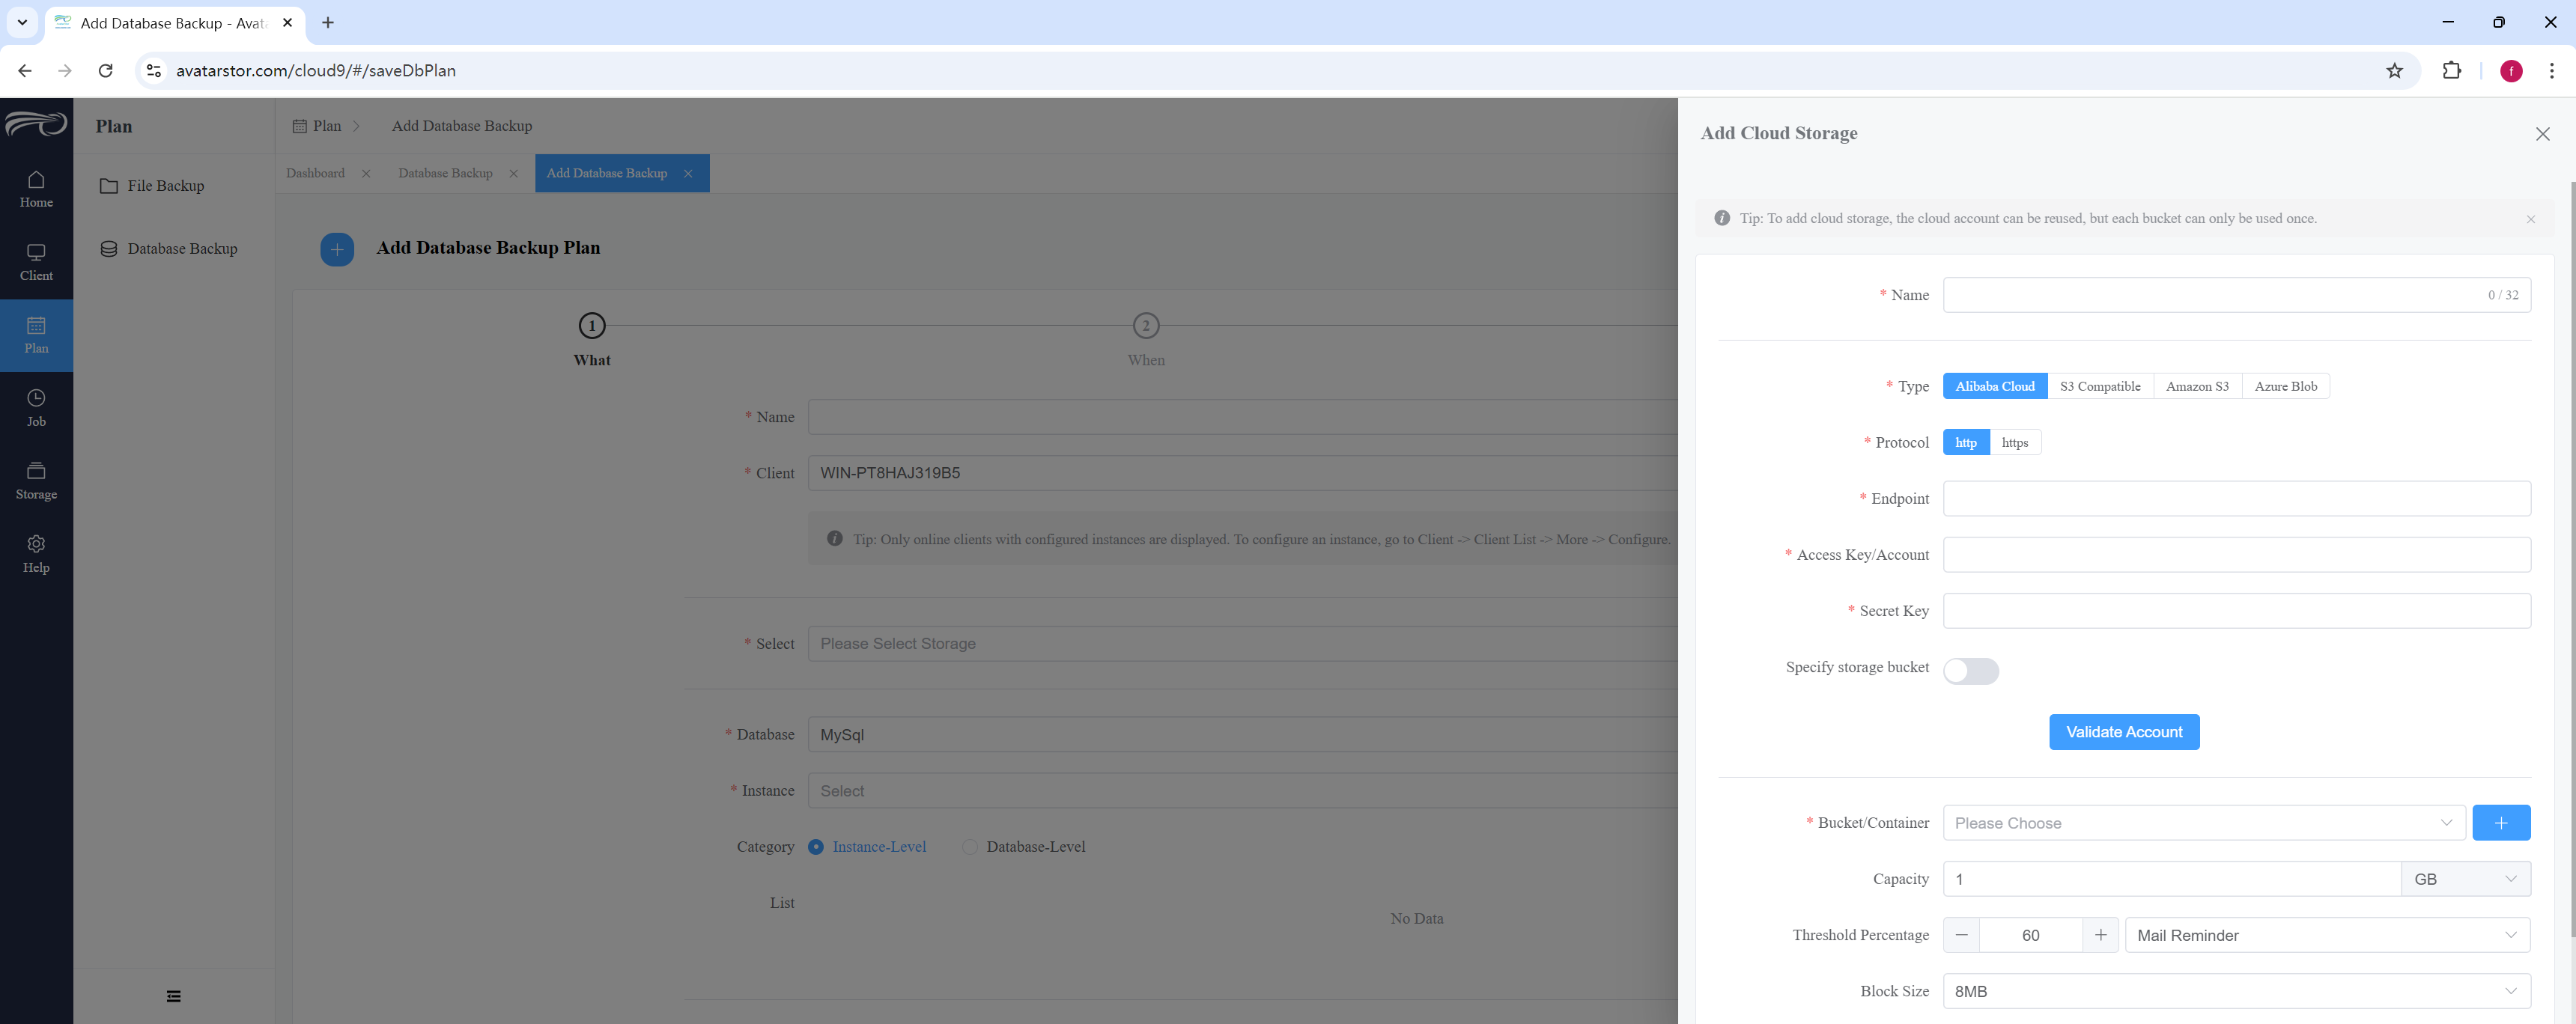
Currently, we support Alibaba Cloud, Amazon Web Services (AWS), Microsoft Azure, and standard S3 object storage.Using Alibaba Cloud as an example, after entering the domain, Access Key (AK), and Secret Key (SK), click "Validate Account." This will automatically check the connectivity between the client and the object storage:
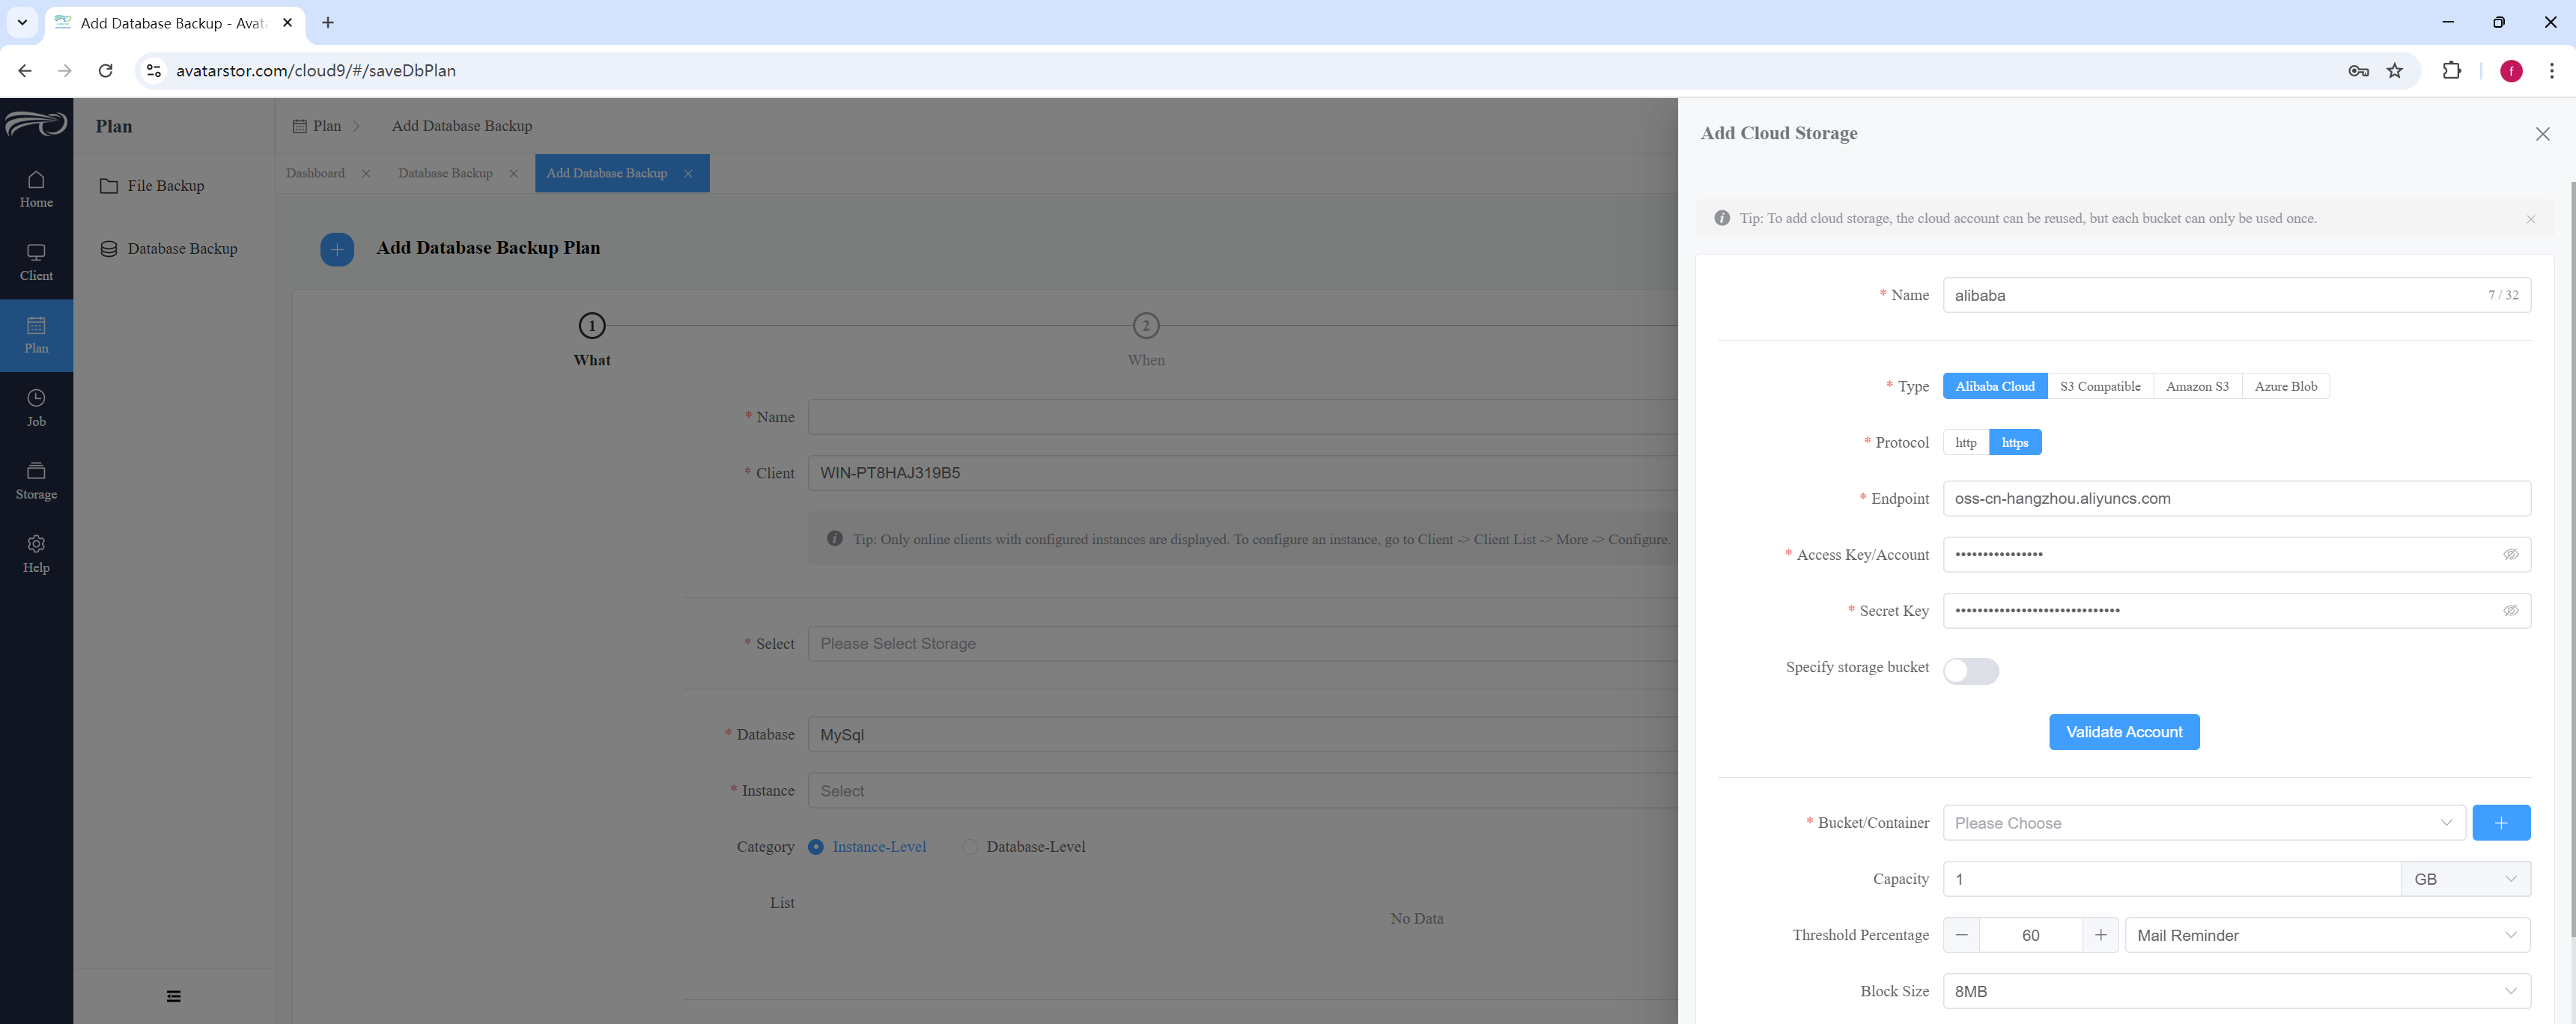
|
Note that some cloud storage accounts do not have permission to access all buckets and may only have access to a specific bucket. In such cases, please enable the "Specify Bucket" option and enter the name of the designated bucket before validating. |
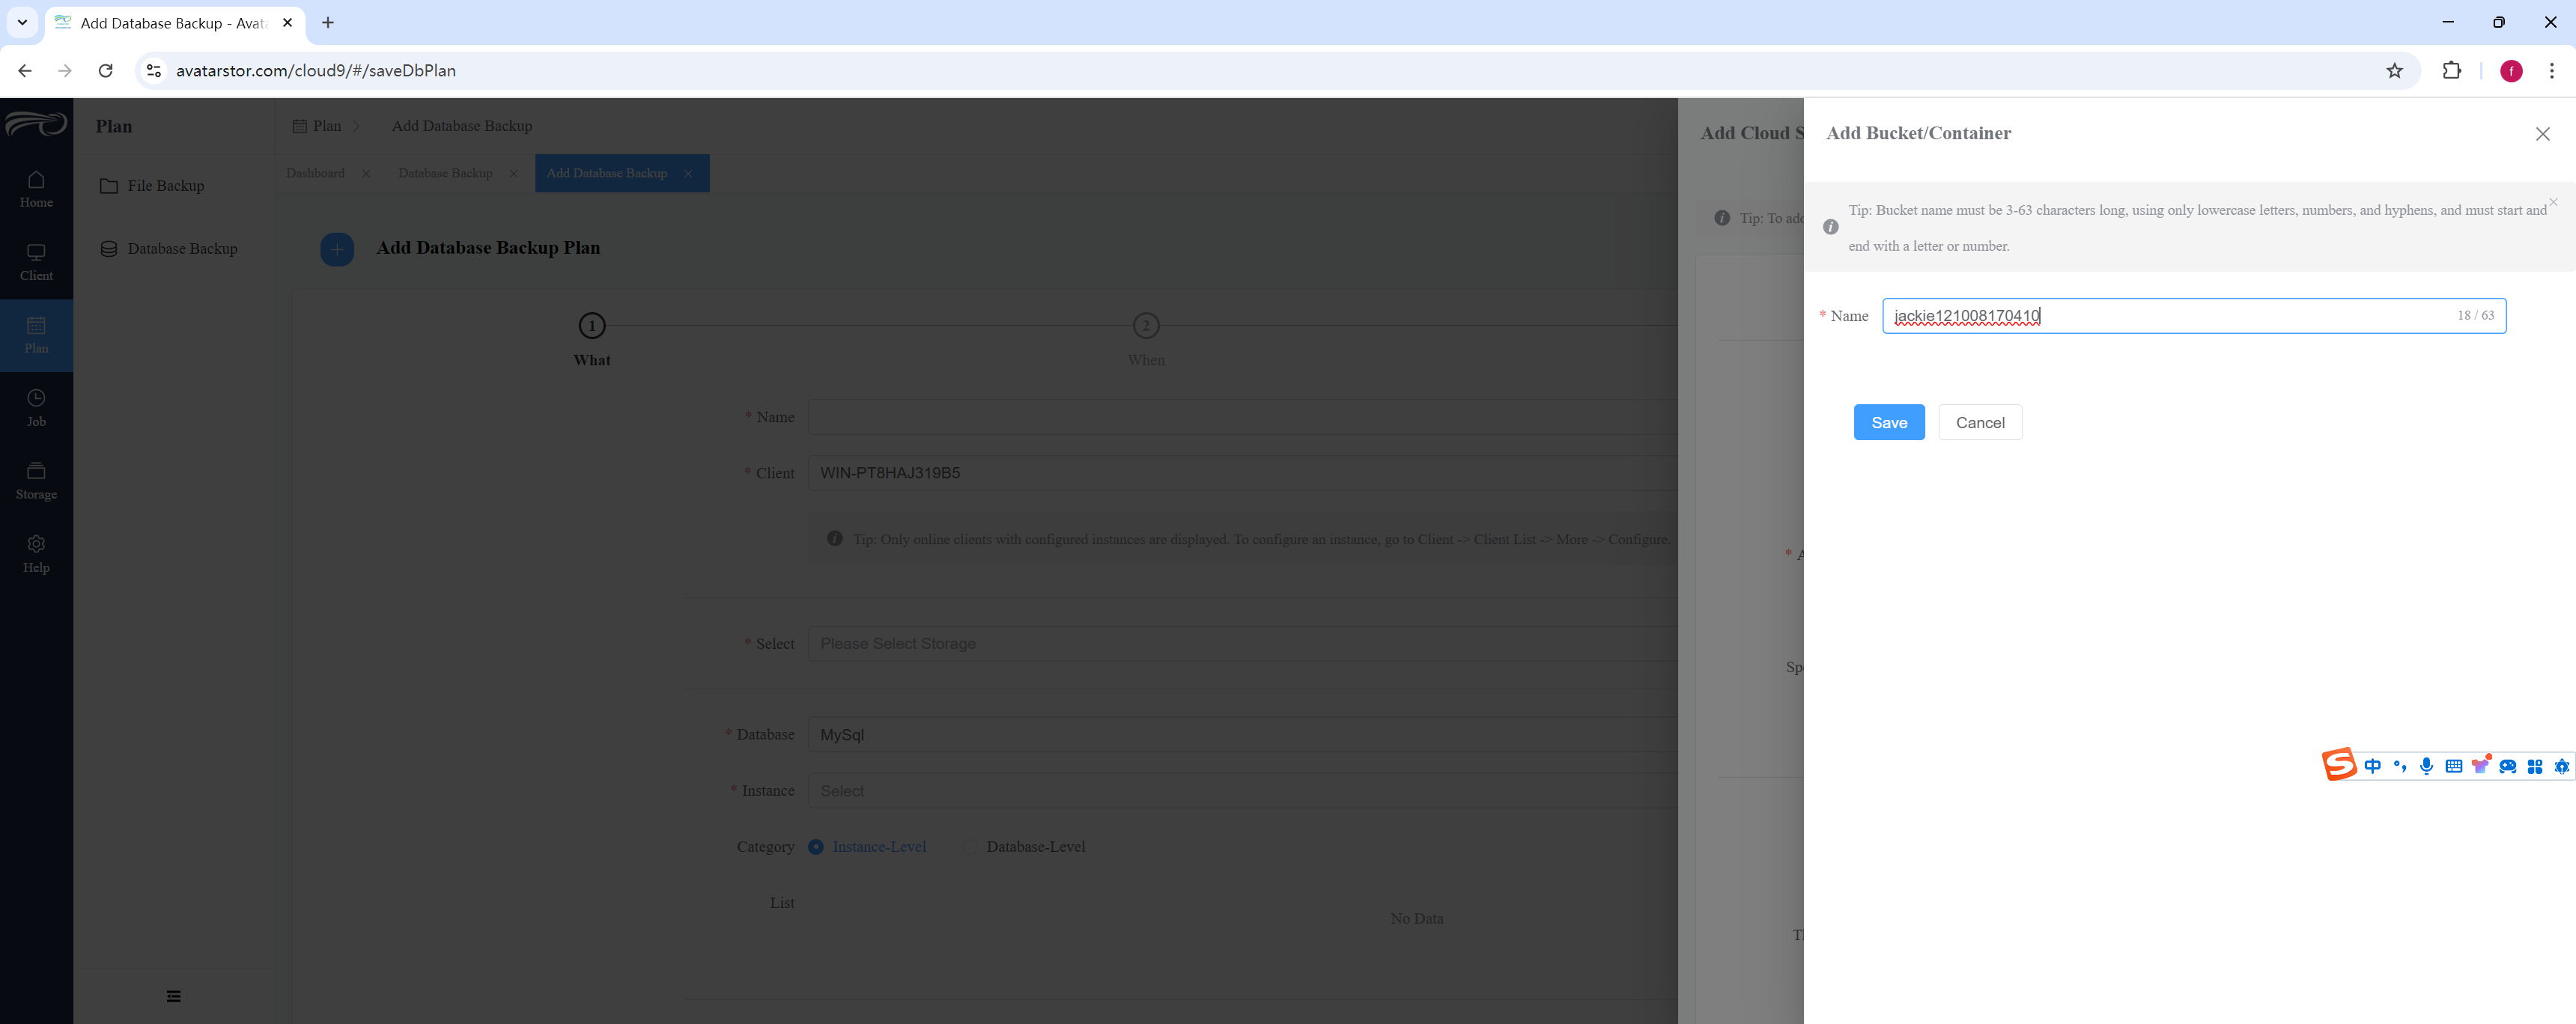
After validation, select the bucket you wish to use or create a new one:
|
Here are the typical naming requirements for object storage buckets, which may vary slightly between cloud providers but generally follow similar rules: Global Uniqueness: Naming Length: Character Restrictions: Allowed Characters: Lowercase letters (a-z), numbers (0-9), and hyphens (-). Disallowed Characters: Uppercase letters, underscores (_), and special characters (such as @, #, $, &, etc.). Hyphen Usage: Hyphens cannot be at the beginning or end of the name and cannot be used consecutively. Naming Structure: The name cannot resemble an IP address format (e.g., 192.168.0.1). Overly generic names like test or dev are usually discouraged to avoid conflicts with other users. DNS Compatibility: No uppercase letters. Hyphens can only be used in the middle of the name. Region-Specific Naming: |
Select the other parameters, then click "Save" to complete the storage creation:
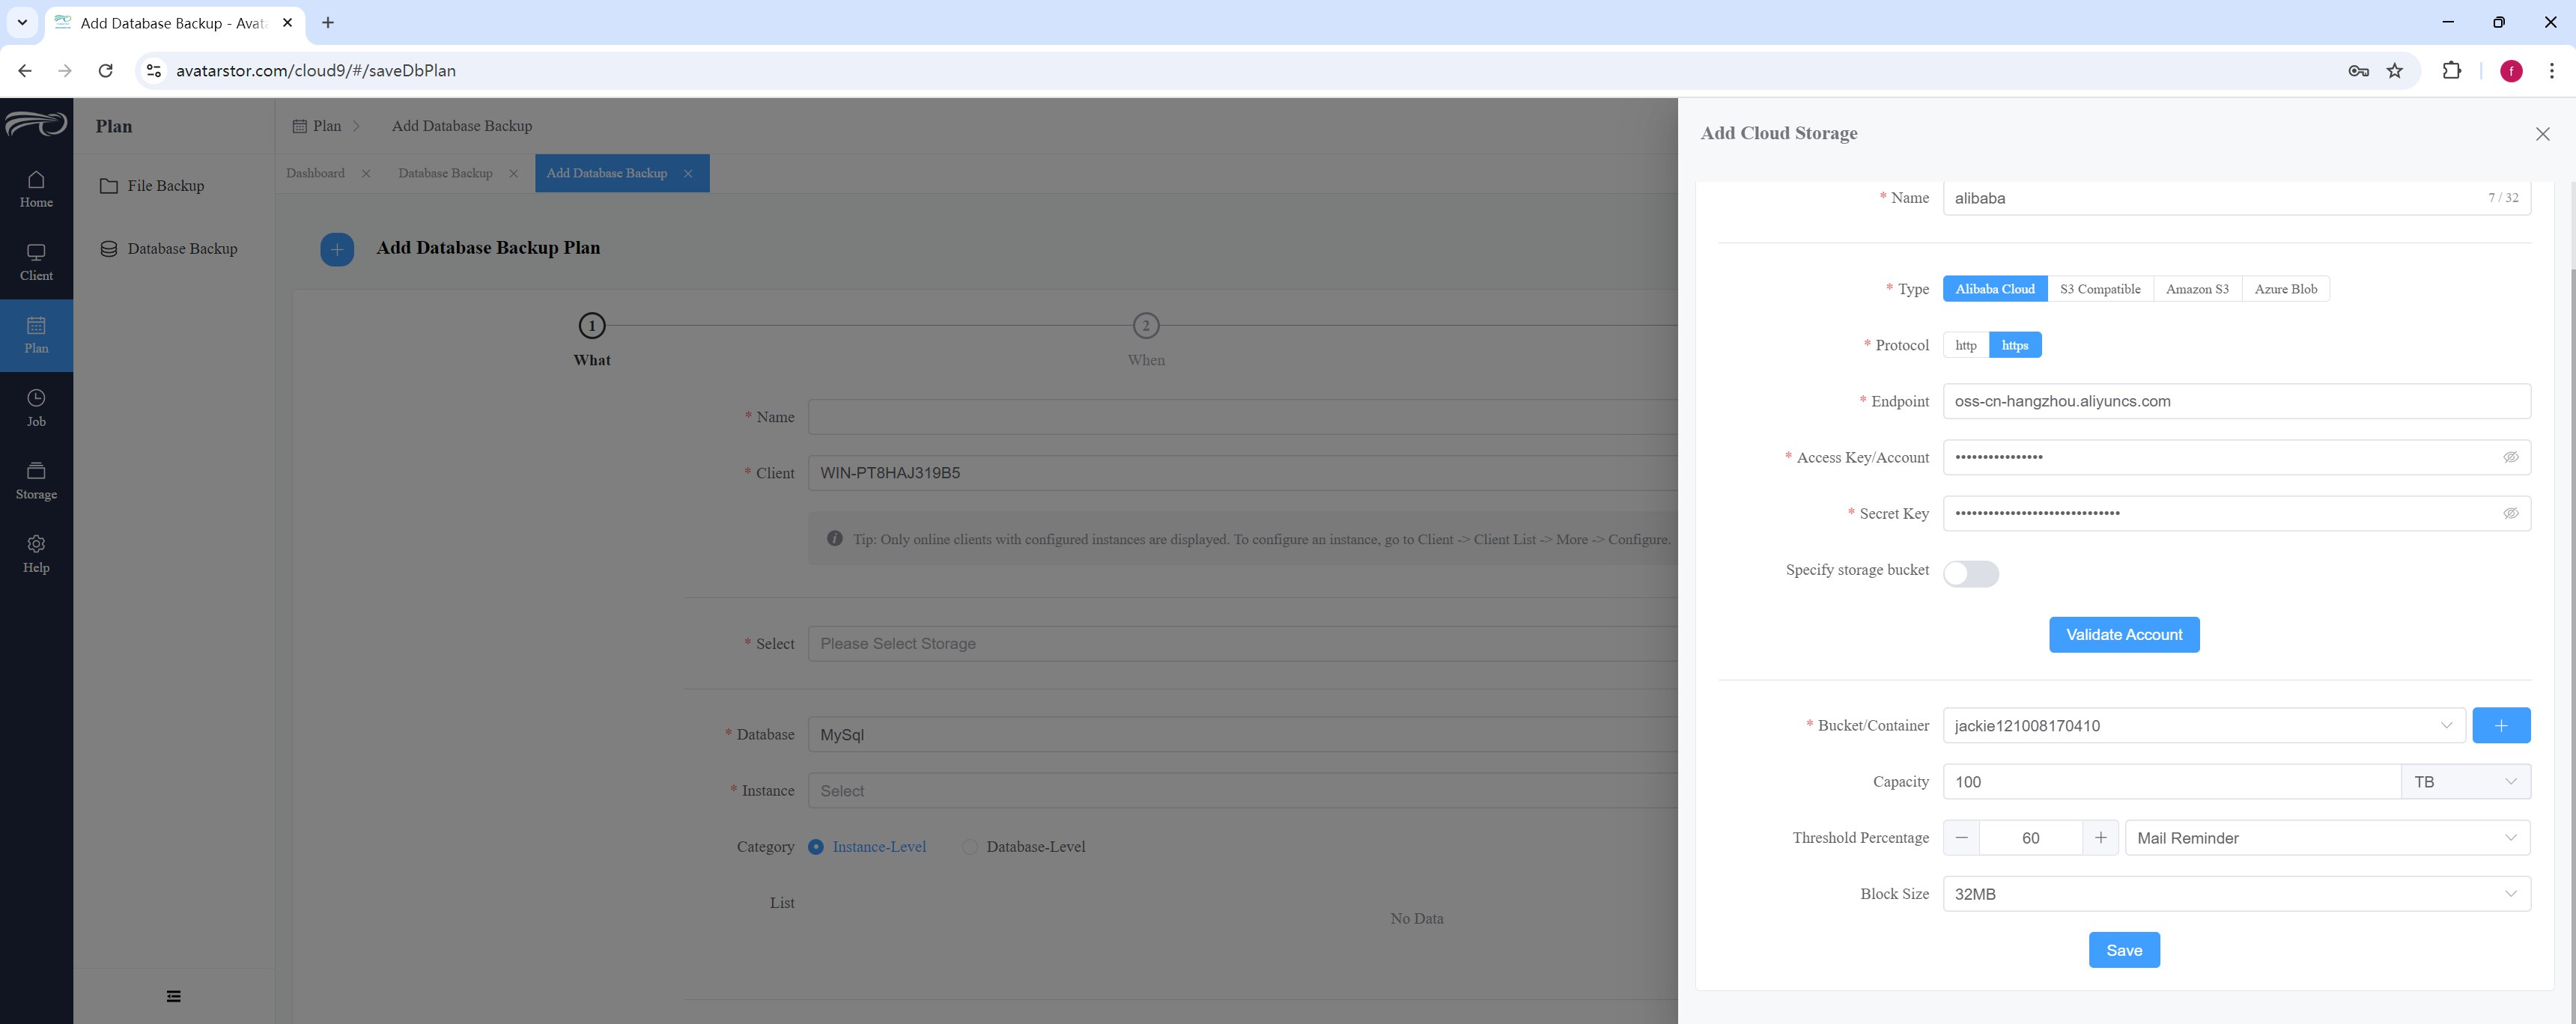
Capacity: The storage size you wish to use. The range is from 1GB to 256TB.
Threshold Percentage: When this threshold is exceeded, there are two options: send an email notification or send an email notification and simultaneously disable the backup plan.
Block Size: The size of the chunks into which data is divided during upload.
Examples for Other Cloud Storage Providers:
Amazon S3:
Domain: s3.amazonaws.com
Access Key (AK): Your Amazon access key
Secret Key (SK): Your Amazon secret key
Bucket Name: The name of your bucket on Amazon S3
Microsoft Azure:
Domain: azureblob.core.windows.net
Account Name: Your Azure storage account name
Account Key: Your Azure storage account key
Container Name: The name of your container in Azure Blob Storage
|
The configured storage can be reused by other clients. |
4.2 Data source Configuration
In Step 1, besides configuring storage, another important task is selecting the data type on the client, which involves configuring instances. If instances haven't been configured on the client before, you can click the + icon on the right side of "Instance" to add a new instance. For detailed steps, please refer to Section 7 of Chapter 3.
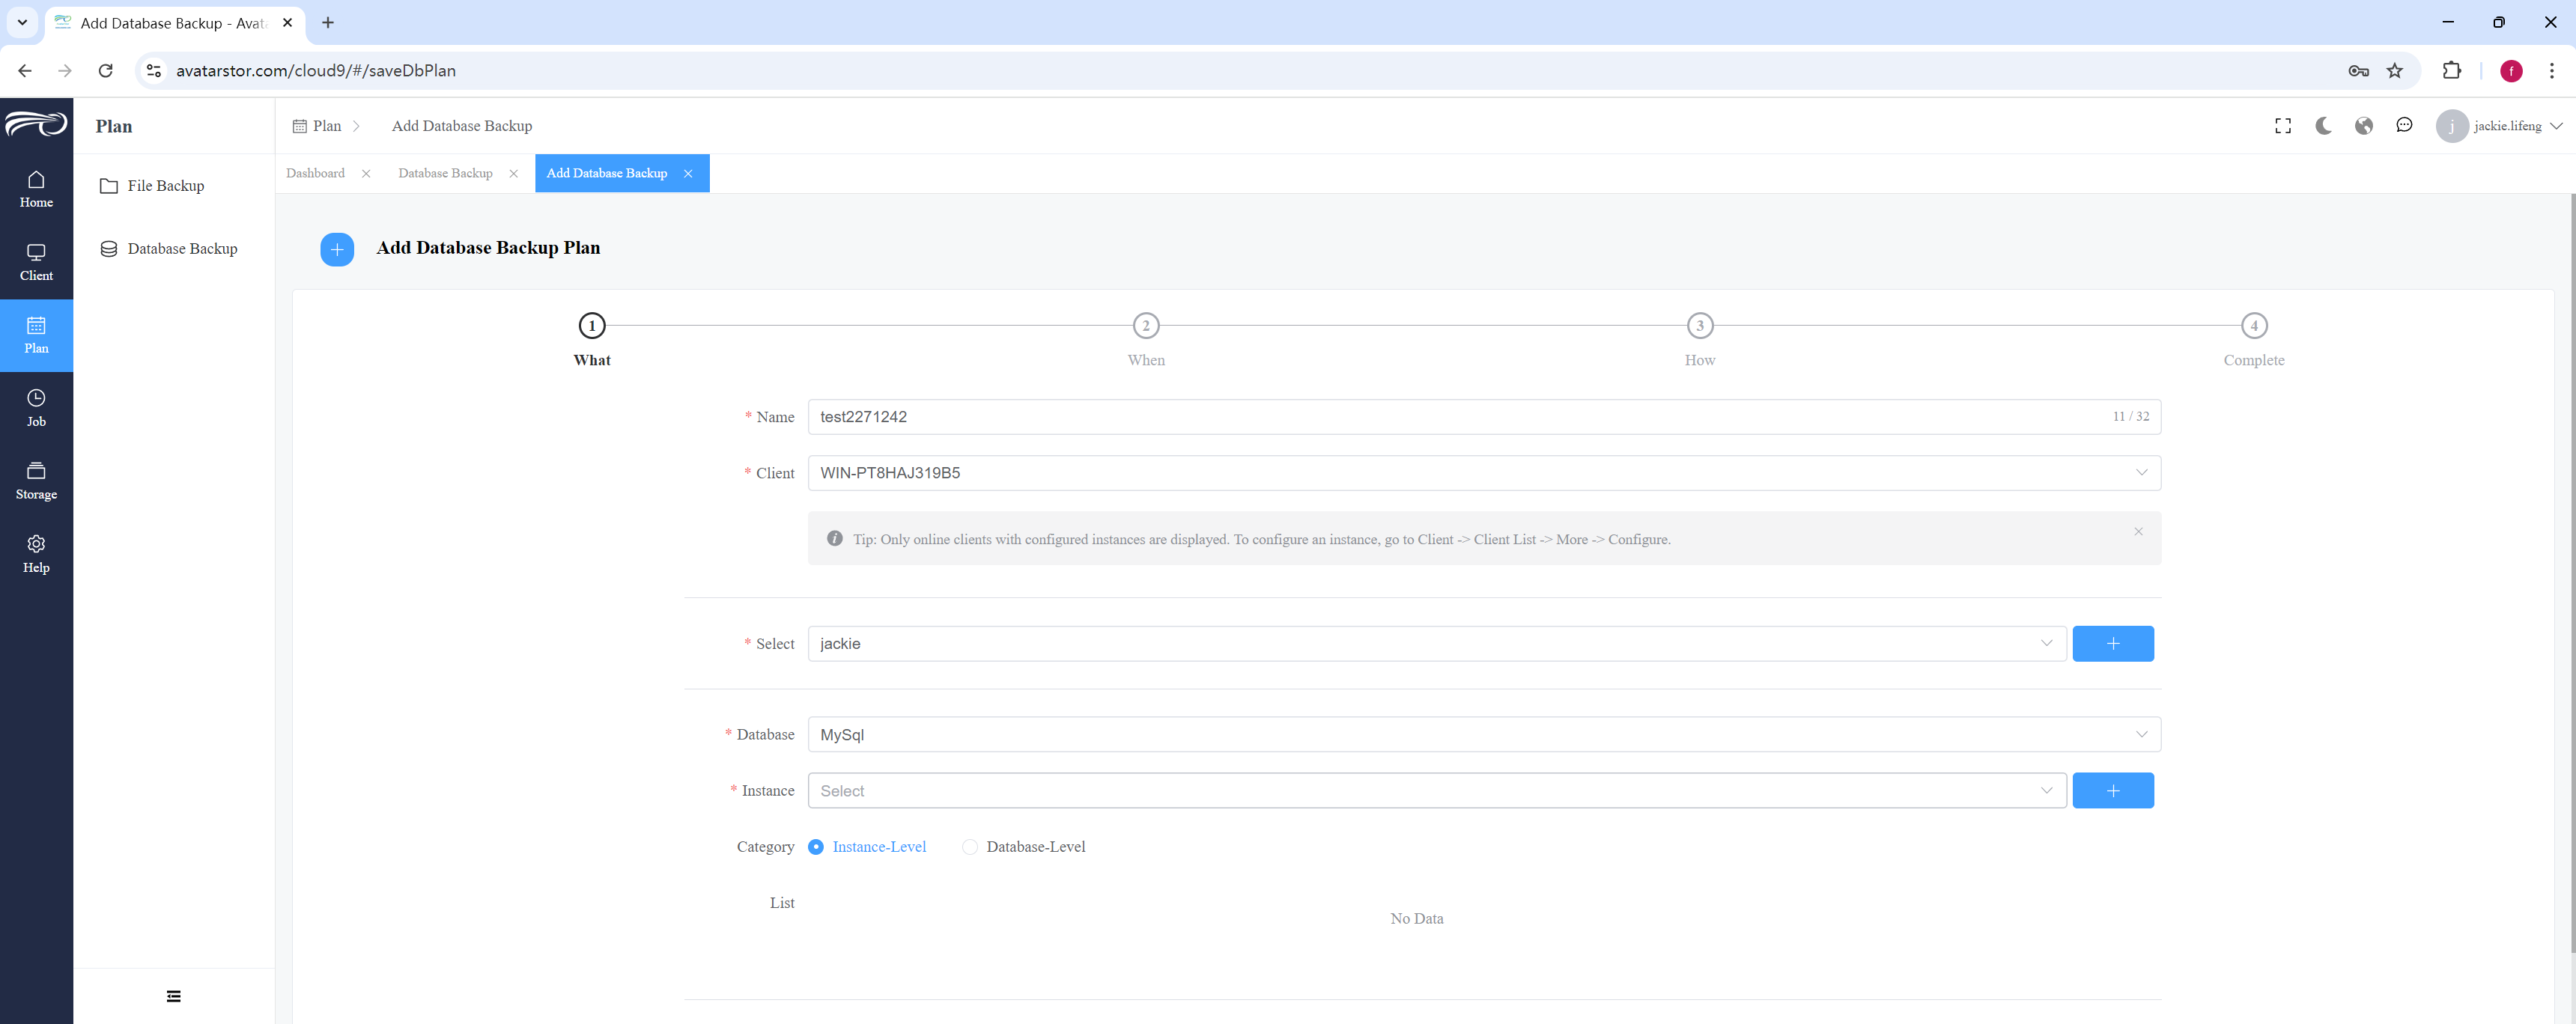
4.3 Automatic triggering of backup plans
Regardless of the type of instance backup, the second step in the plan configuration always involves scheduling trigger-related settings. Start from the left navigation bar [Plan] - [xx Backup](xx means file or database):
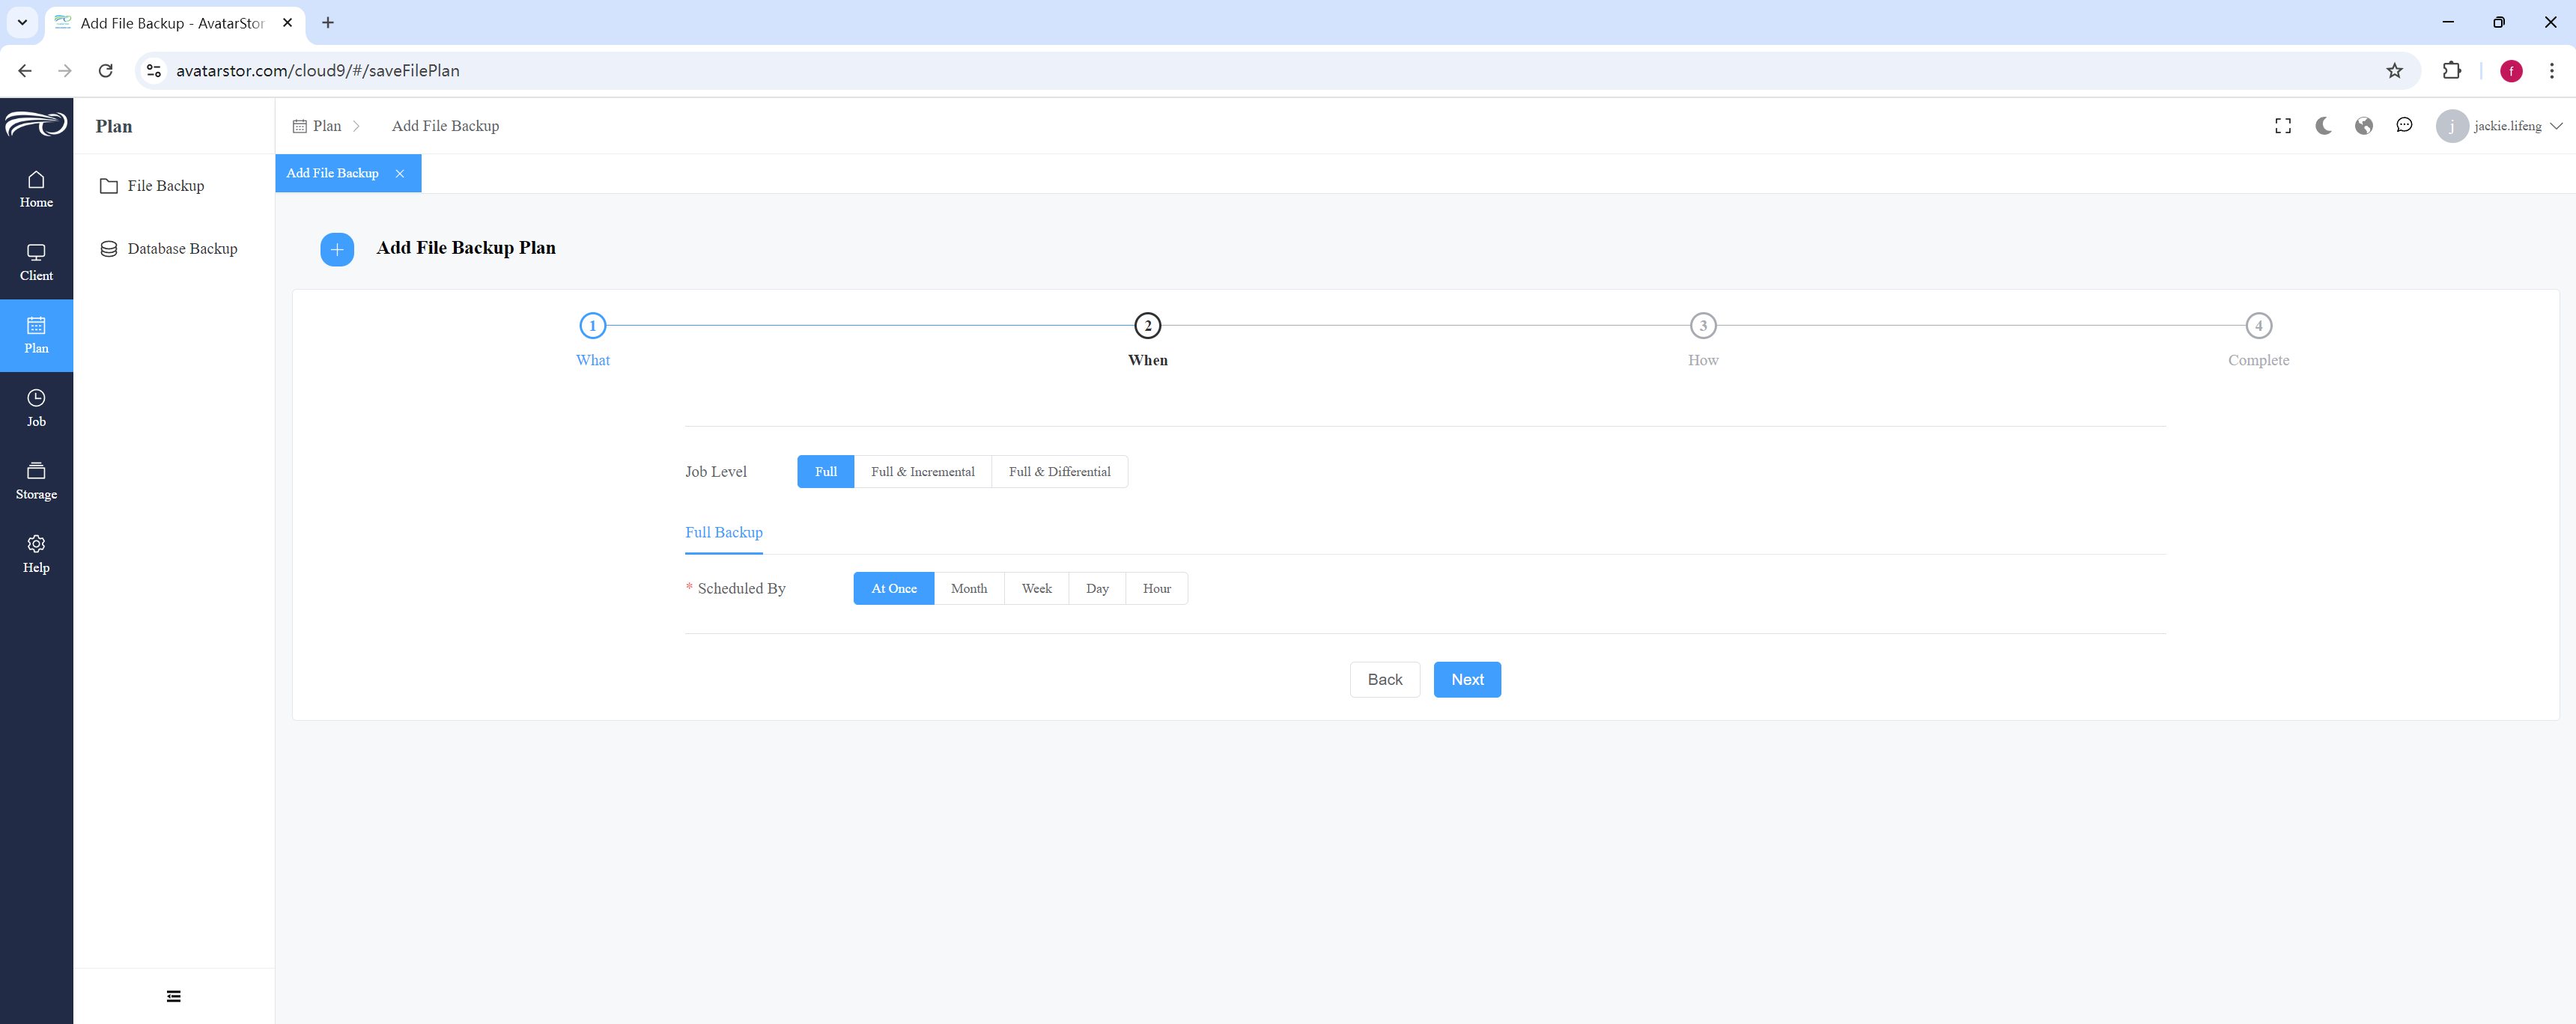
Set the full backup schedule, supporting options for monthly, weekly, daily, or hourly intervals. Below are a few examples; please adjust according to your needs.
For example, start the backup on the 1st, 15th, and 30th of each month at 10:00 PM:
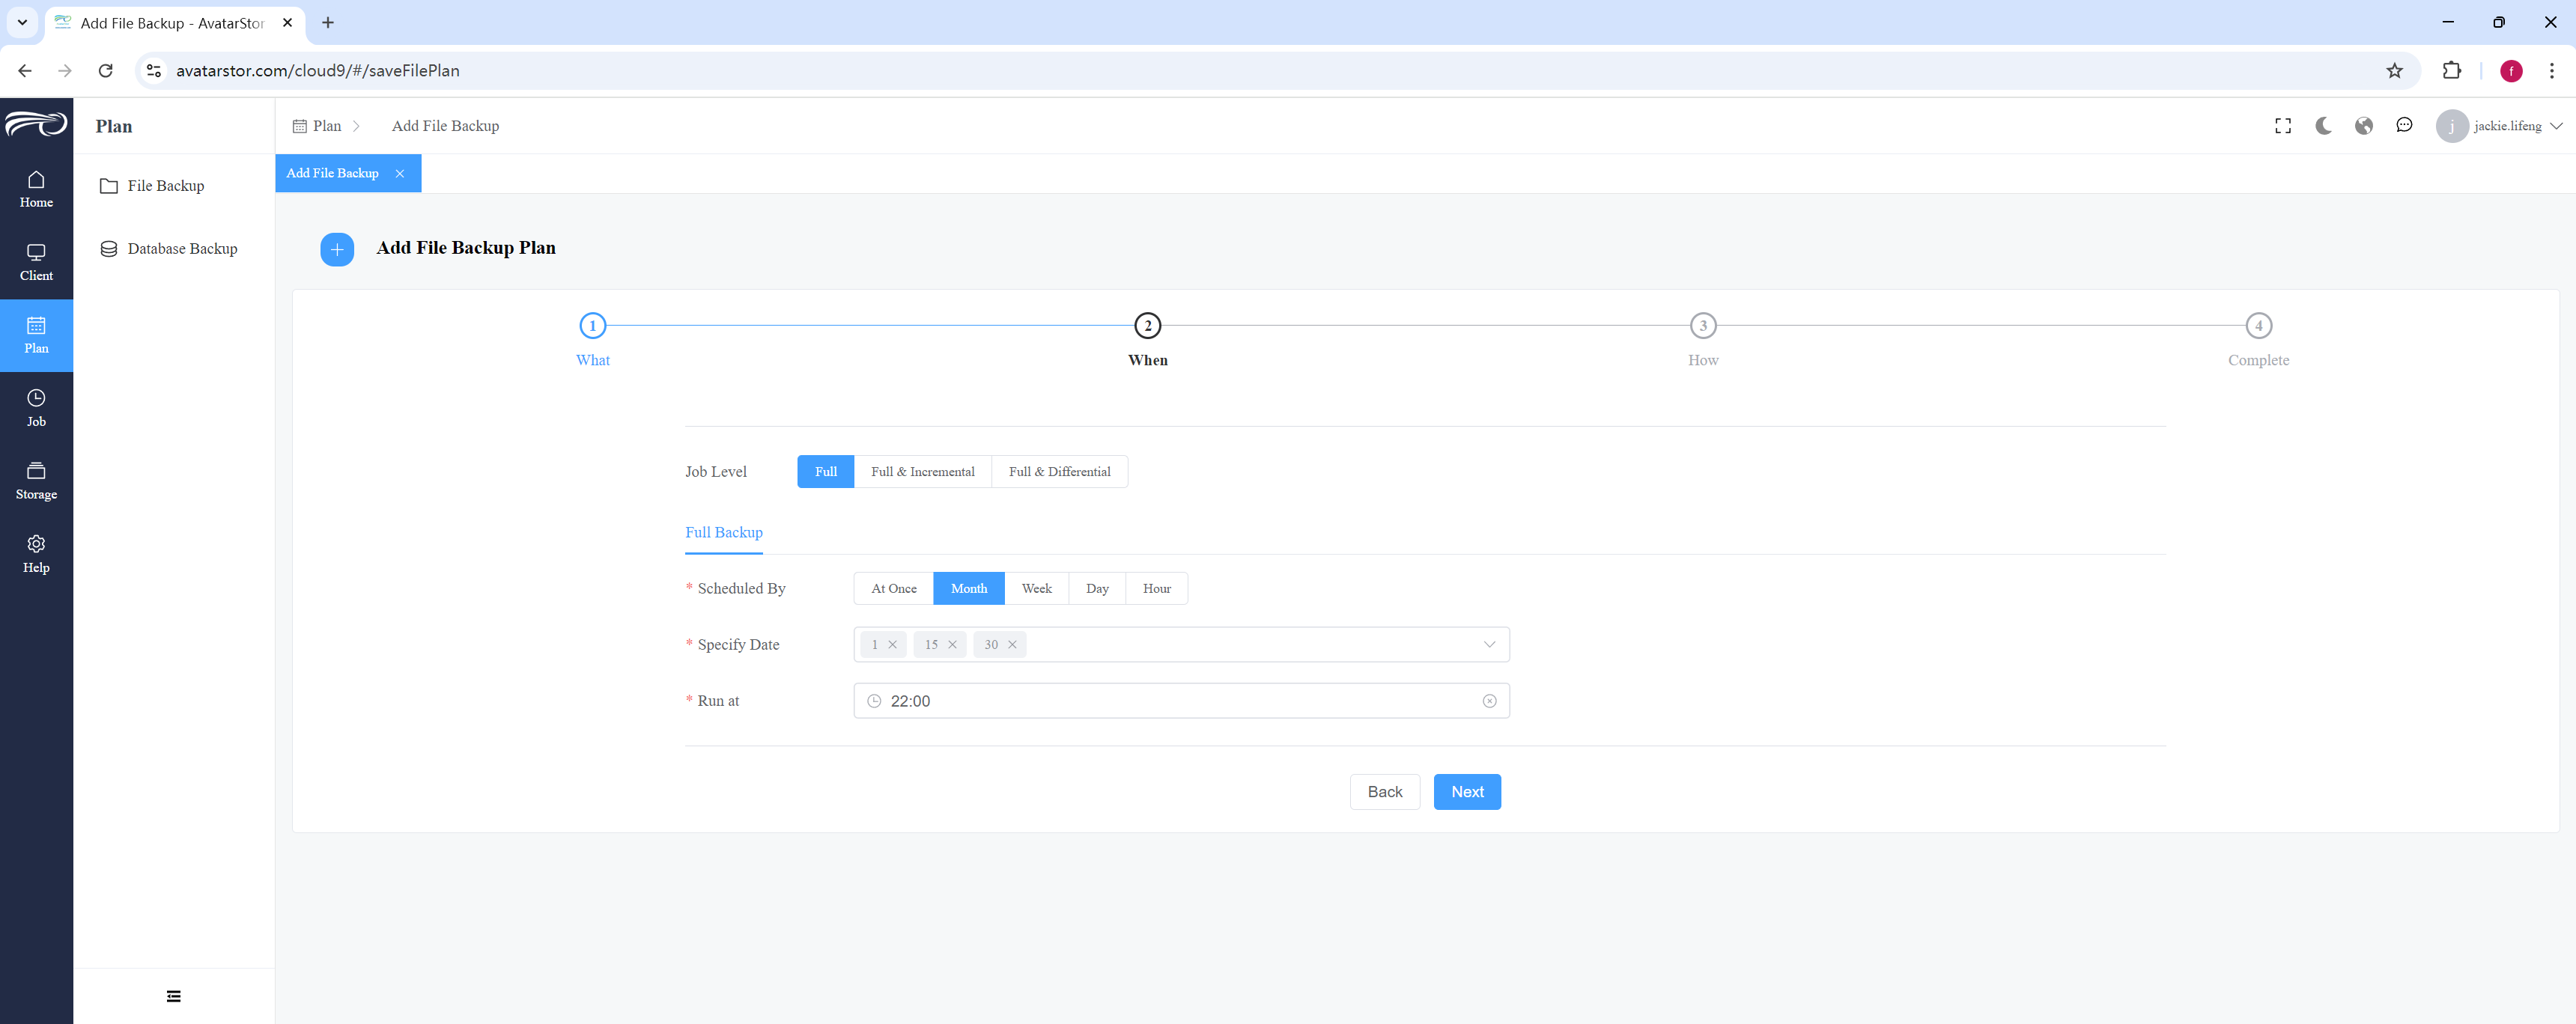
For example, start the backup every Saturday at 10:30 PM:
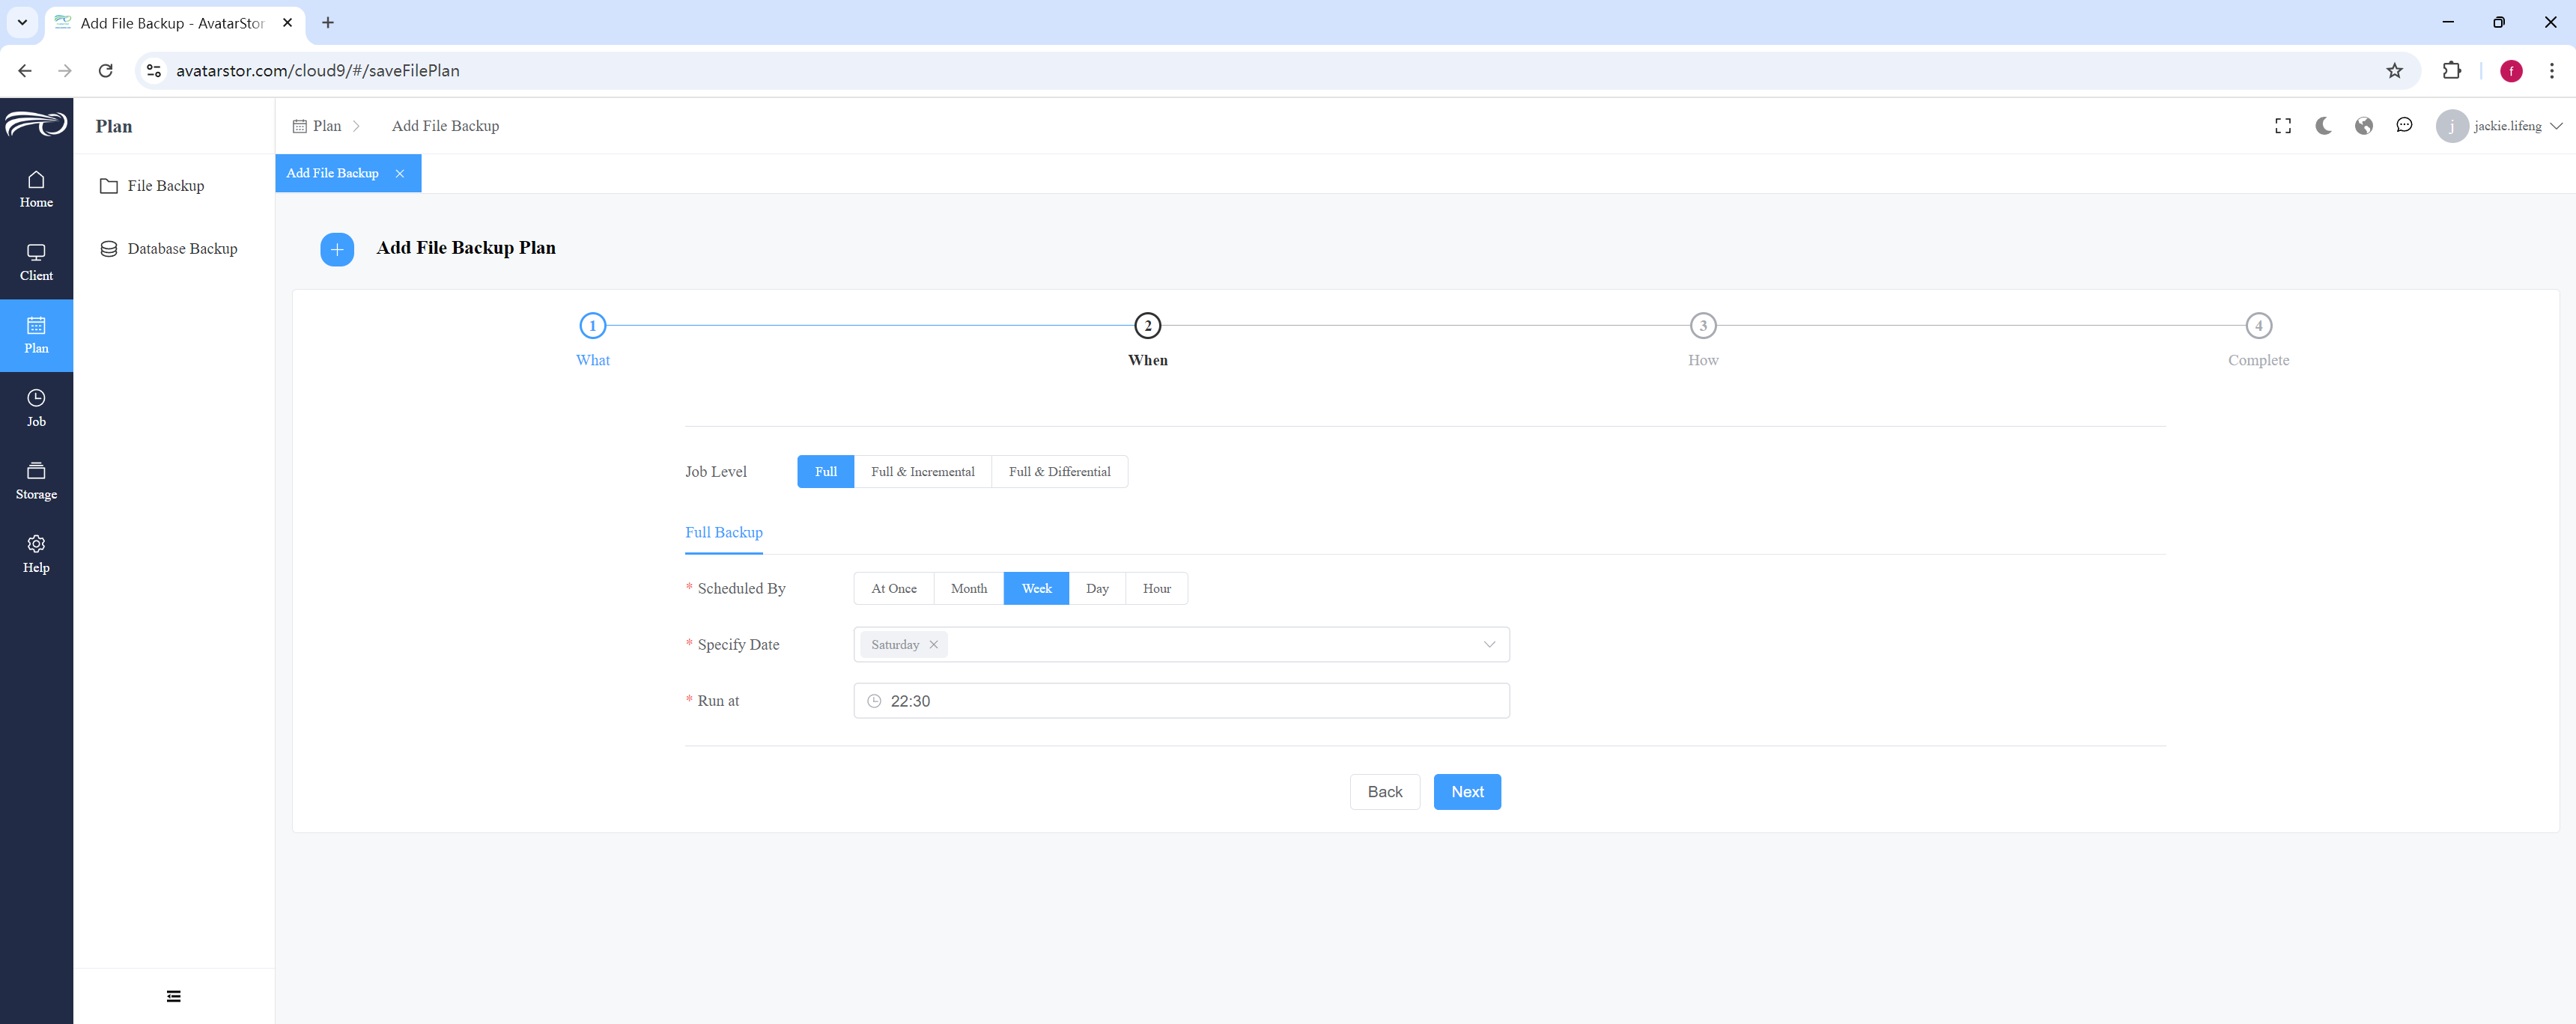
For example, start the backup every day at 12:30 AM:
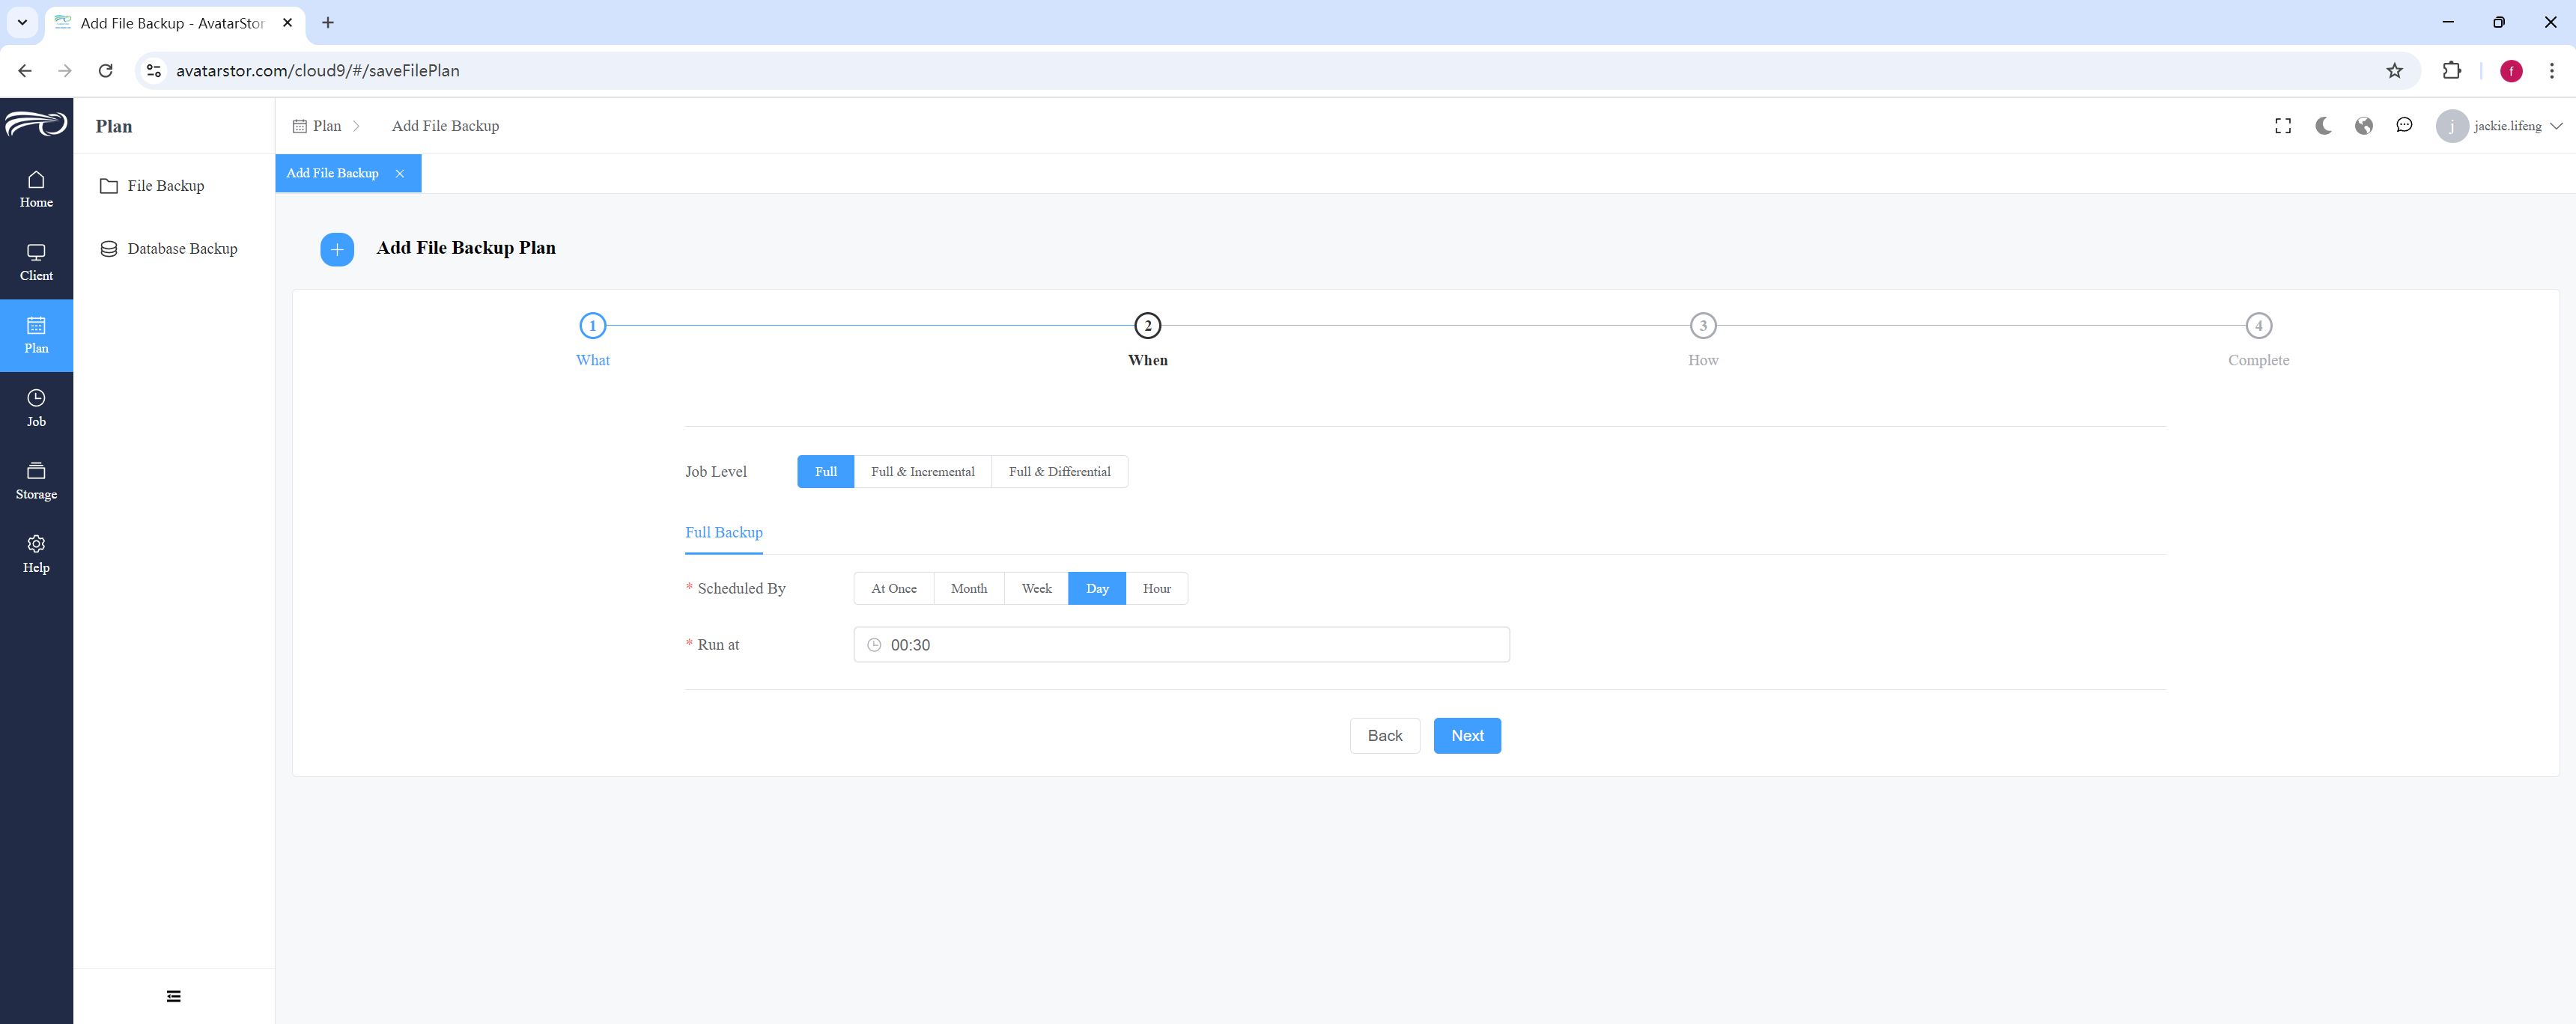
For example, run the backup every hour at the 30th minute:
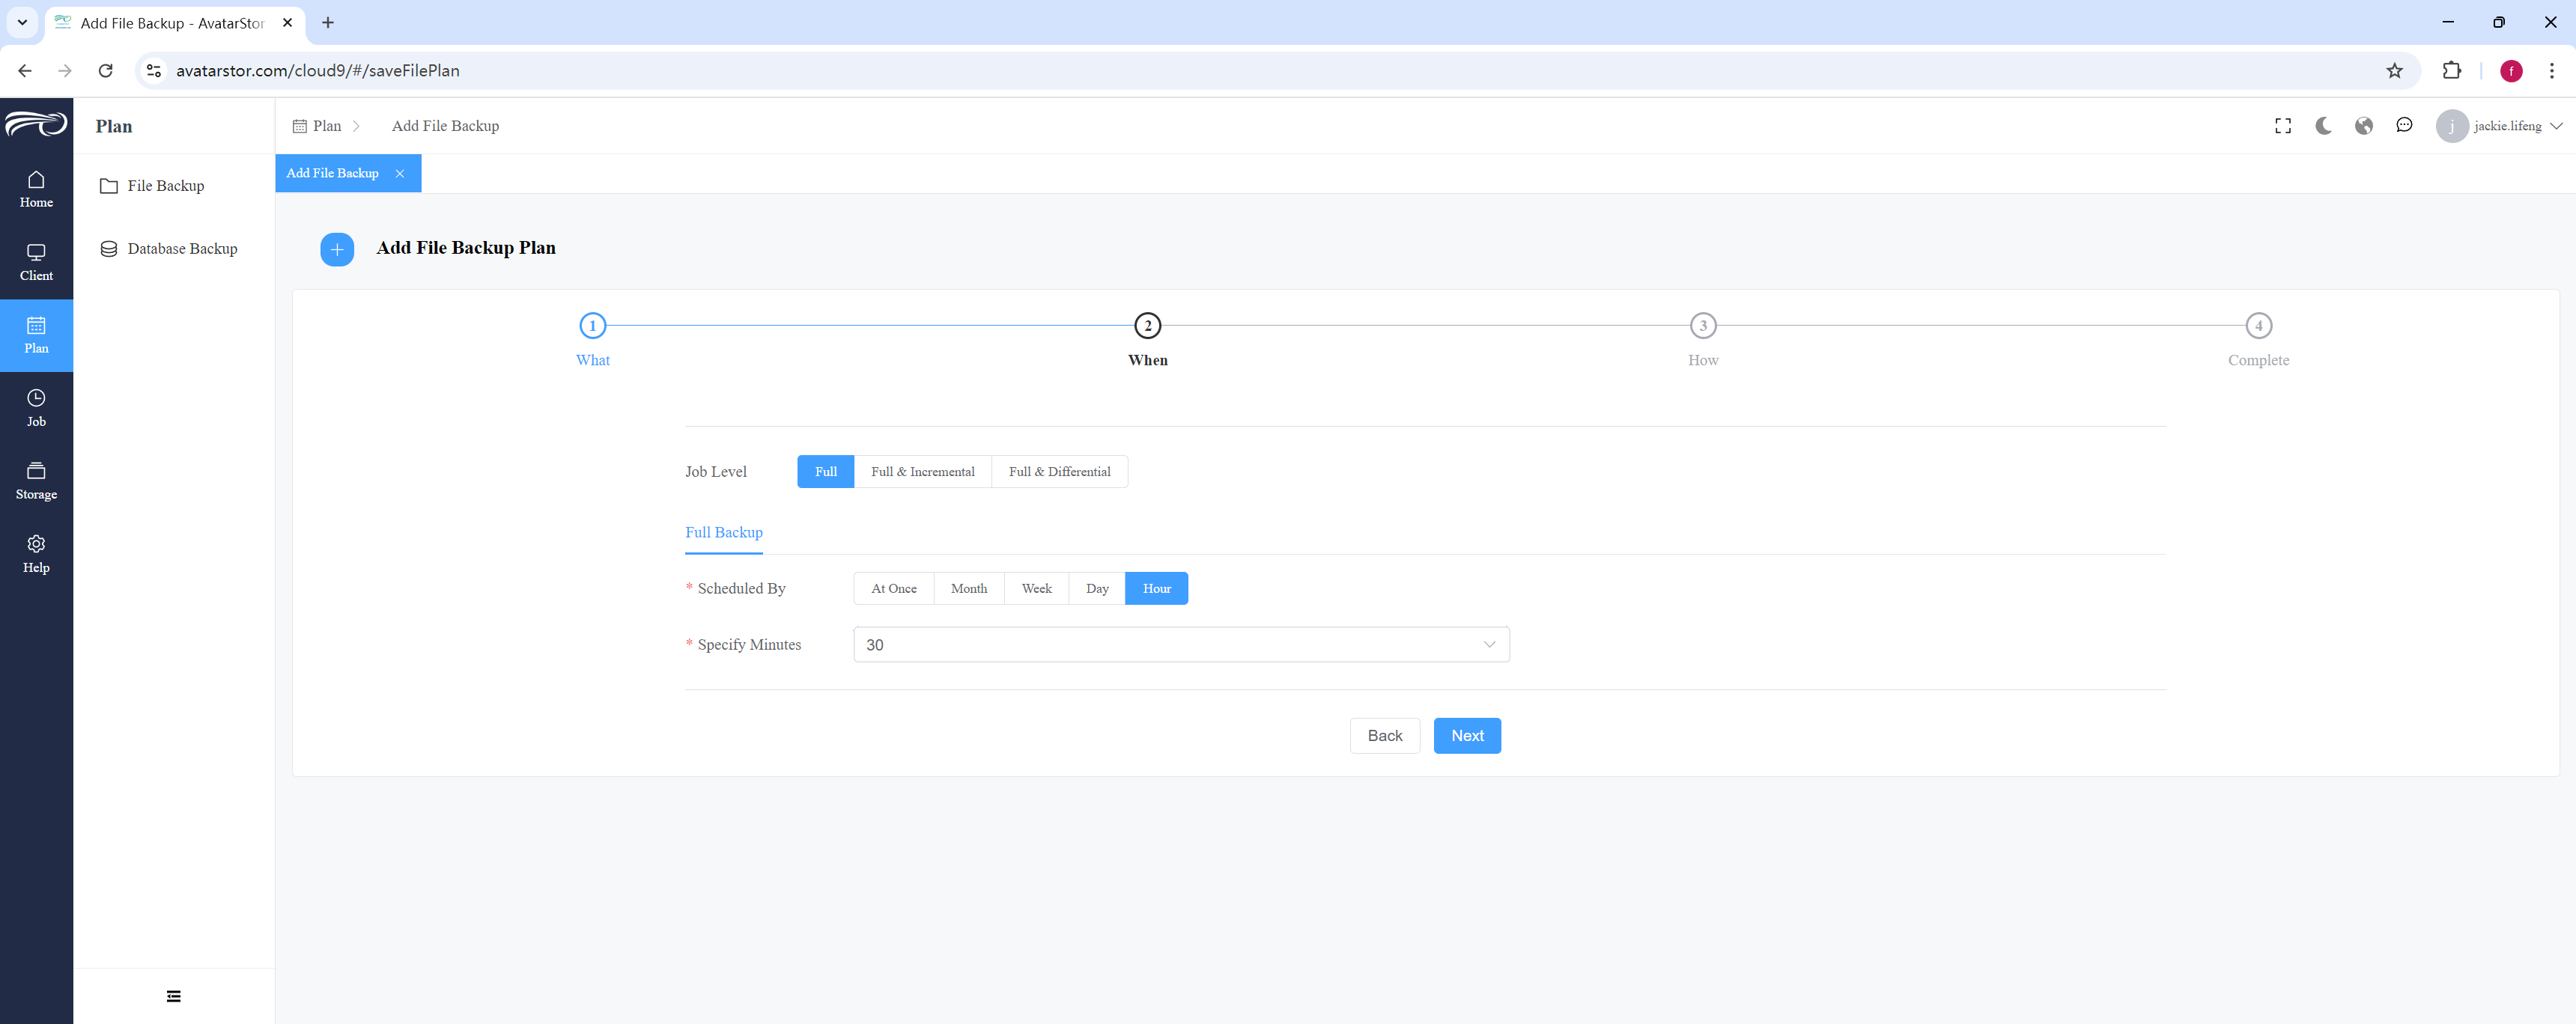
|
Tip Please set the backup interval according to your needs. Setting an excessively short backup interval may place pressure on both your business system and storage. A common backup plan typically includes a full backup once a week, usually on the weekend, and daily incremental backups. |
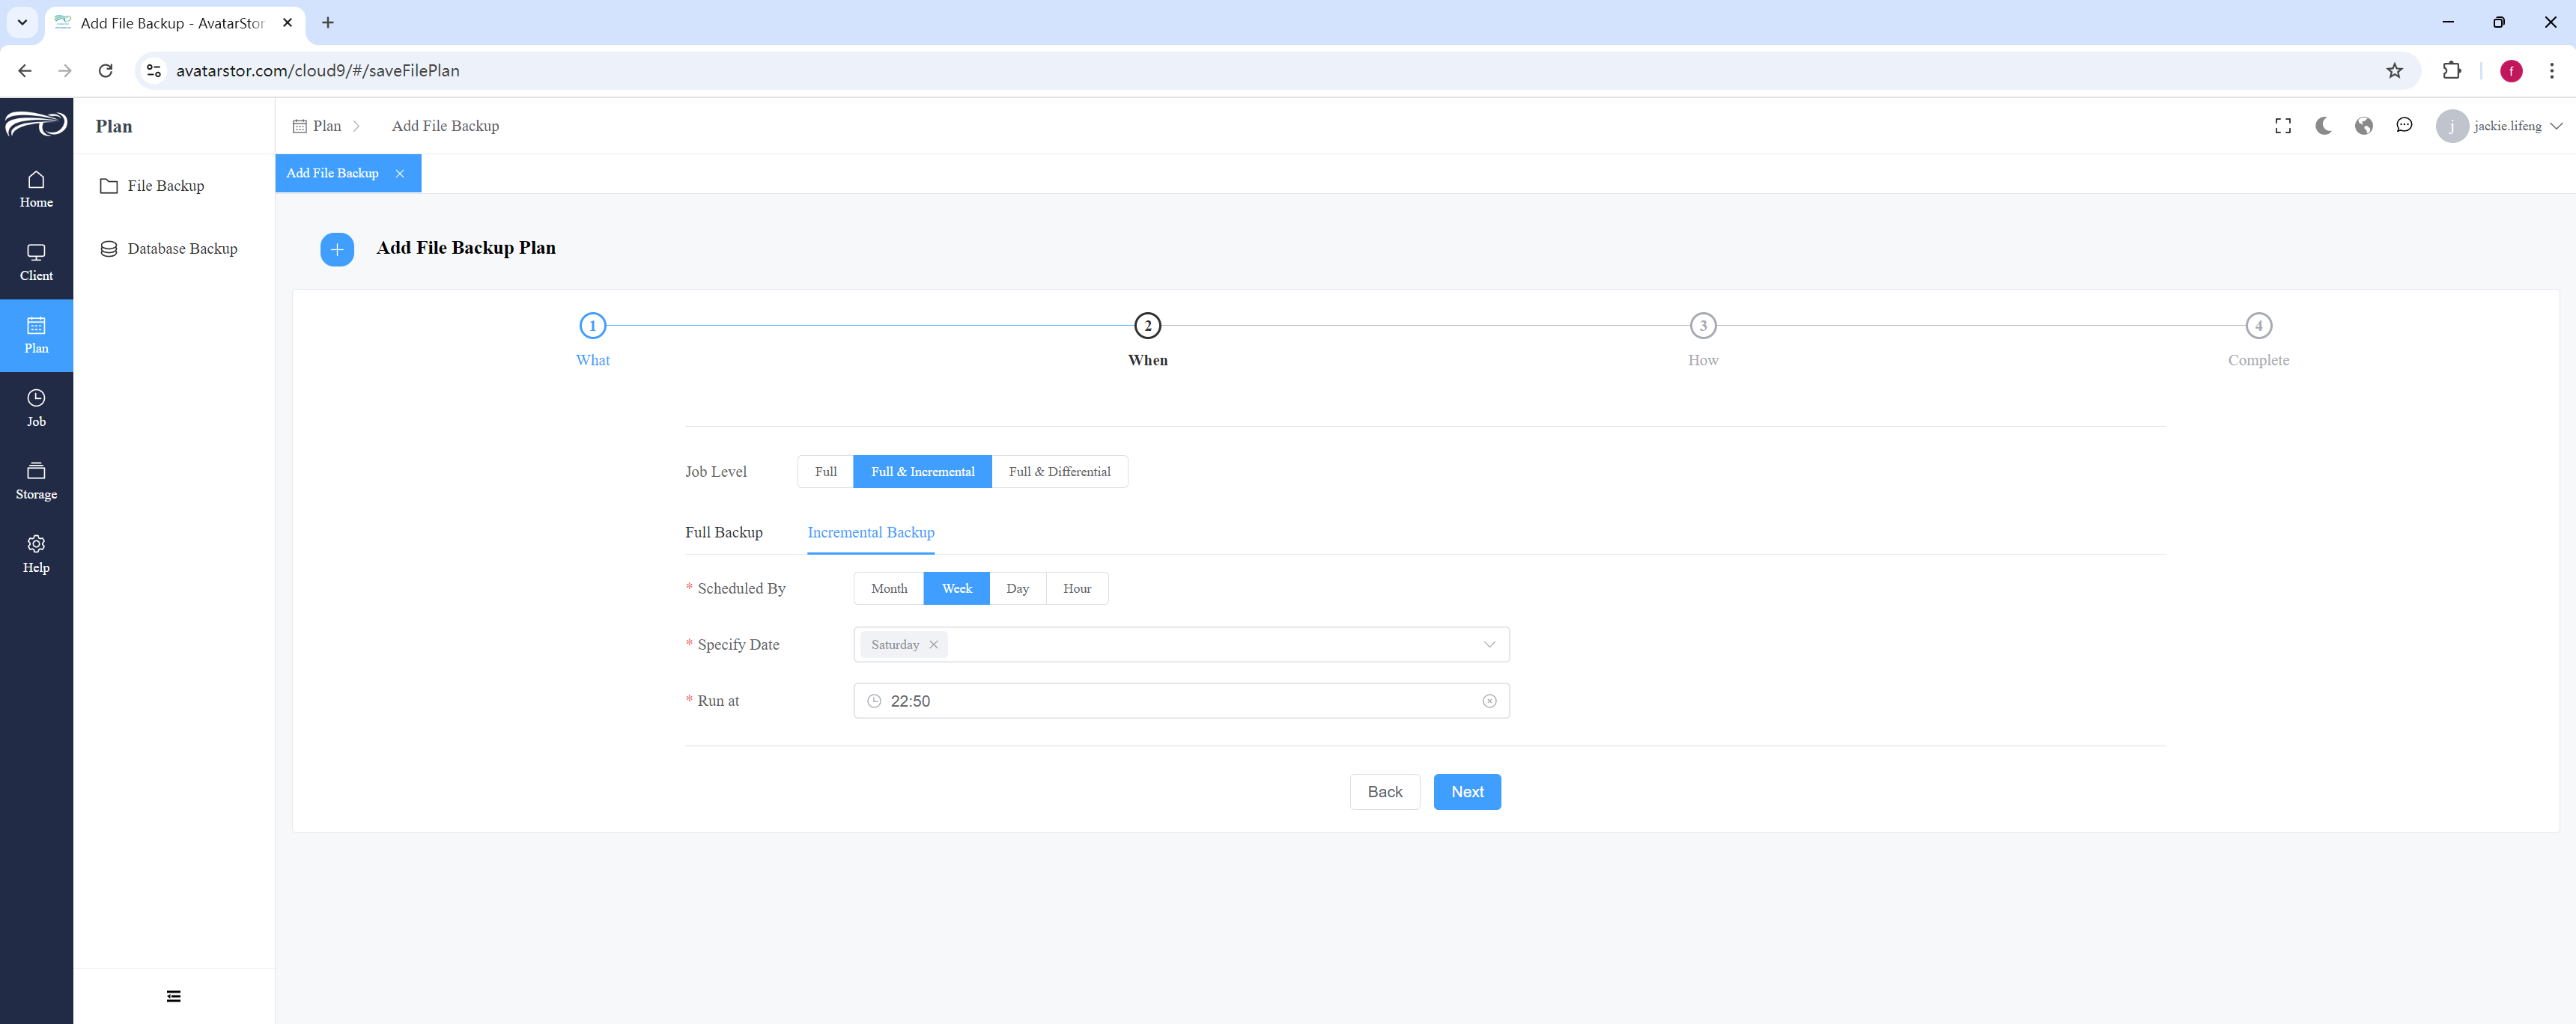
Set up a full plus incremental backup (optional). The process is similar to that of configuring a full backup, so it will not be repeated here.
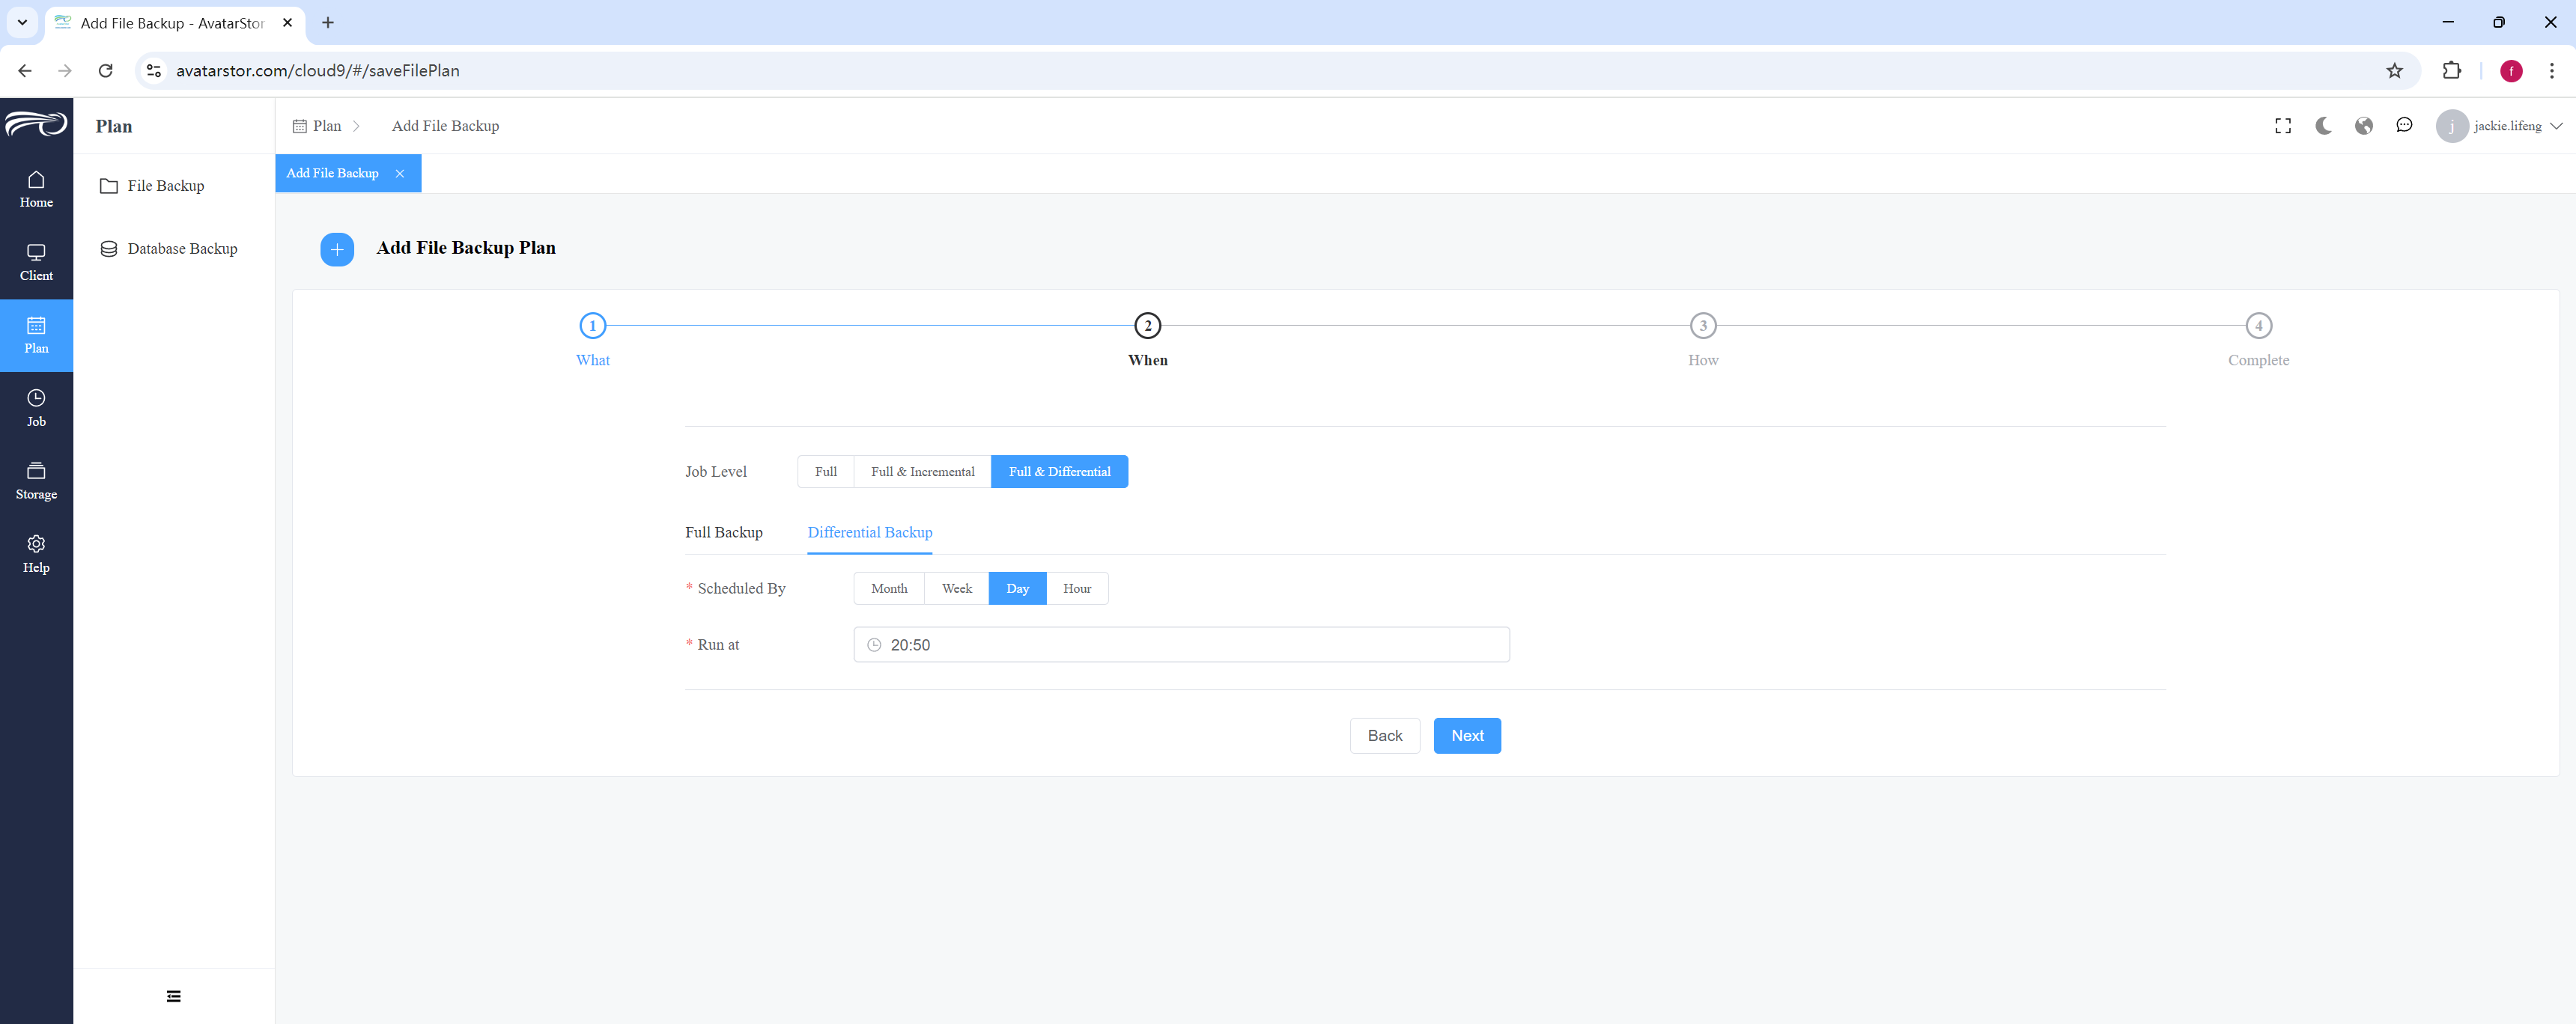
Set up a full plus differential backup (optional). The process is similar to configuring a full backup, so it will not be repeated here.
|
Tip Running a backup immediately is generally used for testing purposes. Please avoid configuring this schedule for formal backup plans. |
4.4 Manual triggering of backup plans
Execute the backup and review the results.
|
Note that only online clients with related backup strategies will have the [Run Immediately] option available. |
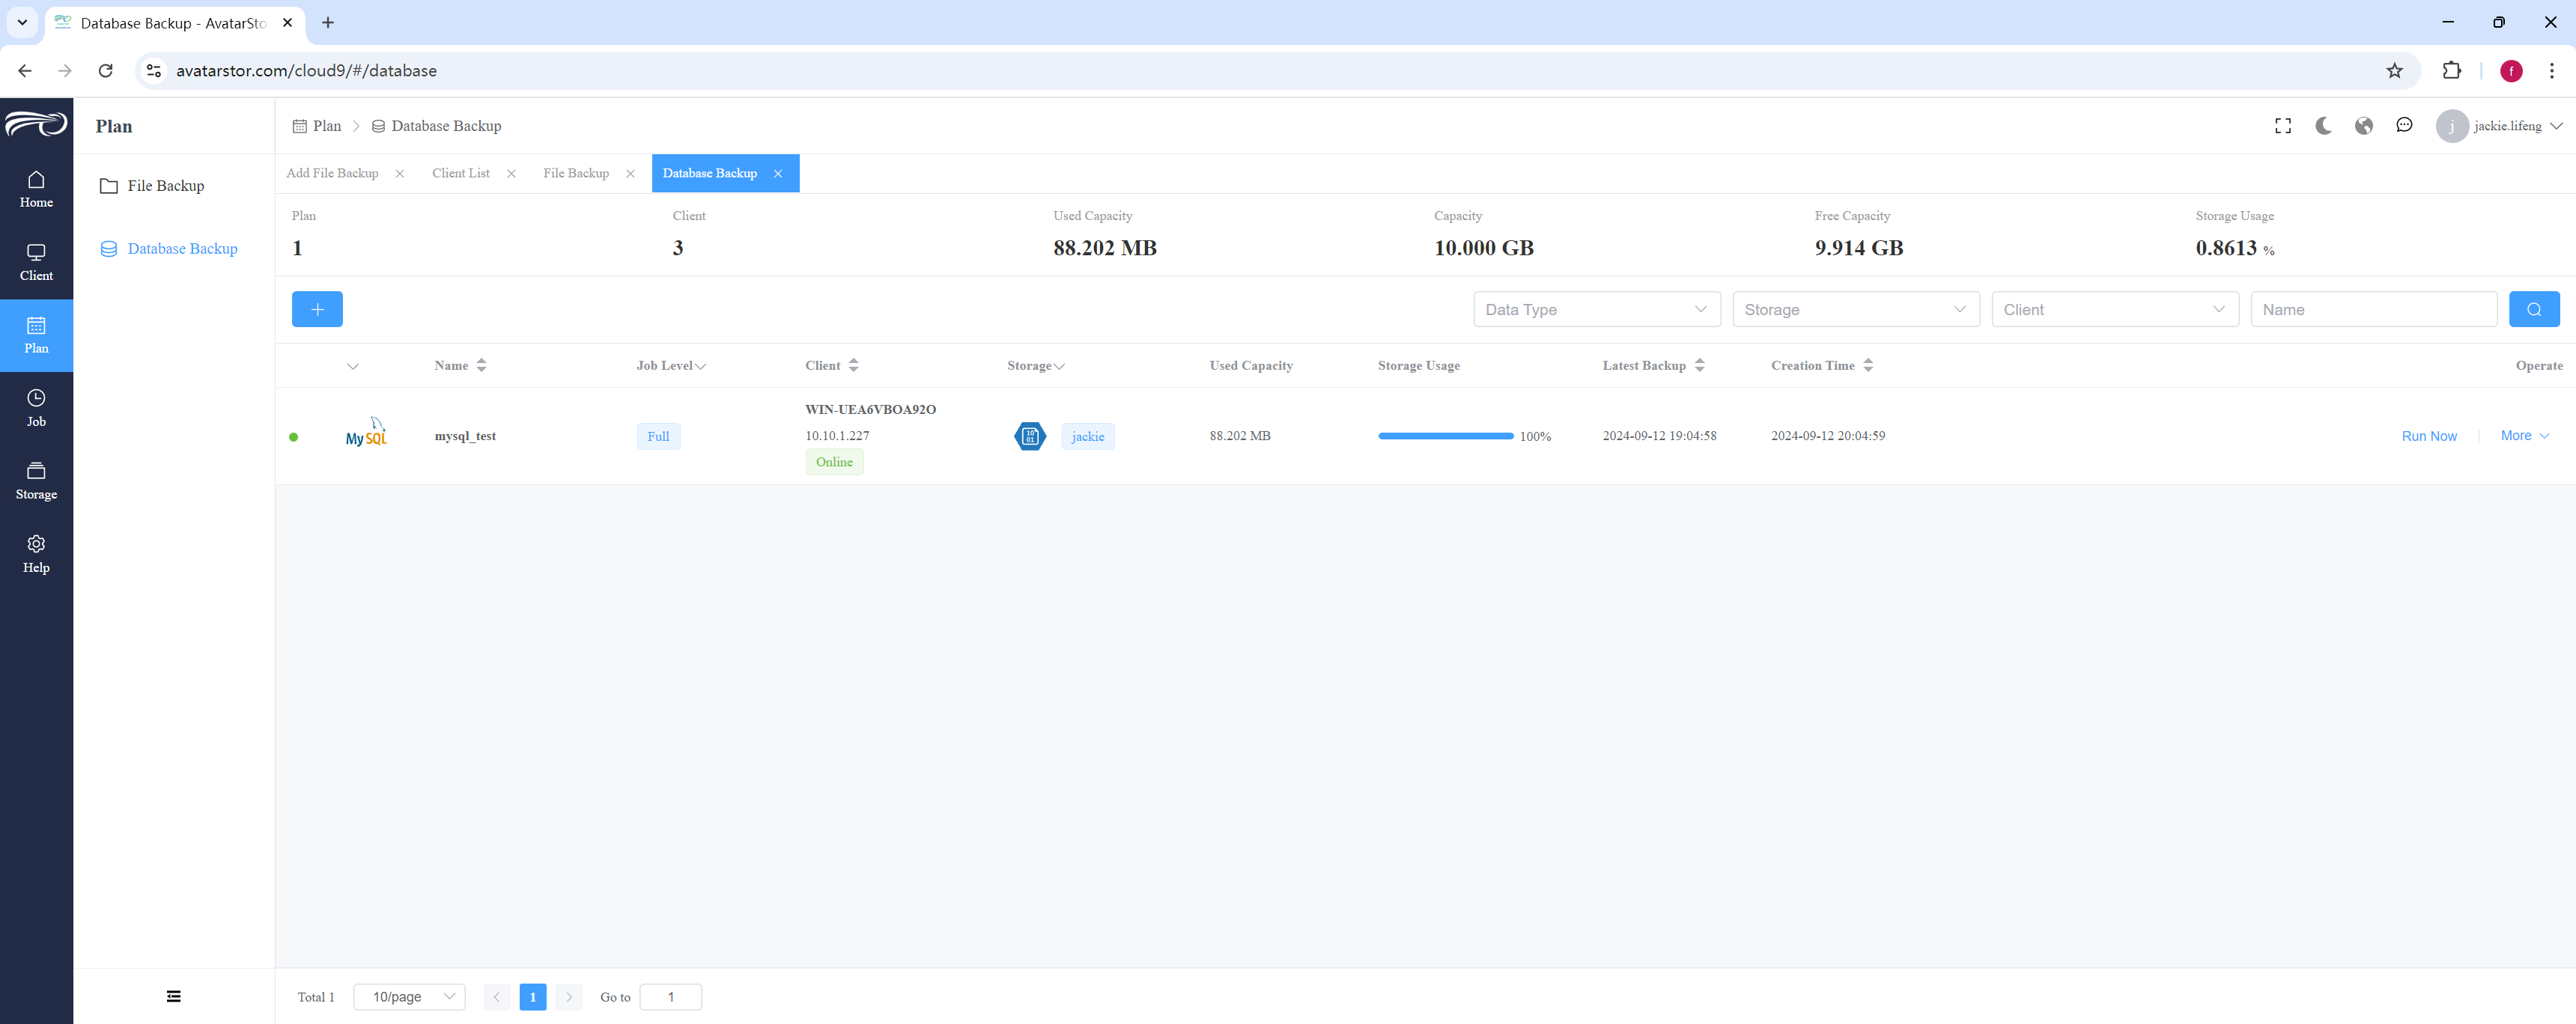
Clicking [Run Immediately] allows you to manually execute the strategy (without waiting for the scheduled trigger) and choose the run level:
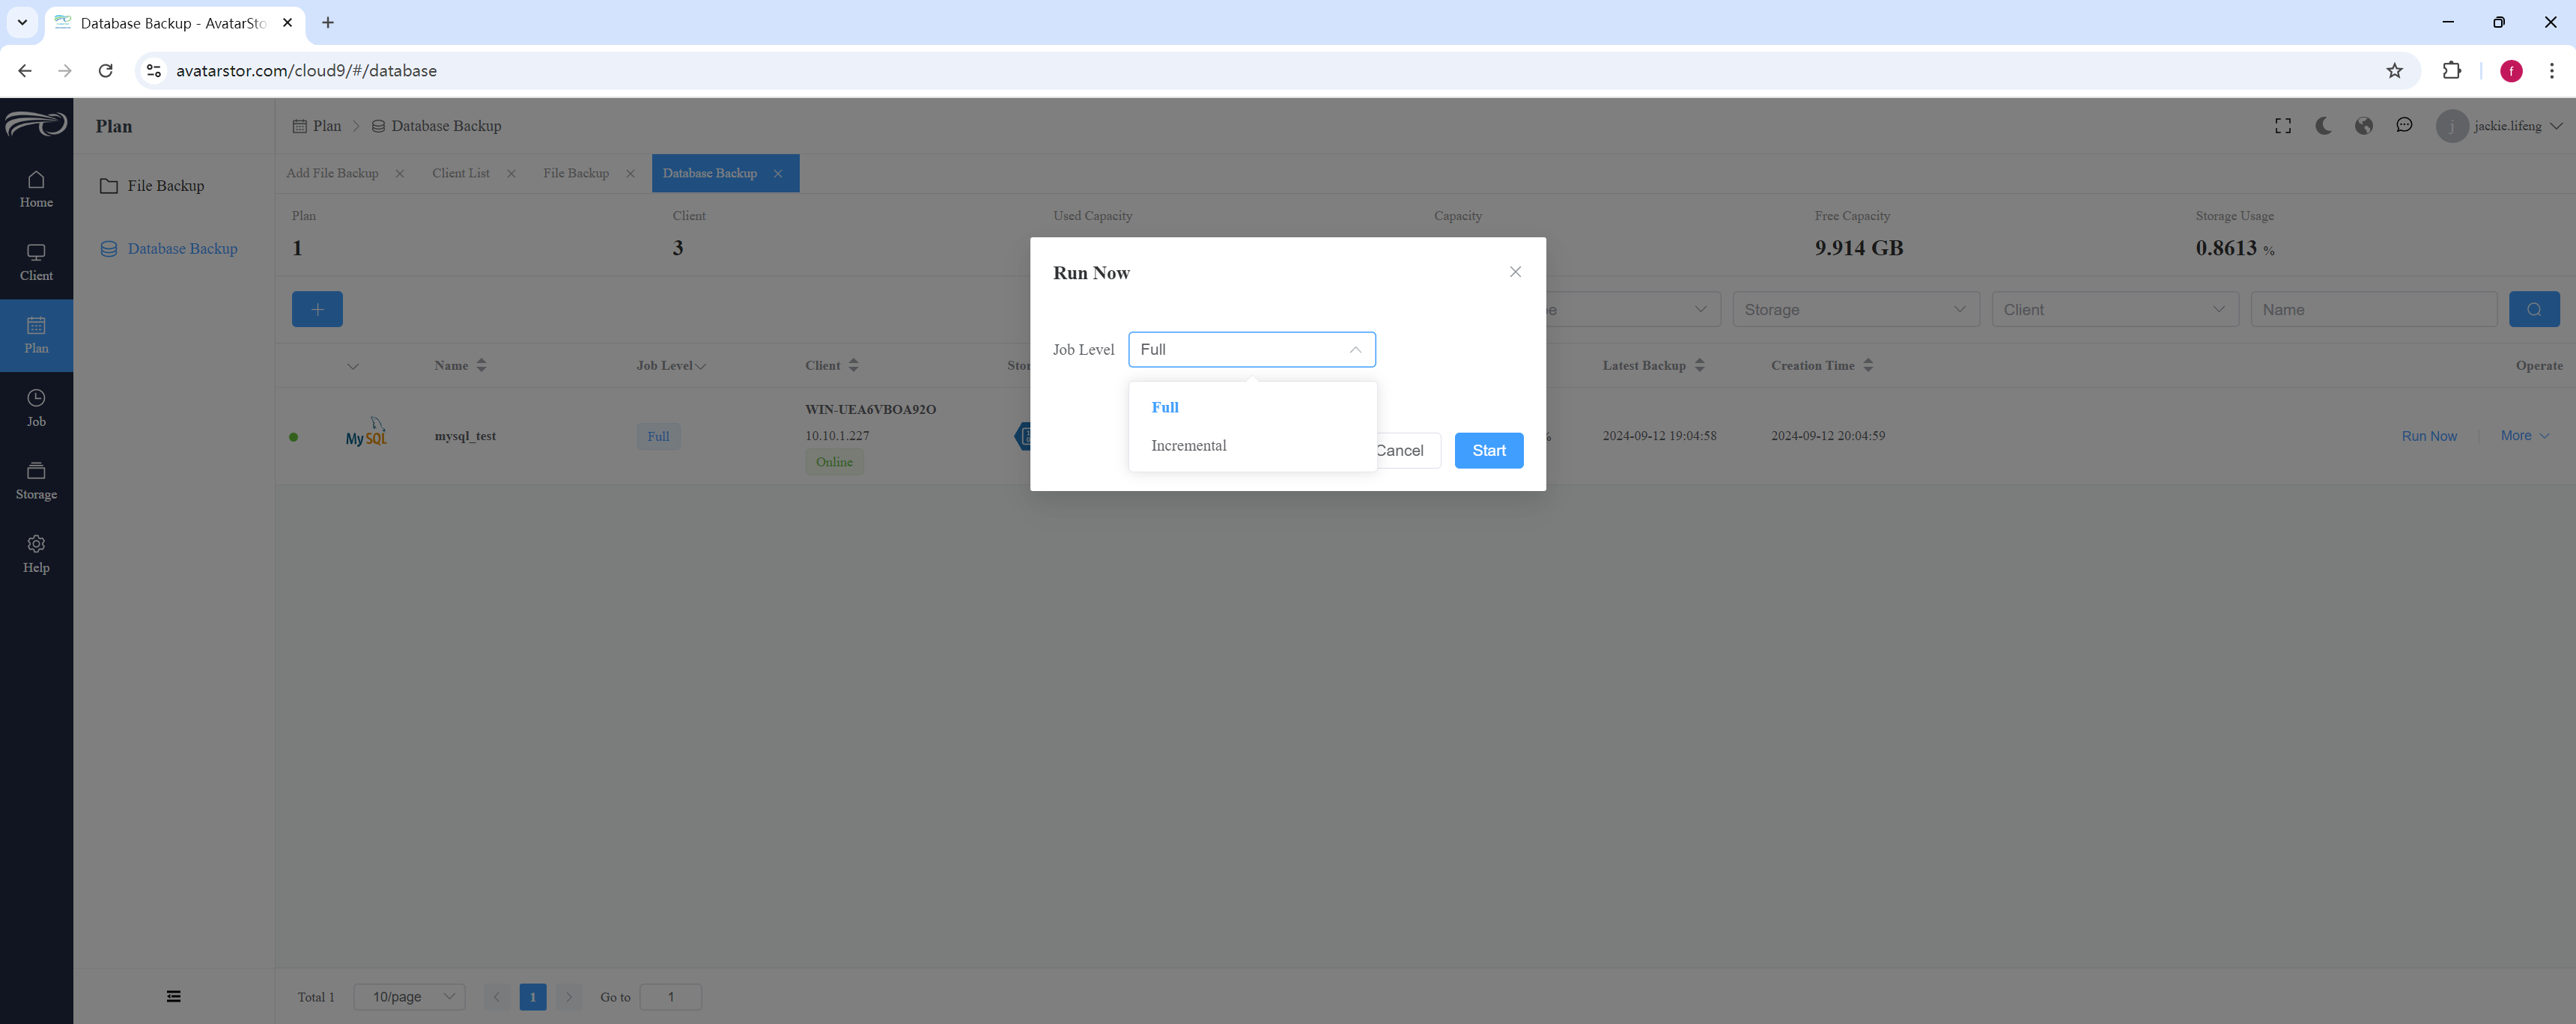
Wait a moment and it will jump to [Job] - [Running]:
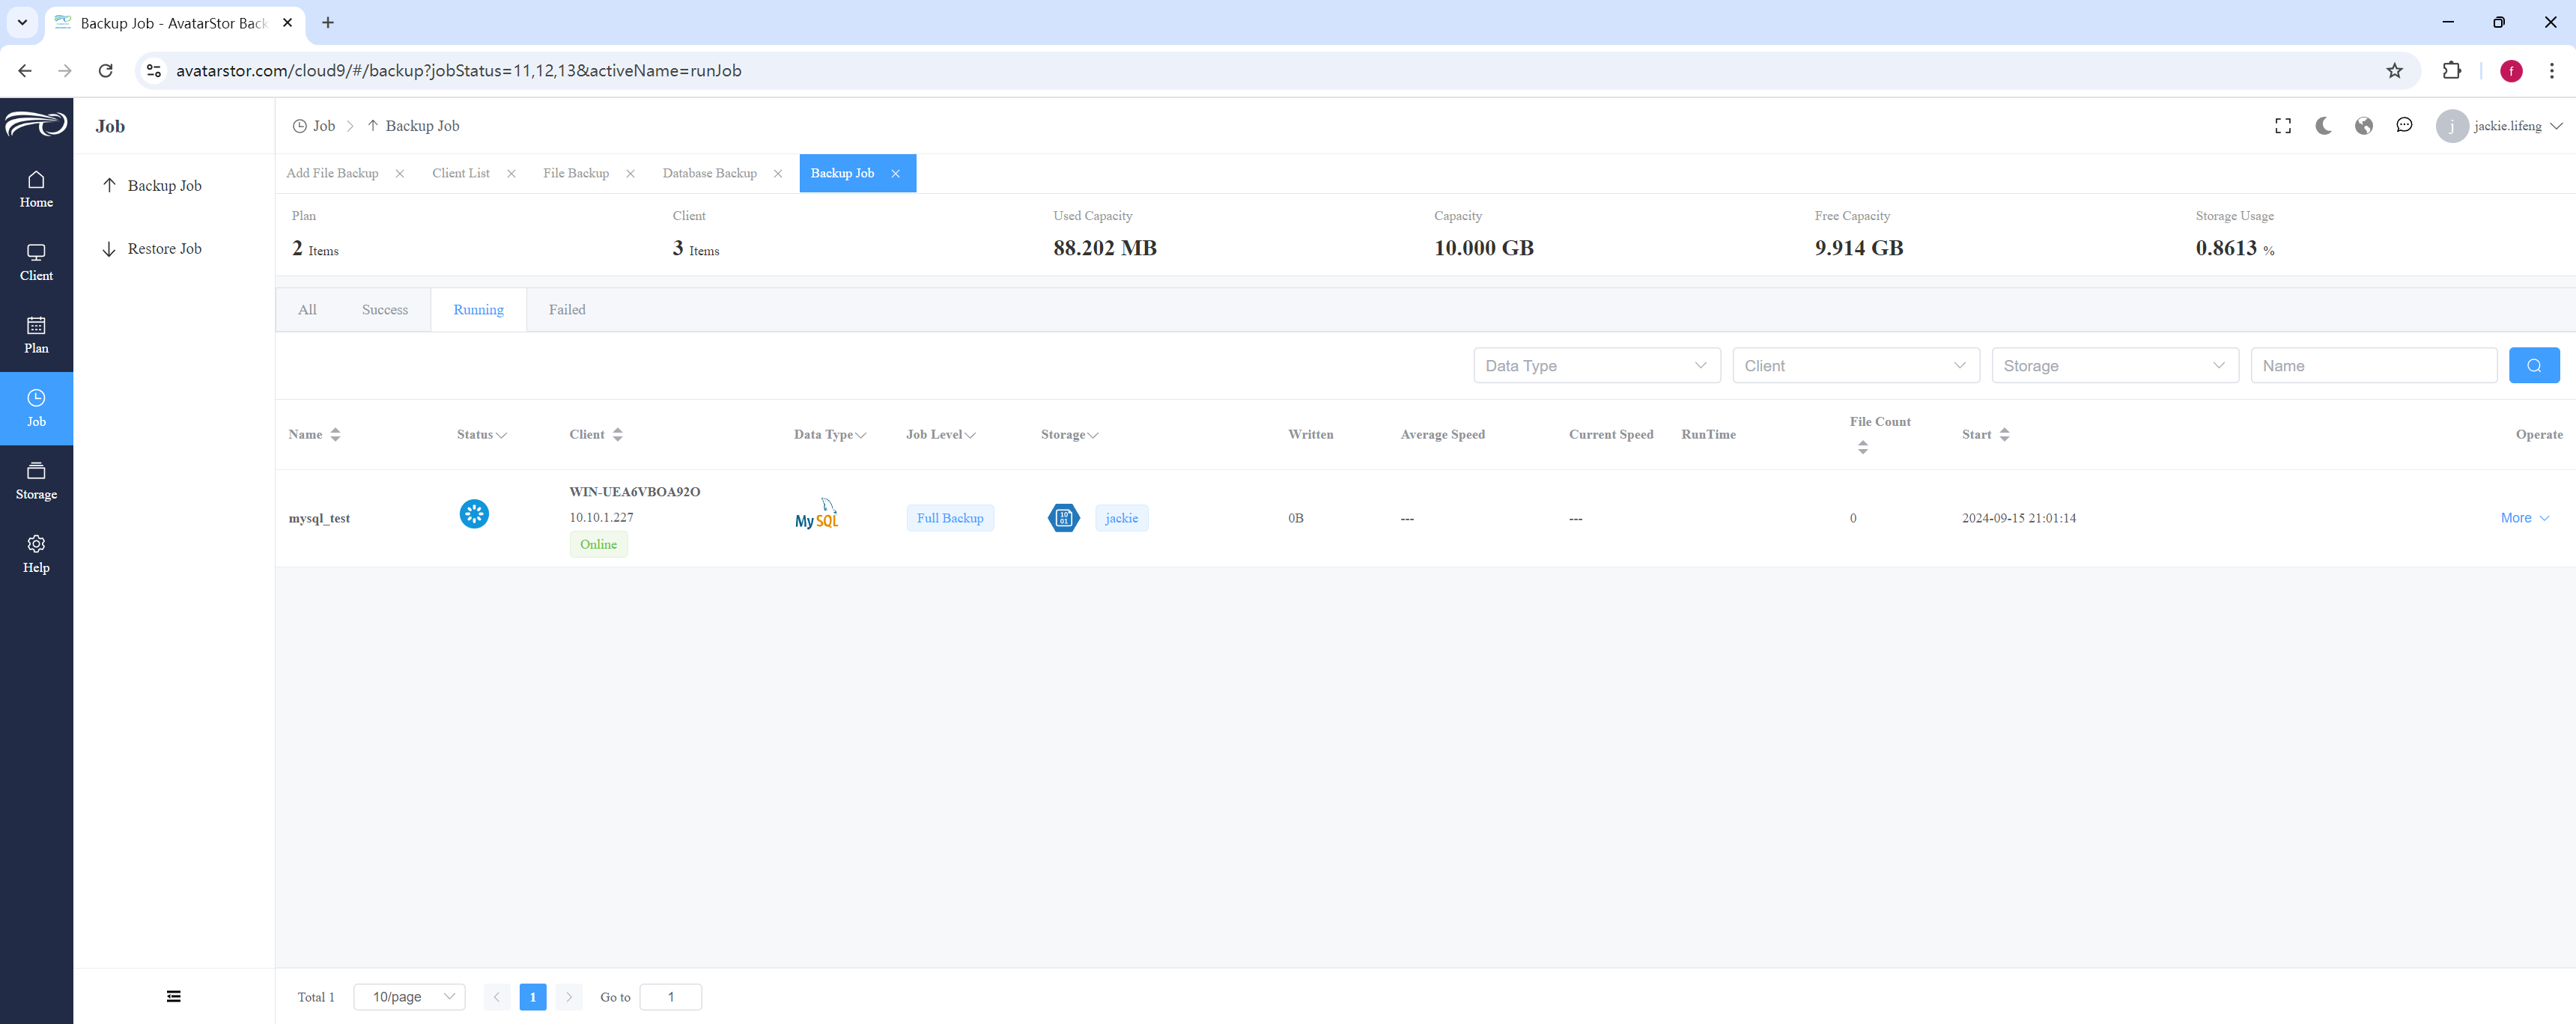
|
The "incremental" levels associated with different plugins have slight variations: Sqlserver does not support incremental backups, only differential backups and transaction log backups. Mysql supports incremental backups at the instance level, while at the database level, only full backups are available. |
|
Incremental Backup and Differential Backup are two common backup strategies used to optimize the backup process by reducing storage space usage and backup time. Their main differences lie in the scope of the data being backed up and the complexity of the recovery process. Incremental Backup Definition: Incremental backup only backs up data that has changed since the last backup (whether it was a full or incremental backup). Advantages: Saves storage space: Only changes since the last backup are saved, so the backup size is smaller. Saves time: Since only a small amount of changed data is backed up each time, the process is quicker. Disadvantages: Complex recovery process: To restore data, you first need to restore the last full backup, followed by each incremental backup in sequence until the latest data is restored. Example: Sunday: Full backup Monday: Backup changes since Sunday Tuesday: Backup changes since Monday Continue like this each day Differential Backup Definition: Differential backup backs up all the data that has changed since the last full backup. Advantages: Simpler recovery process: You only need to restore the last full backup and the most recent differential backup to recover the data. Saves time: The recovery process is faster compared to incremental backups because fewer files need to be restored. Disadvantages: More storage space needed: Each differential backup includes all changes since the last full backup, potentially consuming more space than incremental backups. Backup time increases: As time goes on, the size of each differential backup increases because it captures all changes since the last full backup. Example: Sunday: Full backup Monday: Backup changes since Sunday Tuesday: Backup changes since Sunday Continue like this each day Note that AvatarStor has improved the recovery process for incremental backups by supporting synthetic recovery. This means you can initiate a recovery from the results of any incremental or differential backup at any point in time. The system will automatically locate and combine all related incremental, differential, and full backups to complete the recovery. |
|
Tip If a specific backup plan is manually triggered and is still running when its scheduled automatic trigger time arrives, the automatically triggered job will be canceled. Similarly, if you manually trigger the same backup plan multiple times, all subsequent runs will be canceled as long as the first triggered job is still in progress. In other words, only one instance of a particular backup plan can run at the same time. |
From the left navigation bar [Jobs], click [Backup Jobs], you can:
View all job information:
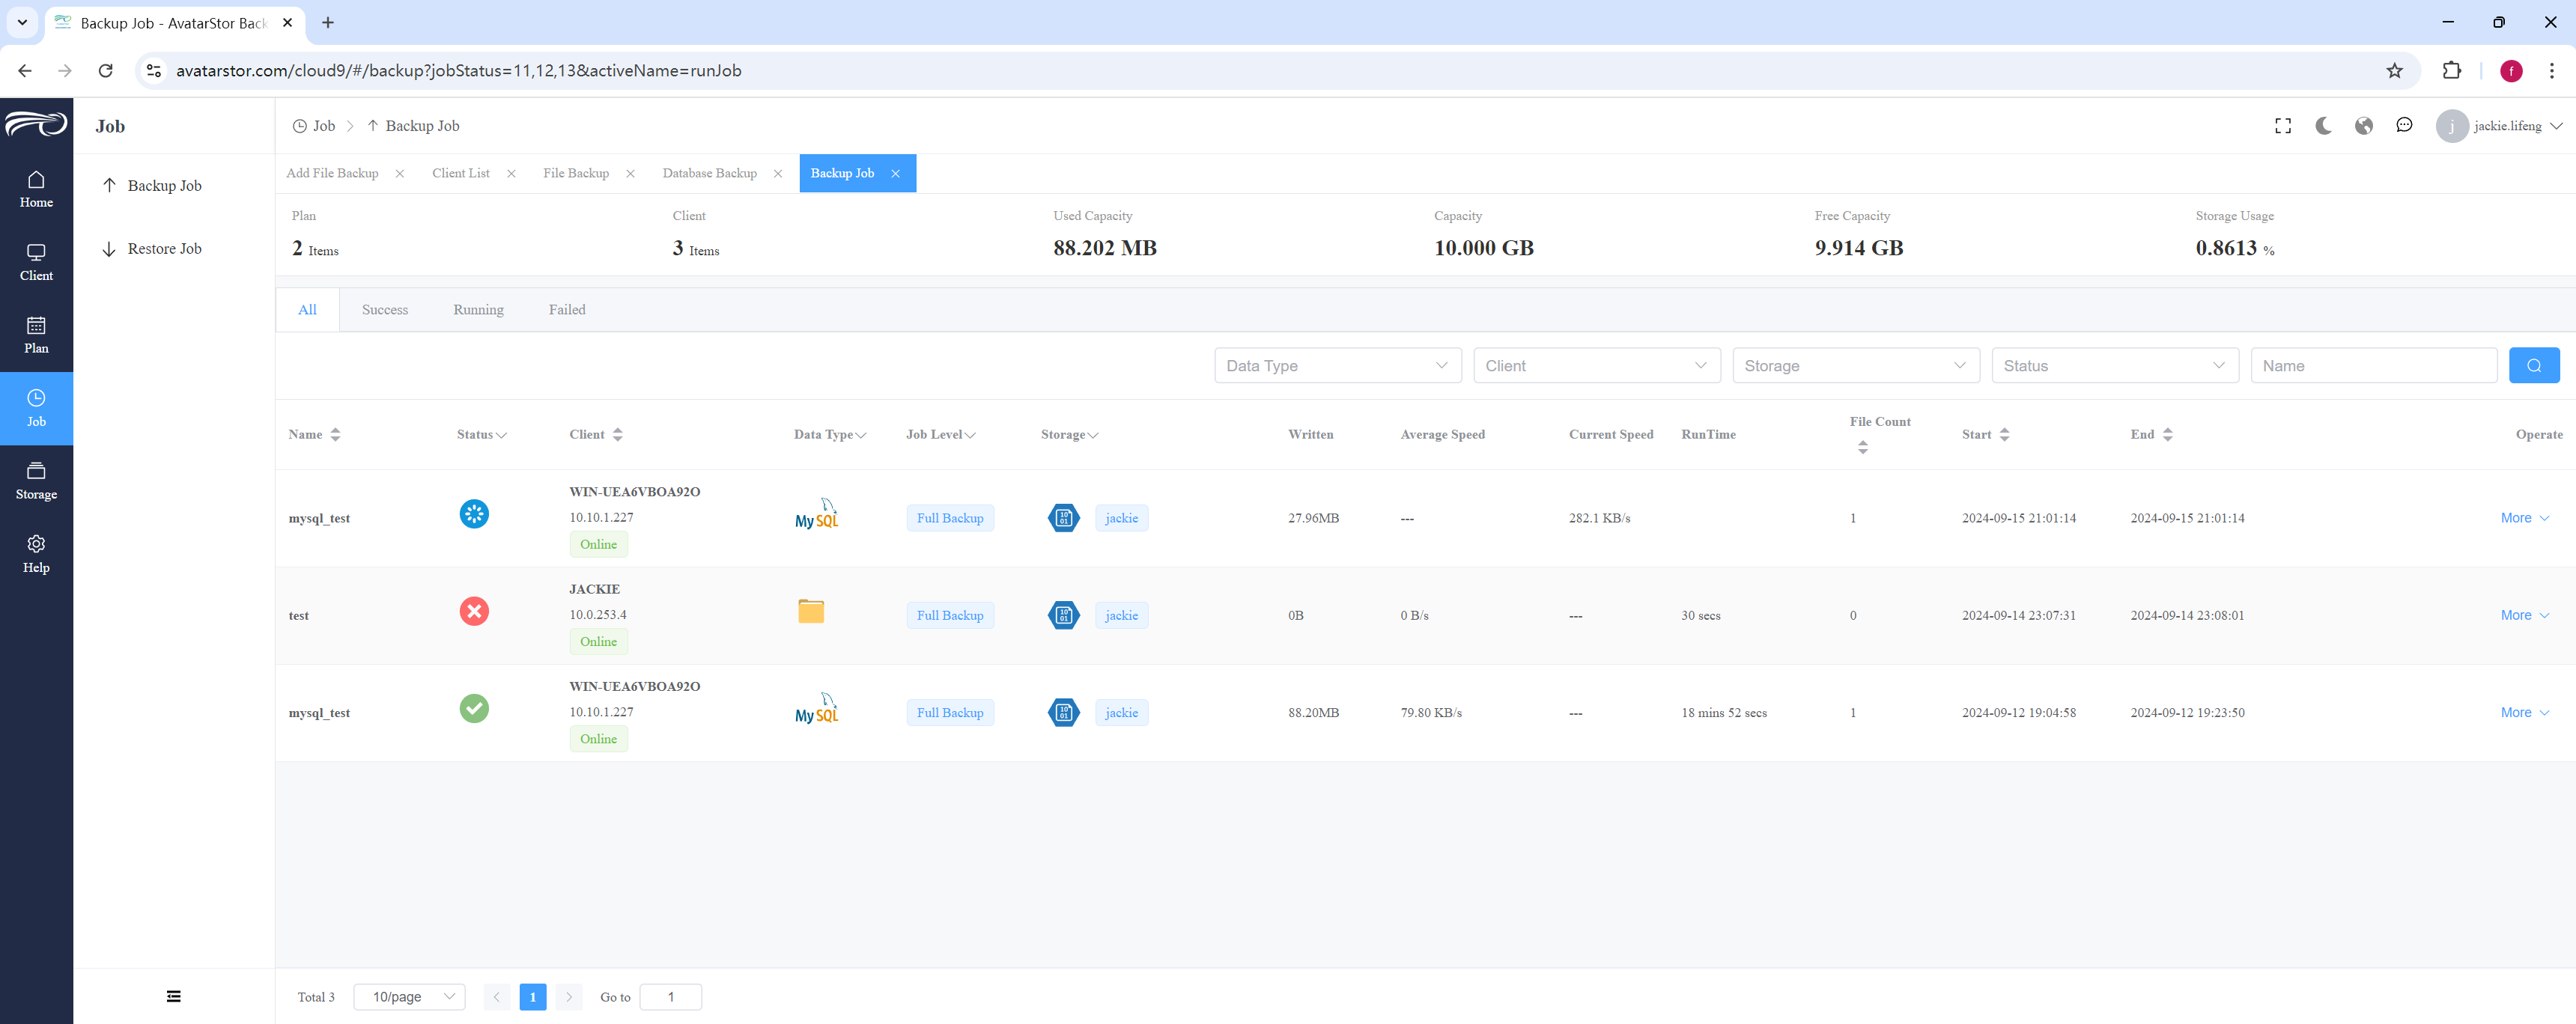
View successful jobs:
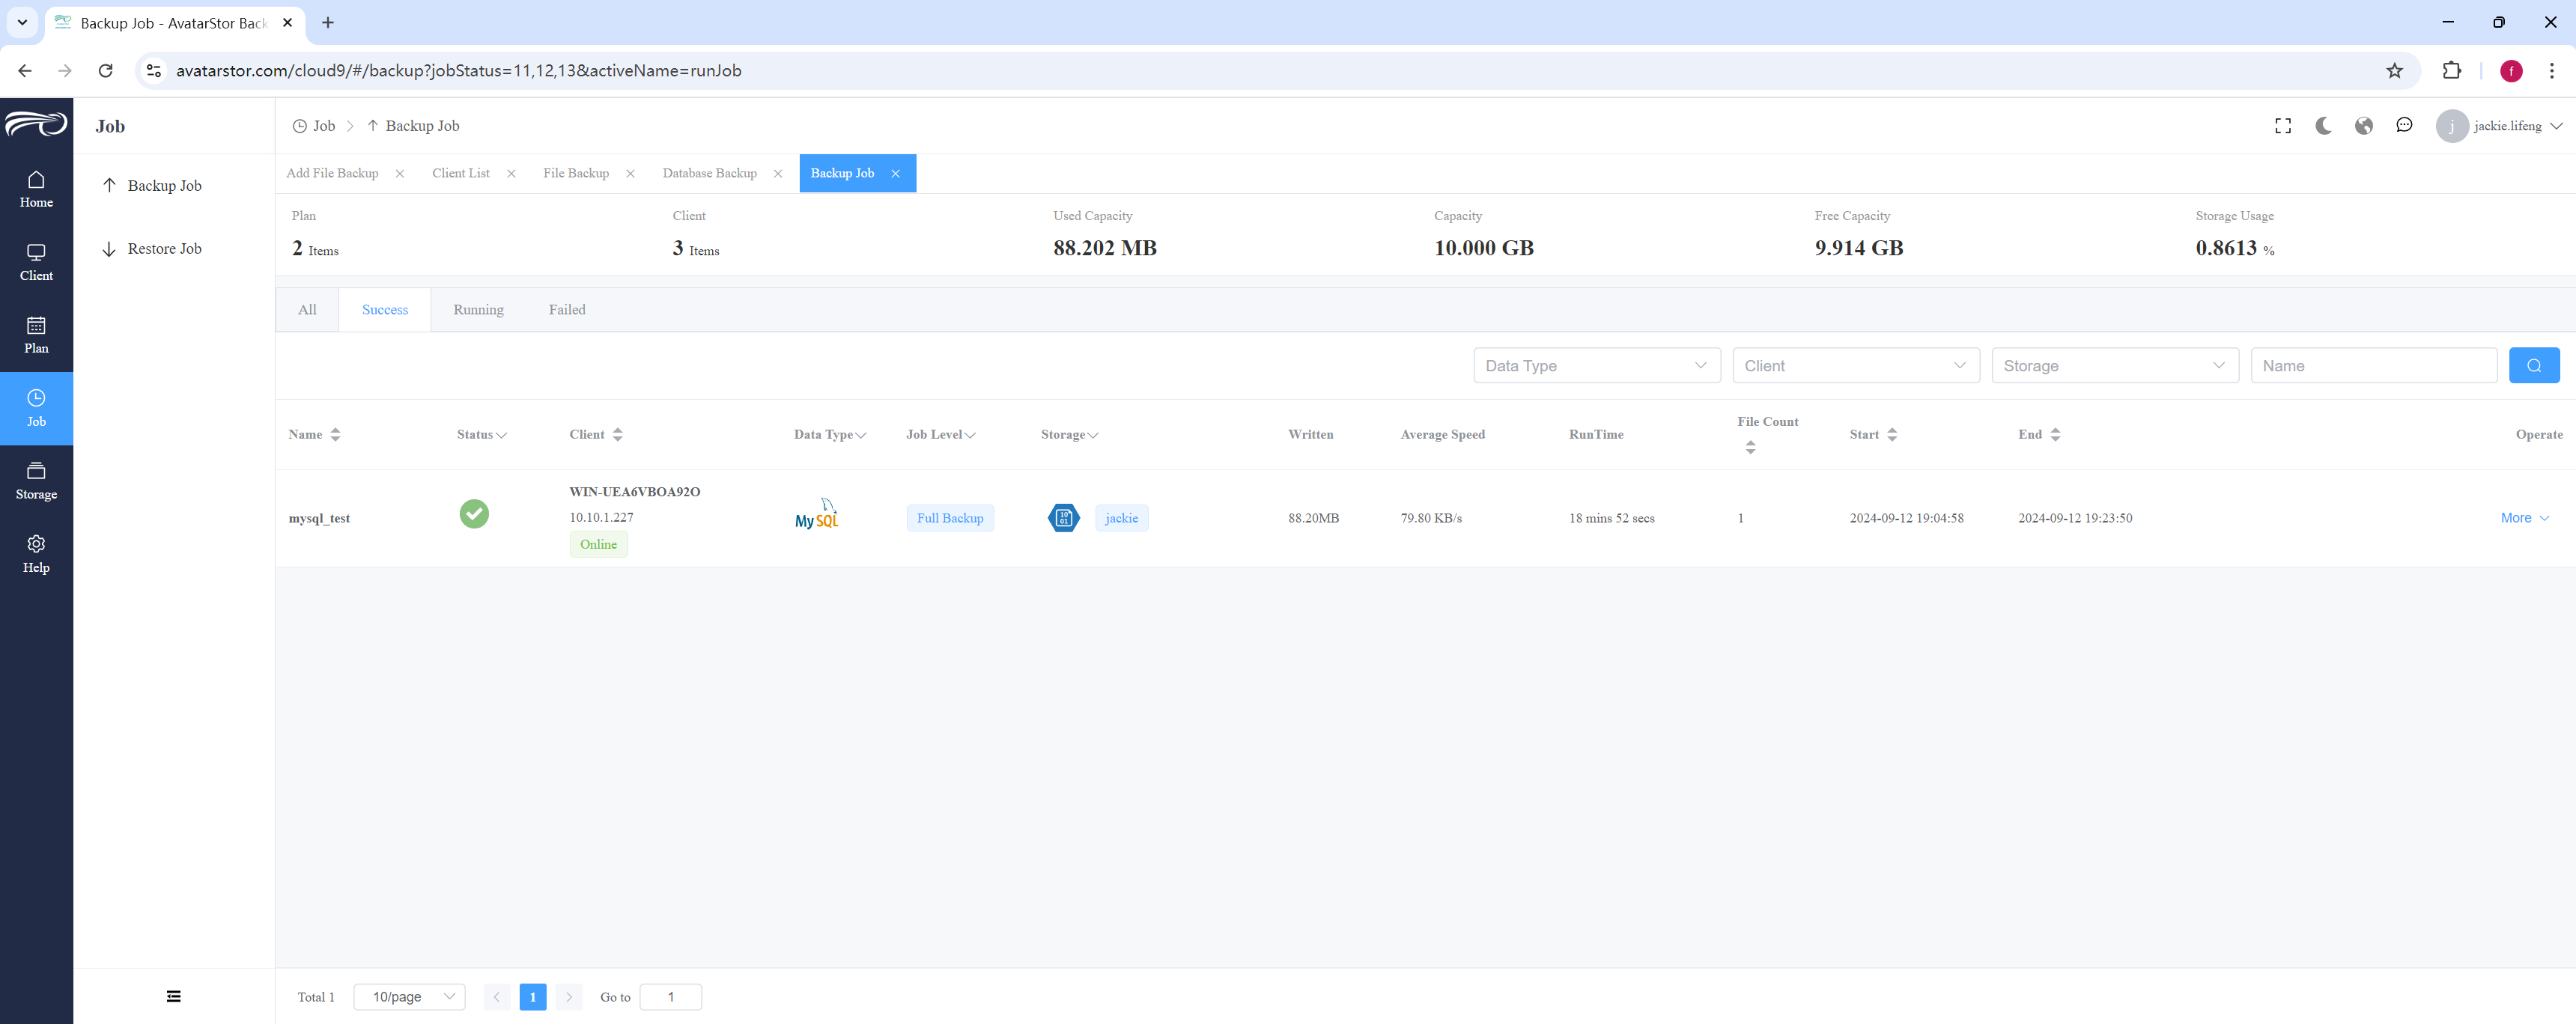
|
Note that jobs can have two statuses: "Successful" and "Partially Successful." A successful job is marked with a green checkmark, while a partially successful job is marked with a yellow exclamation point. A partially successful job means that some data encountered issues or failed during the backup process. It is still possible to restore the backup, but some data may be incomplete. Please refer to the client logs to analyze and review the specific data that failed. |
View running jobs.
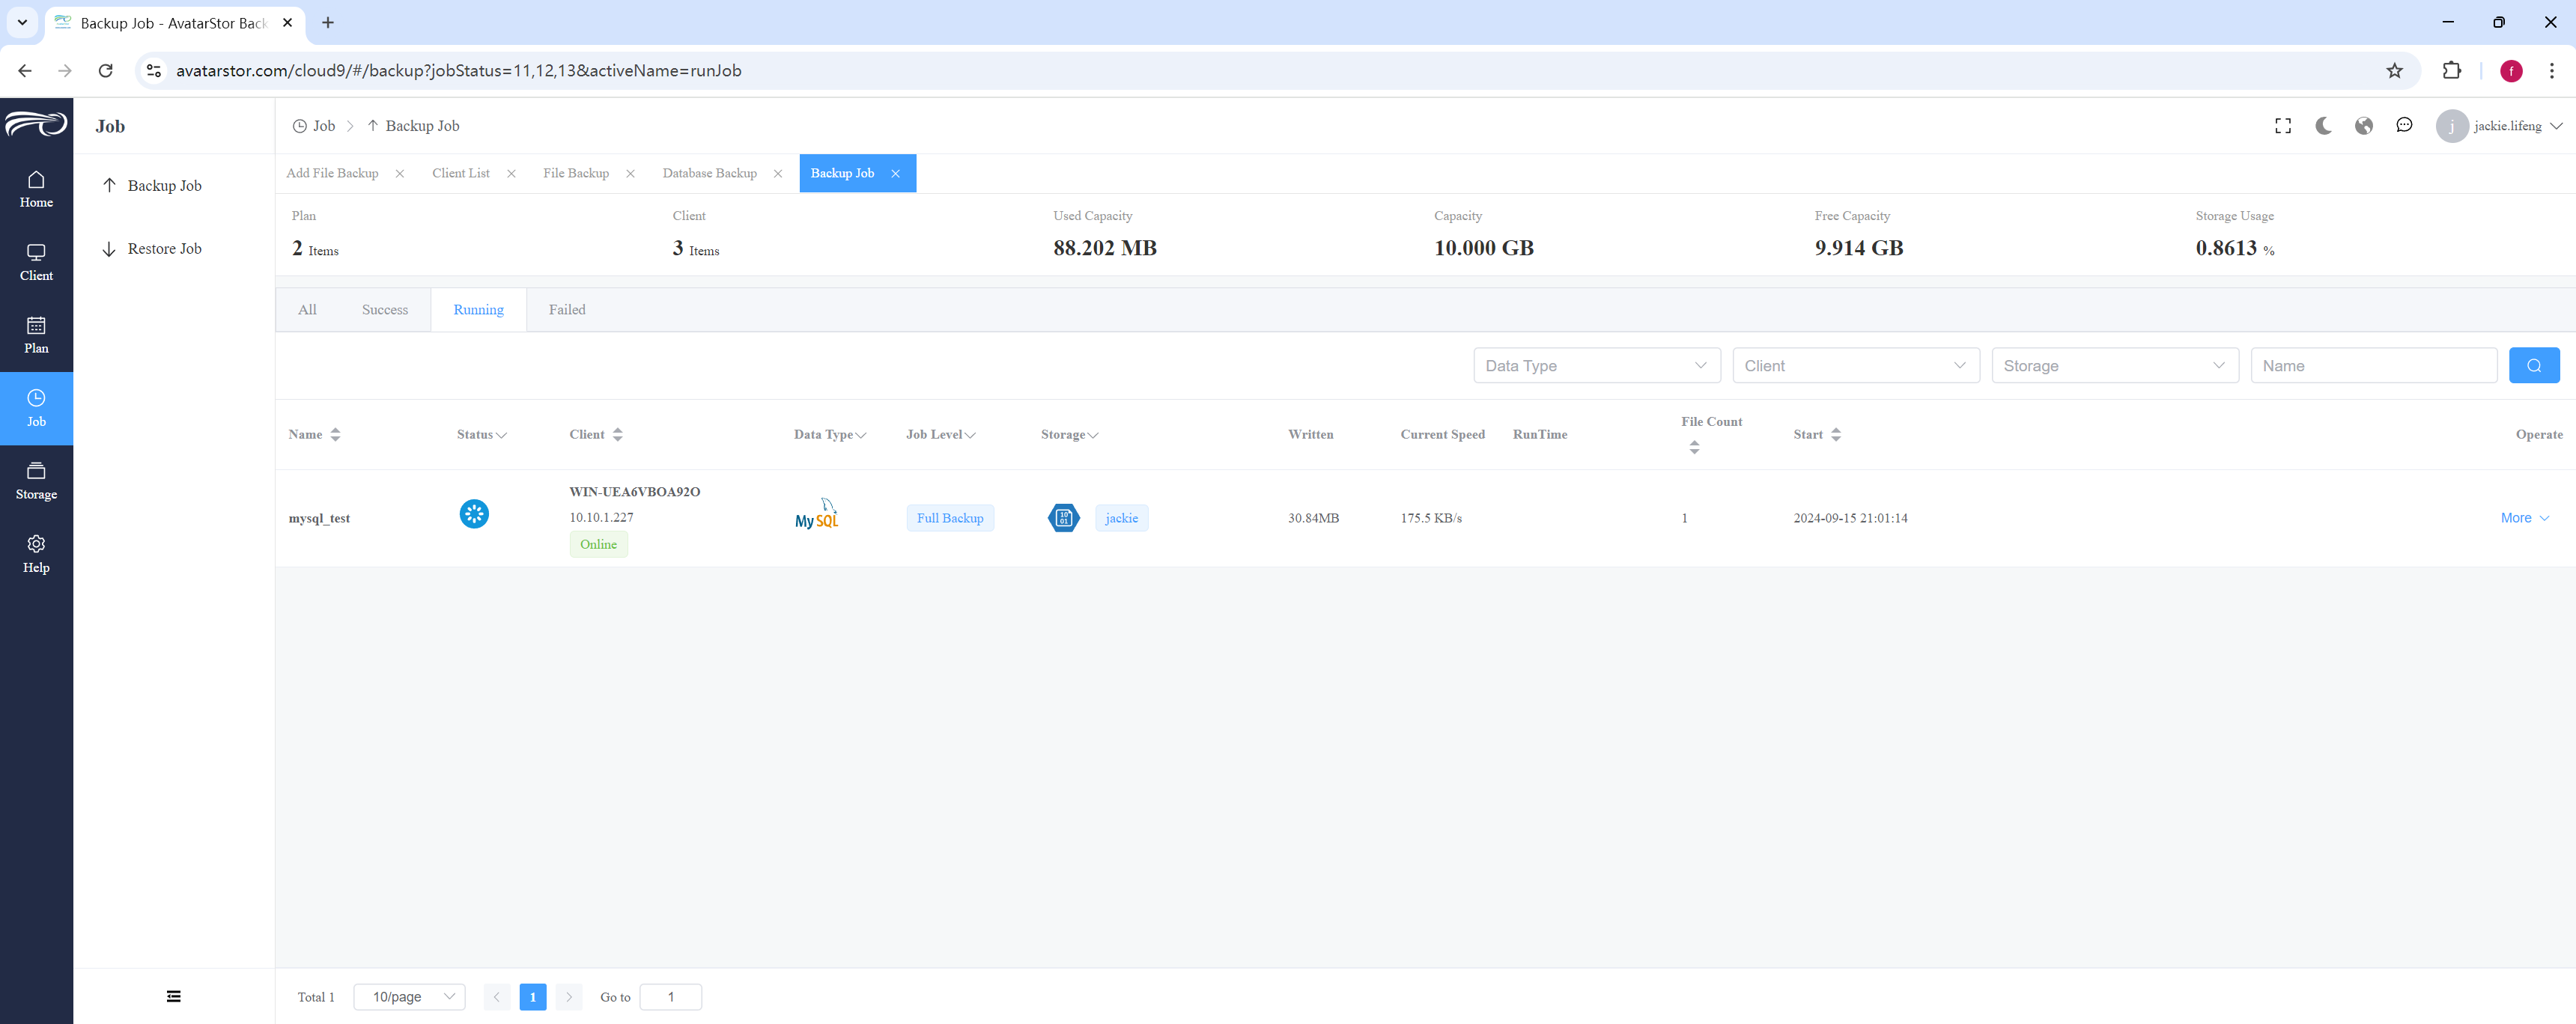
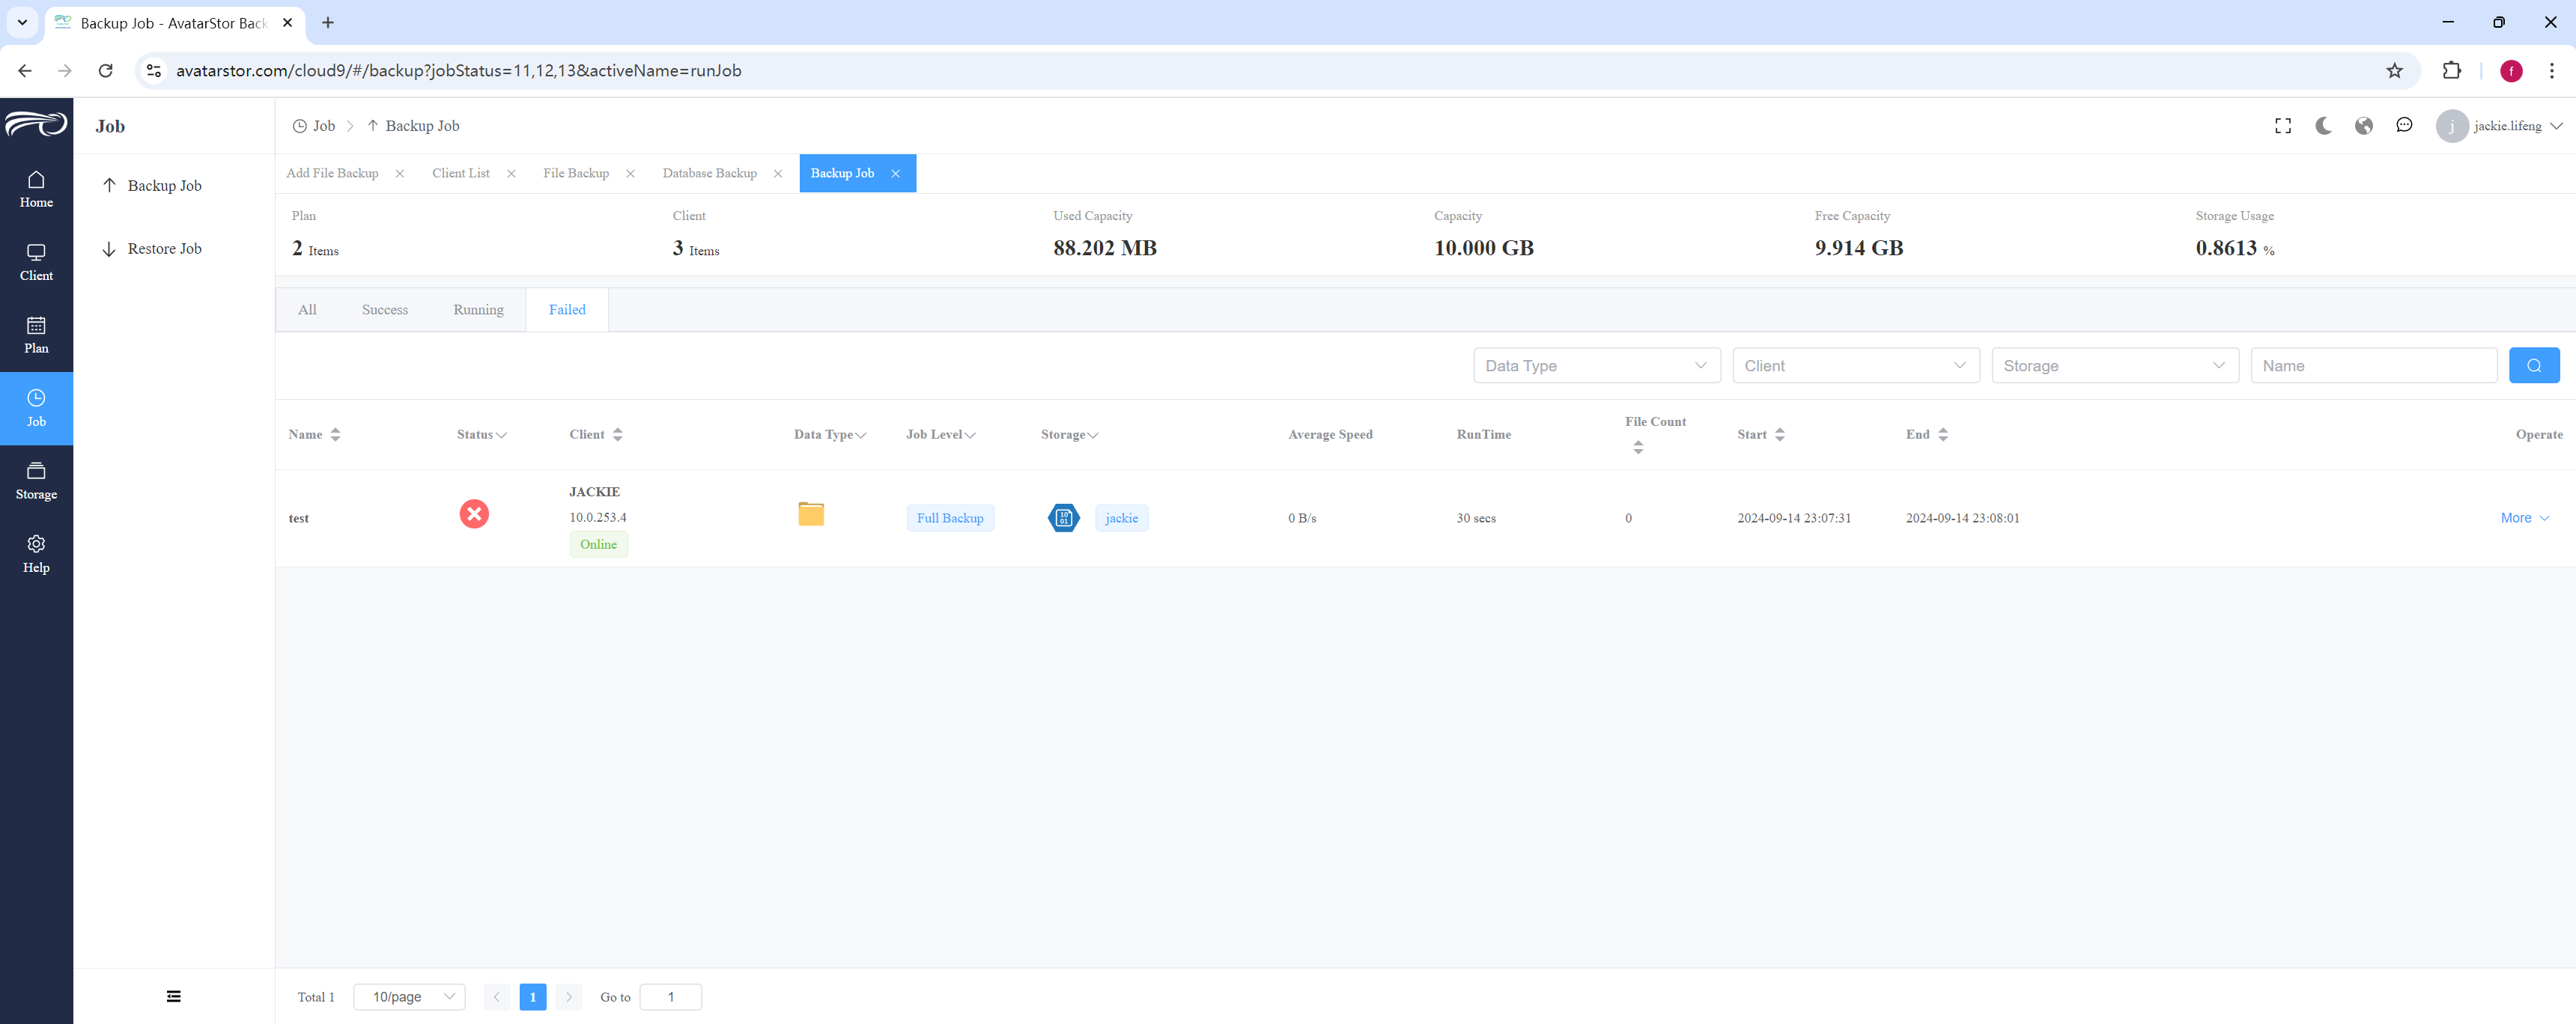
View failed jobs:
4.5 View/edit/disable/delete backup plan
You can edit, disable, delete, or view an already created backup plan by clicking on [Plan] - [xx Backup] - [More]. This provides you with various management options for your backup plans to suit your operational needs.
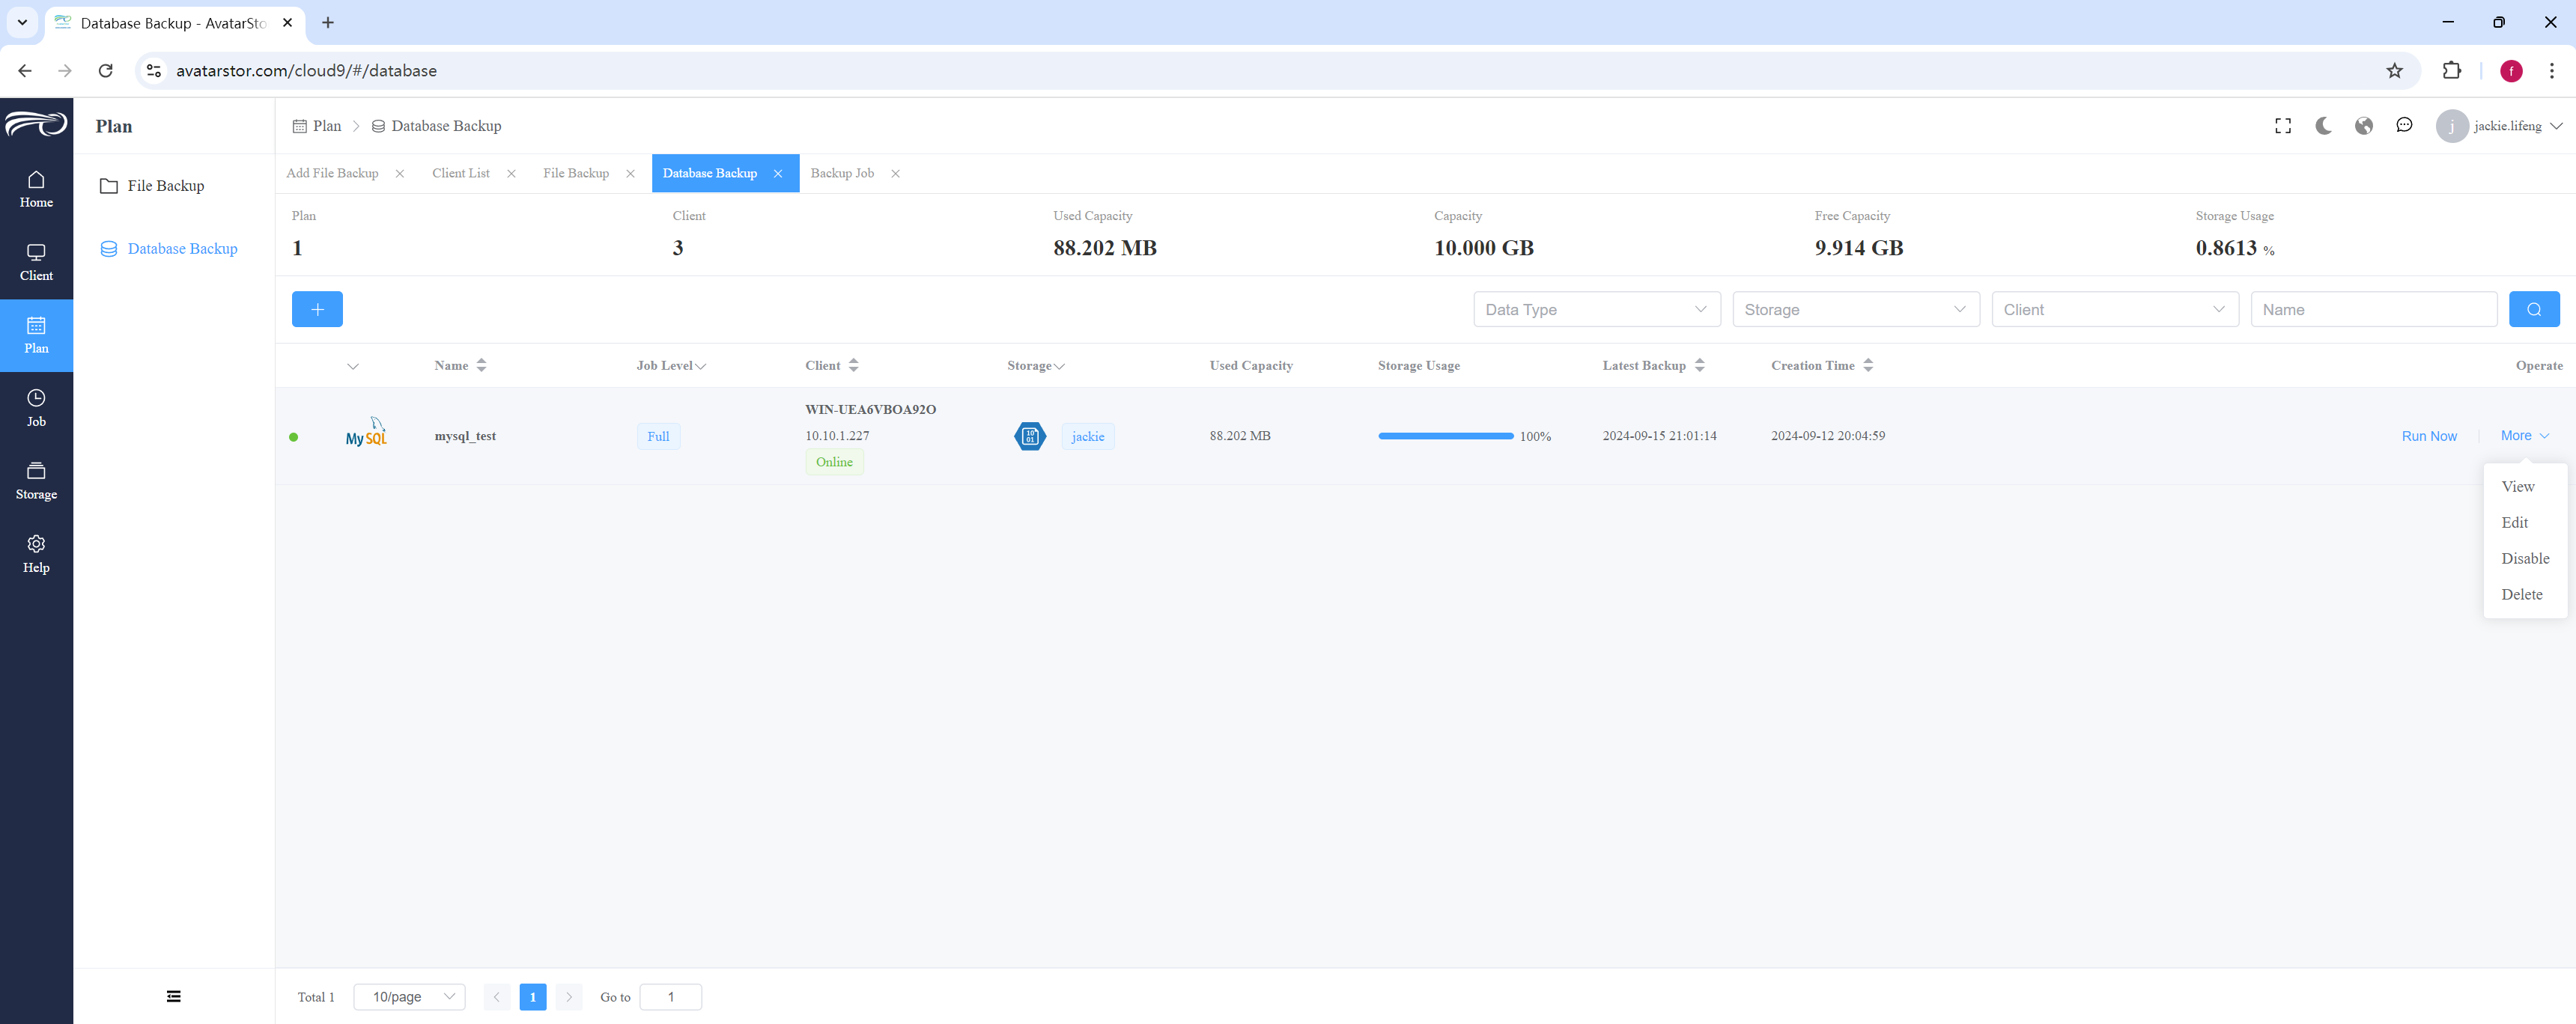
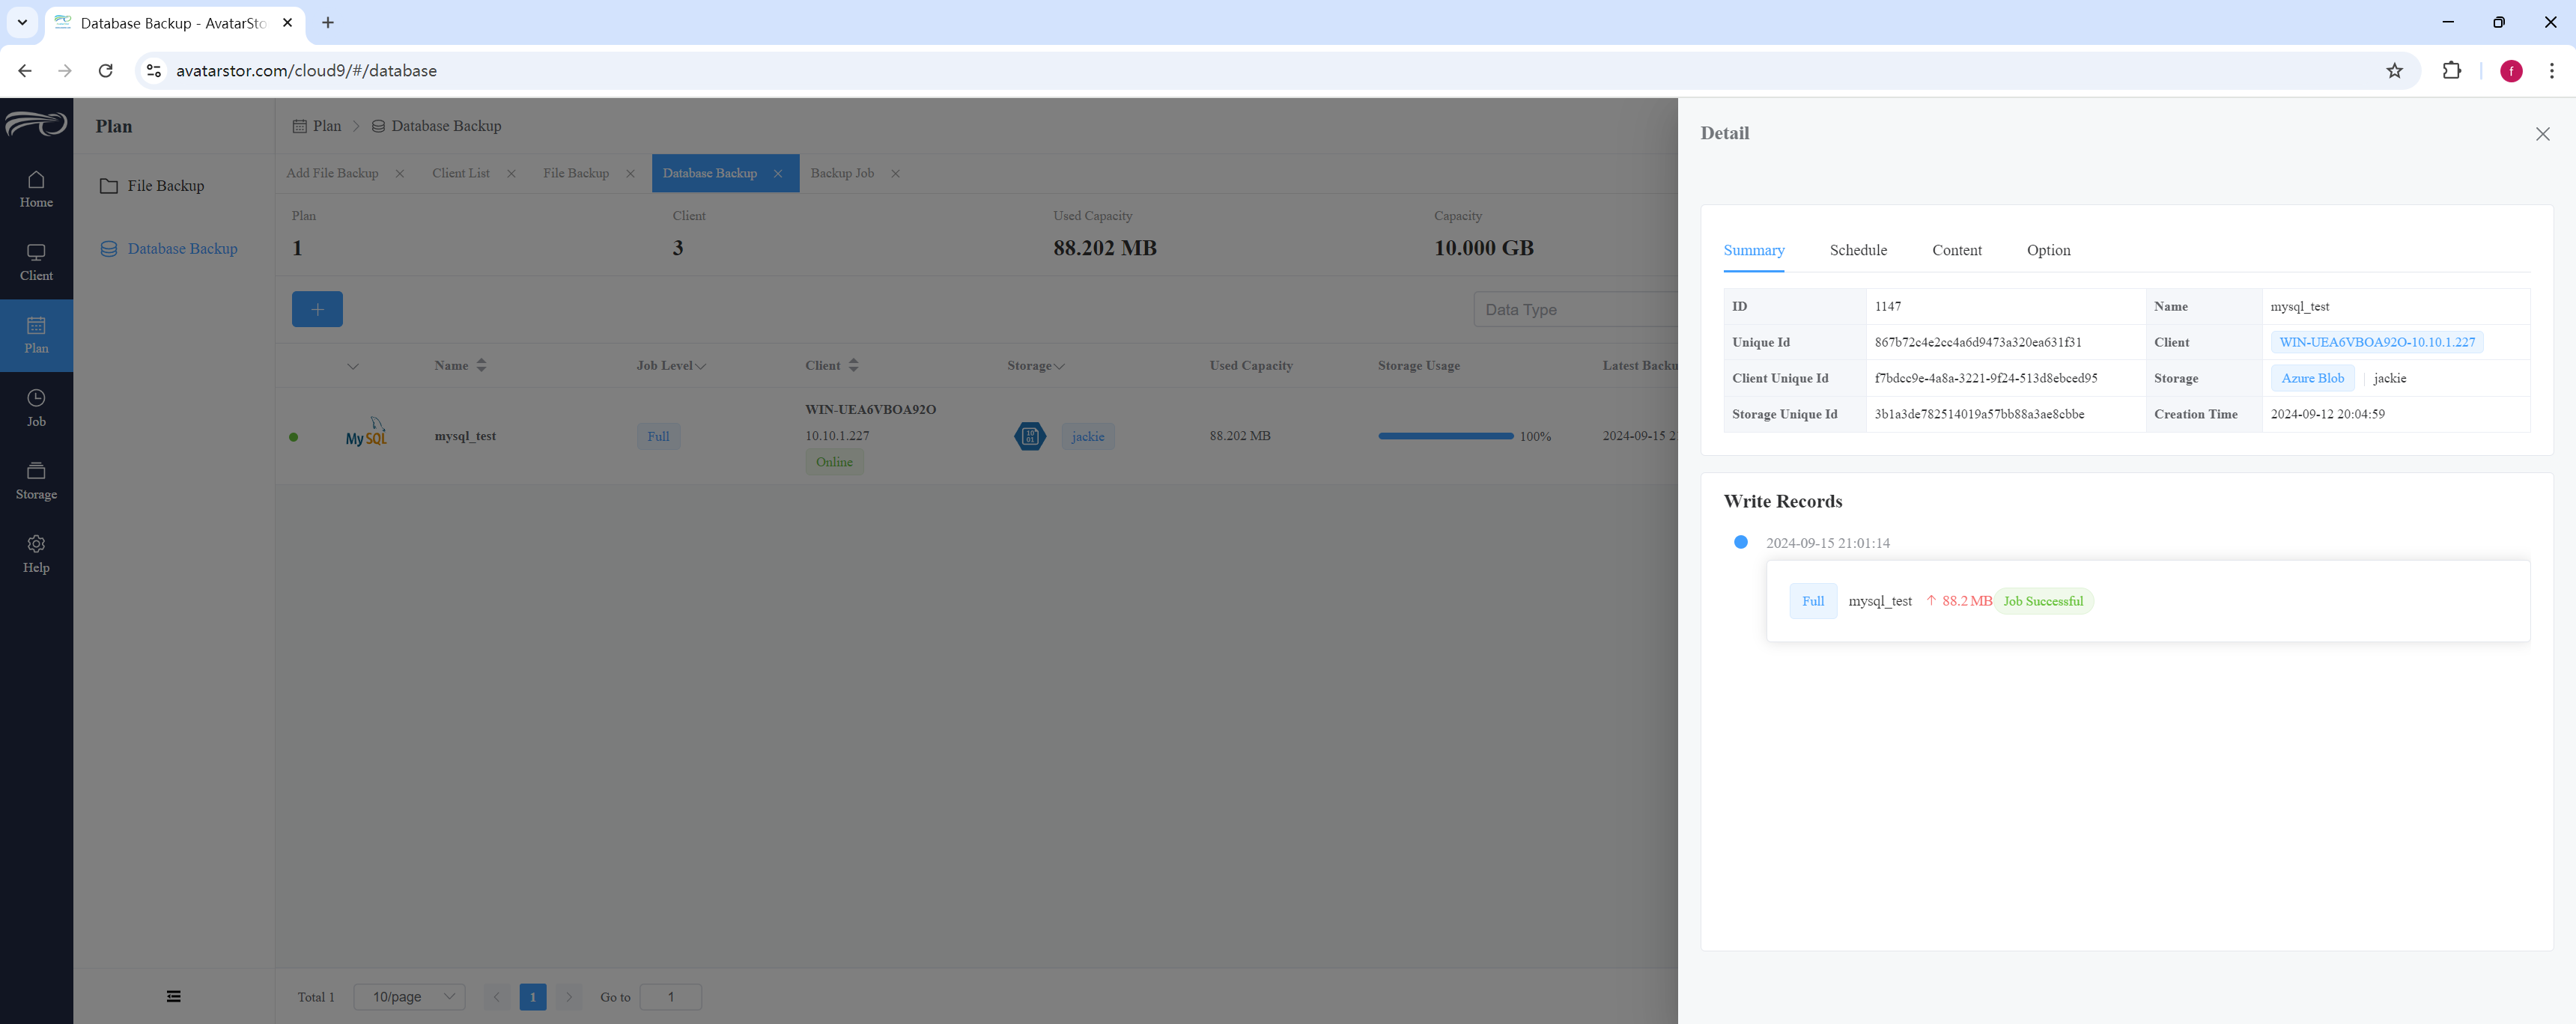
In the View section, you can see the basic information of the backup plan, including the schedule, backup content, and advanced options. This allows you to review the settings and ensure that everything is configured as expected for the backup plan.
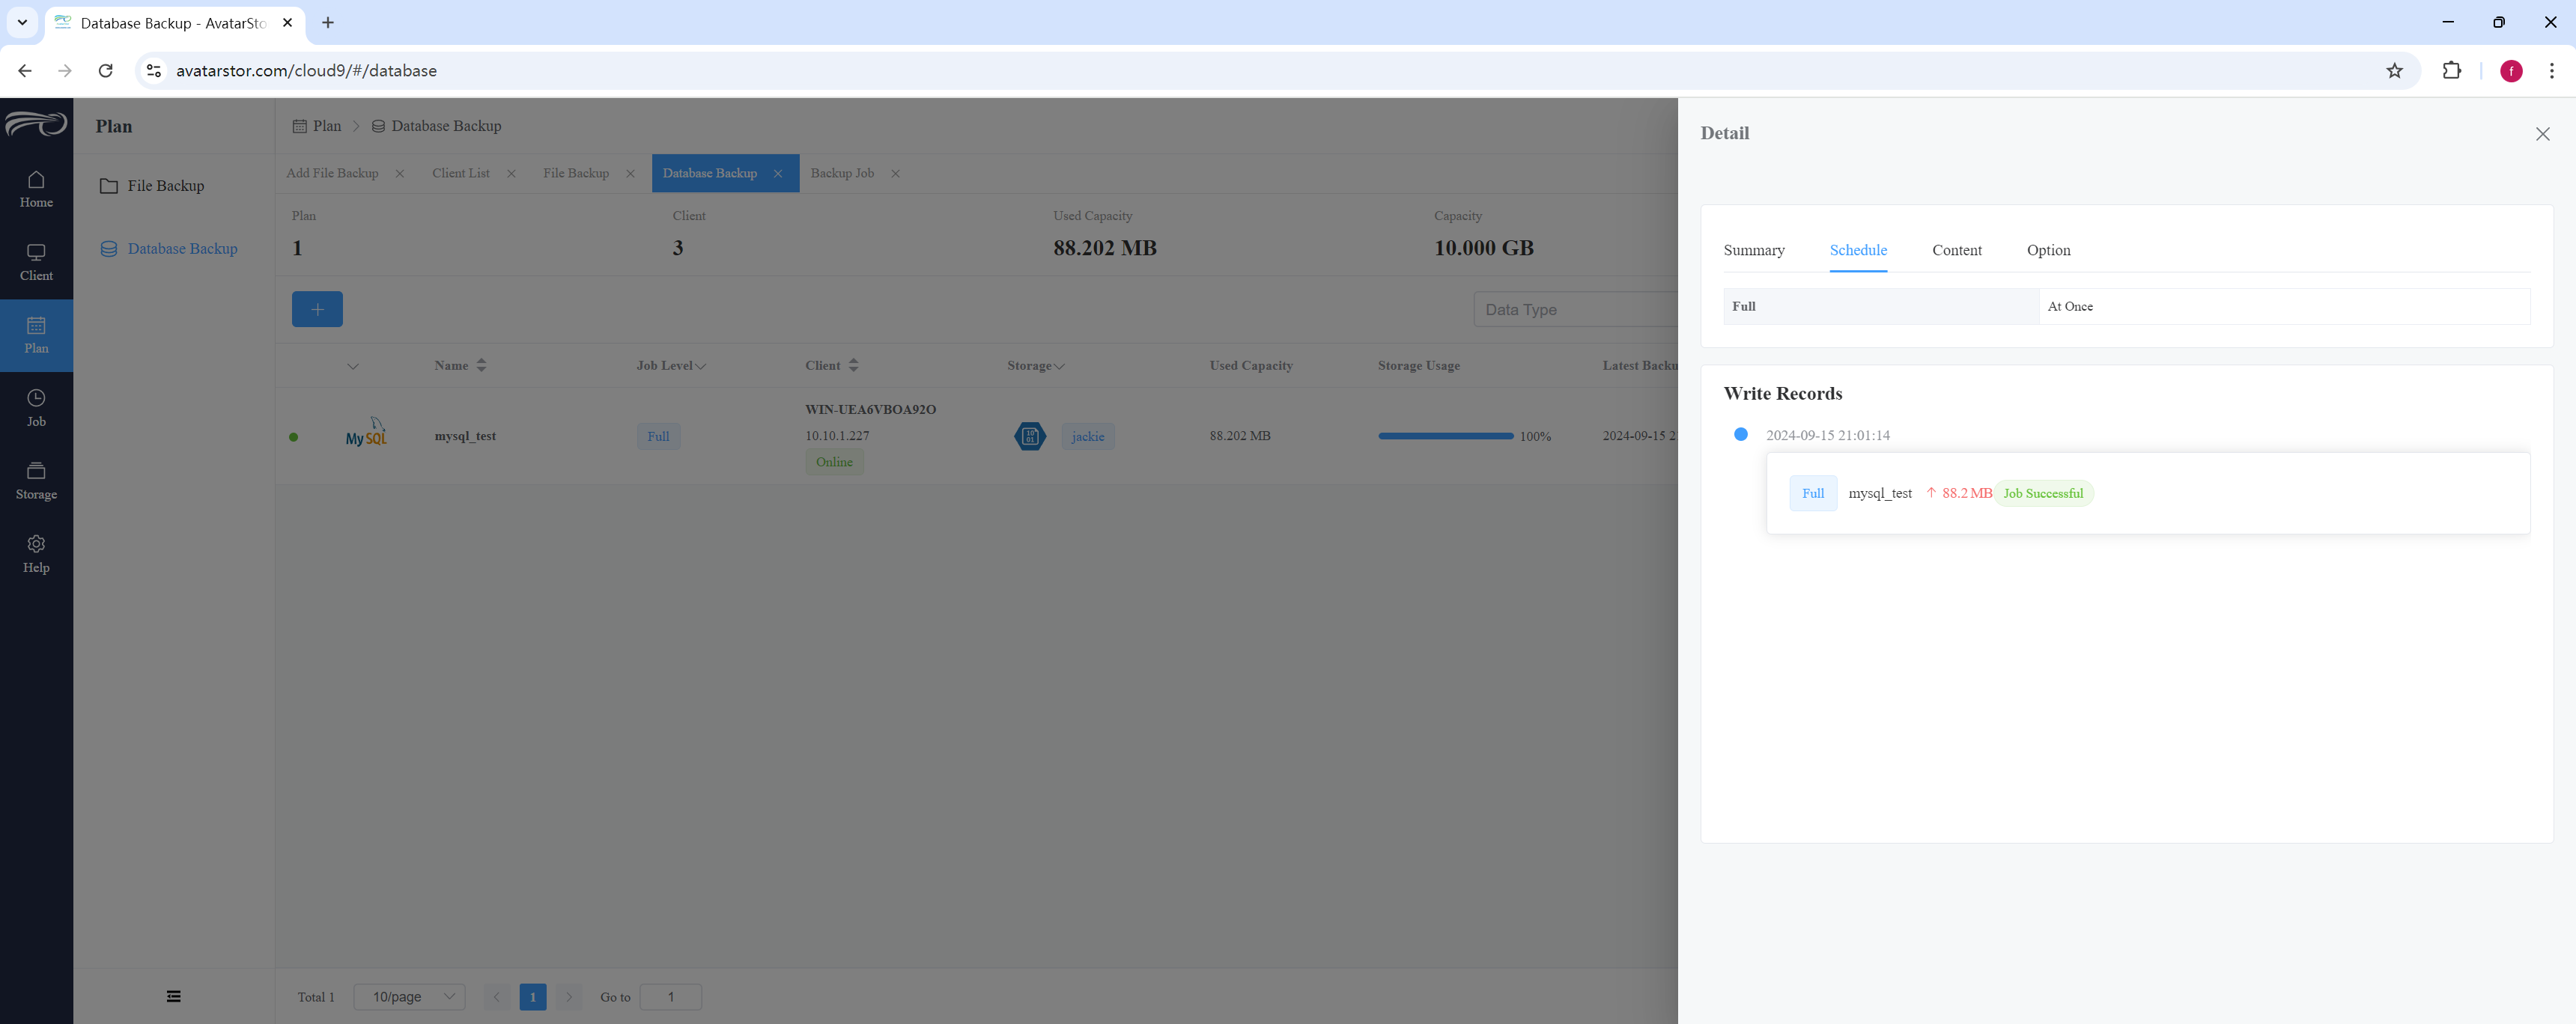
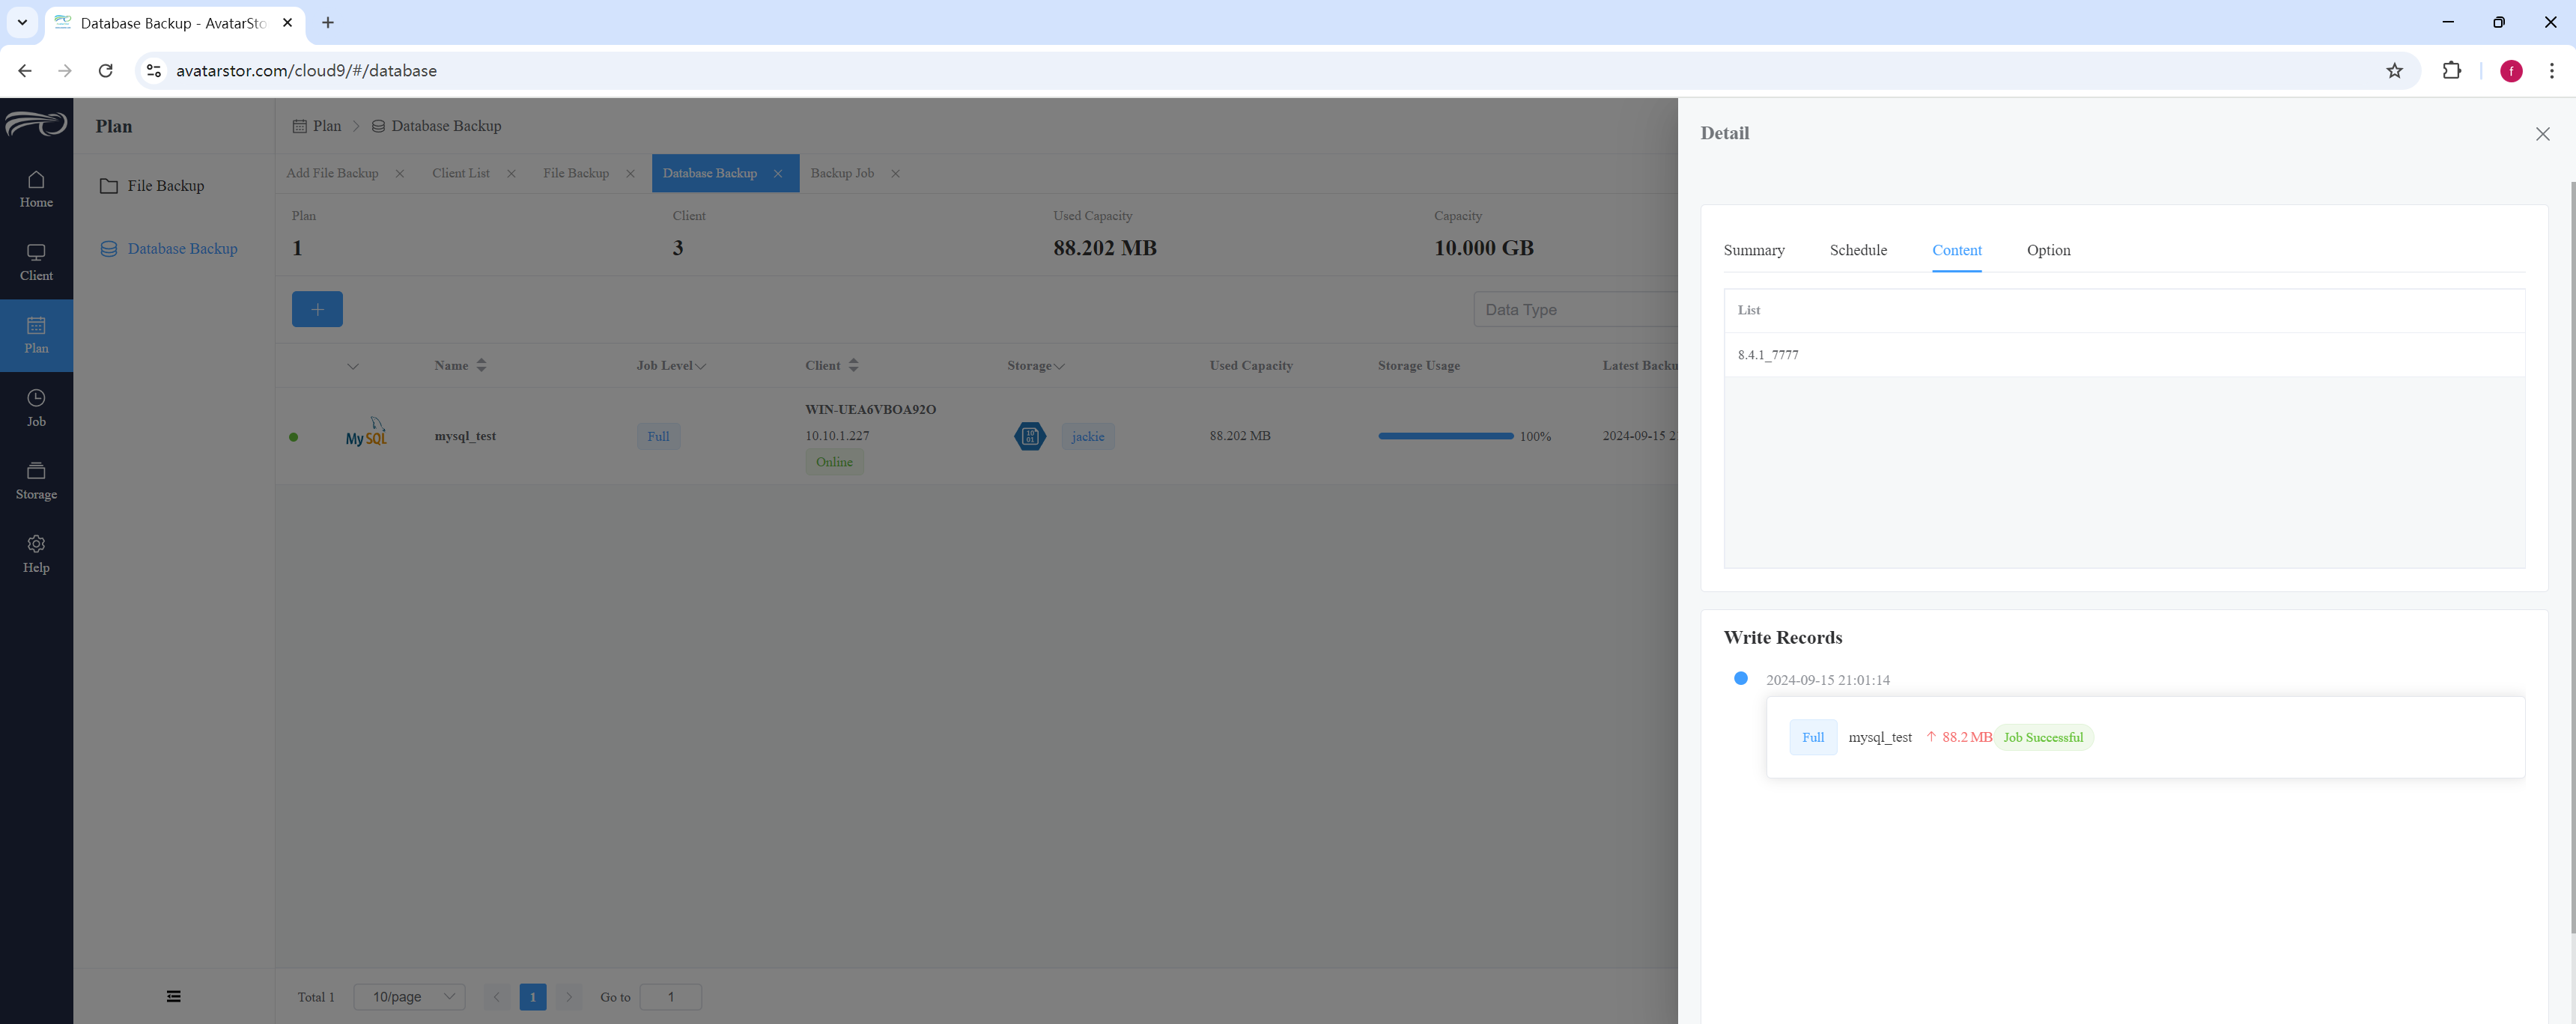
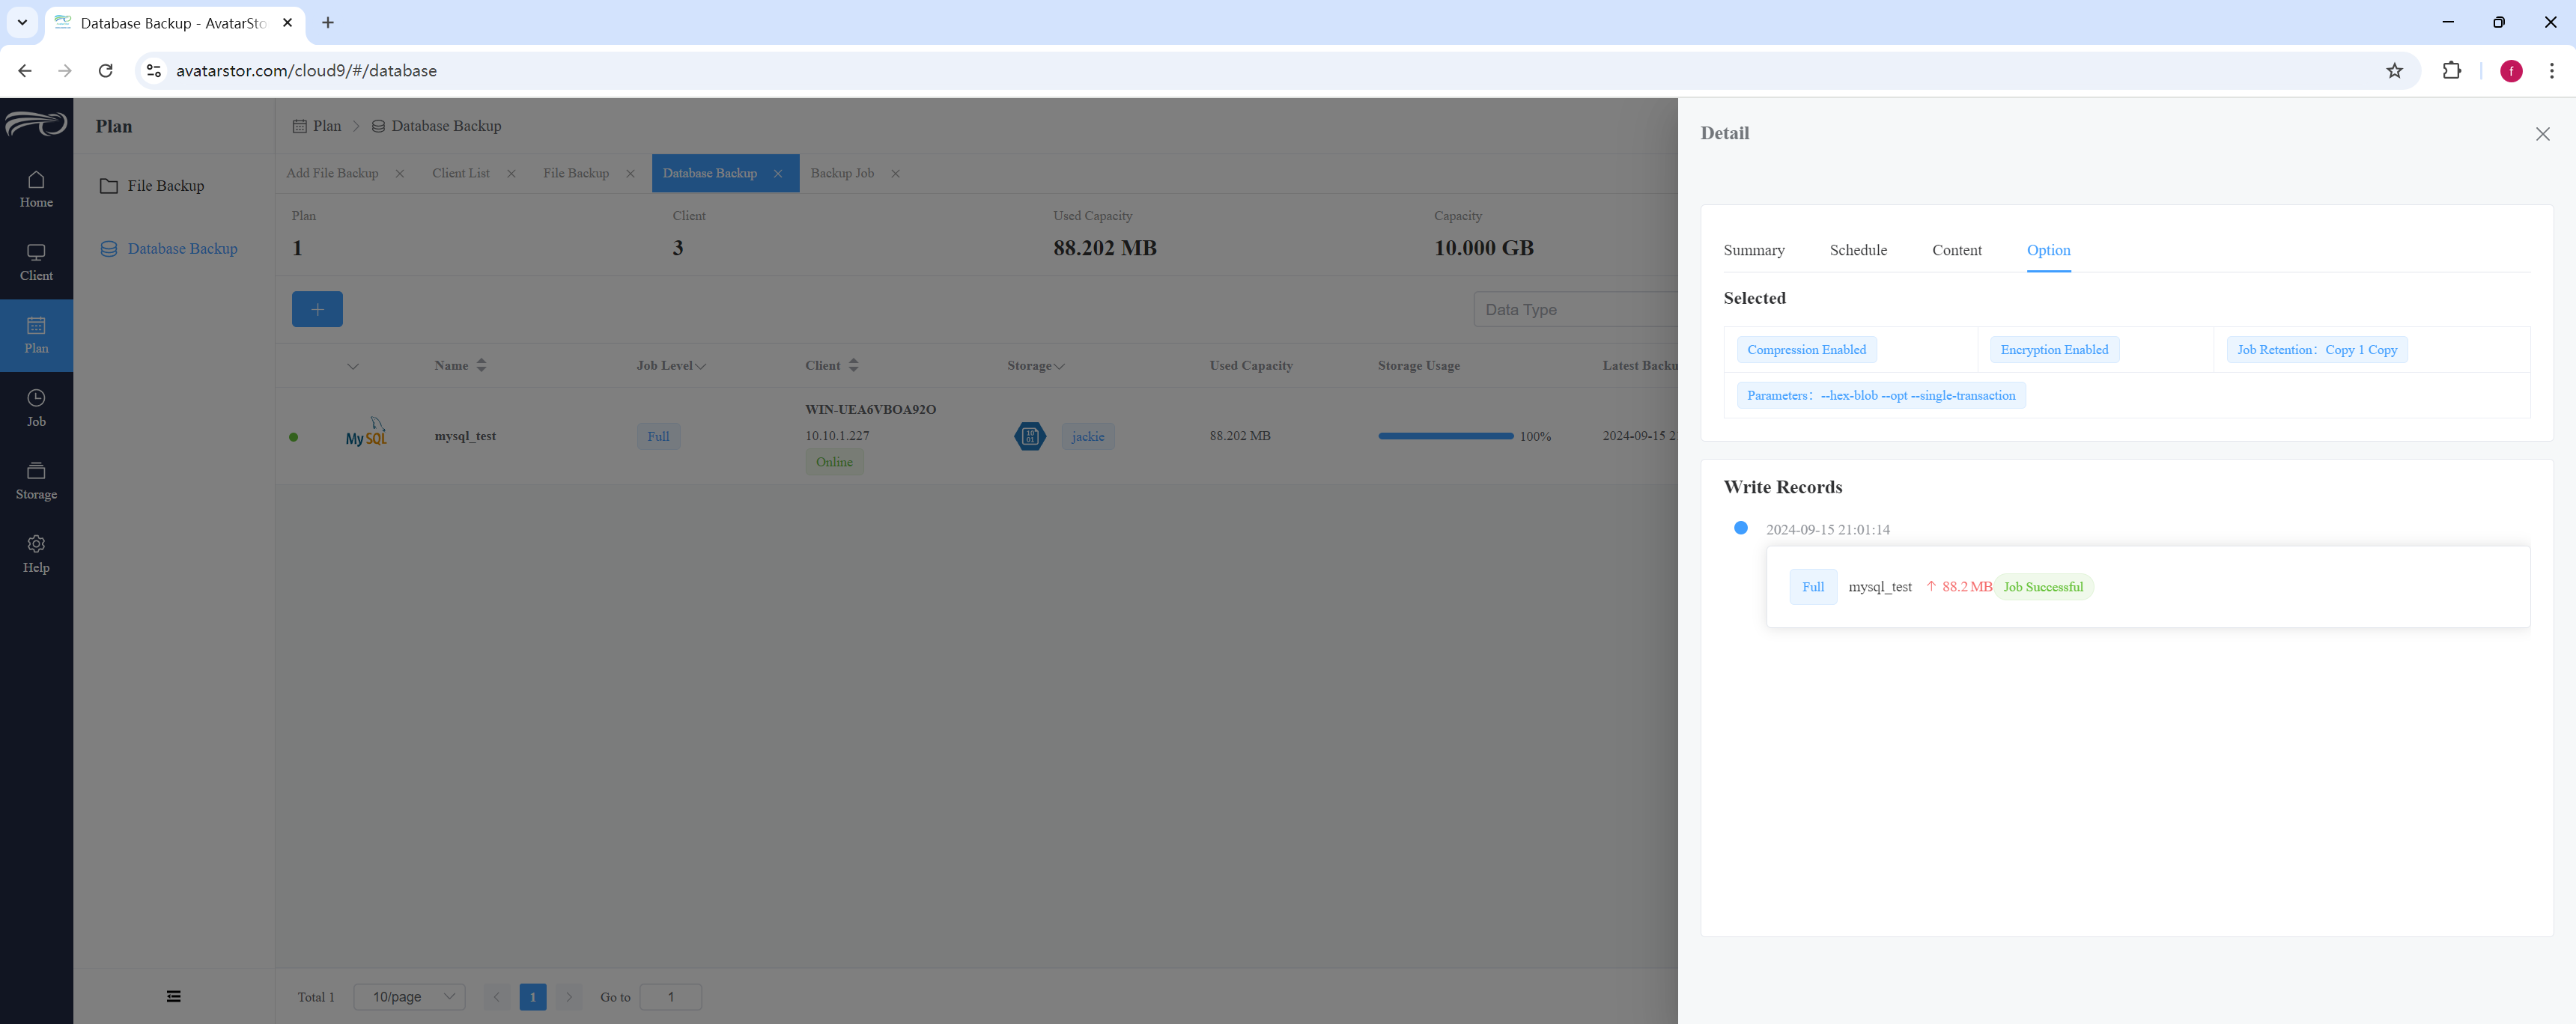
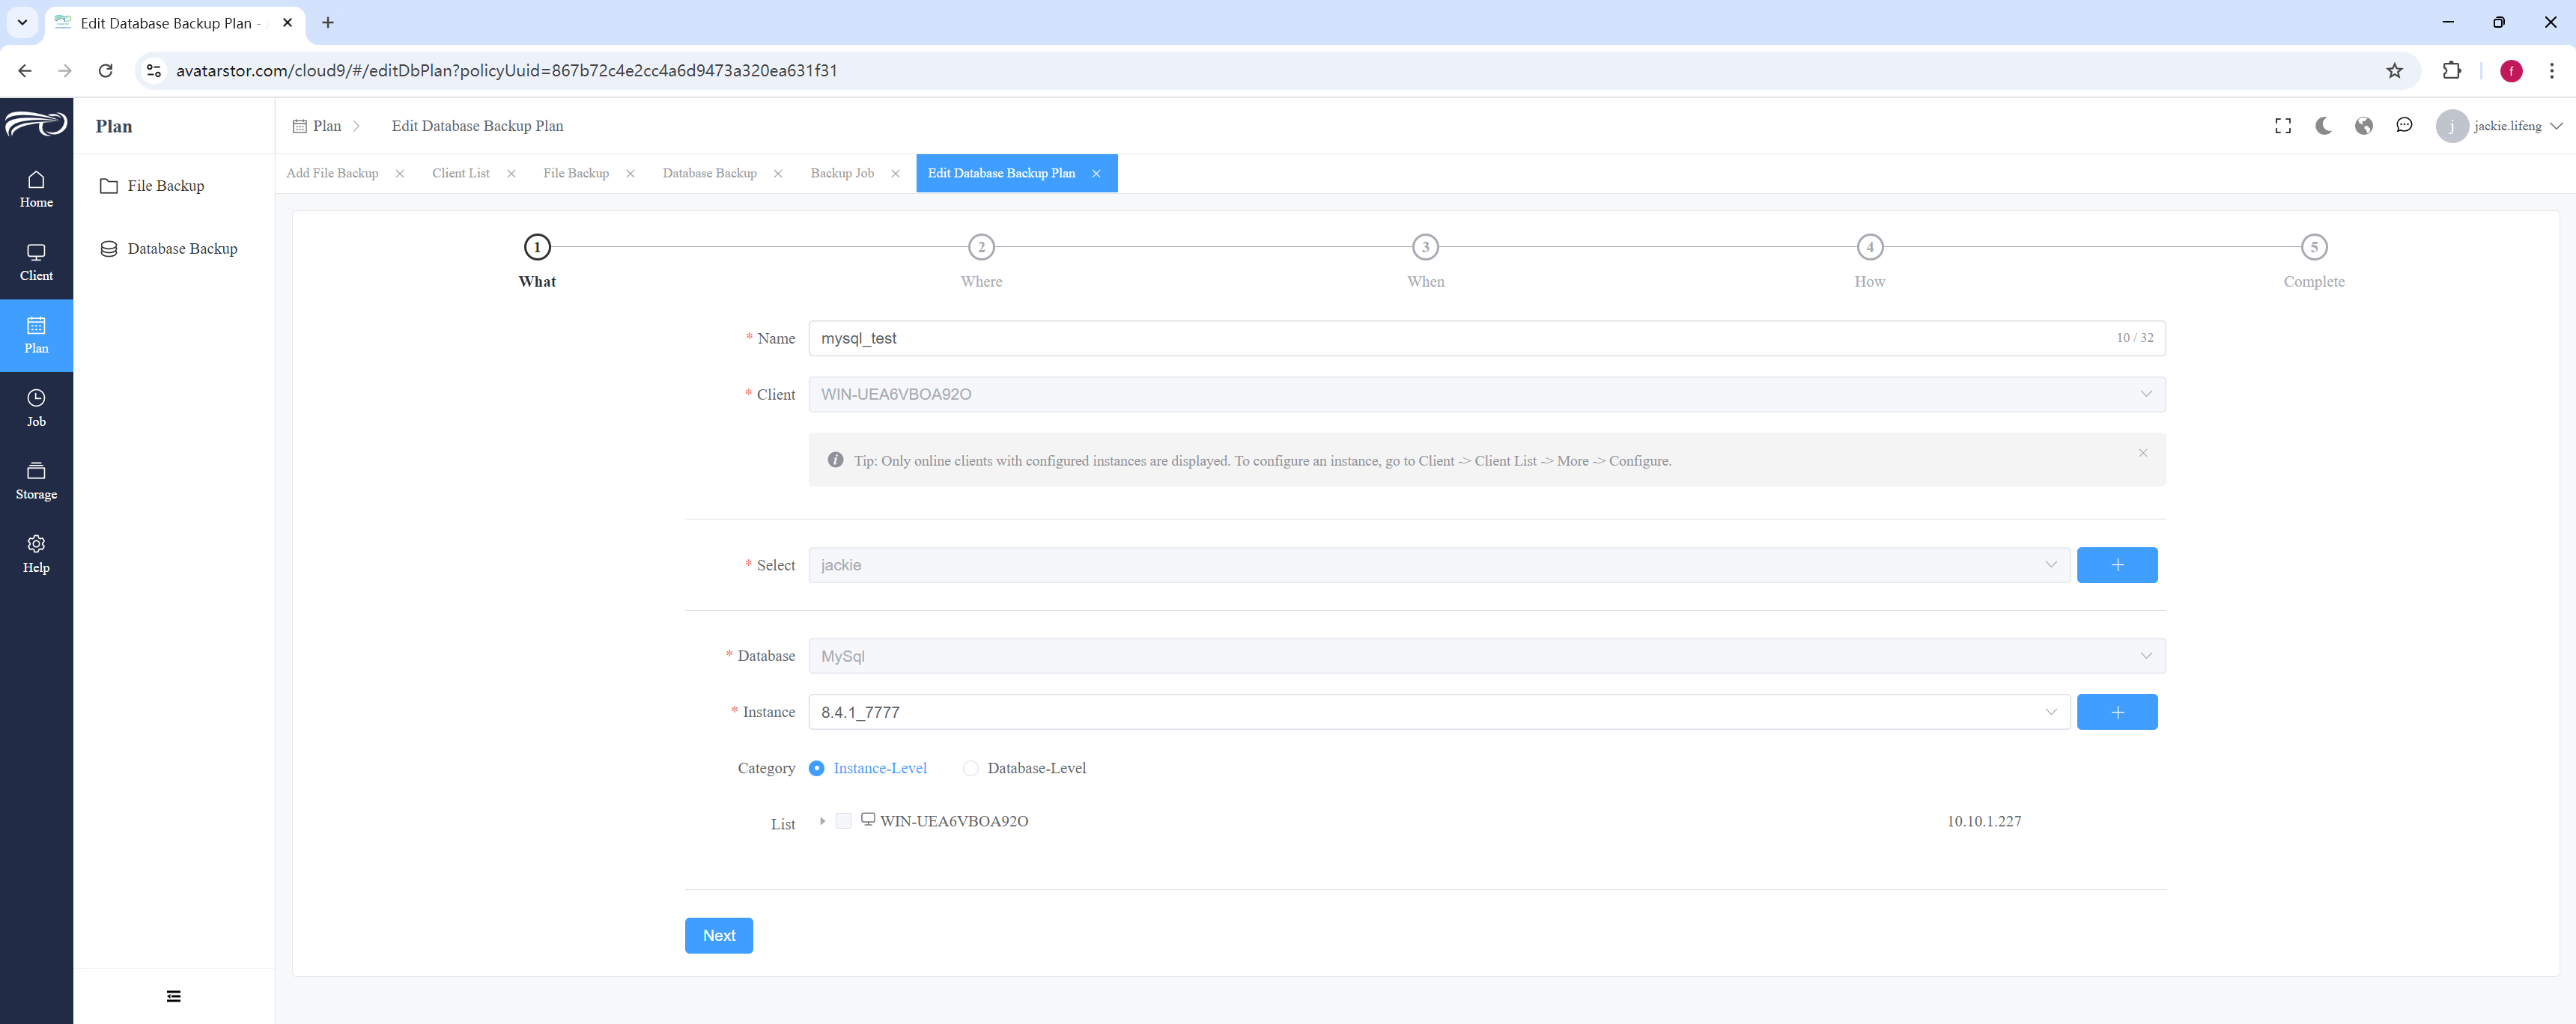
In the Edit section, you can modify the backup plan by following the same steps as when creating the plan. This allows you to adjust or change any aspect of the plan, such as schedule, backup content, or advanced options, to suit your updated requirements.
To disable a backup plan, you can prevent it from running automatically. This option temporarily pauses the plan without deleting it, allowing you to re-enable it later if needed. You can disable the plan by selecting [More] next to the specific backup plan and choosing Disable.
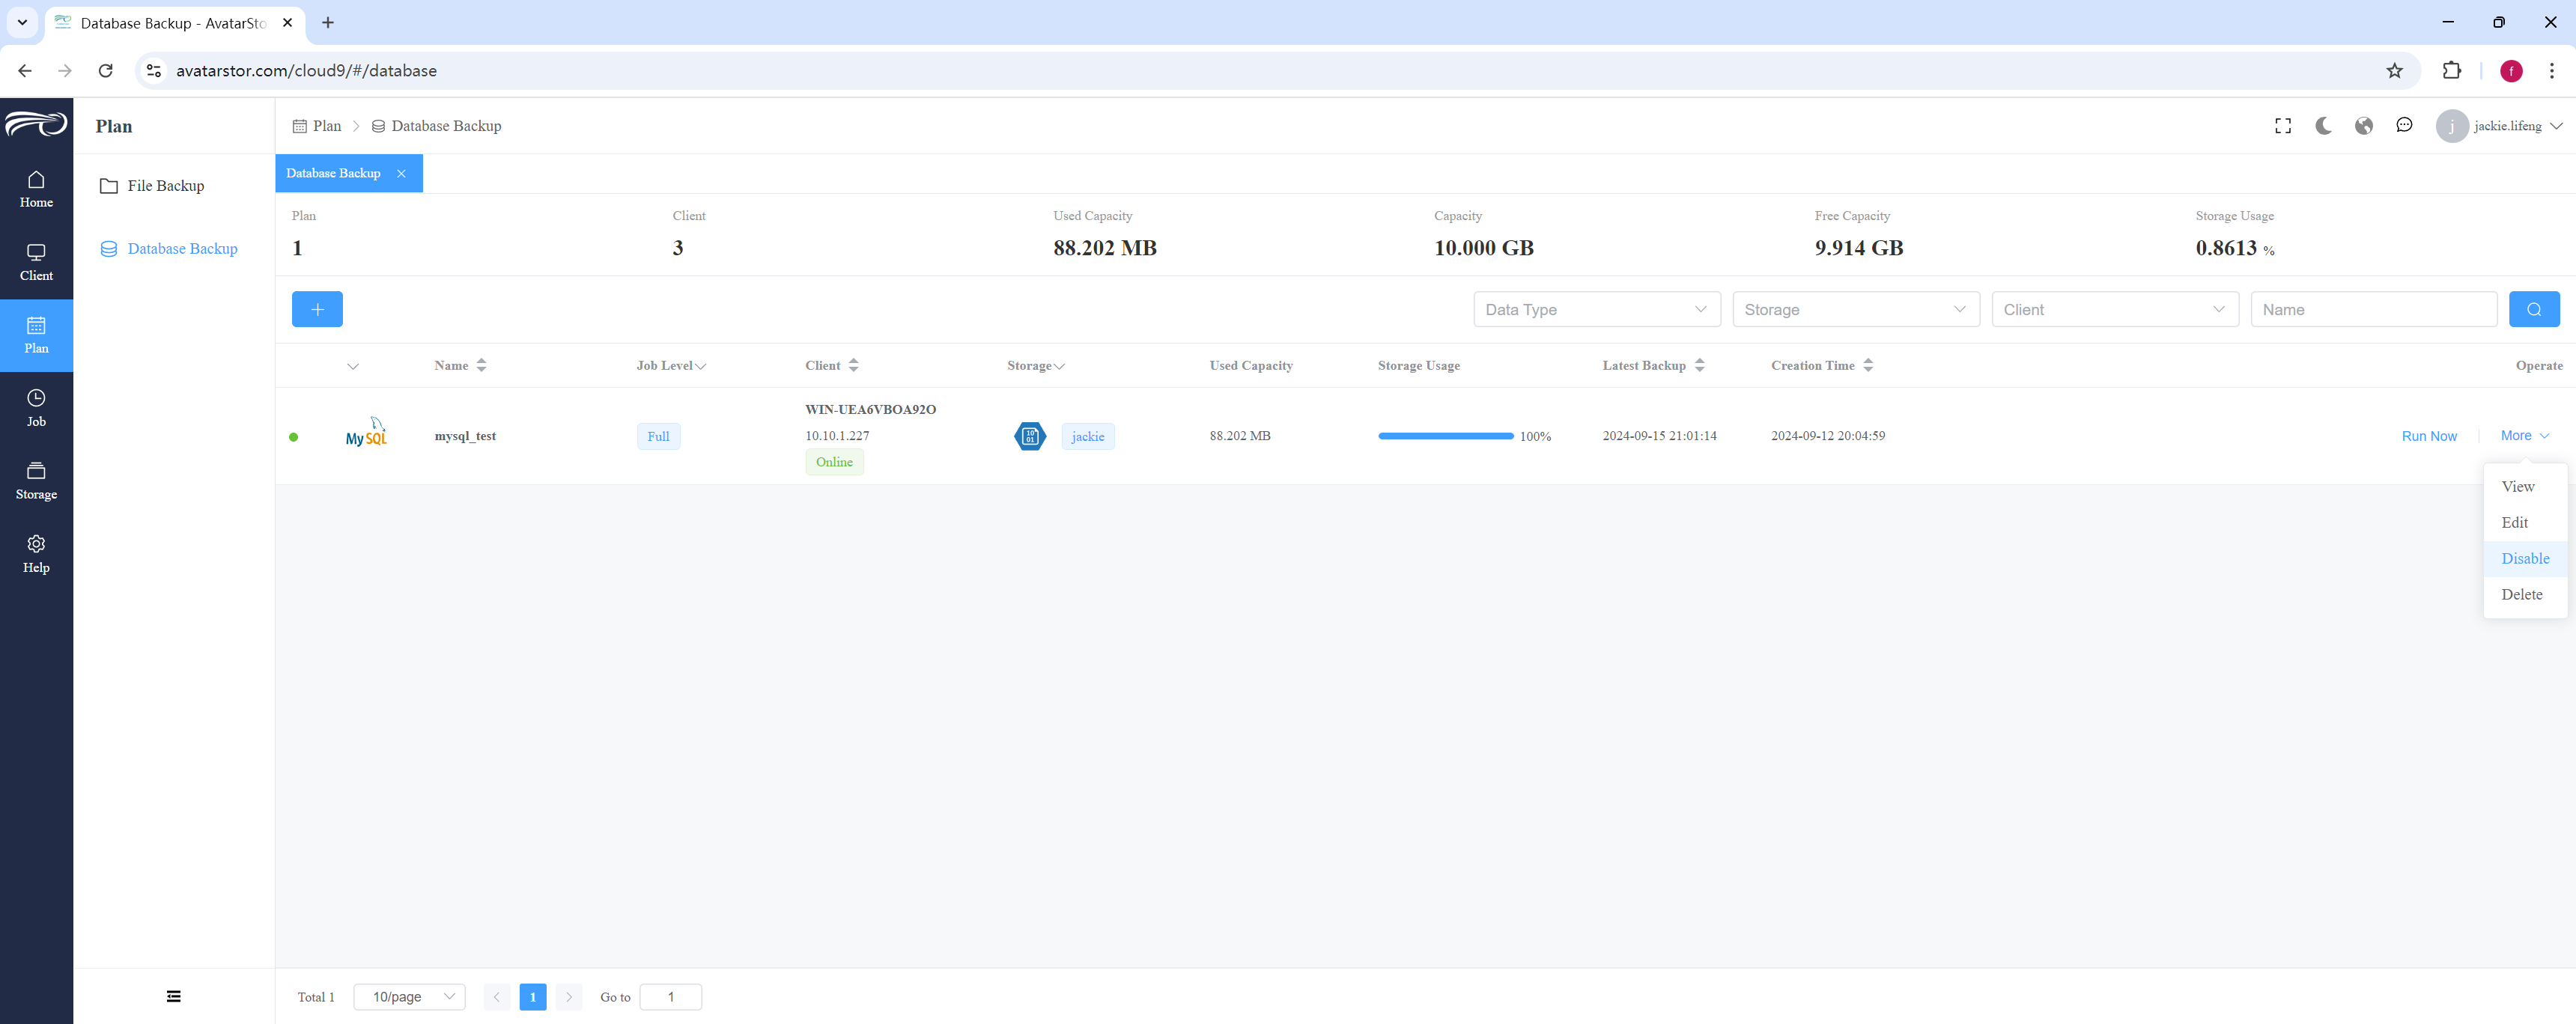
To delete a backup plan, note that any currently running backup plans cannot be deleted. You must wait until the backup process is complete before you can delete the plan. To delete a plan, click [More] next to the plan you wish to remove and select Delete.
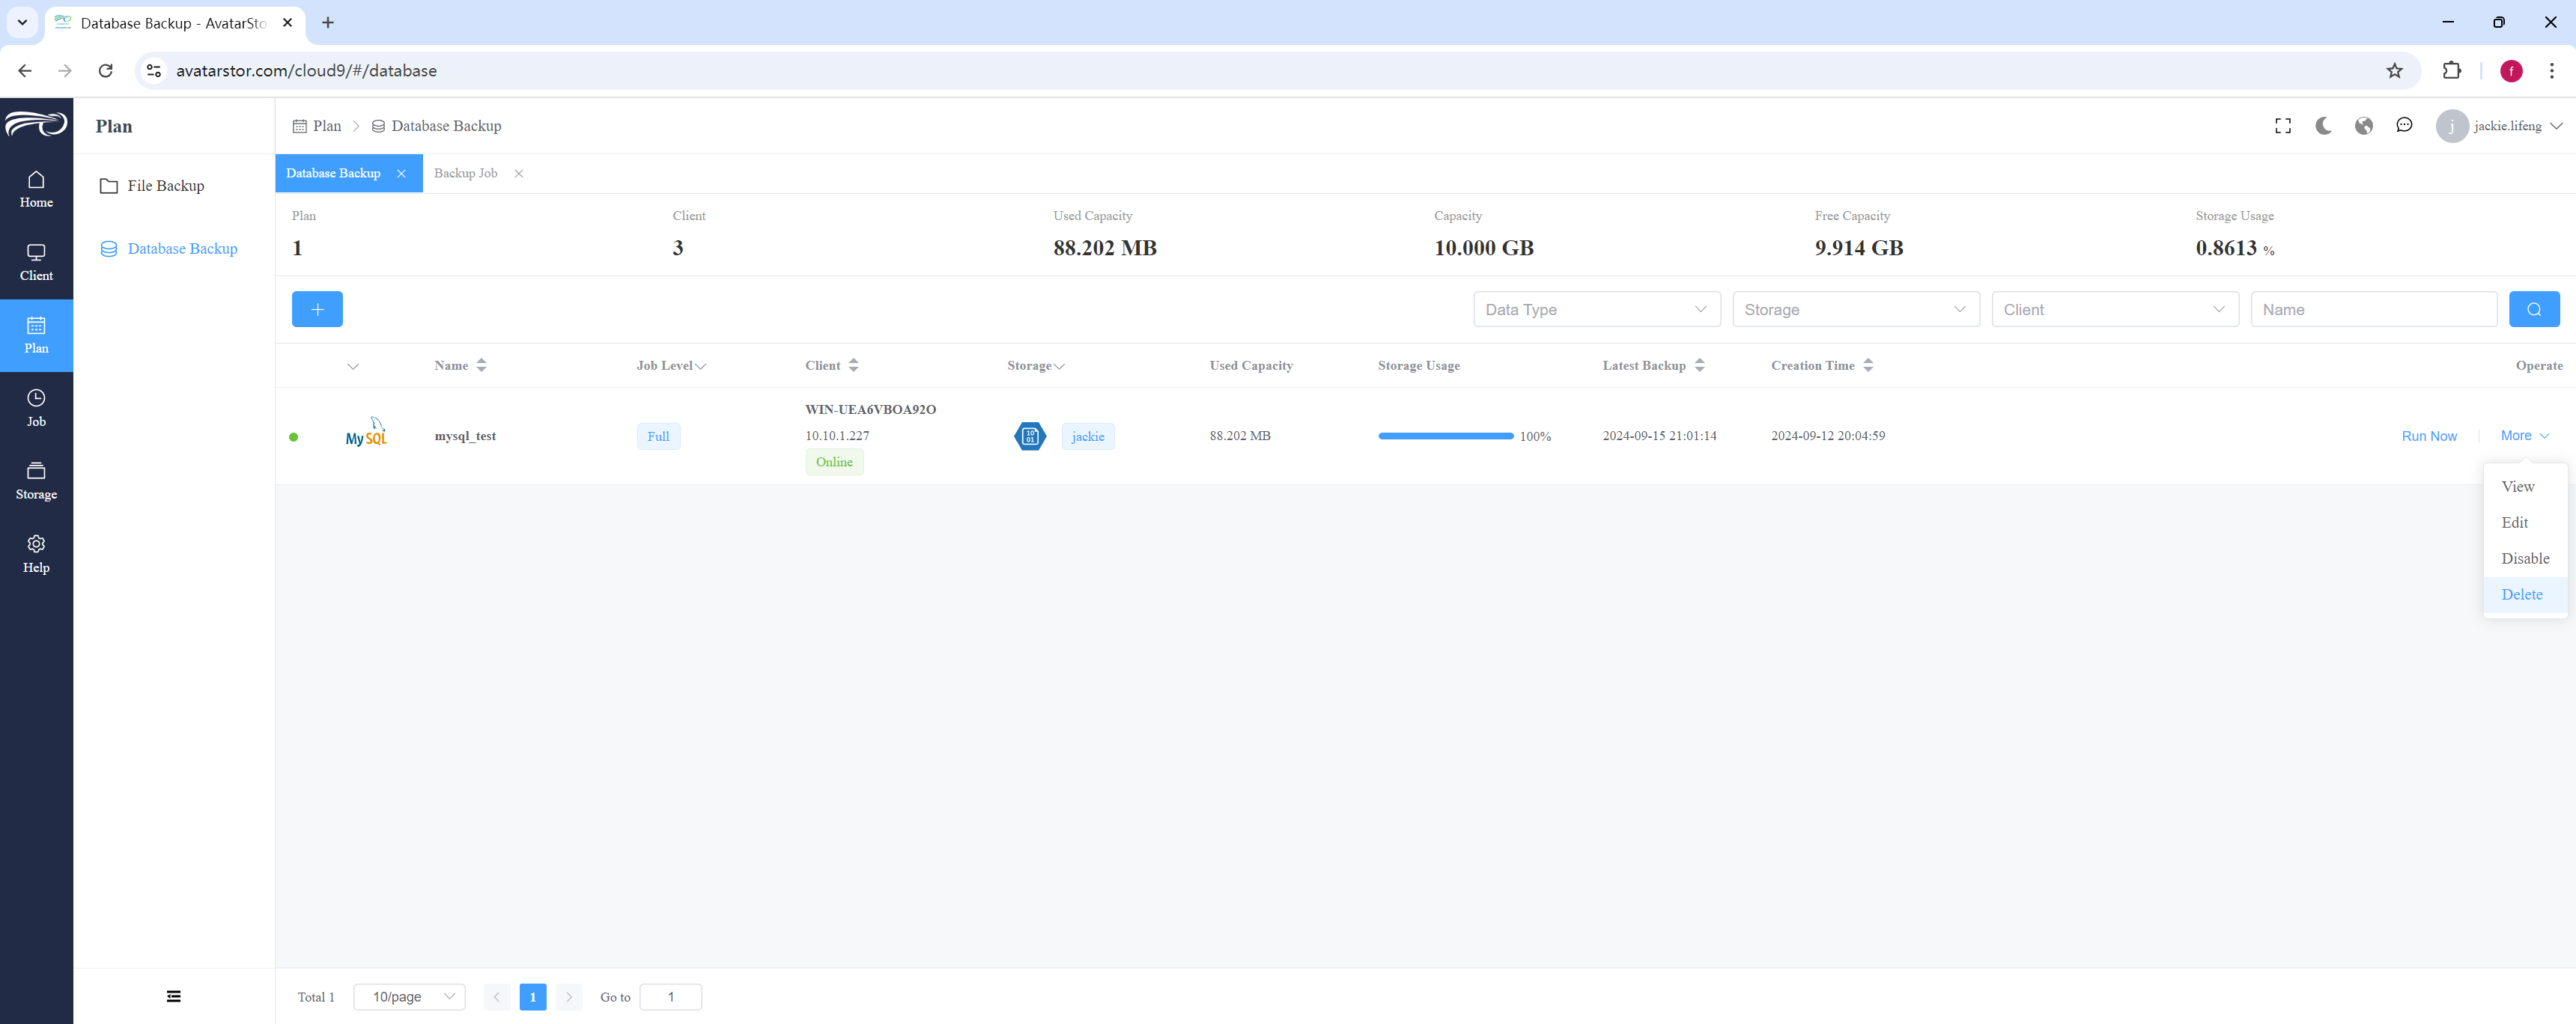
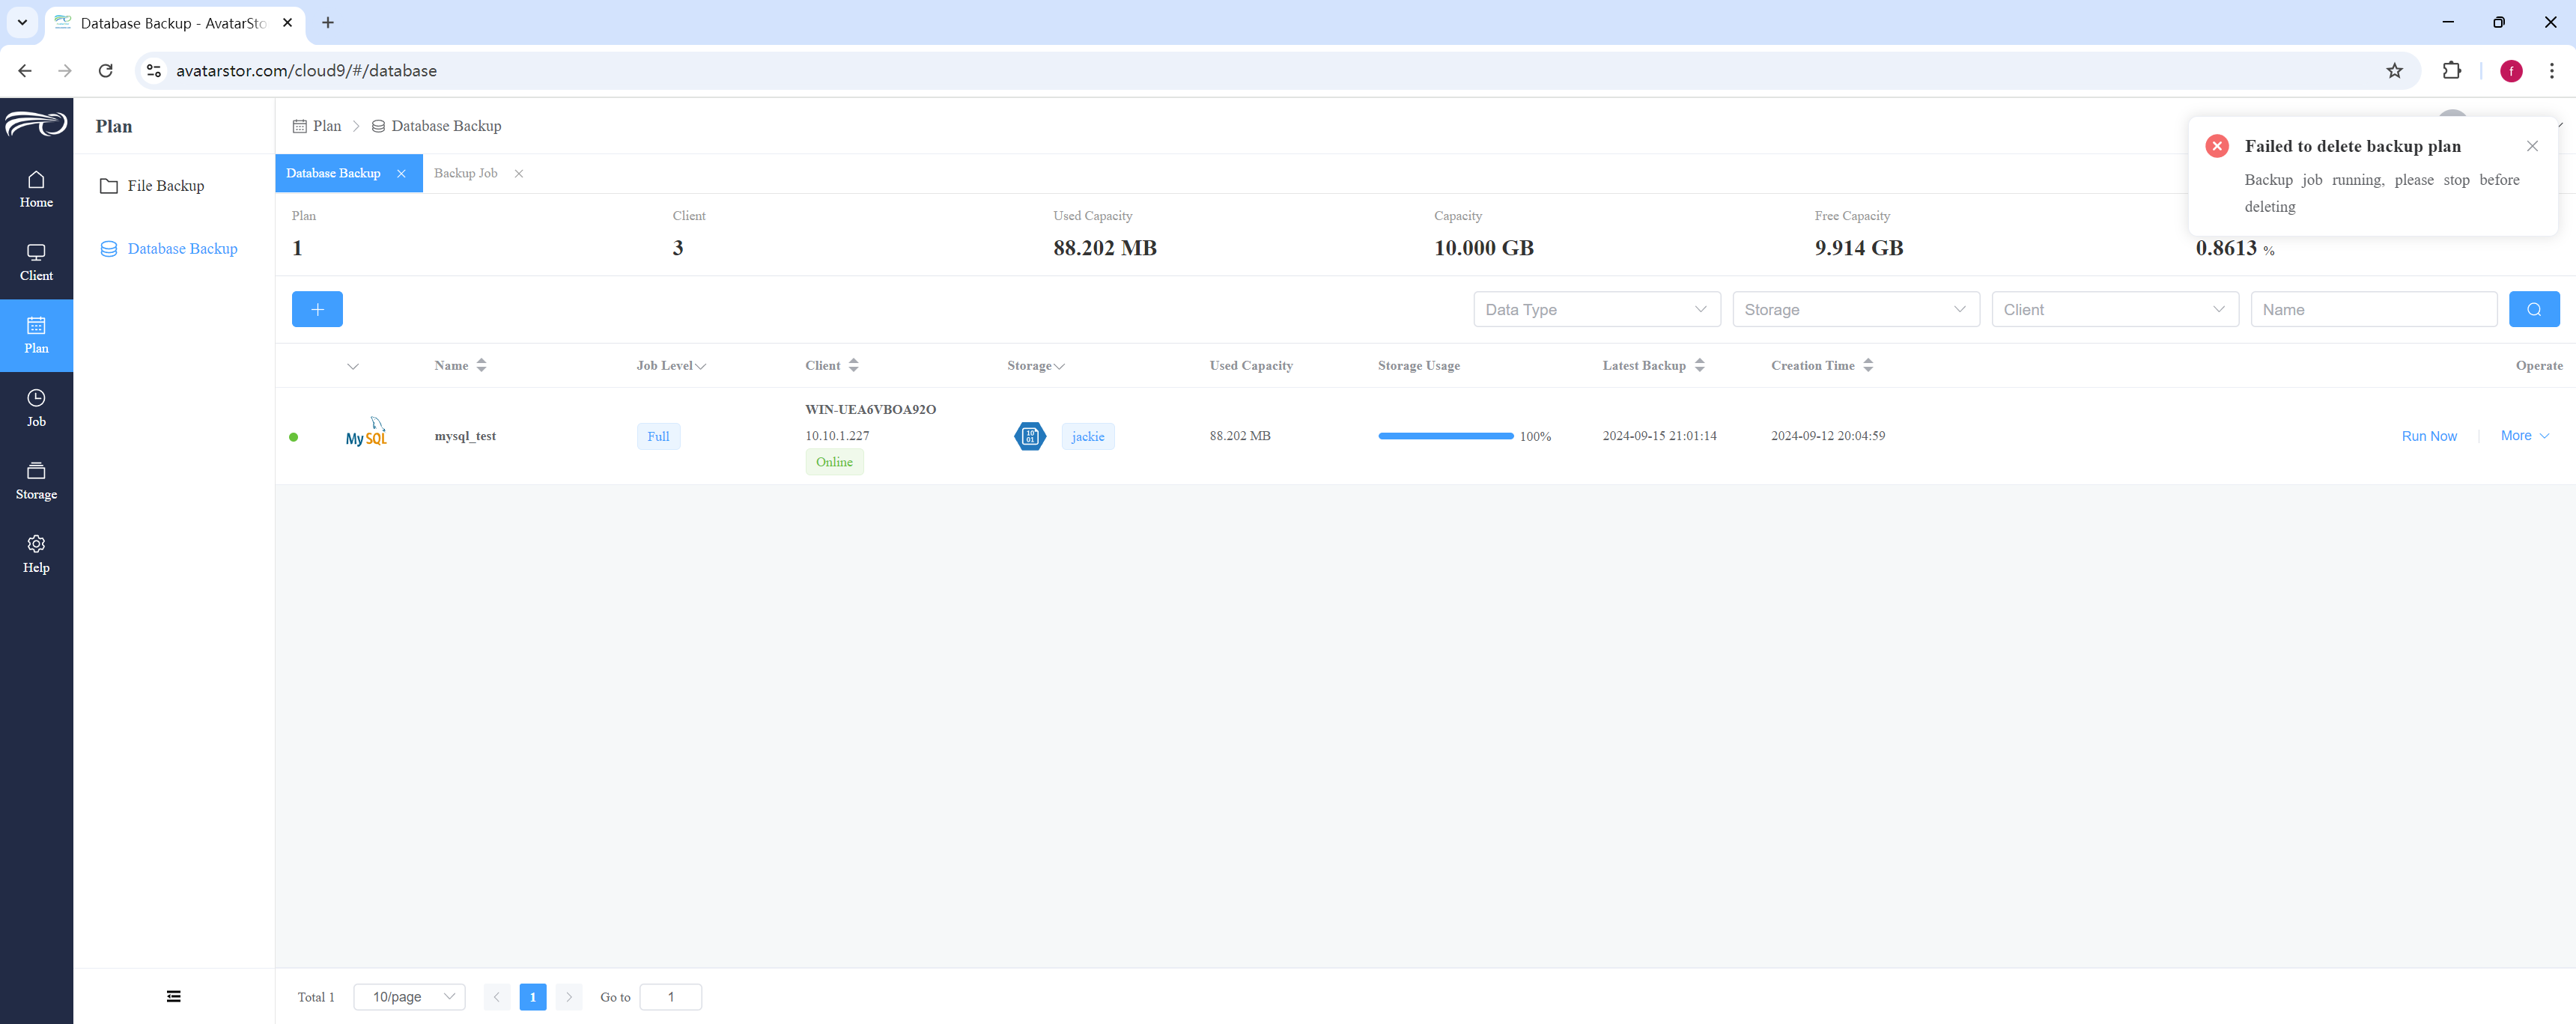
|
Only backup plans related to online clients can be viewed, edited, modified, or deleted. For backup plans associated with offline clients, you can only view the plan but cannot edit, modify, or delete it. |
4.6 Advanced options for backup plans
There are some common advanced parameters, such as:
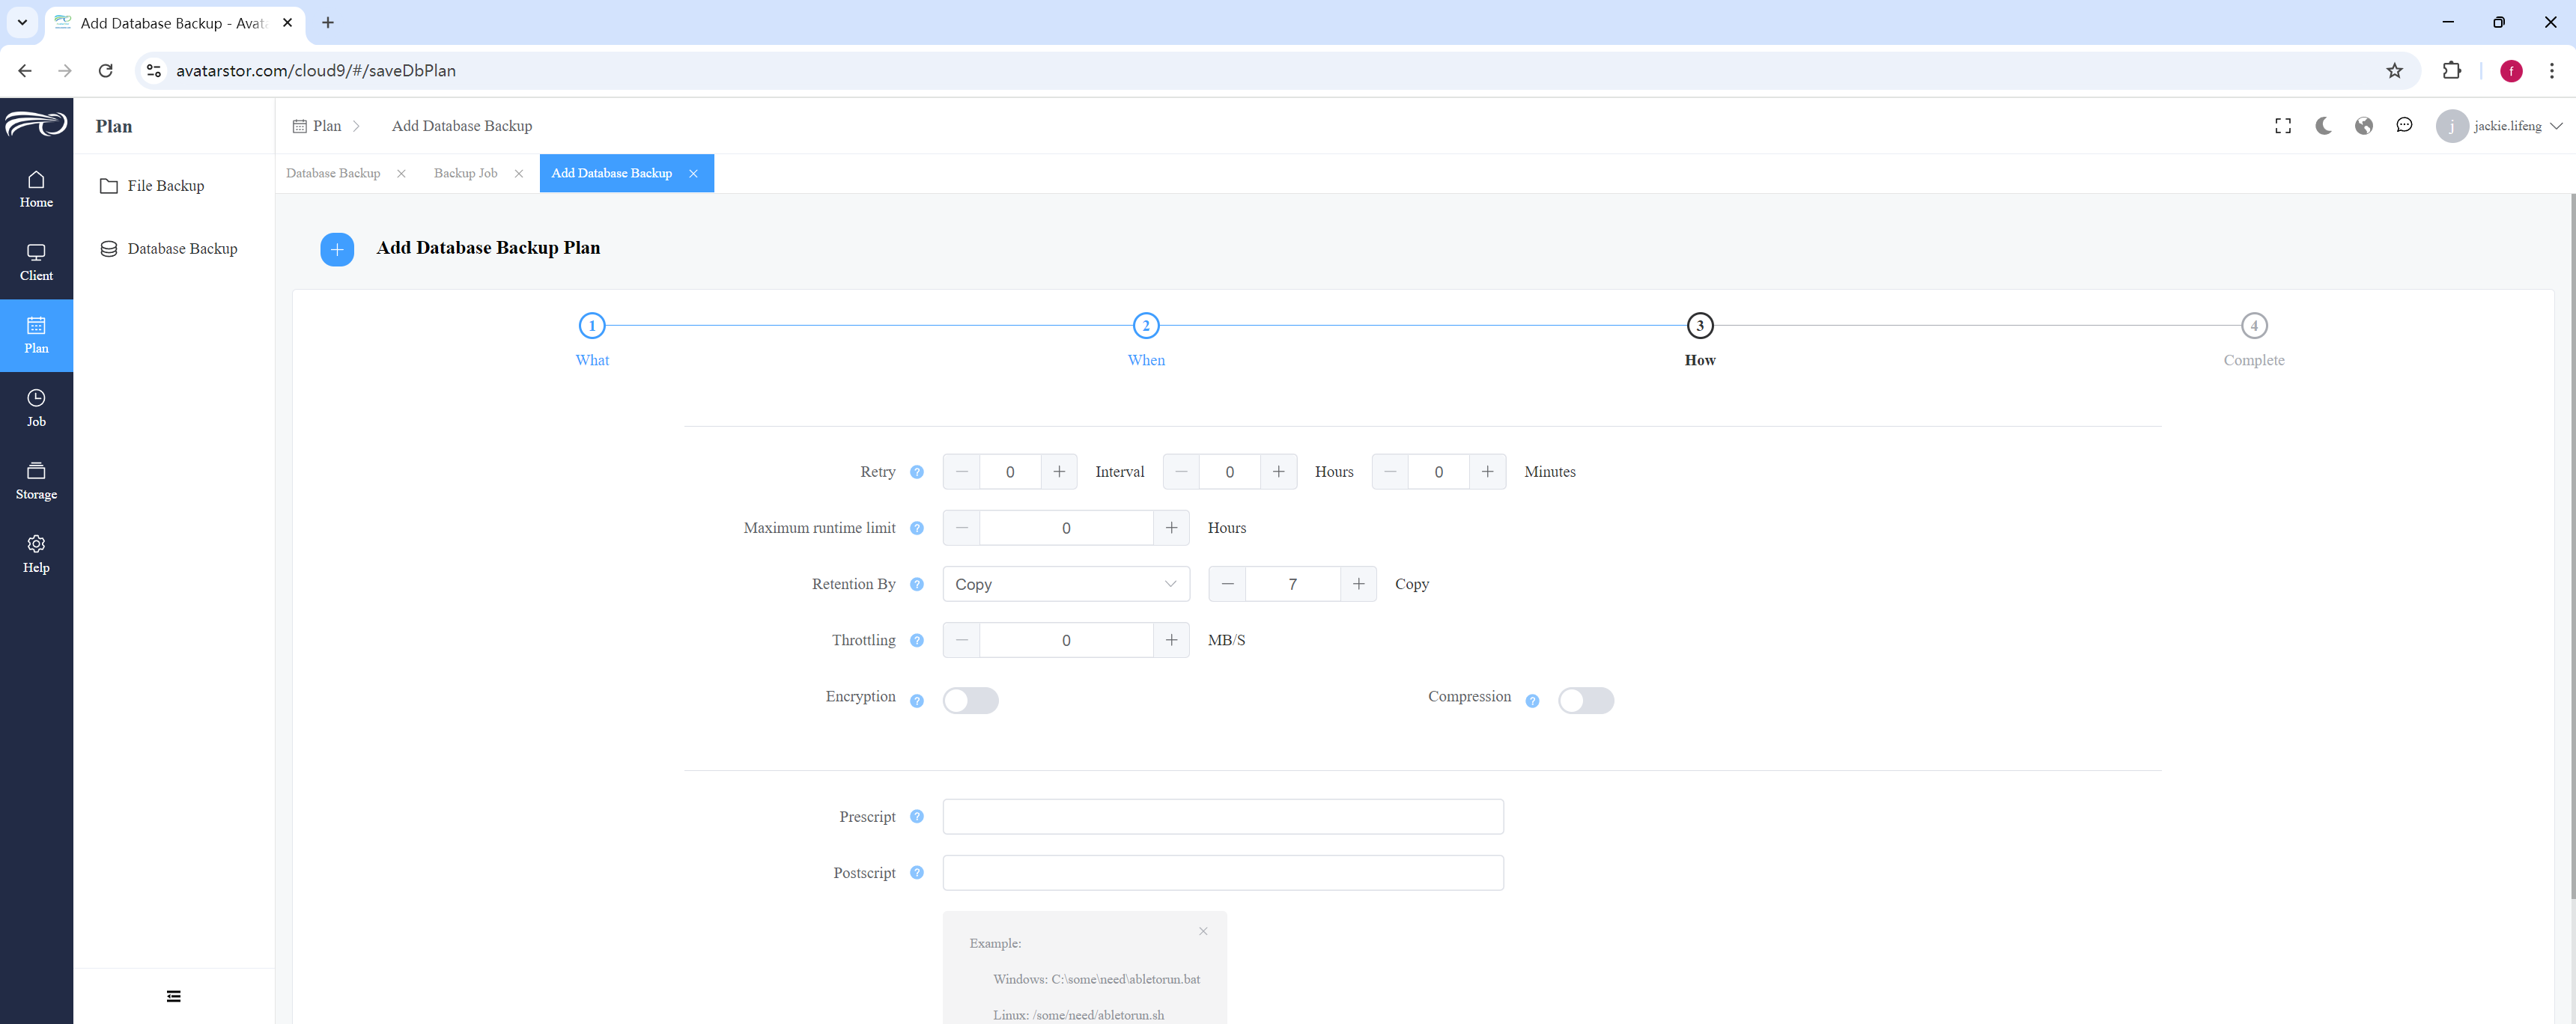
Retry Attempts: Set the number of times to retry the
backup
after
a job failure. The system will automatically attempt to run the strategy again based on the
specified
number of retries and time interval.
For example, if "Retry Attempts" is
set
to 3
and the interval is 10 minutes, the system will retry running the strategy every 10 minutes
after a
failure, up to a maximum of three attempts.
Maximum Runtime: The maximum allowed runtime for the strategy. If the strategy exceeds this time window, it will automatically fail.
Data Retention: Determines how backup data is retained. There are three methods:
Retain by number of days.
Retain by the number of backup sets.
Retain permanently.
Data Encryption: Uses SHA512 encryption to secure the backup data.
Data Compression: Compresses backup data to minimize bandwidth usage and storage space required.
Backup Throttling: Limits the speed of backups to prevent backup-related network traffic from affecting regular business traffic.
There are also plugin-specific parameters, which will be discussed in detail in later chapters.
4.7 Pre and post script
Pre-script and Post-script functionality in backup software allows users to execute custom scripts before the backup operation begins and after it completes. These scripts are useful for performing auxiliary tasks to ensure a smooth backup process and optimize operations. Below are some common uses of pre- and post-scripts:
4.7.1 Pre-script
Notifications and Logging :
Send a notification email or message to inform the administrator that the backup is about to begin.
Record the backup start time and other relevant information in the log file.
Prepare the environment :
Clean up temporary files or directories to make room for backups.
Check if there is enough storage space to avoid insufficient storage space during the backup process.
Application operation :
Pause or stop related applications or services to ensure data consistency.
Switch the database to read-only mode to prevent data from being modified during the backup process.
Database operations :
Perform database snapshots or locking operations to ensure the consistency of backup data.
Start database transactions to ensure data consistency.
4.7.2 Post-script
Notifications and Logging :
Send a notification email or message informing the administrator that the backup has been completed.
Record the end time of the backup, backup results, and other relevant information in the log file.
Cleaning and maintenance :
Clean up temporary files during the backup process.
Delete the old backup file and keep the latest backup according to the retention policy.
Application operation :
Restore or restart relevant applications or services.
Switch the database from read-only mode back to read-write mode.
Verification and testing :
Verify the integrity of the backup file to ensure a successful backup.
Perform recovery tests to ensure that backup data can be successfully restored.
Storage and transmission :
Transfer backup files to remote storage or cloud storage to increase backup security.
Encrypt backup files to ensure data security.
4.7.3 Pre-script example (Linux Shell)
|
Bash |
4.7.4 Post-script example (Linux Shell)
|
Bash |
Pre- and post-scripts provide significant flexibility and automation in backup strategies, ensuring both efficiency and data consistency throughout the backup process. By utilizing these scripts, administrators can prepare for backups before they start and handle subsequent tasks once backups are complete, thus ensuring a smooth backup operation.
|
Please note that pre- and post-scripts can be used not only during the backup process but also during the recovery process. |
4.8 The entry point for initiating restore
Only backup jobs with a status of "Successful" can be used for data recovery. Therefore, regardless of the plugin type, the entry point for initiating recovery is located in the left-side navigation bar under [Job] - [Backup Job] - [Success] - [More] - [Restore]:
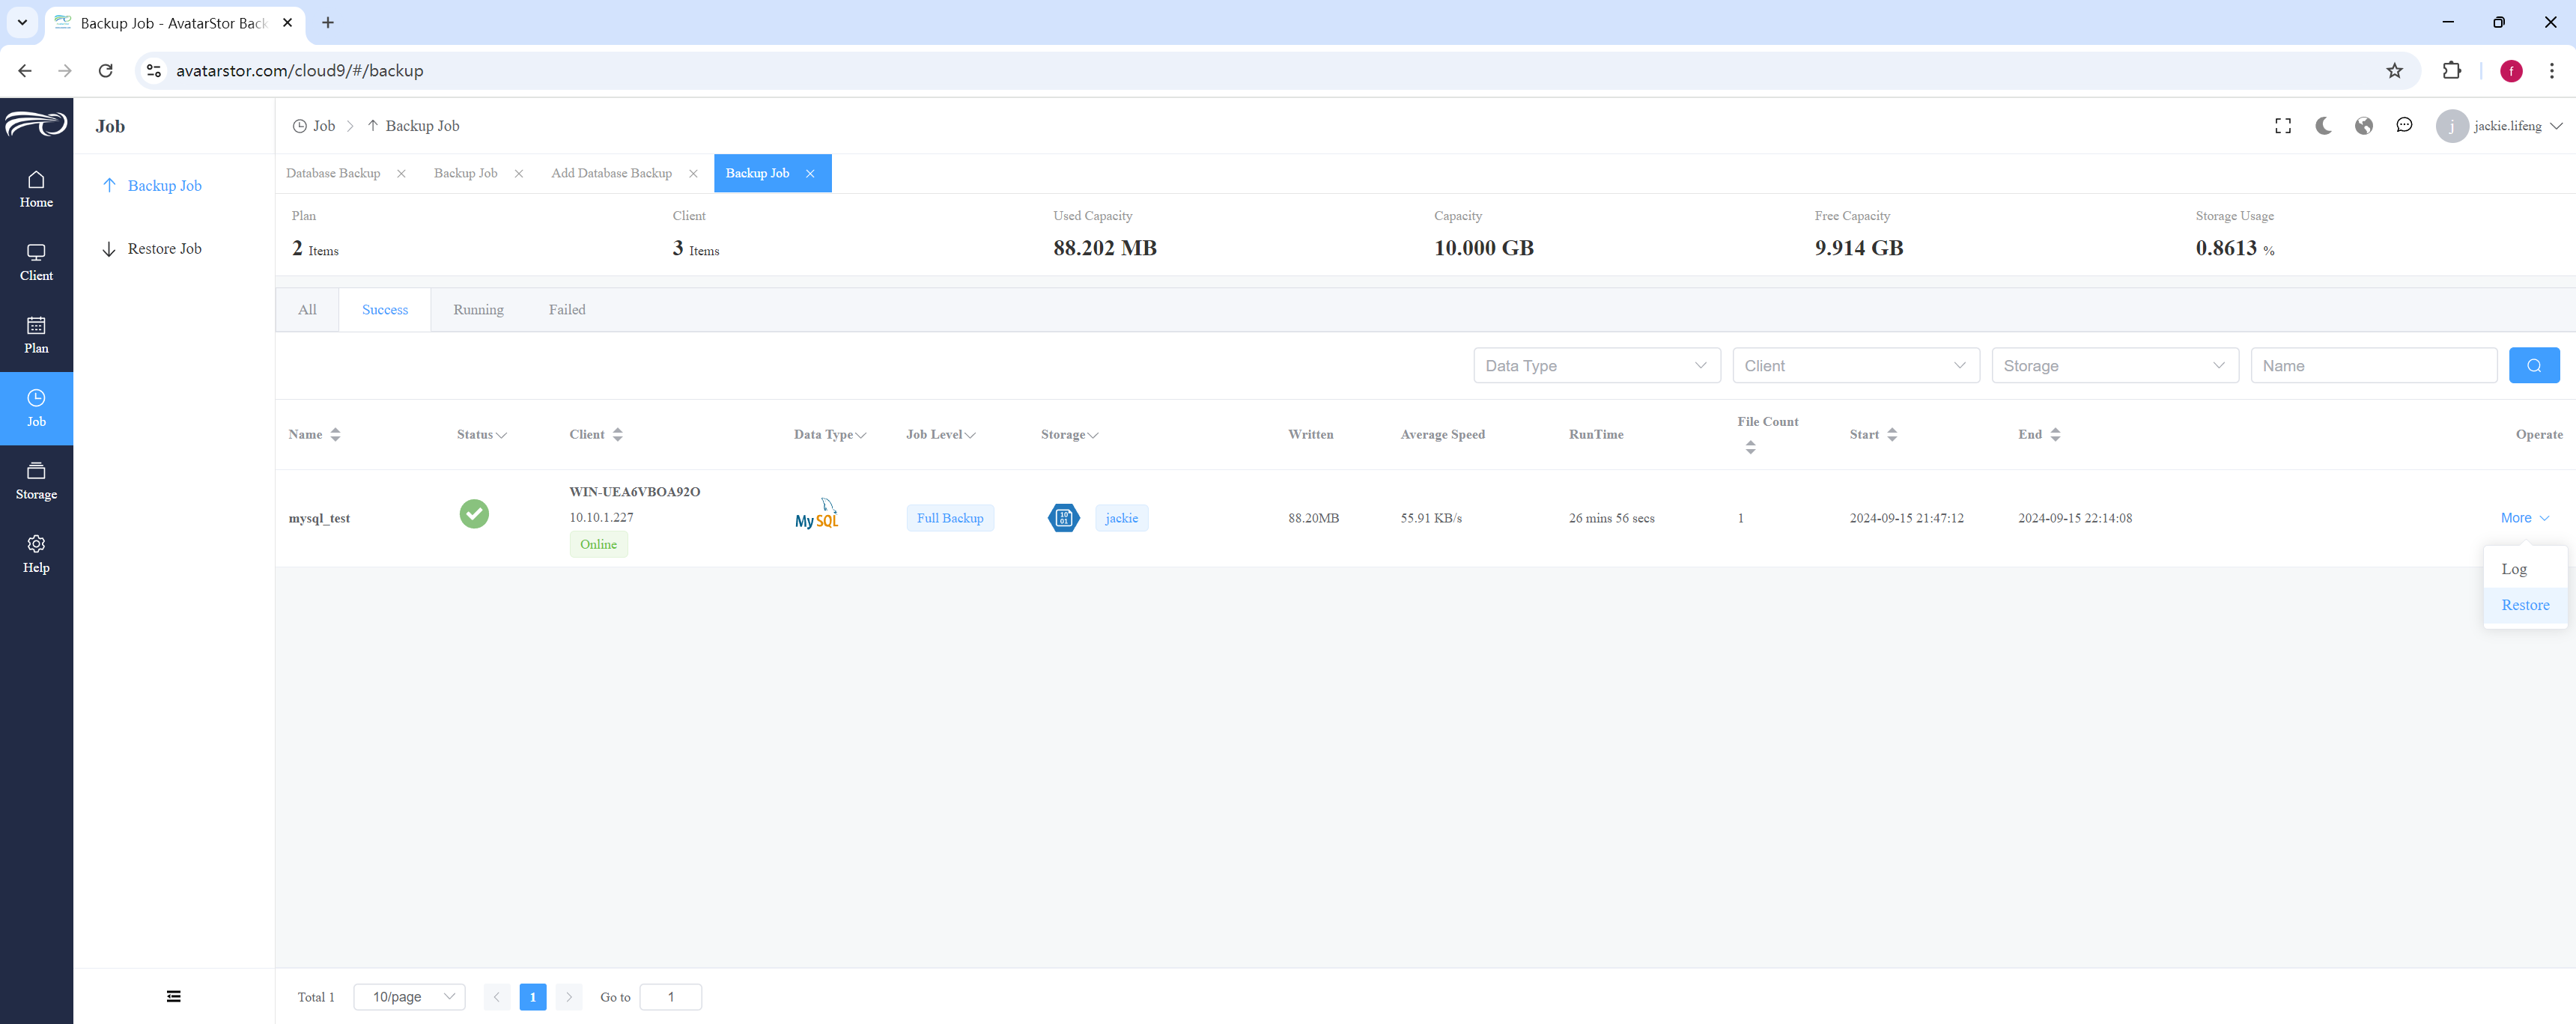
If there are too many historical jobs listed, a good approach is to filter them by [Data Type] and [Client Name].
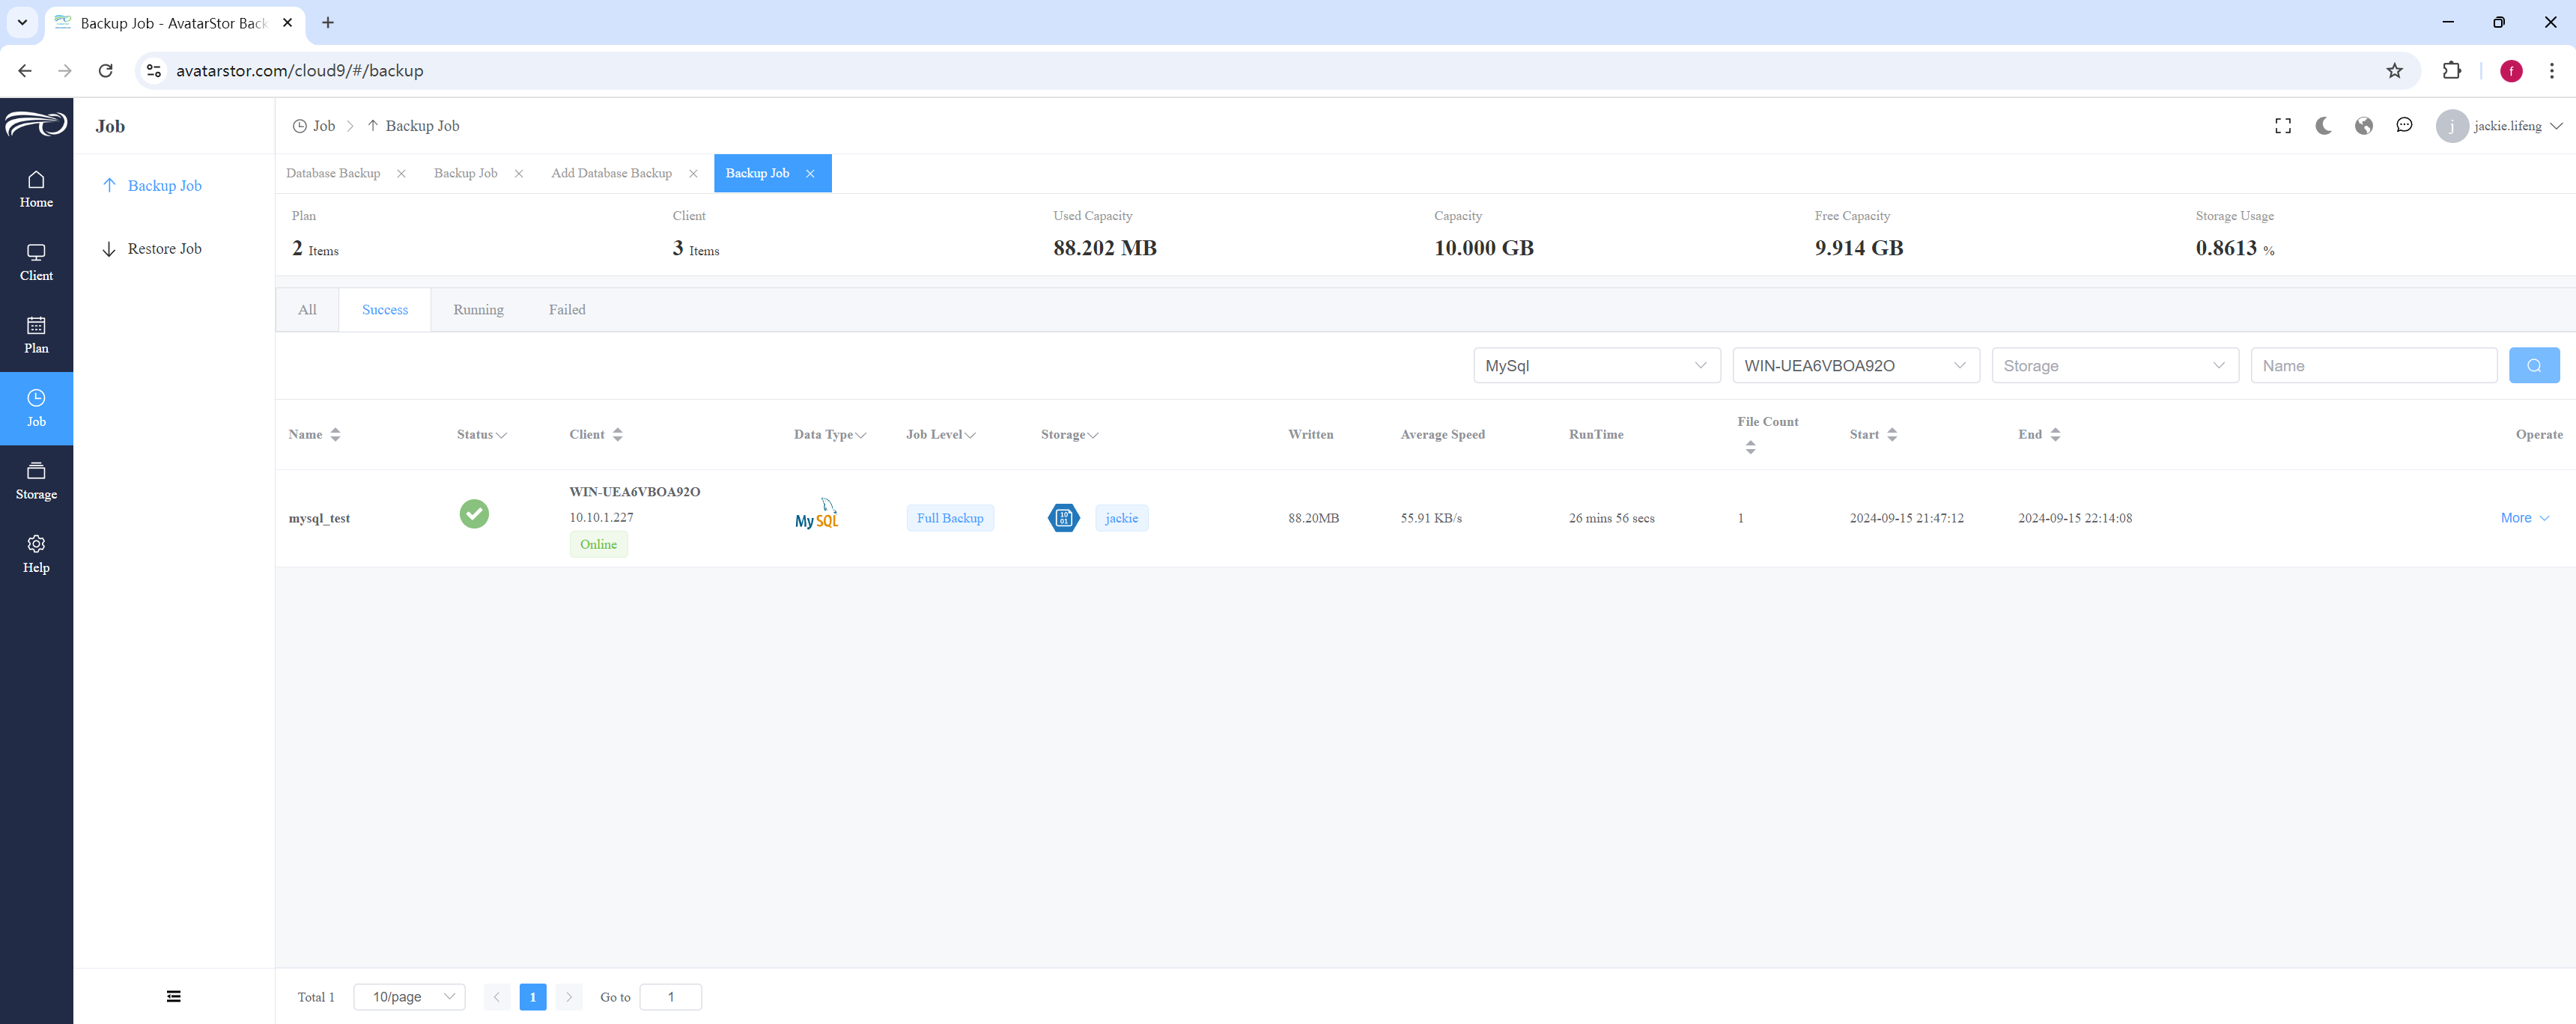
Clicking [Restore] will initiate the job restoration wizard. The overall process is similar for different plugins, with slight variations in the details, which we will discuss in detail in the following chapters.
4.9 Local Restore and Remote Restore
4.9.1 Local Restore
Local Restore, as the name suggests, involves restoring data to the same client machine from which the backup was taken. After initiating the restore wizard from the restore entry point, select [Local Restore] and proceed with the following steps:
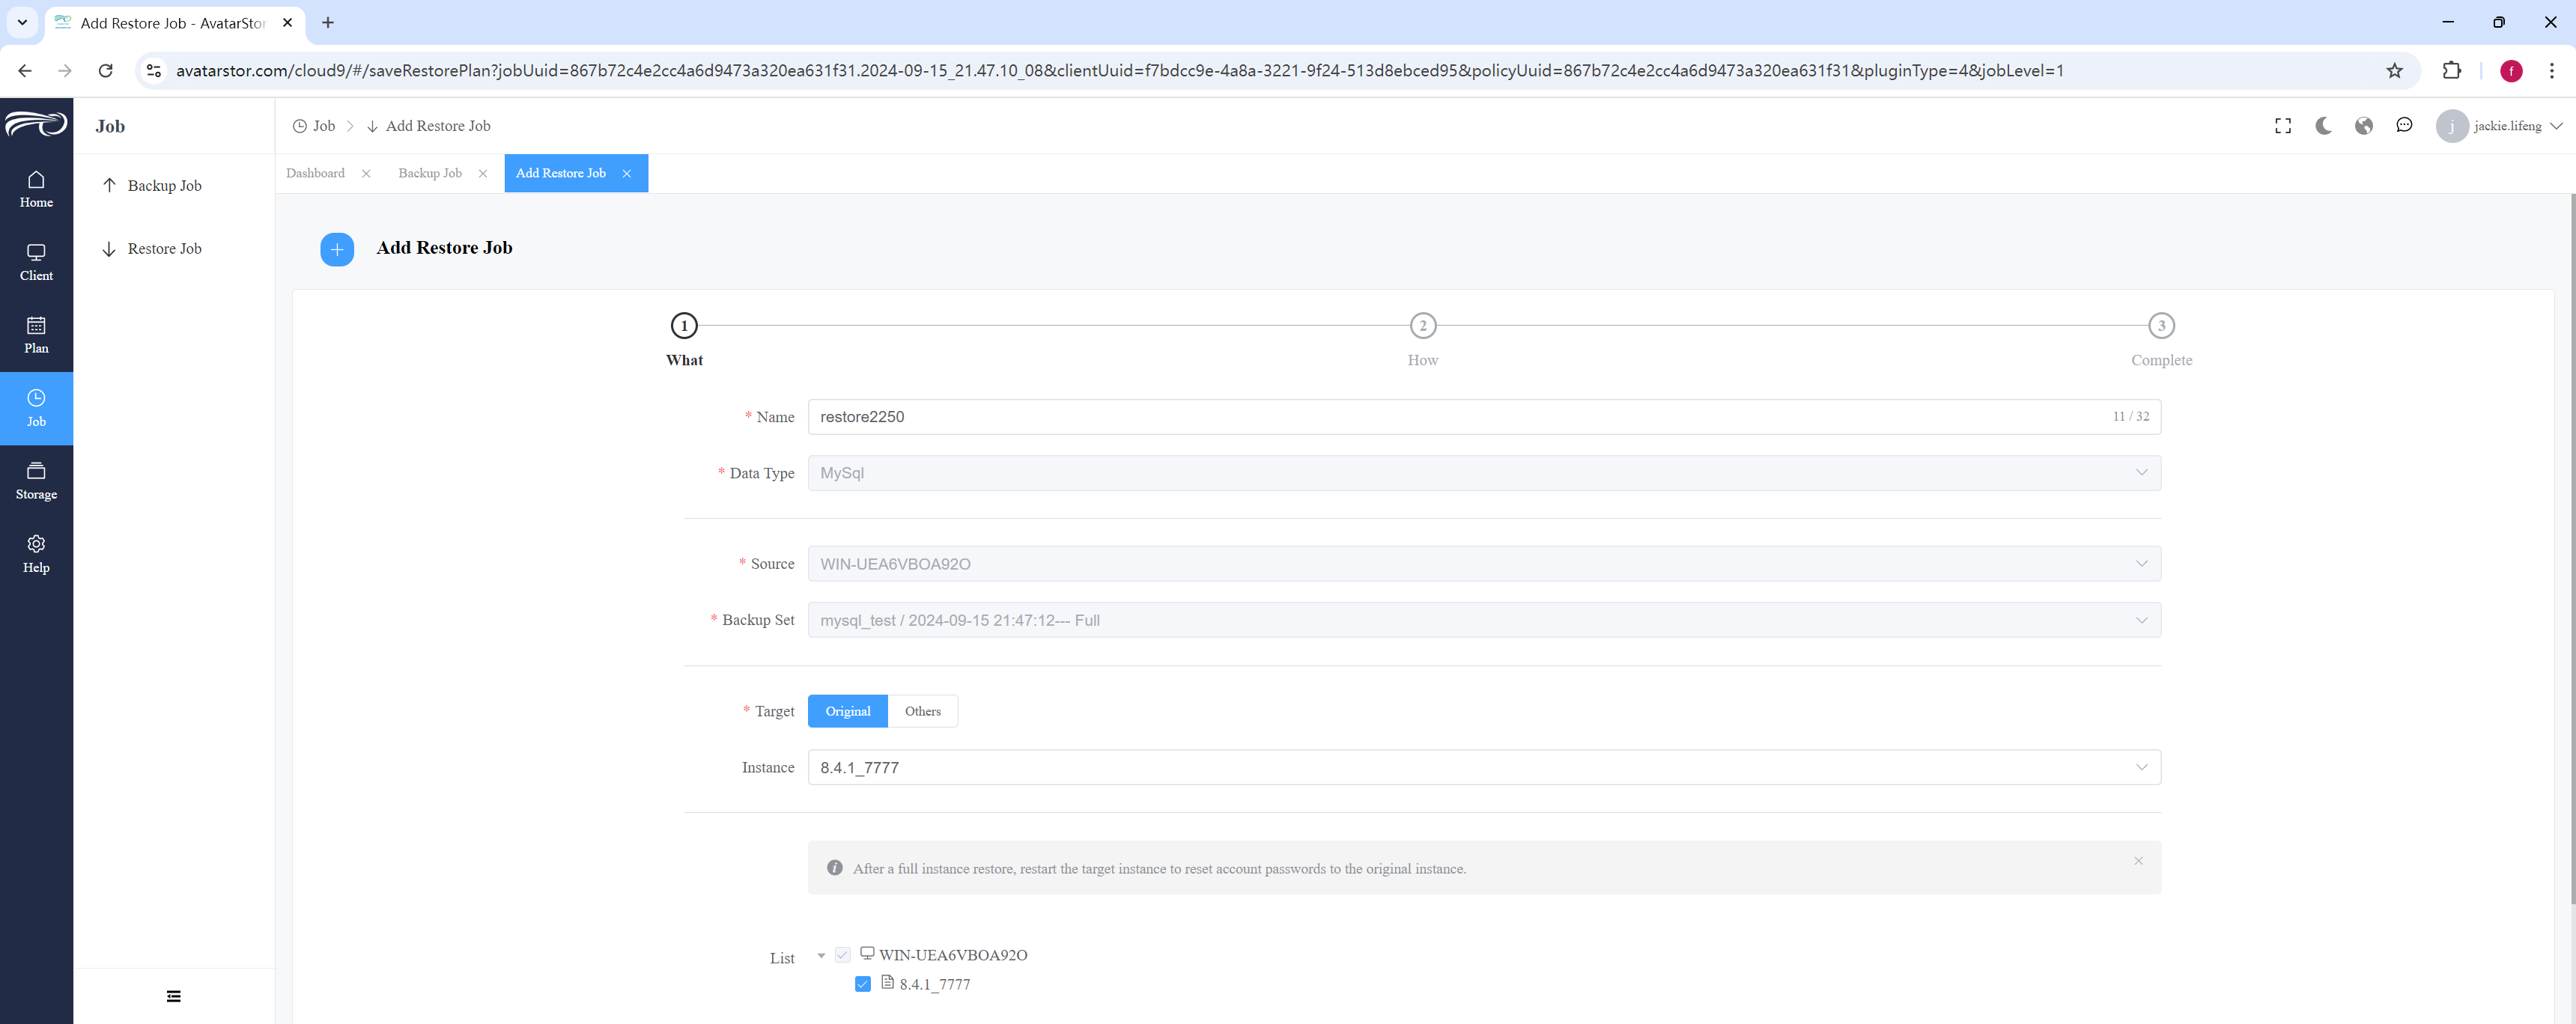
|
Local Restore is generally not recommended, especially for instance-level backups of plugins like MySQL or Oracle. This method can lead to actual data overwriting and corruption on the source system. It is crucial to exercise caution and consider alternative restore methods to avoid potential data loss or damage. |
4.9.2 Remote restore when the original machine is online
When the original machine is online, remote restore can directly read the relevant information needed for the backup from the original machine's database. Therefore, you can directly select the target [Others] and start the restore process.
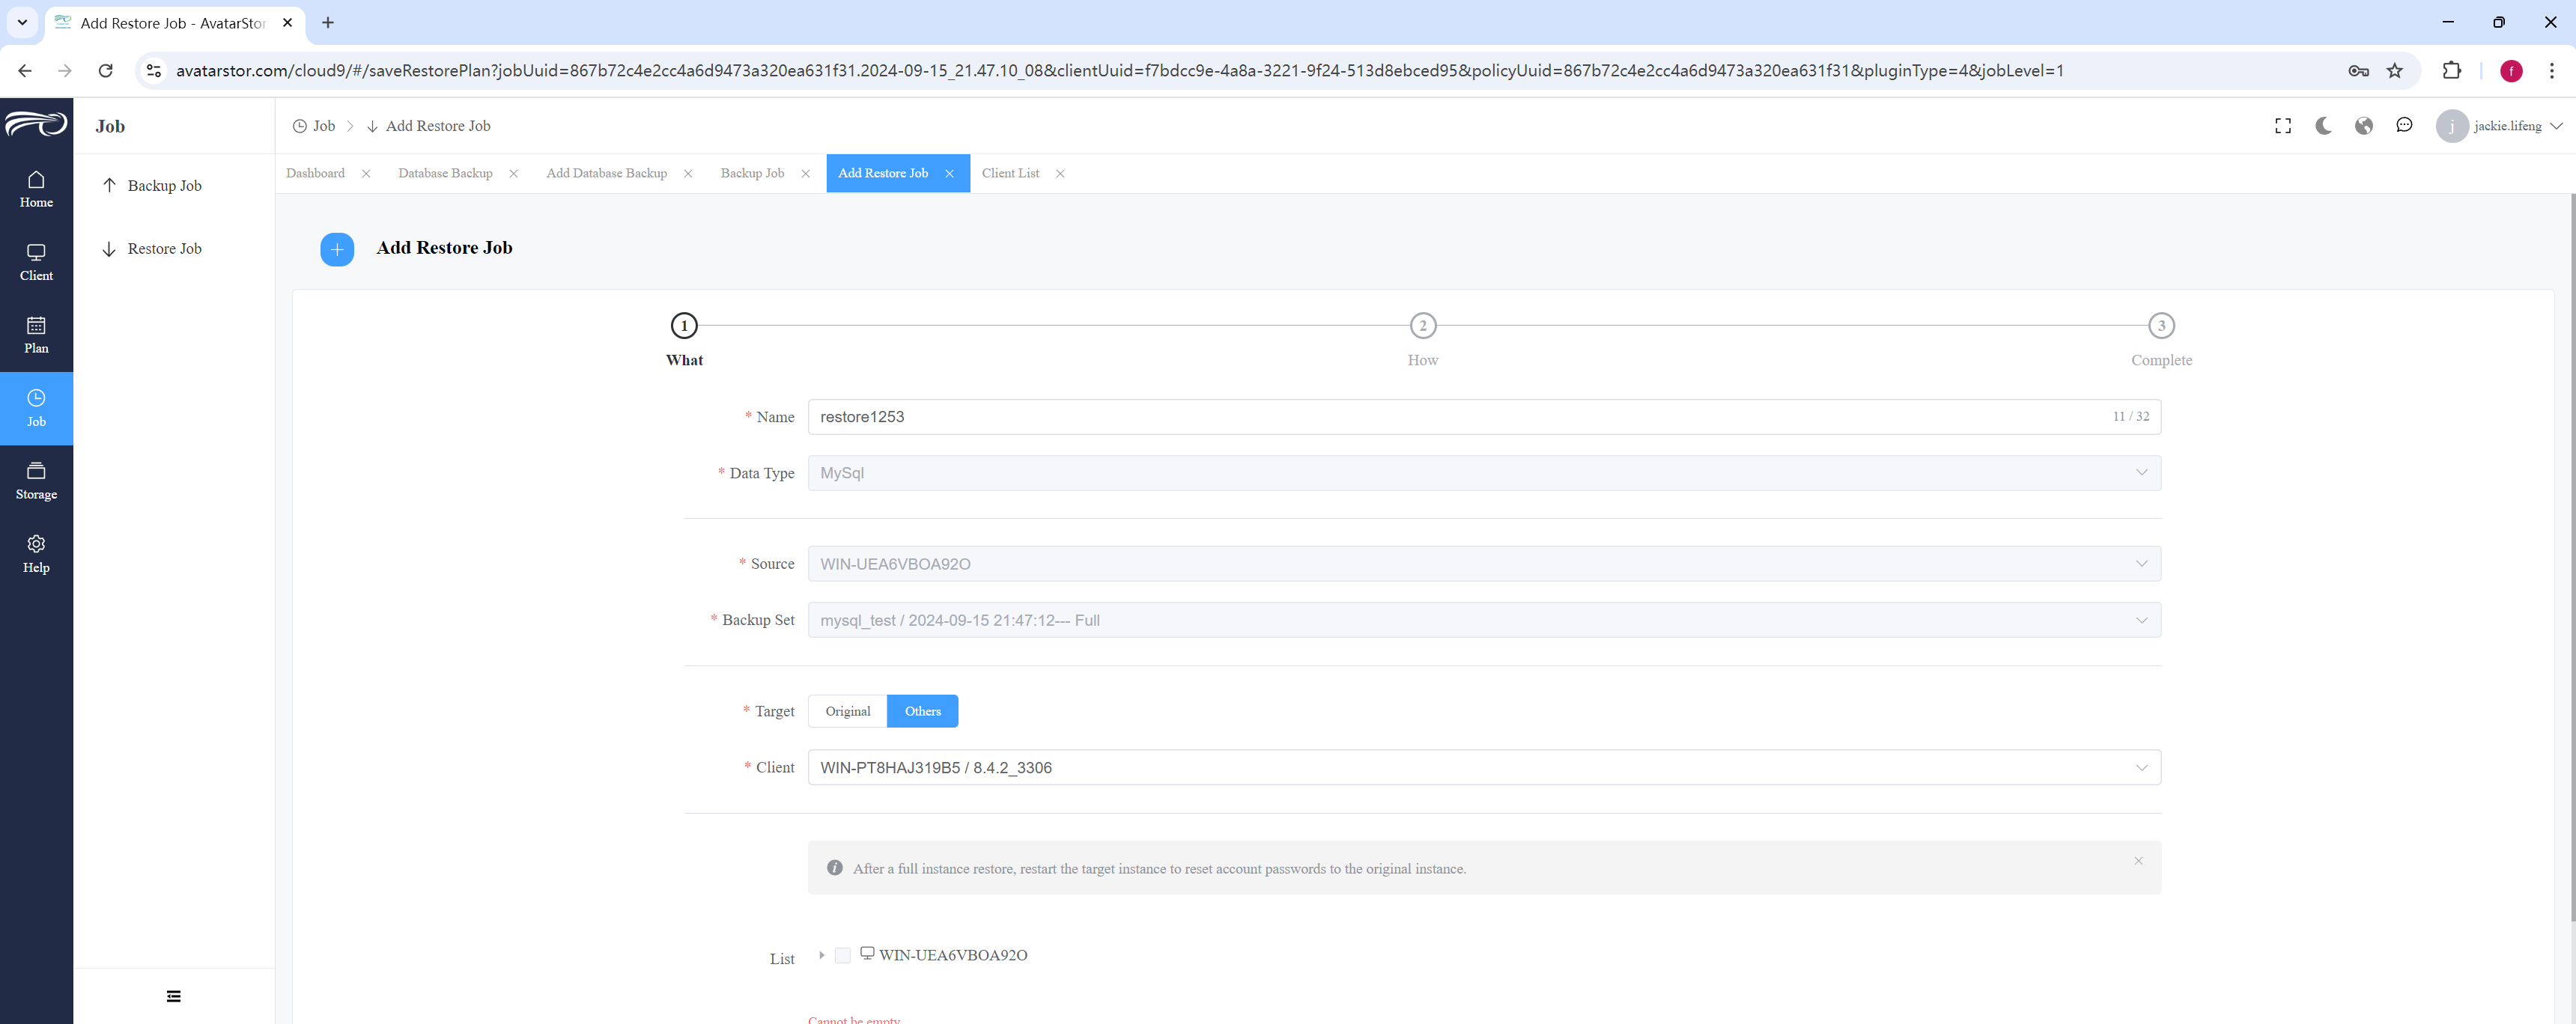
|
Note that when performing a remote restore, the remote machine must be configured with instances of the same version as the original backup set. For example, if the original backup set is for MySQL 8.4.1, the remote client must also be MySQL 8.4.1. |
4.9.3 Remote restore when the original machine is offline
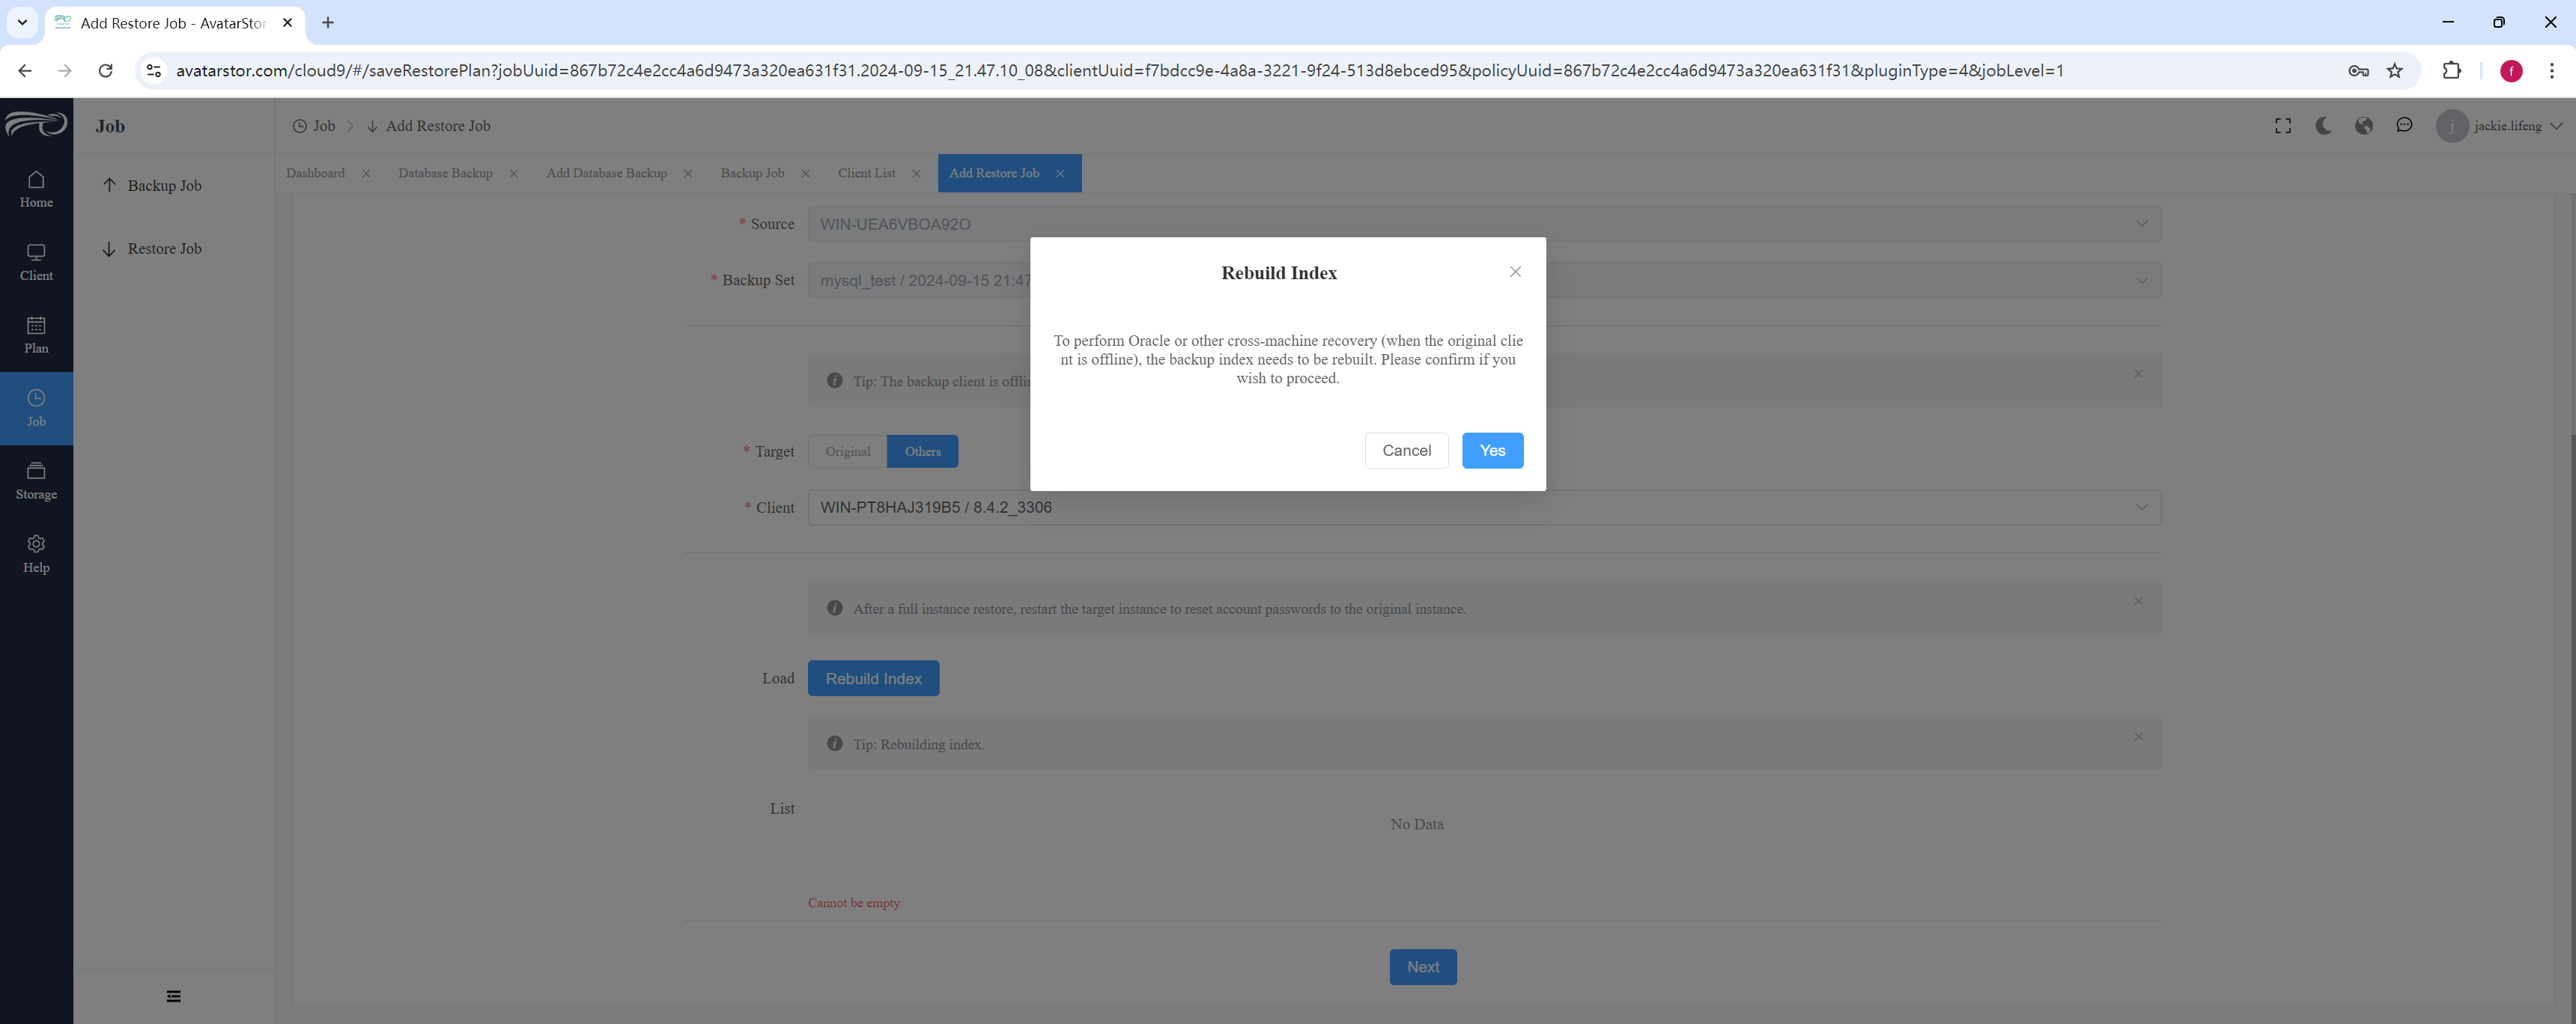
When the original machine is offline, the external machine cannot directly read the backup information of the original machine. It is necessary to reconstruct the backup information from cloud storage.
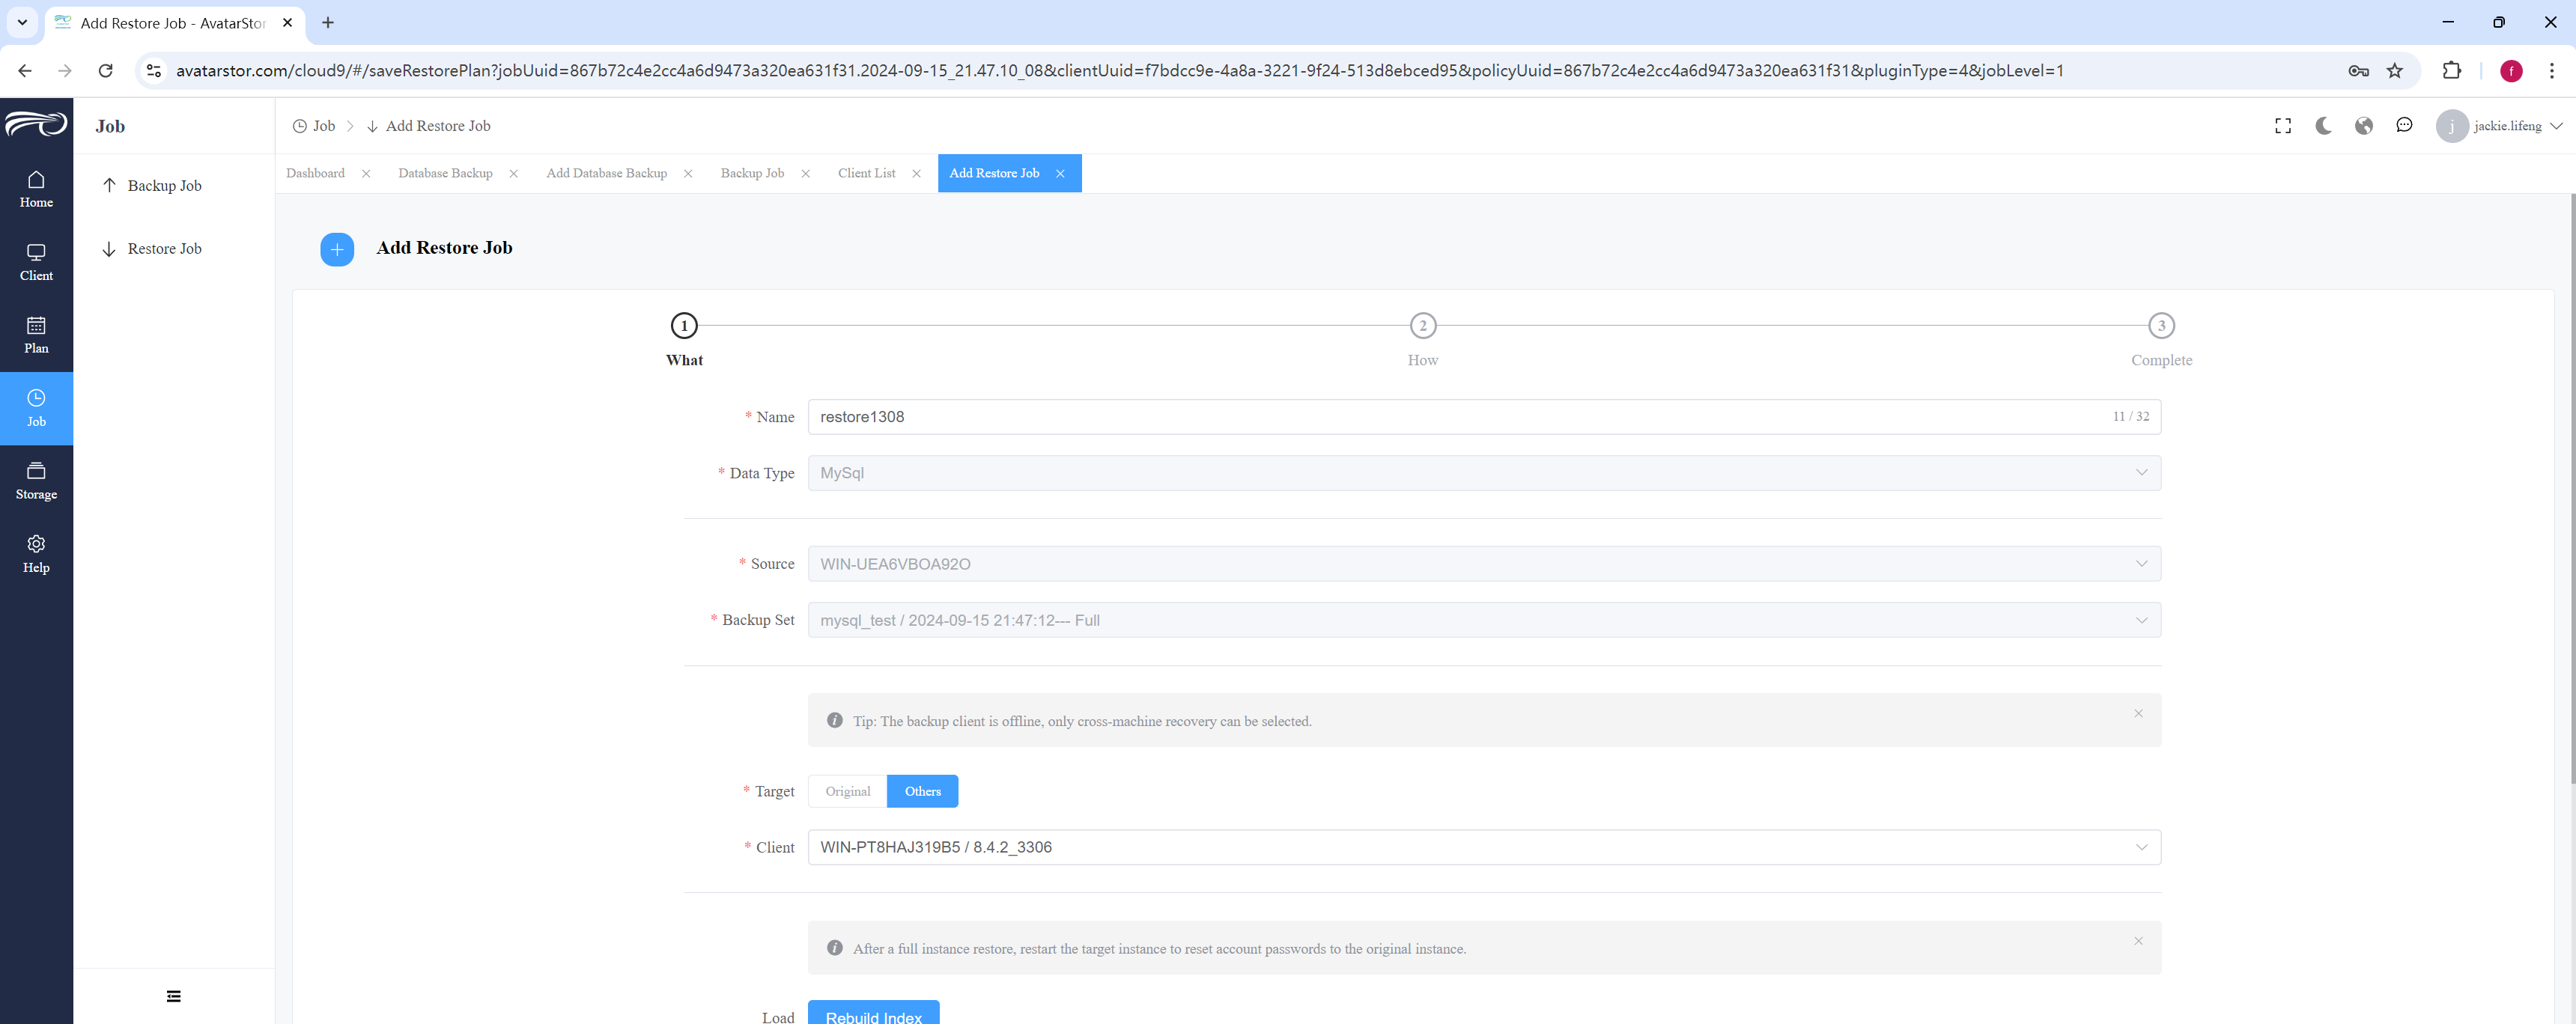
Click [Rebuild index]:
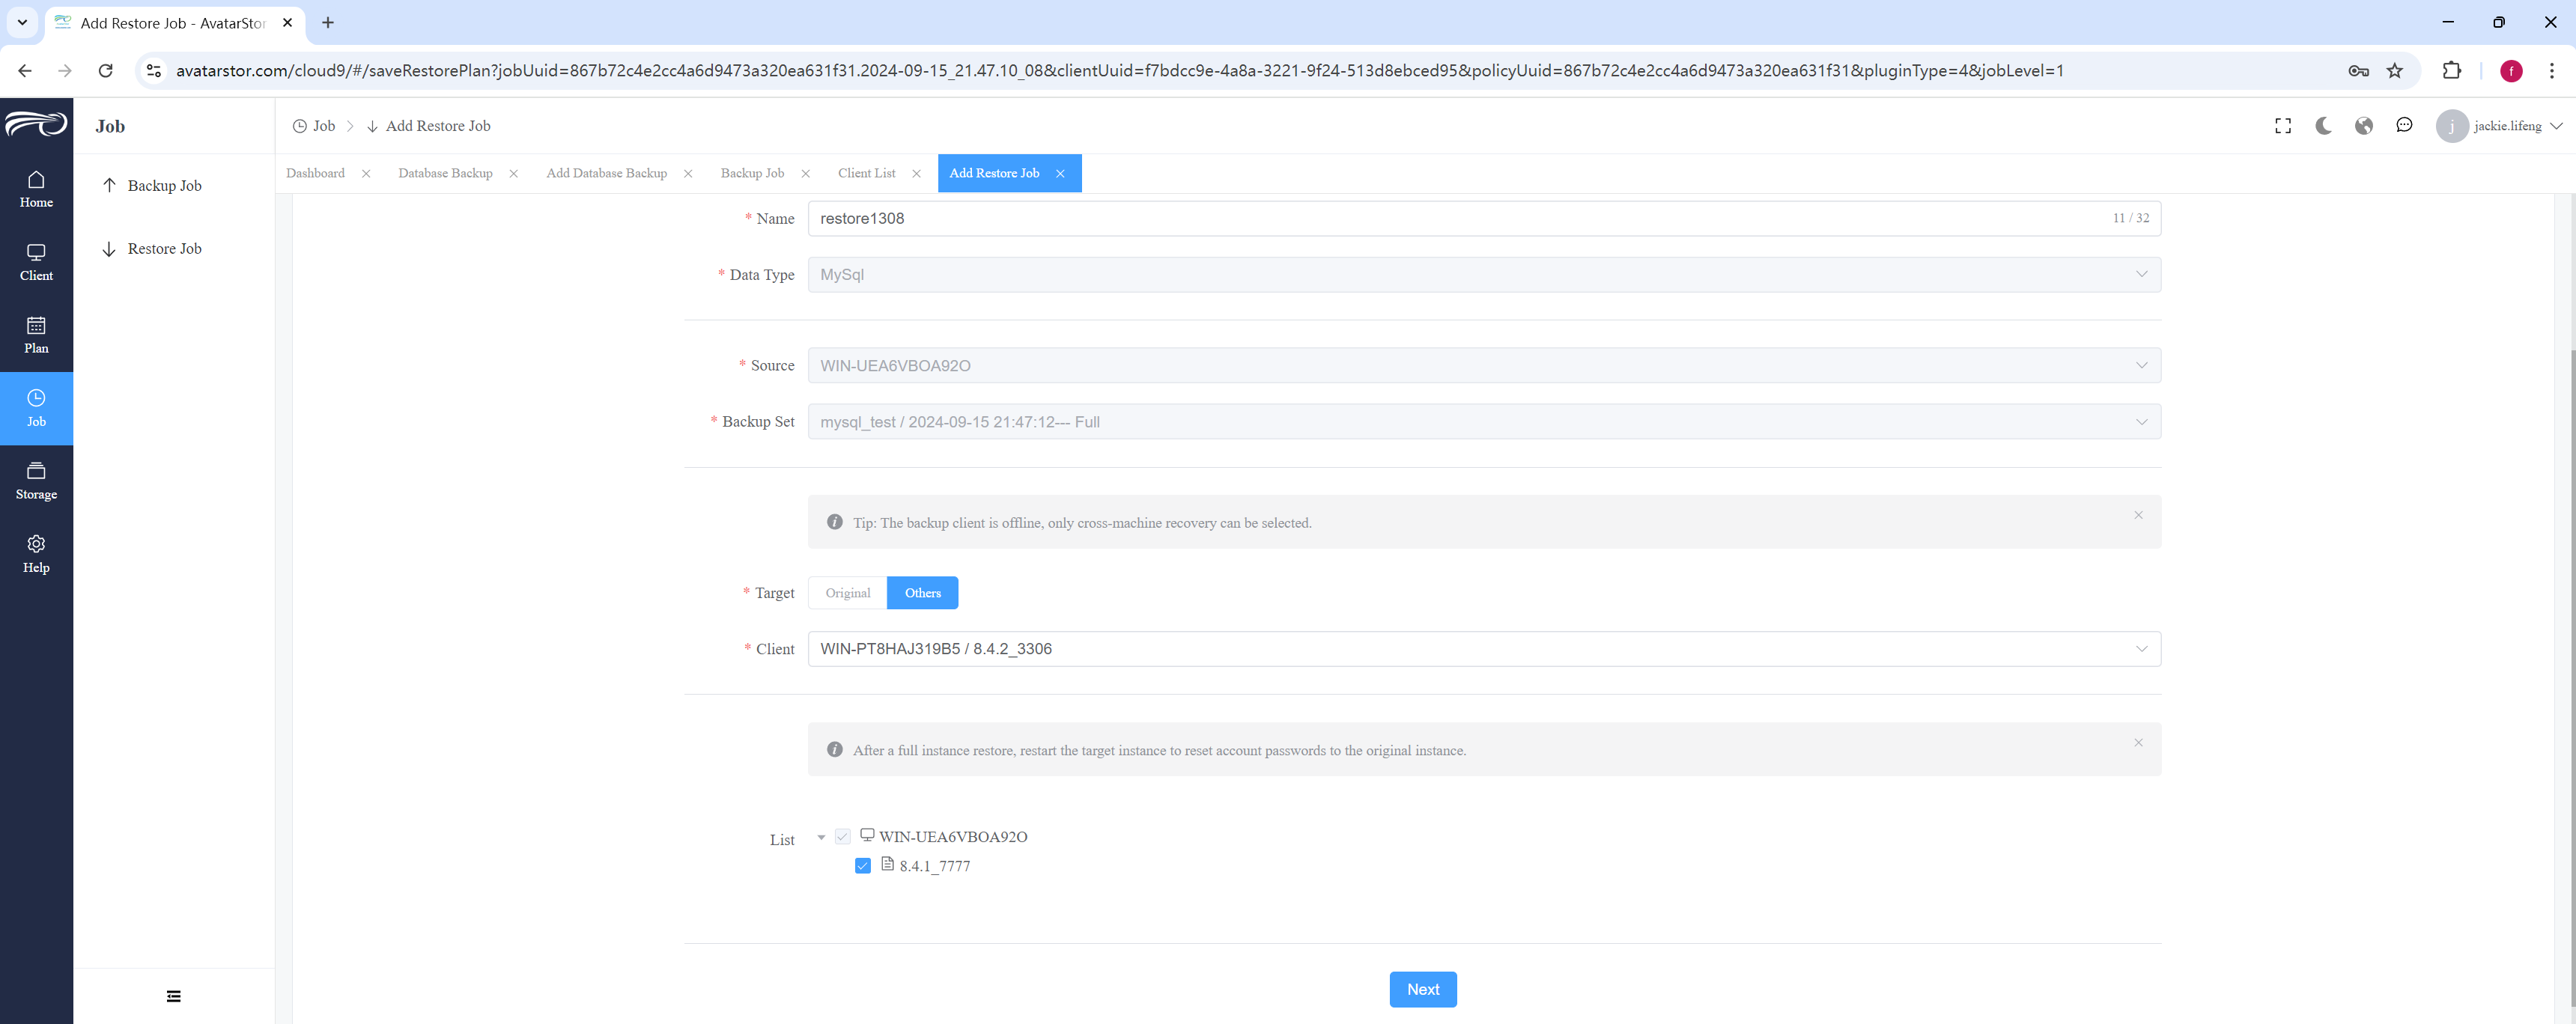
After the index rebuild is complete, you can expand the original backup set and select the content you need to restore.
|
Note that the destination client must have access to the storage where the original backup set is located in order to perform index rebuilding and subsequent recovery tasks. |
Now you can continue with the restore wizard.
4.10 Files backup and restore
4.10.1 File backup
File backup does not require configuration instances.
Start creating a new file strategy from the left navigation bar [Plan] - [File Backup] - [+], and complete a backup plan in 4 steps.
Step one, select your destination storage and backup content.Give the plan a name, drop down and select the Client you want to backup. There are two ways to choose the backup content, one is to expand the list, and the other is to directly enter the path. Usually, we will select the expanded list and check it, for example, select backup C:\
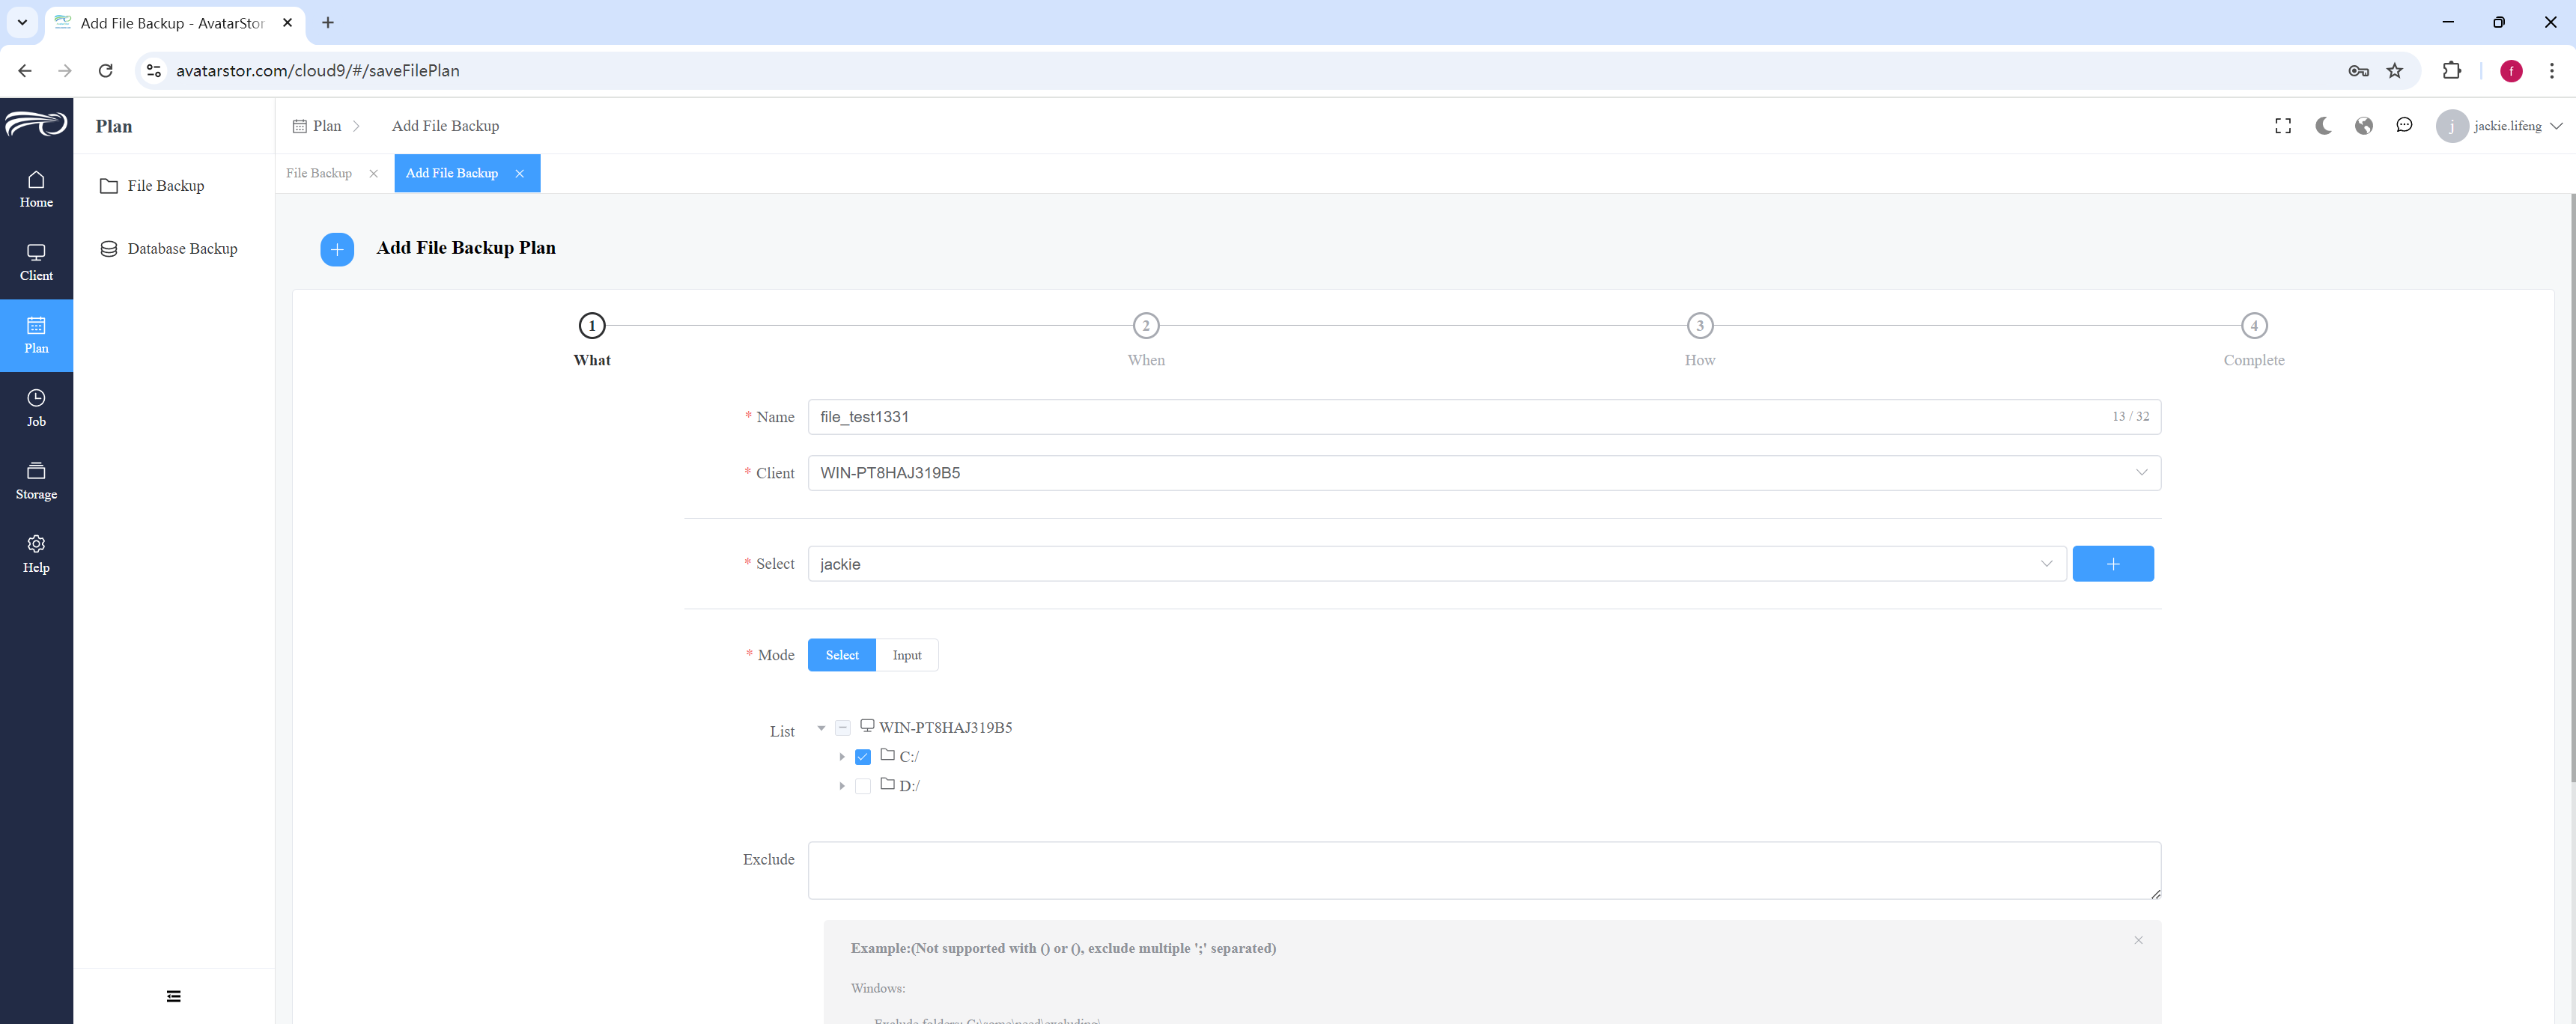
Excluding file paths is used to filter out several folders or files that are not needed after selecting a large range of paths. Please fill in the filtering content you need according to the page prompts. It is particularly important to pay attention here.
|
The filtering methods for folders and files are different. Windows: filter excluding folders C:\ some\ need\ excluding\ Filter excluding files: C:\ some\ need\ excluding Linux: filter excluding folders:/some/need/excluding/ Filter excluding files:/some/need/excluding Only directories ending with "\" or "/" will be recognized as directories by the system. |
|
In the C drive of Windows system, there are some common system files and folders that are not recommended to be backed up through backup software, because these files are either temporary, locked during system operation, or may cause problems during recovery. Therefore, AvatarStor has already filtered out these files and folders by default.. Here are some common examples: C:\ Windows folder : C:\ Windows\ System32\ config : Store the regedit file, the system runtime is locked. C:\ Windows\ Temp : Temporary file. C:\ Windows\ SoftwareDistribution : Windows Update File. C:\ Windows\ WinSxS : Cache for storing system files, not recommended for backup and recovery. C:\ Program Files and C:\ Program Files (x86) folders : Application folders are usually not recommended for backup because reinstalling applications is more reliable than restoring from backup. Temporary and cached files in user directory : C:\ Users\ < Username >\ AppData\ Local\ Temp : Temporary file. C:\ Users\ < Username >\ AppData\ Local\ Microsoft\ Windows\ INetCache : Browser cache. Please replace Username with your actual username. Page files and hibernation files : C:\ pagefile.sys : Page file. C:\ hiberfil.sys : hibernate file. System Volume Information : C:\ System Volume Information : Data for the System Restore Point and Volume Shadow Copy services. Recycle Bin : C:\ $Recycle. Bin : Files and folders deleted by the user. In Linux systems, there are also some system files and directories that are not recommended for backup because they are temporary, can be locked while the system is running, or may cause problems during recovery. Here are some common examples: Temporary files and directories : /tmp : Store temporary files, which will be cleared after restarting. /var/tmp Store temporary files, but they will not be cleared after restarting. Virtual file system : /proc Virtual file system for kernel and process information. /sys Virtual file system for device and kernel information. /dev Virtual file system for device files. System logs : /var/log Store system and application log files that can be regenerated. Cache and lock files : /var/cache : Cache file. /var/lock : Lock the file. System service files : /run : Store runtime data, such as PID files. Package Manager Cache : /var/lib/apt/lists and /var/cache/apt/archives (for Debian-based systems). ** /var/lib/dnf and /var/cache/dnf (for Fedora-based systems). Swap files and swap partitions : Swap partitions and swapfiles : no backups are required as they can be recreated. System-specific files : /etc/mtab Contains information about the currently mounted file system. /etc/fstab Be careful when backing up, but may need to be adjusted when restoring. |
|
Backup strategies should focus on user data, configuration files, and important application data, such as: The user's home directory /home . System and application configuration file /etc . Database files (such as /var/lib/mysql or /var/lib/postgresql ). Data directory for specific applications. If it is the latter two, be sure to ensure that the relevant application is in a stopped state when backing up. You can use scripts before and after to start and stop the application. |
After configuring the exclusion path according to your own situation, click [Next] to enter.
Step two, set the scheduled trigger time.
Refer to Chapter 4, Section 3, Automatic Trigger of Backup Plan to configure the trigger time of the plan. For file backup, you can choose only "full", "full + incremental" or "full + differential" three combinations, please choose according to your own needs.
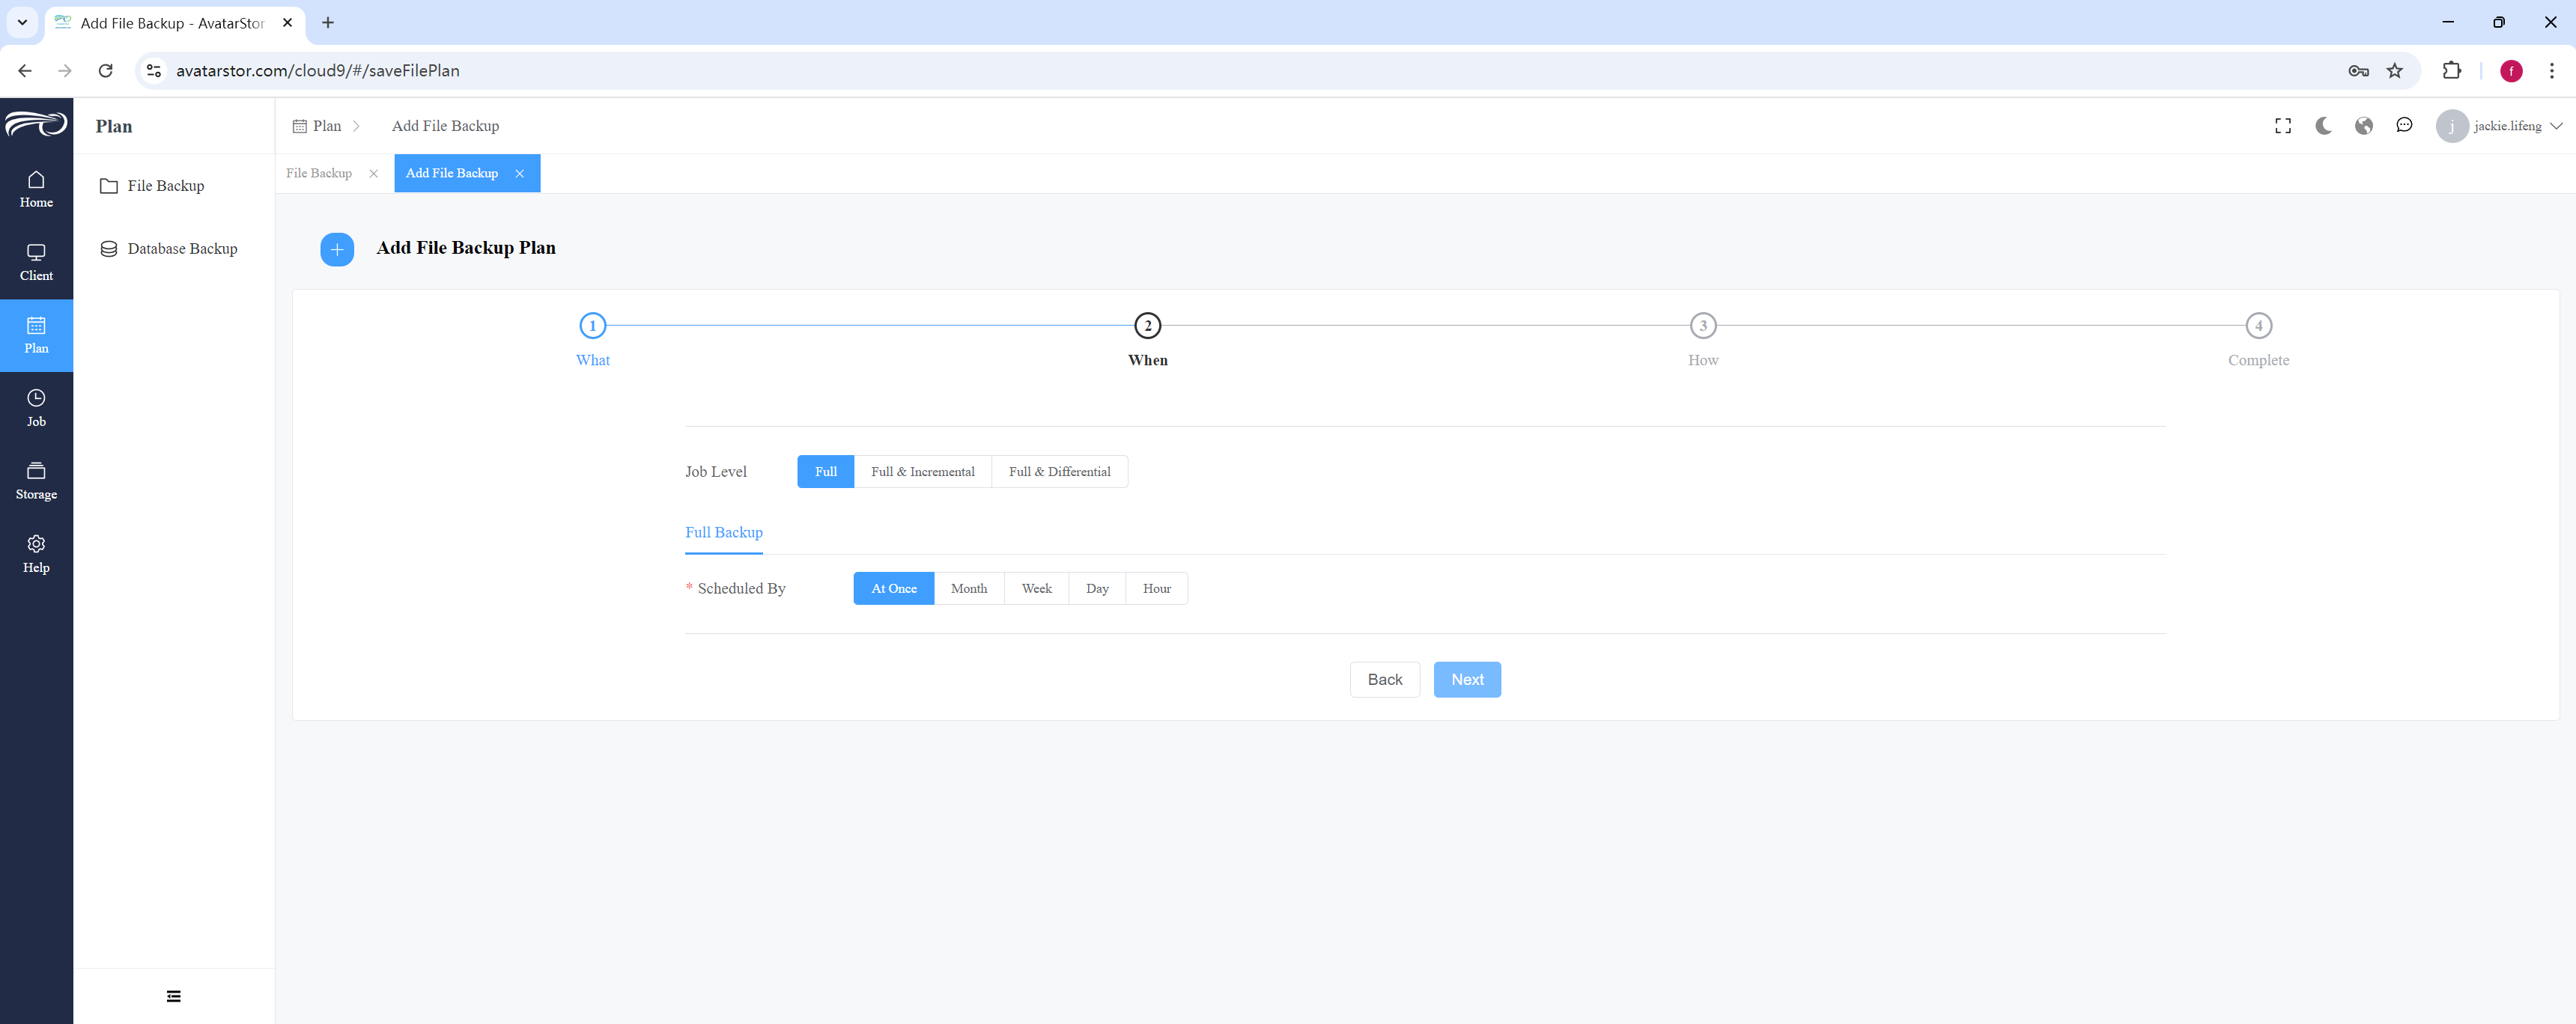
Click [Next] to enter:
Step three, configure advanced option:
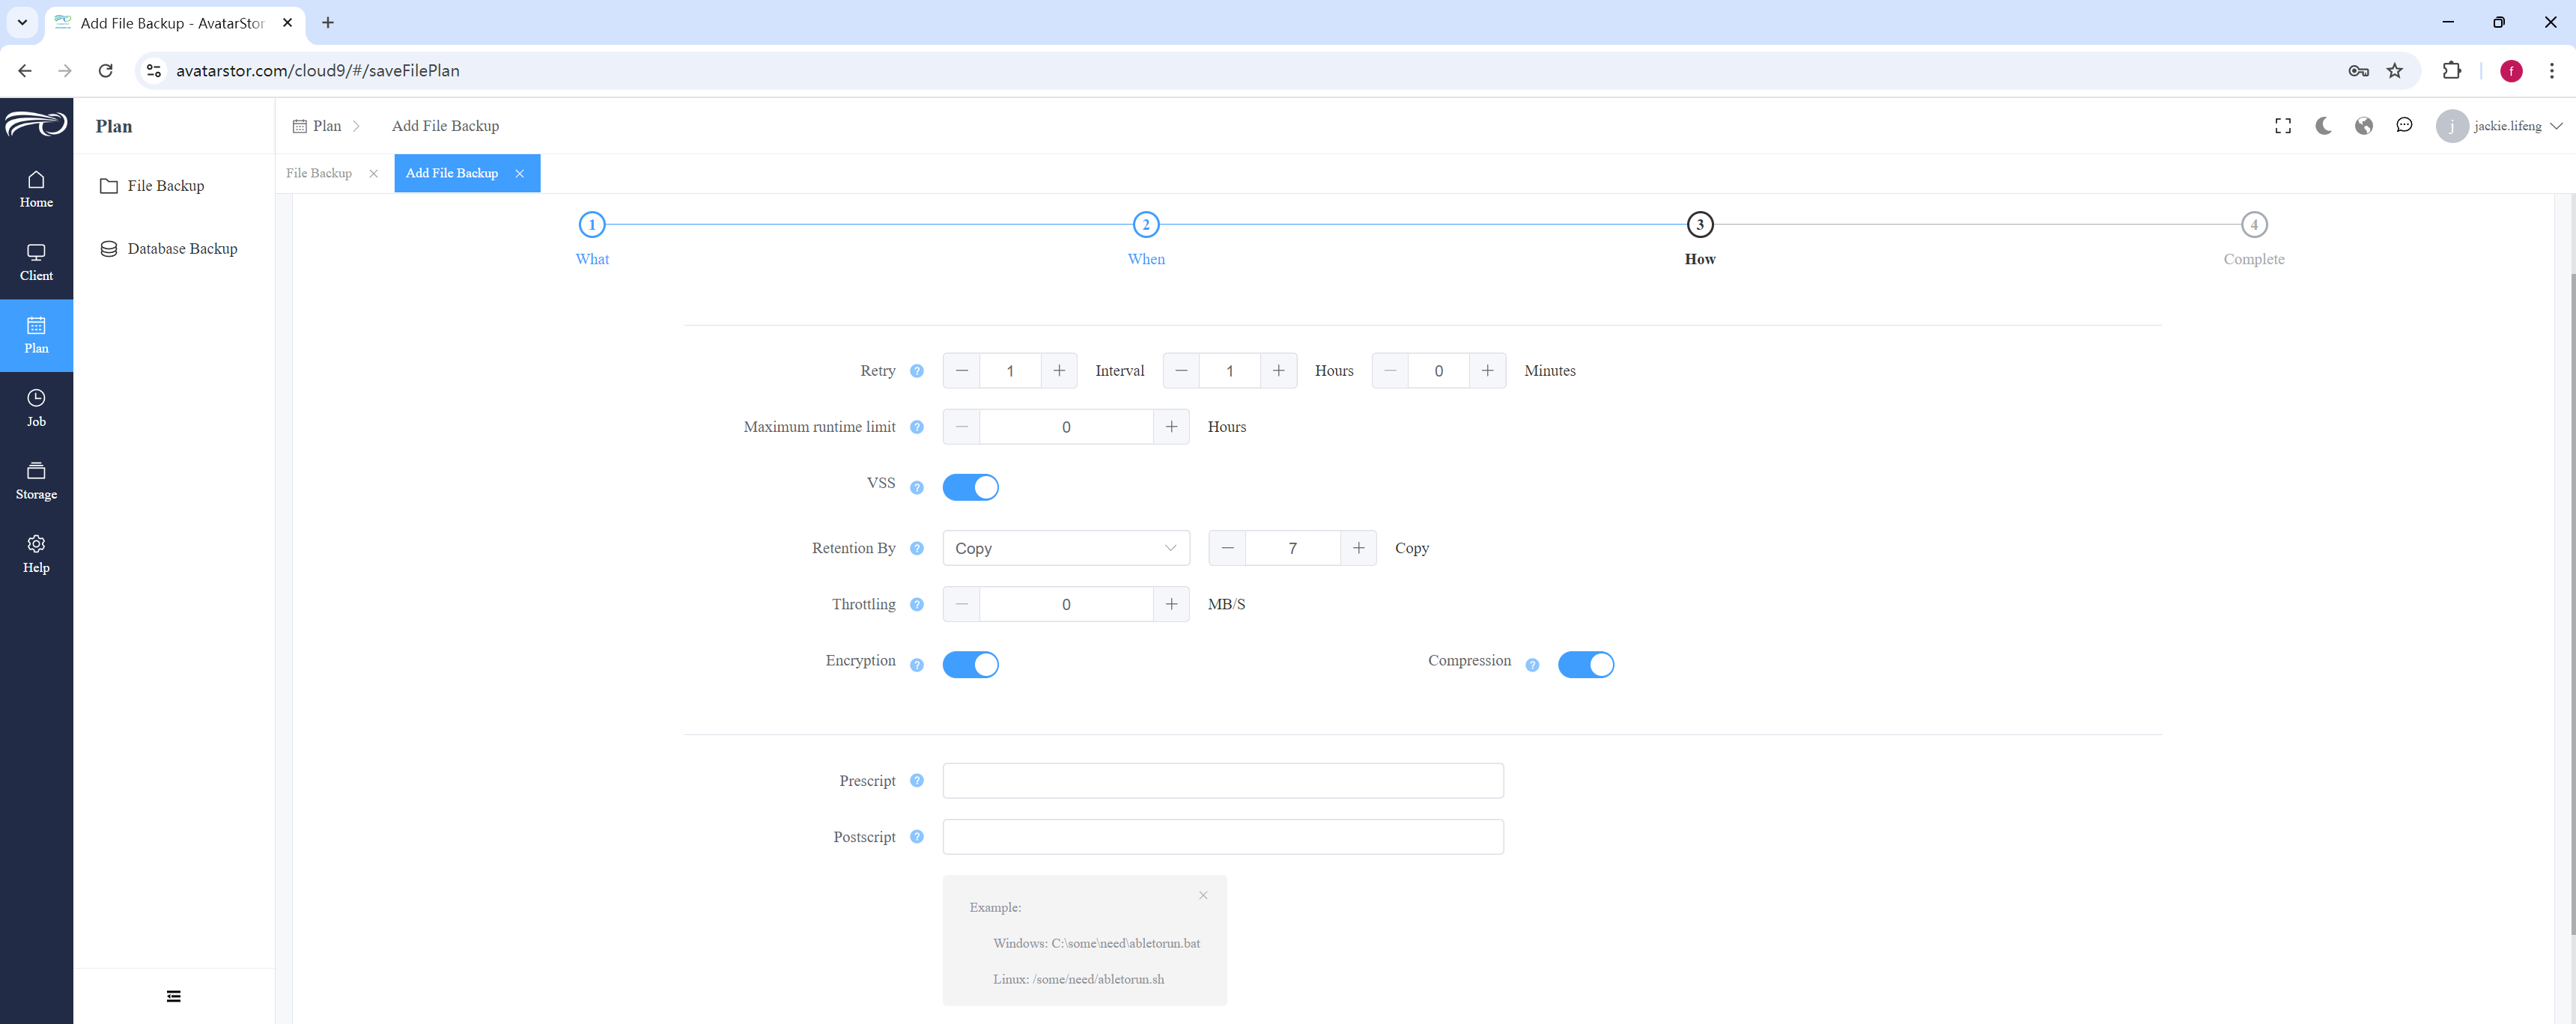
Please refer to Chapter 4, Section 6, Advanced options for backup plans and Section 7, before and after scripts , for explanations.
In addition, special options for Windows file backup:
Enable VSS Volume Shadow Copy: Yes, Enable/No, Not Enable.
|
Tip VSS (Volume Shadow Copy Service) is a feature in the Microsoft Windows operating system that allows snapshots of volumes to be created while the system is running. These snapshots can be used for backup, file recovery, and other operations. VSS is mainly used to create consistent snapshots, and Microsoft's SqlServer backup defaults to using VSS technology. However, in the practice of file backup, VSS is generally ineffective. In addition, VSS can also be affected by other storage management or security software. If you enable VSS for file backup but the backup fails, you may want to turn off VSS and try again. |
Click [Submit] to save the backup plan.
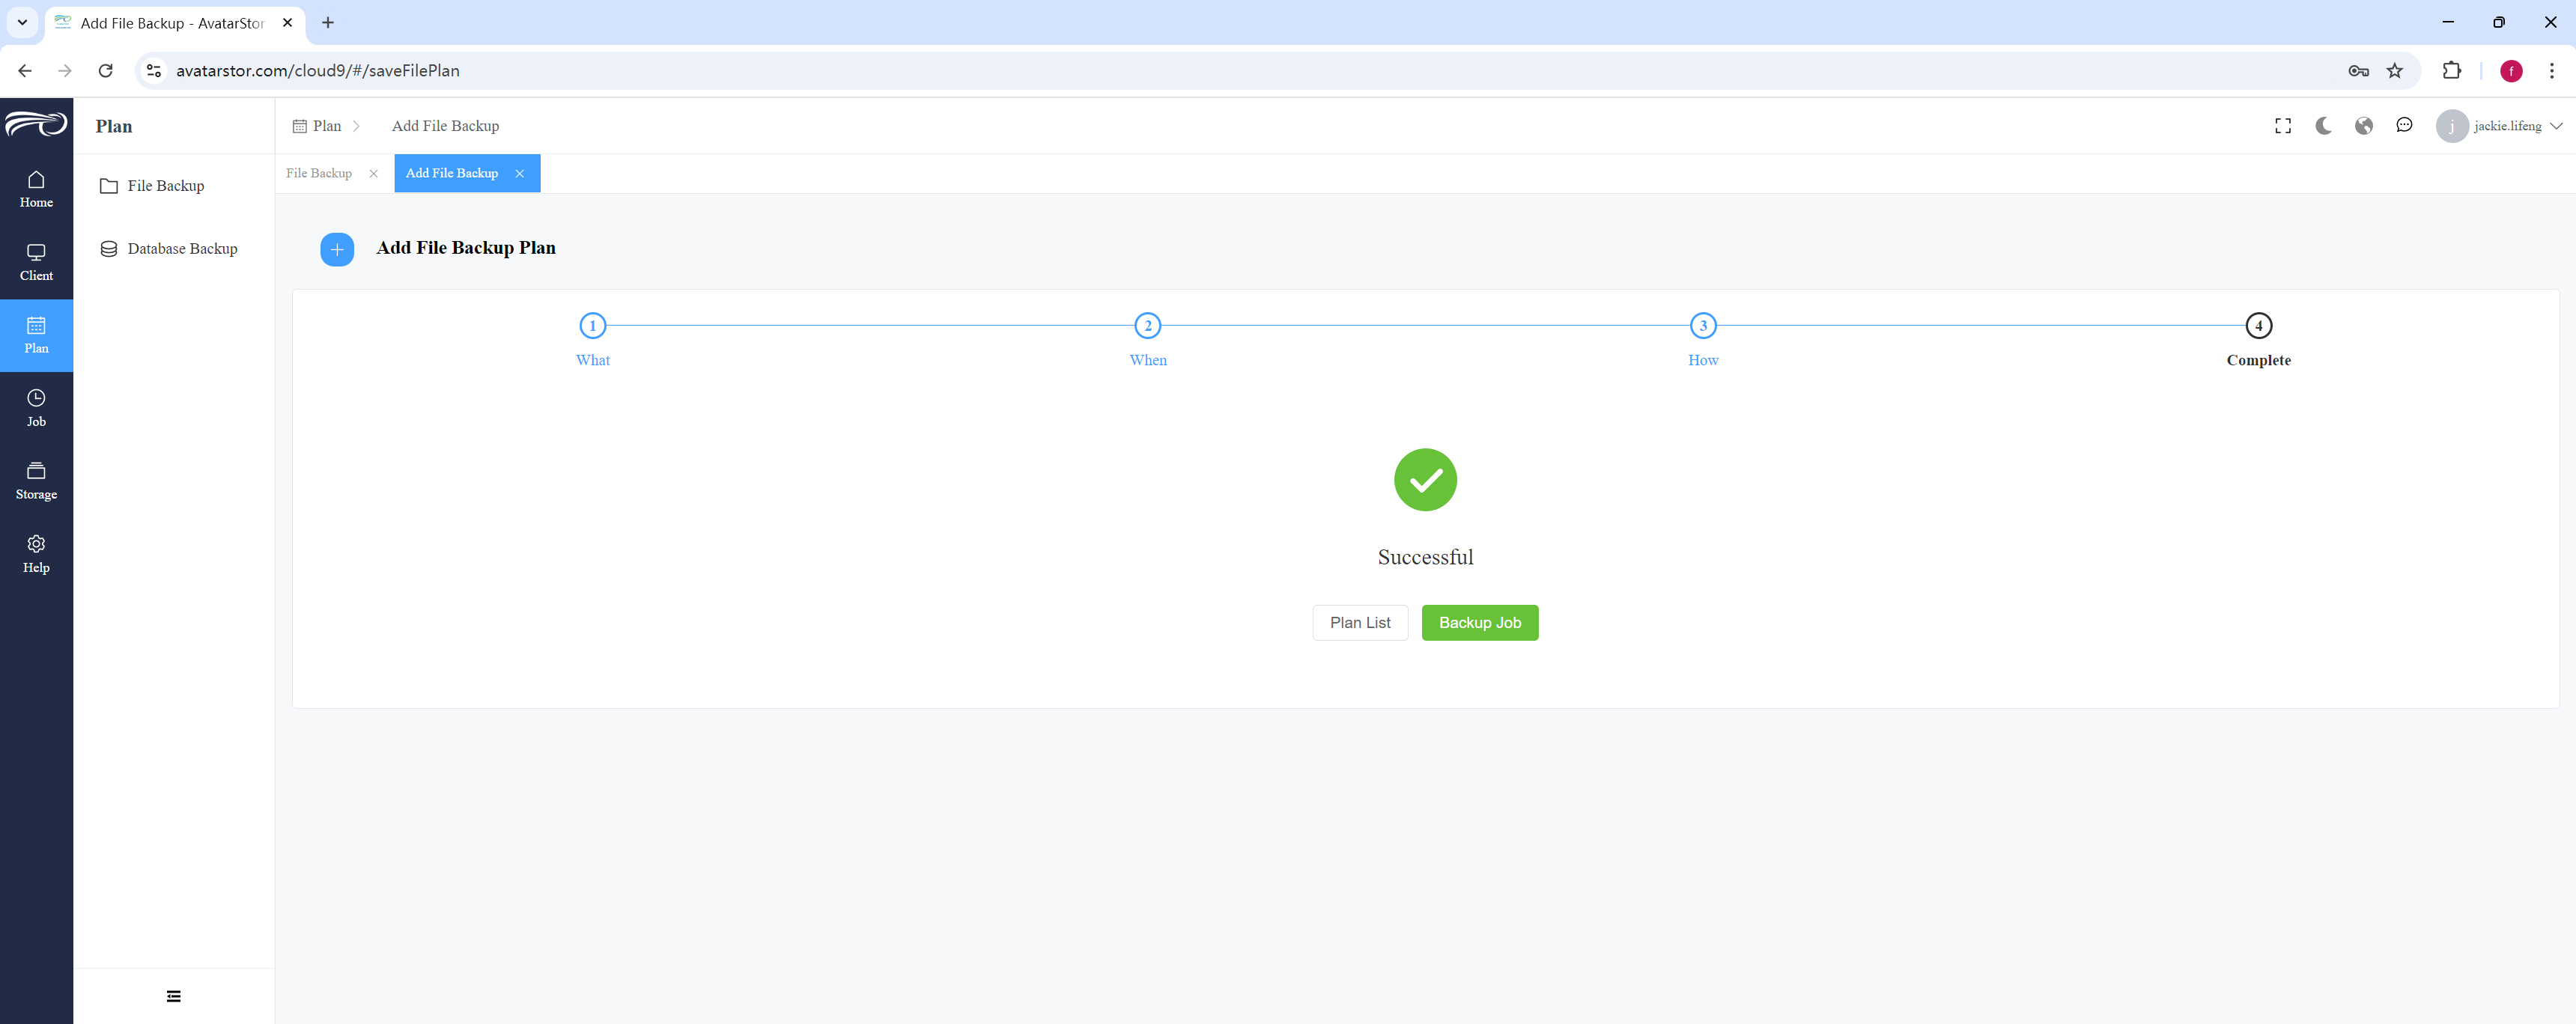
You can then refer to Chapter 4, Section 4, Manual Trigger of Backup Plan to run the plan manually. You can also wait for the scheduled automatic trigger of the plan.
4.10.2 File restore
Launch a restore wizard and give the restore job a name:
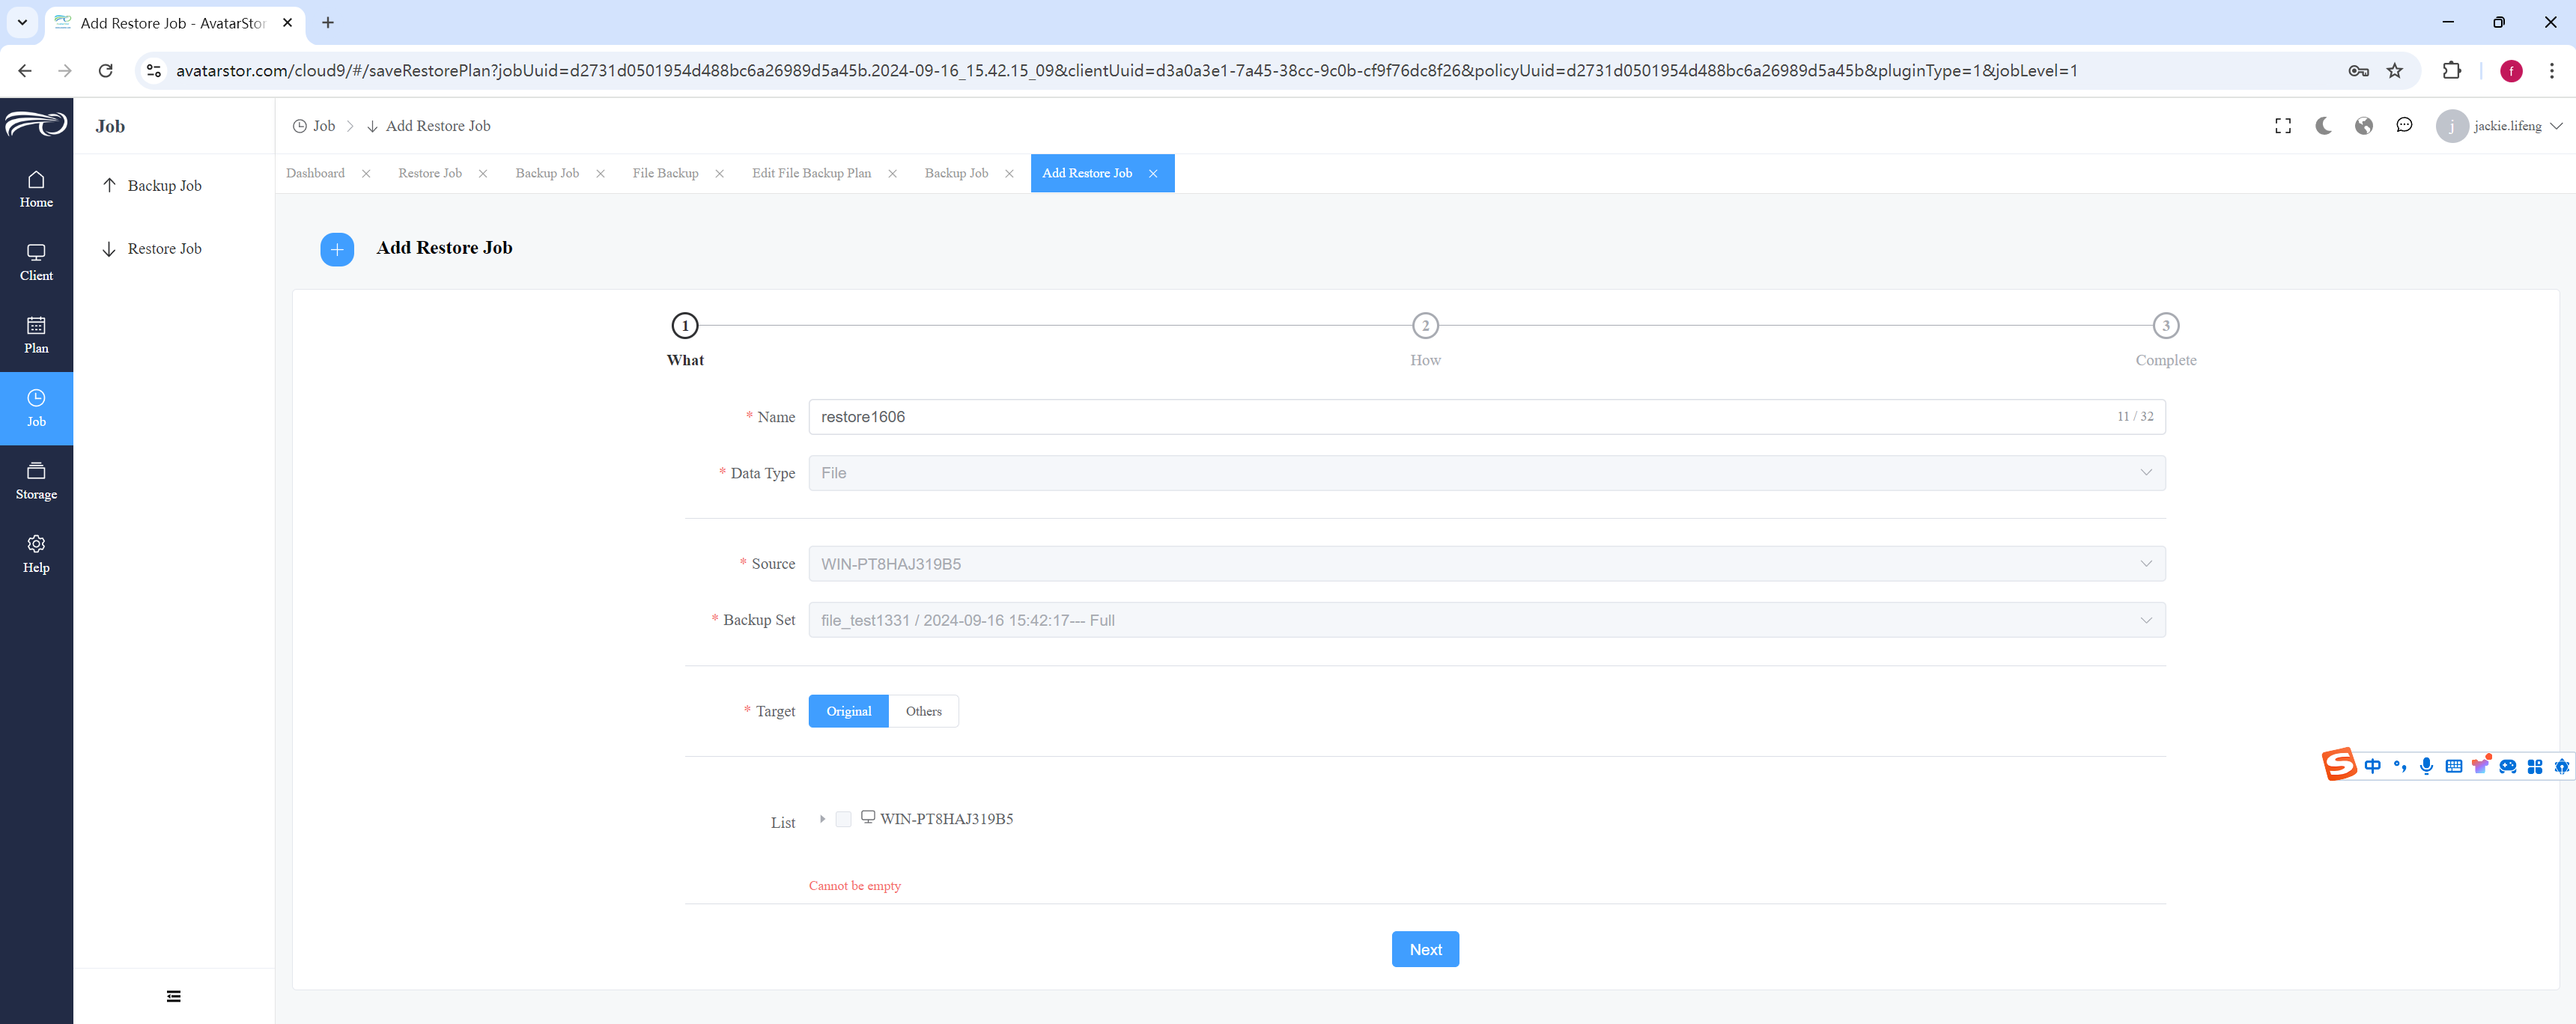
Select local restore or remote restore , expand the content to be restored:
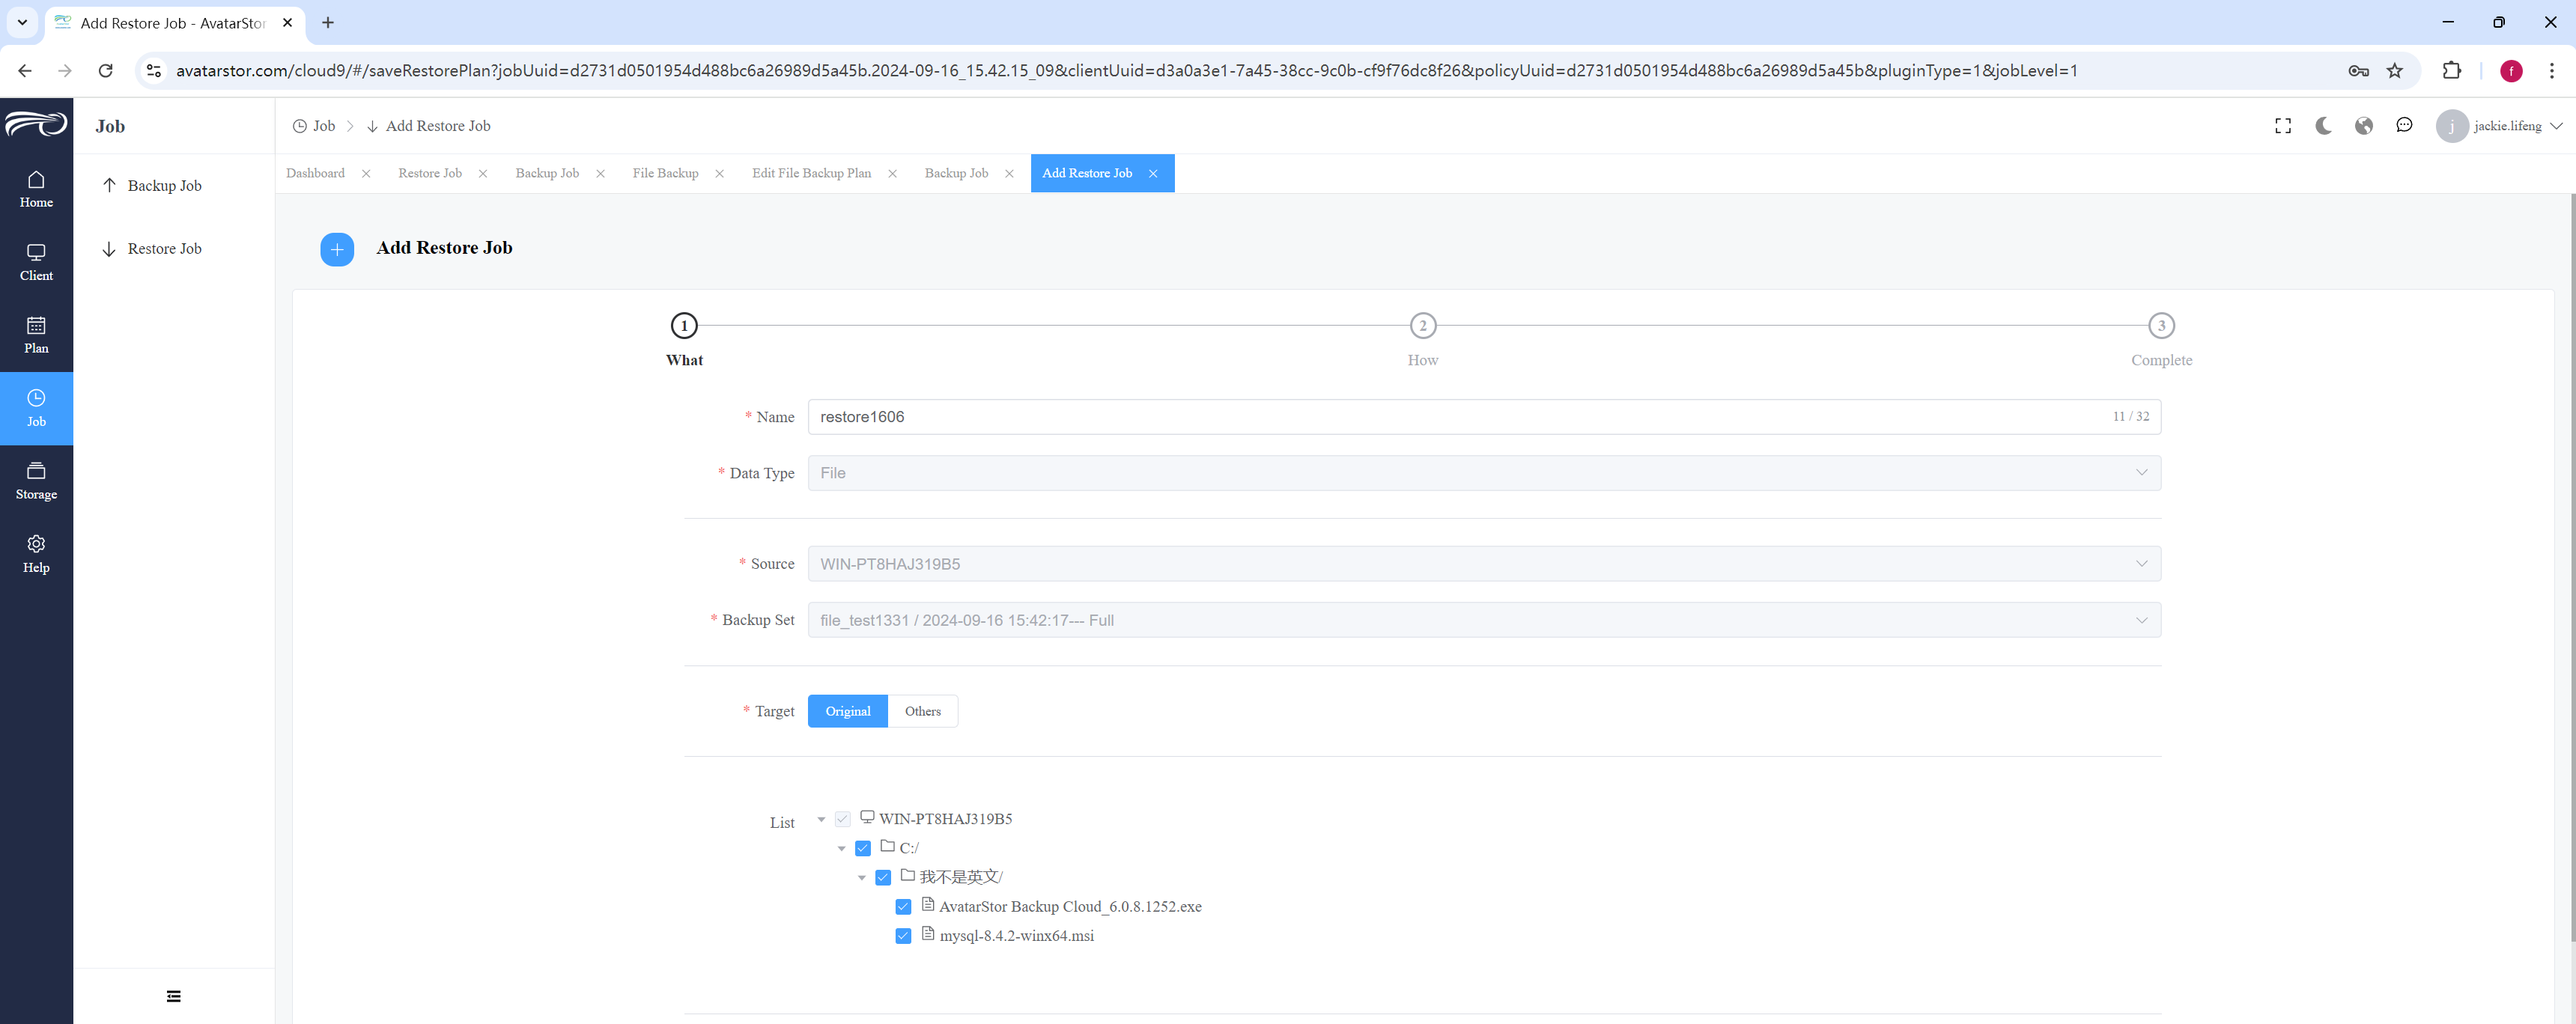
|
If only individual files need to be restored, you can also continue to expand the original backup directory and select individual files to be restored separately. |
Click [Next]:
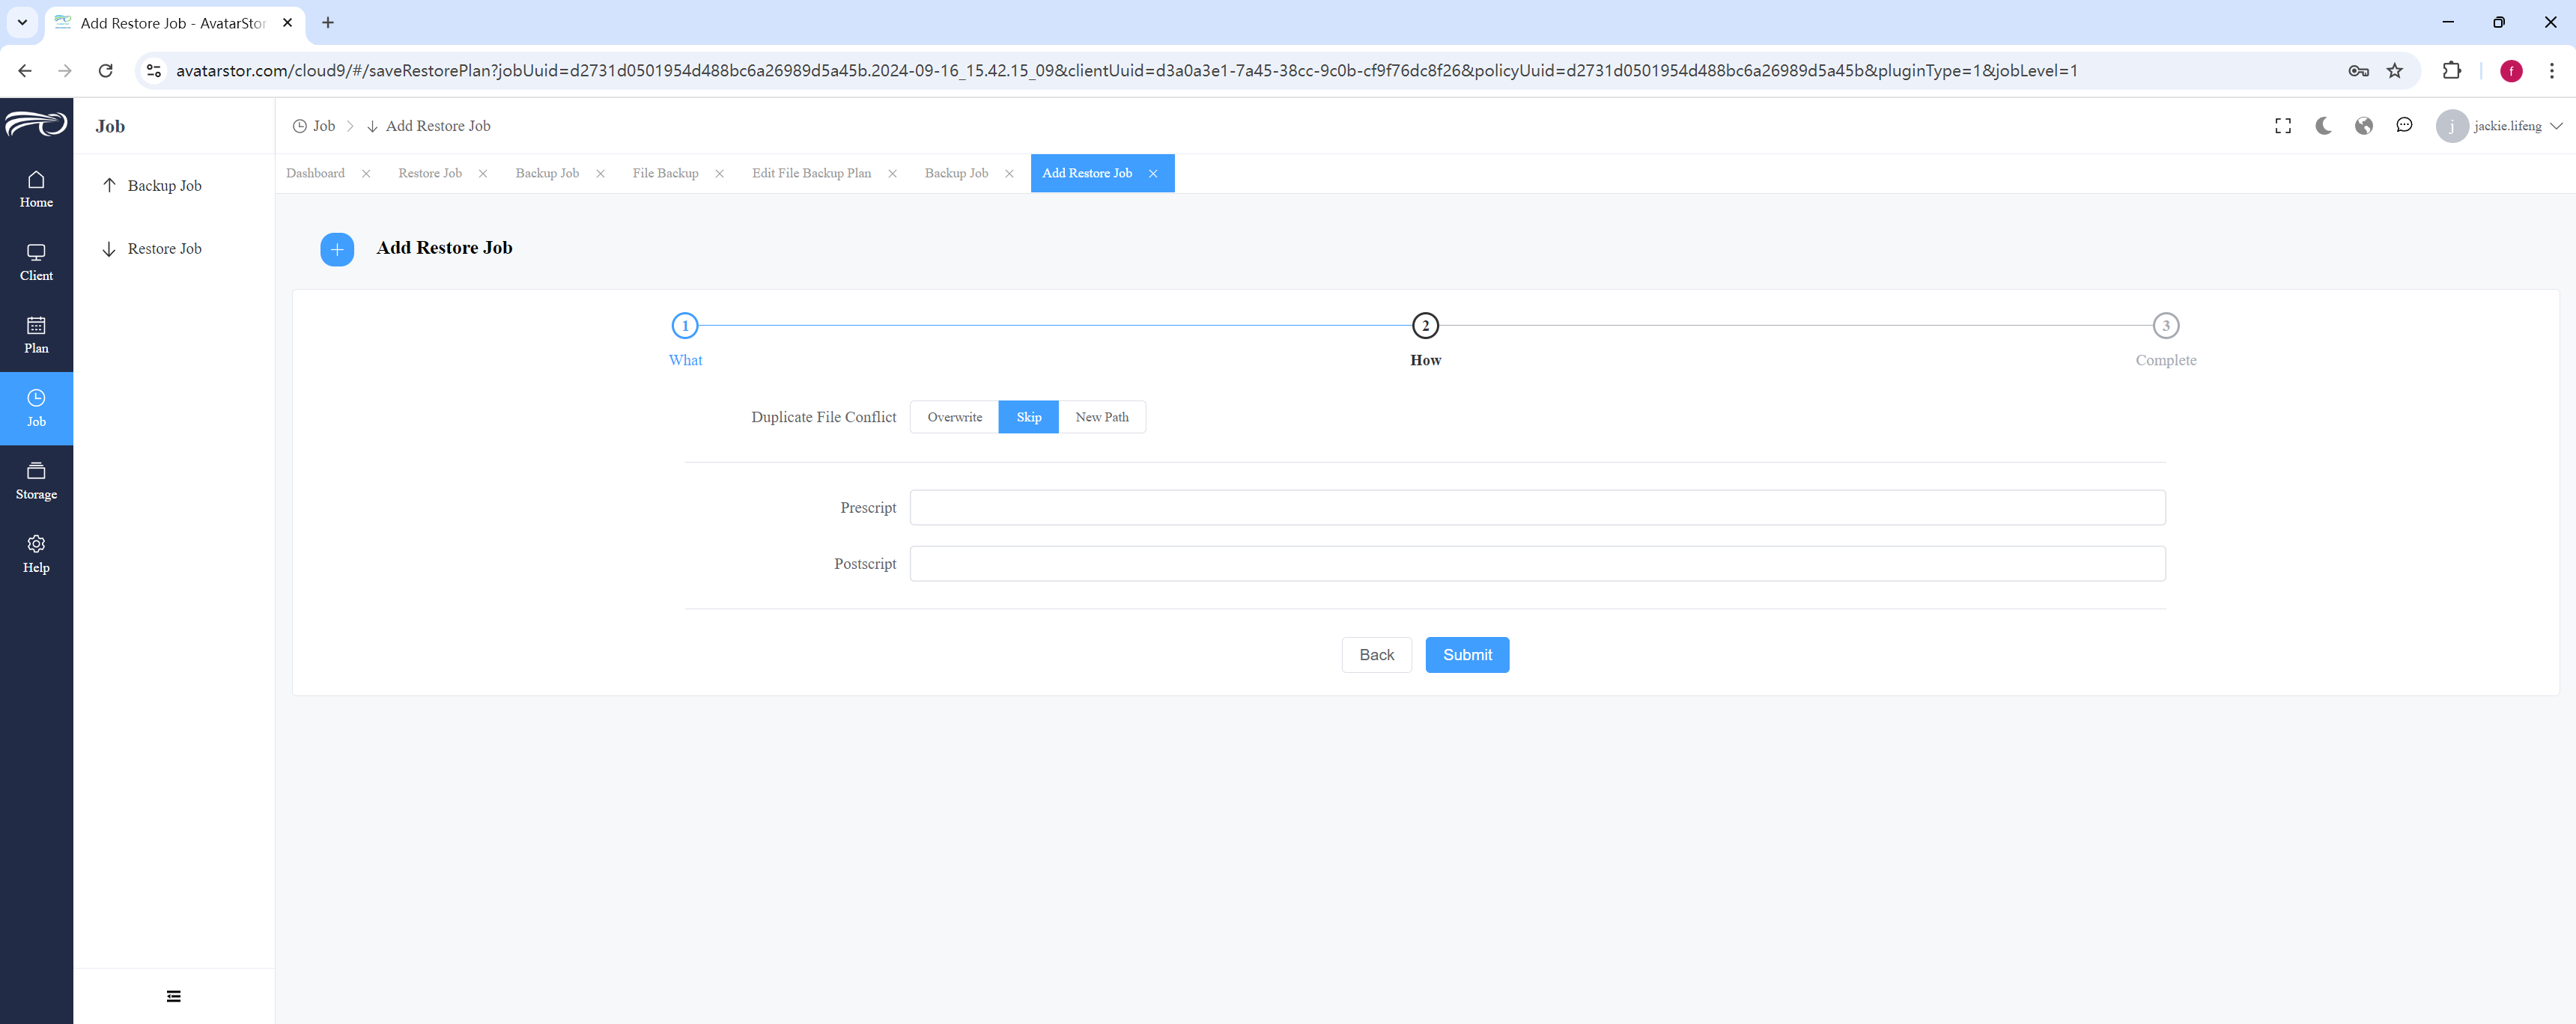
In addition to the before and after scripts , here are three restore options:
Option 1: Select the original path recovery, file recovery process encounters the same name file, "overwrite" the local file.
Option two: select the original path recovery, file recovery process encounters the same name file, "skip" the local file.
Option 3: Select a new path to restore and restore according to the original directory structure in the specified path. (Path format:/usr/or D:/test/)
Recommended option three:
|
Pay extra attention to whether the selected new path space is sufficient. If the compression option is enabled when backing up the original backup job, the actual data volume needs to be divided by the compression ratio. |
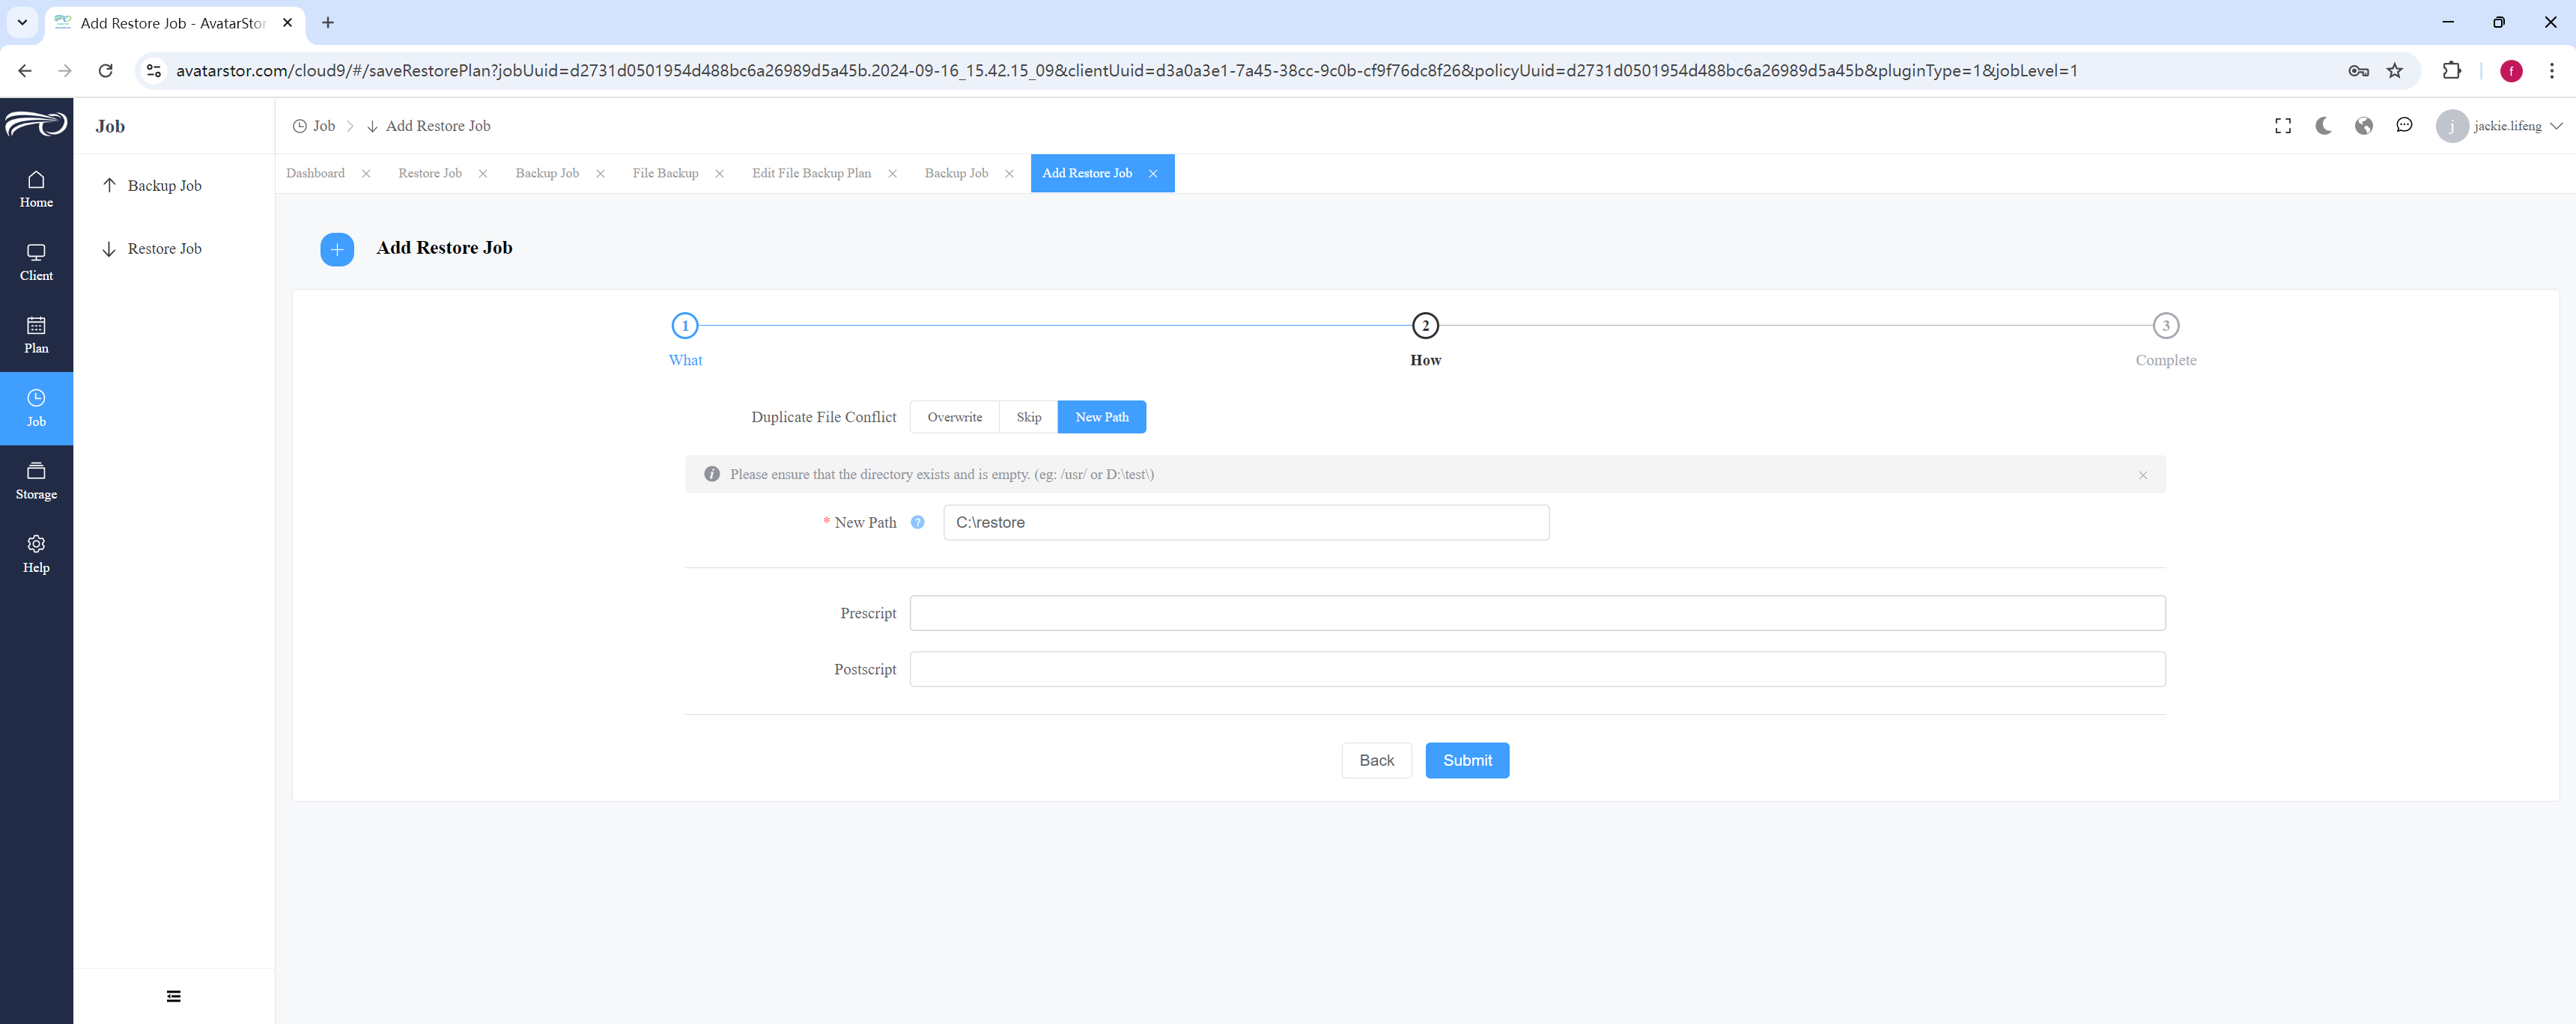
Click [Submit] to initiate restore.
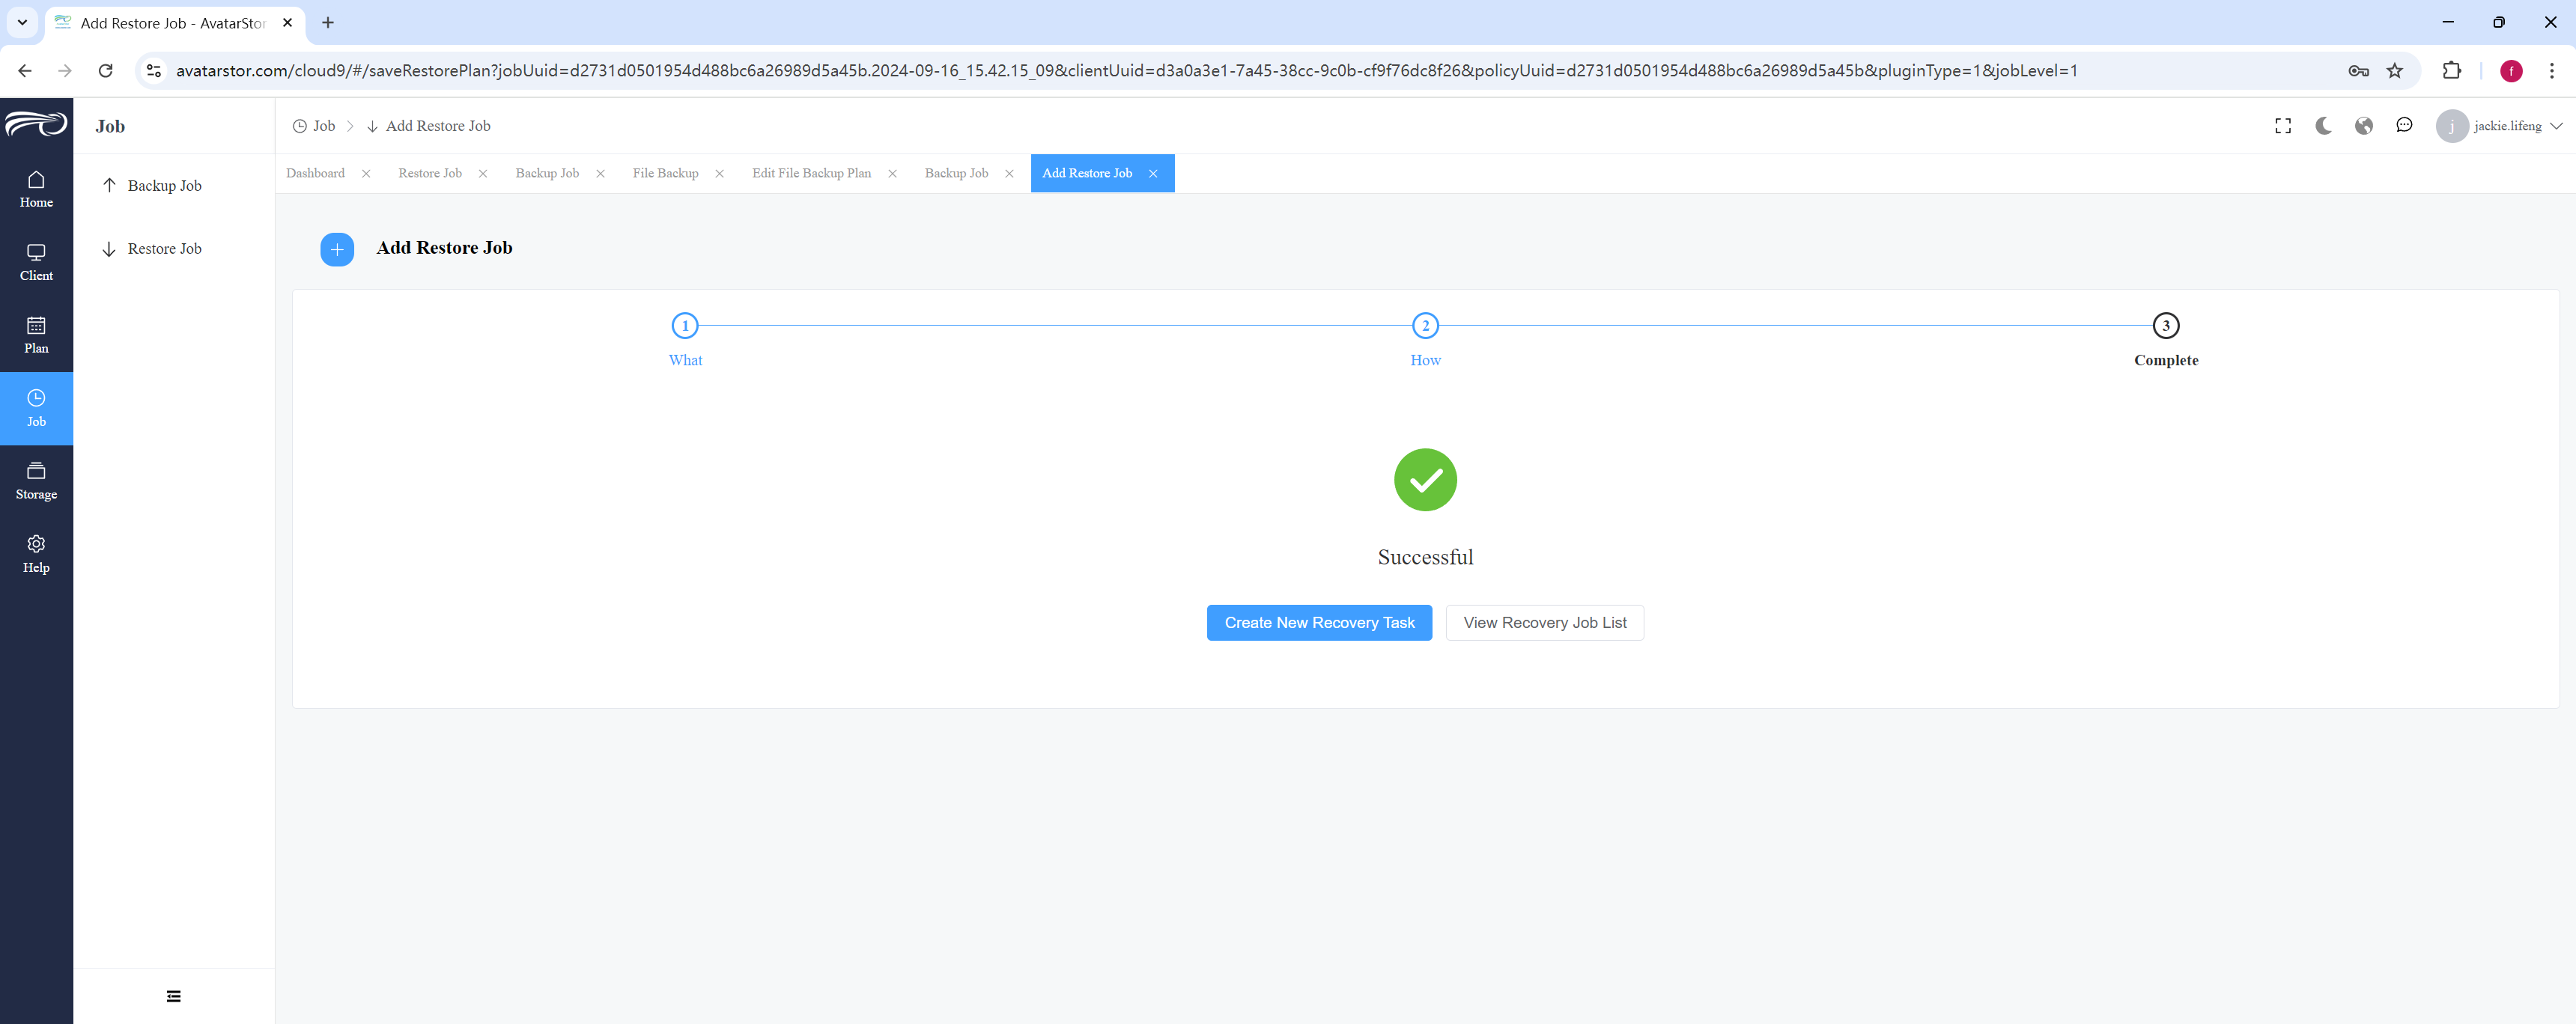
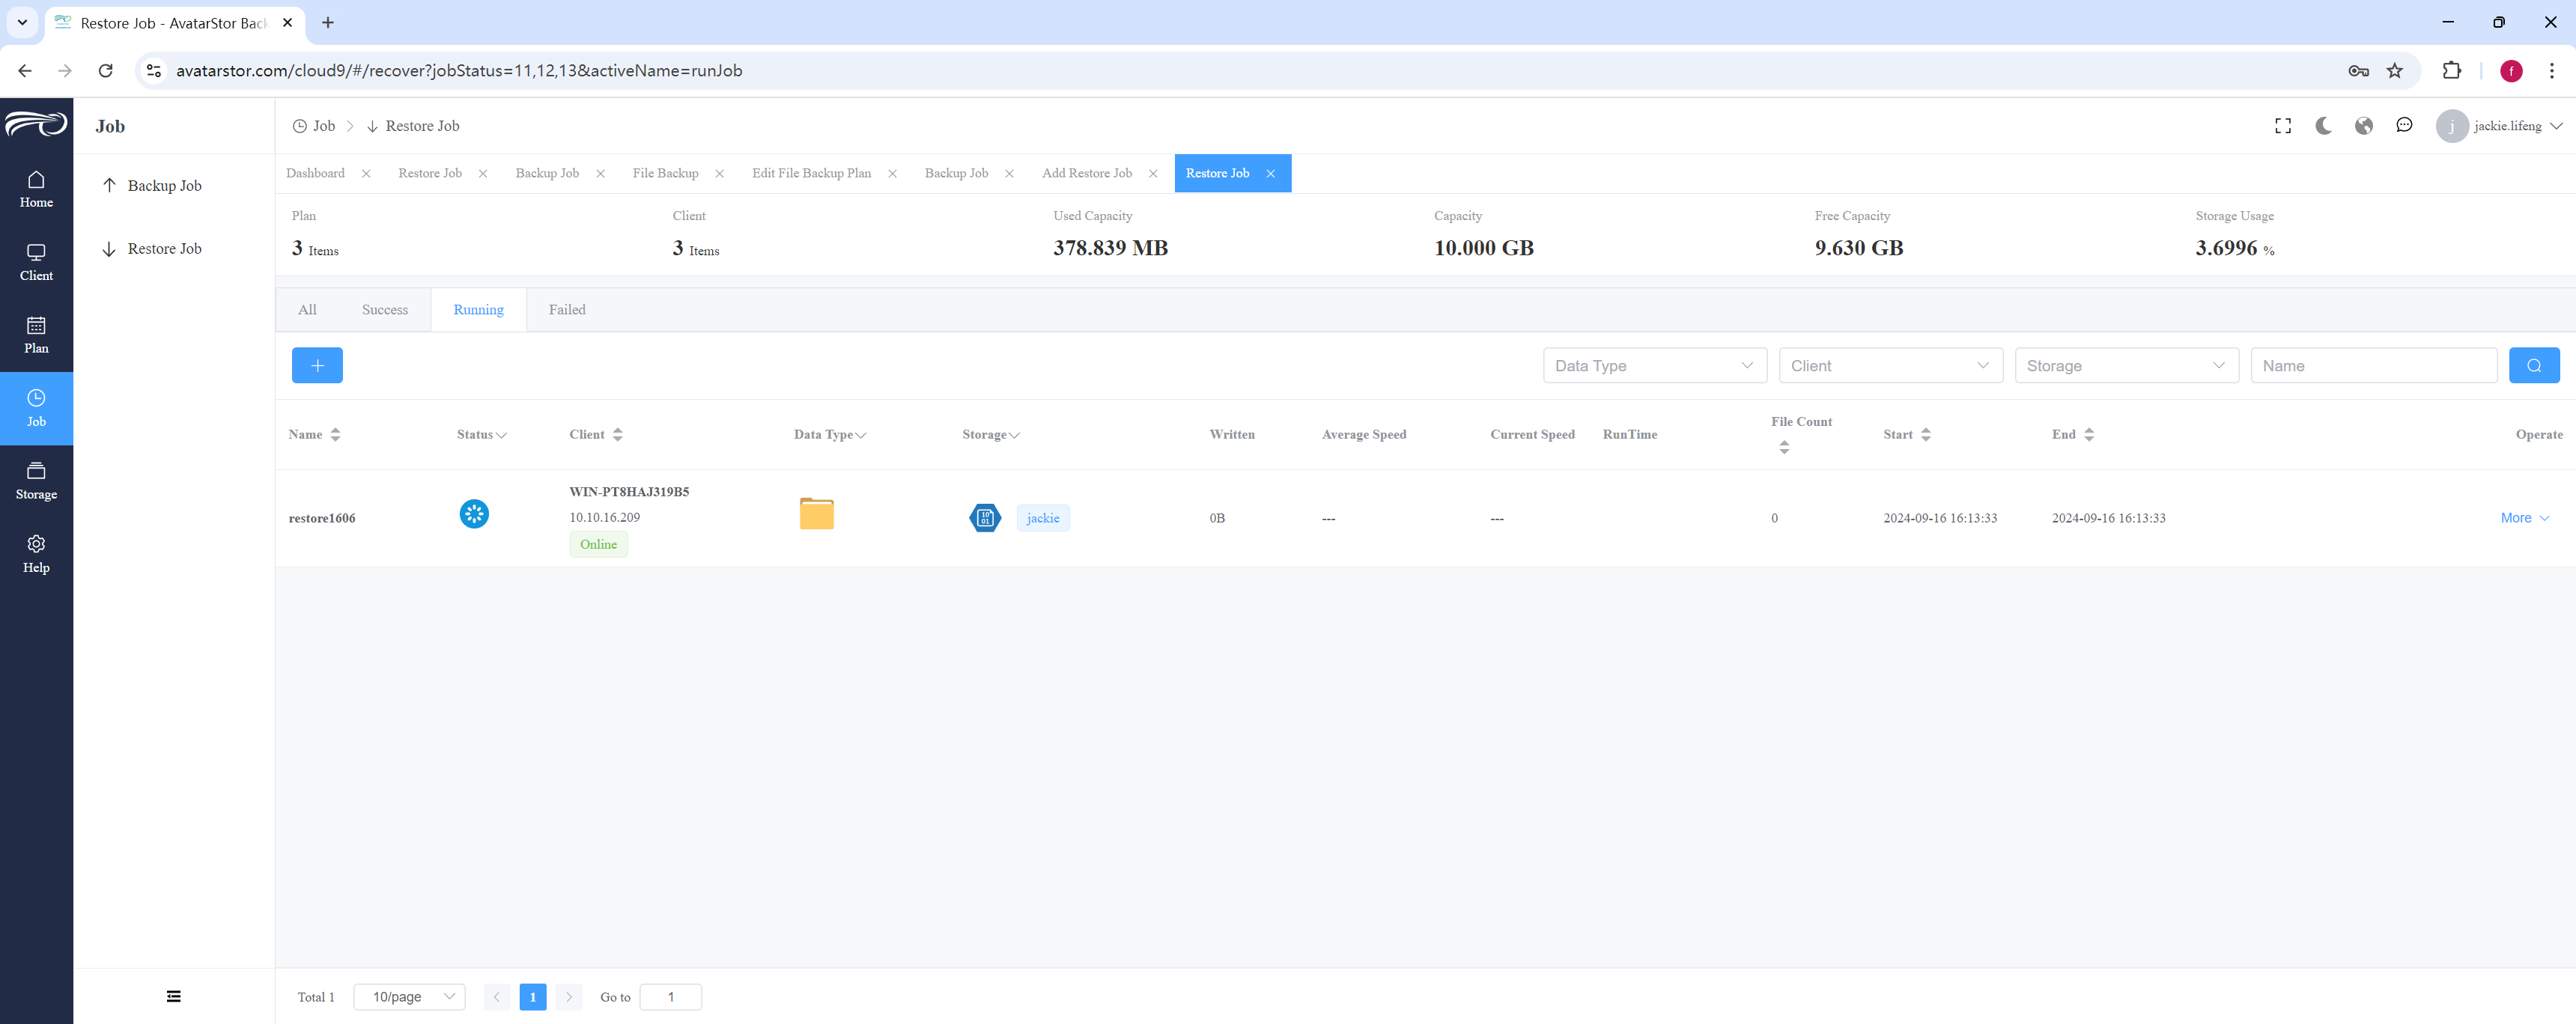
Click [View Recovery Job List] to go to [Job] - [Recovery Job] - [Running] to view the jobs being restored.
4.11 MySQL Backup and Restore
4.11.1 MySQL Backup
First, please refer to Chapter 3 Configuring Instances to configure the corresponding MySql instance information for the source Client. Just as a Client has multiple MySql instances, it can be configured multiple times.
You can also manually query Mysql-related parameters.
Login to MySql:
|
Bash |
Query:
|
SQL |
The result should look like:
|
SQL |
You can compare the above results with the automatic scan results, but the query results should be considered as the final reference.
After configuring the instance:
Start creating a new MySql plan from the left navigation bar [Plan] - [Database Backup] - [+], in 4 steps:
The first step is to select the destination storage and the data content.
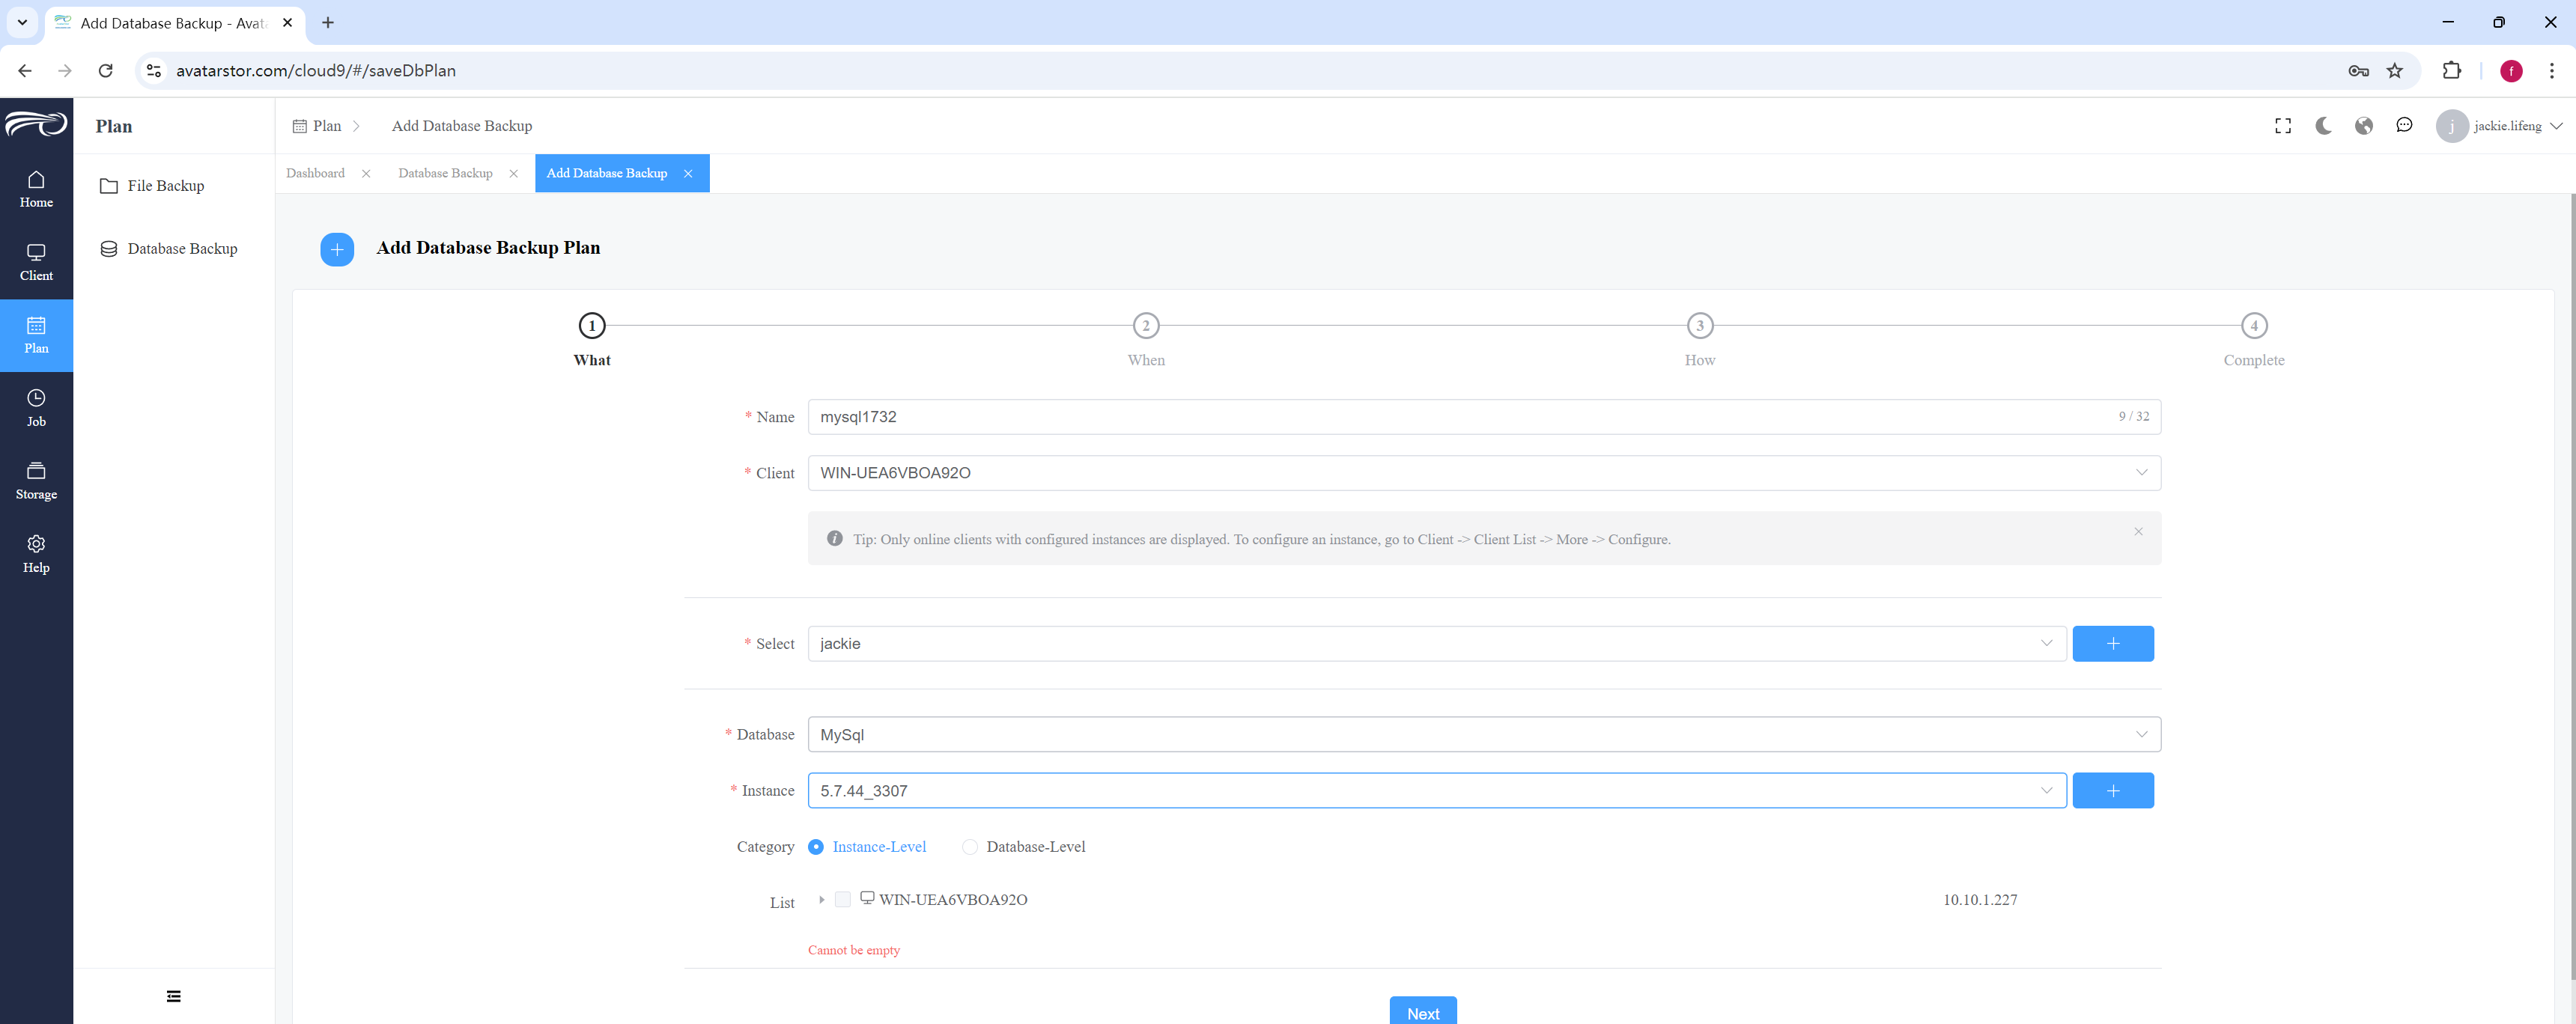
Name the plan and select the data type MySql. After selecting Client and Instance, the system will automatically scan all databases under that instance (note that MySql's system databases such as MySQL/Sys have been hidden). The backup data list can be expanded later.
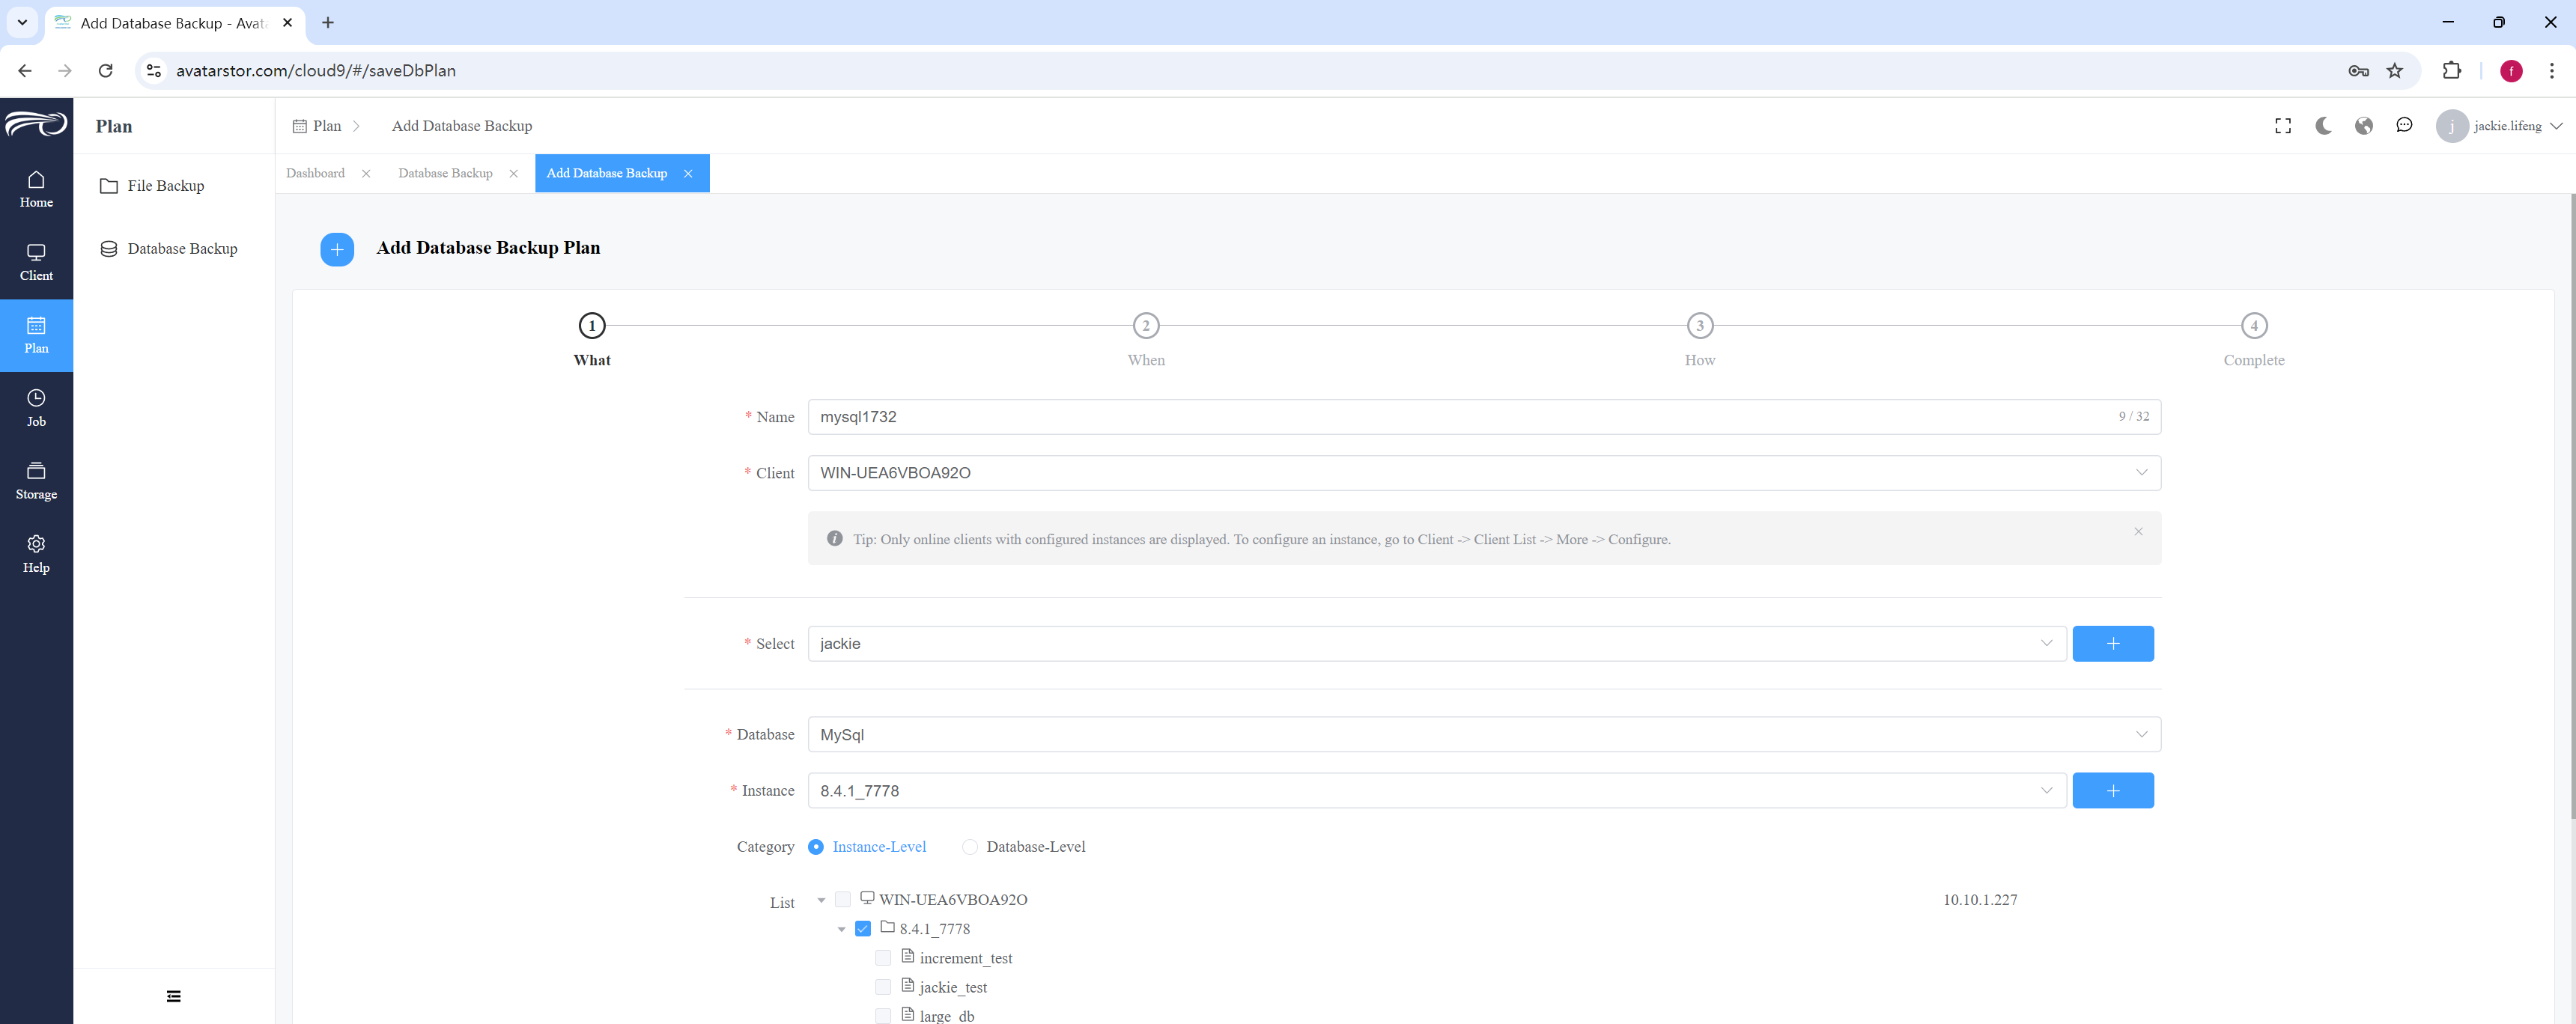
After selecting the database you need to backup, click [Next]:
|
Note that MySQL data selection involves two scenarios that will affect the subsequent backup plan options and recovery outcomes. The first scenario is when you directly click the checkbox in front of the instance name. This action will select all databases under the instance, including MySQL's system libraries (mysql and sys databases), resulting in a full instance-level backup. There are three important points to note about instance-level backups: Incremental backups are possible, as MySQL incremental backups are based on binlog files, and MySQL binlogs are shared across all databases. Restoration can only be done to an empty MySQL instance. Since the entire instance is backed up, recovery will be done at the instance level, resulting in full overwrites. This will delete and recreate databases, which will update the target machine’s accounts and passwords (matching them to the source and requiring a restart). Therefore, restoring on the original machine is not advisable (data loss may occur), and it's also not recommended to restore in environments with existing production data. Newly added databases will automatically be included in the backup plan. The second scenario is when you select individual databases for recovery, i.e., performing a database-level backup. In this case, keep the following in mind: Only full backups can be performed, and incremental backups are not possible. This is because it is difficult to extract logs specific to individual databases from MySQL’s shared binlog. Restoration can be done on either the original machine or a different machine, but you must ensure that no databases with the same name exist on the target instance. |
Step two, set the scheduled trigger time.
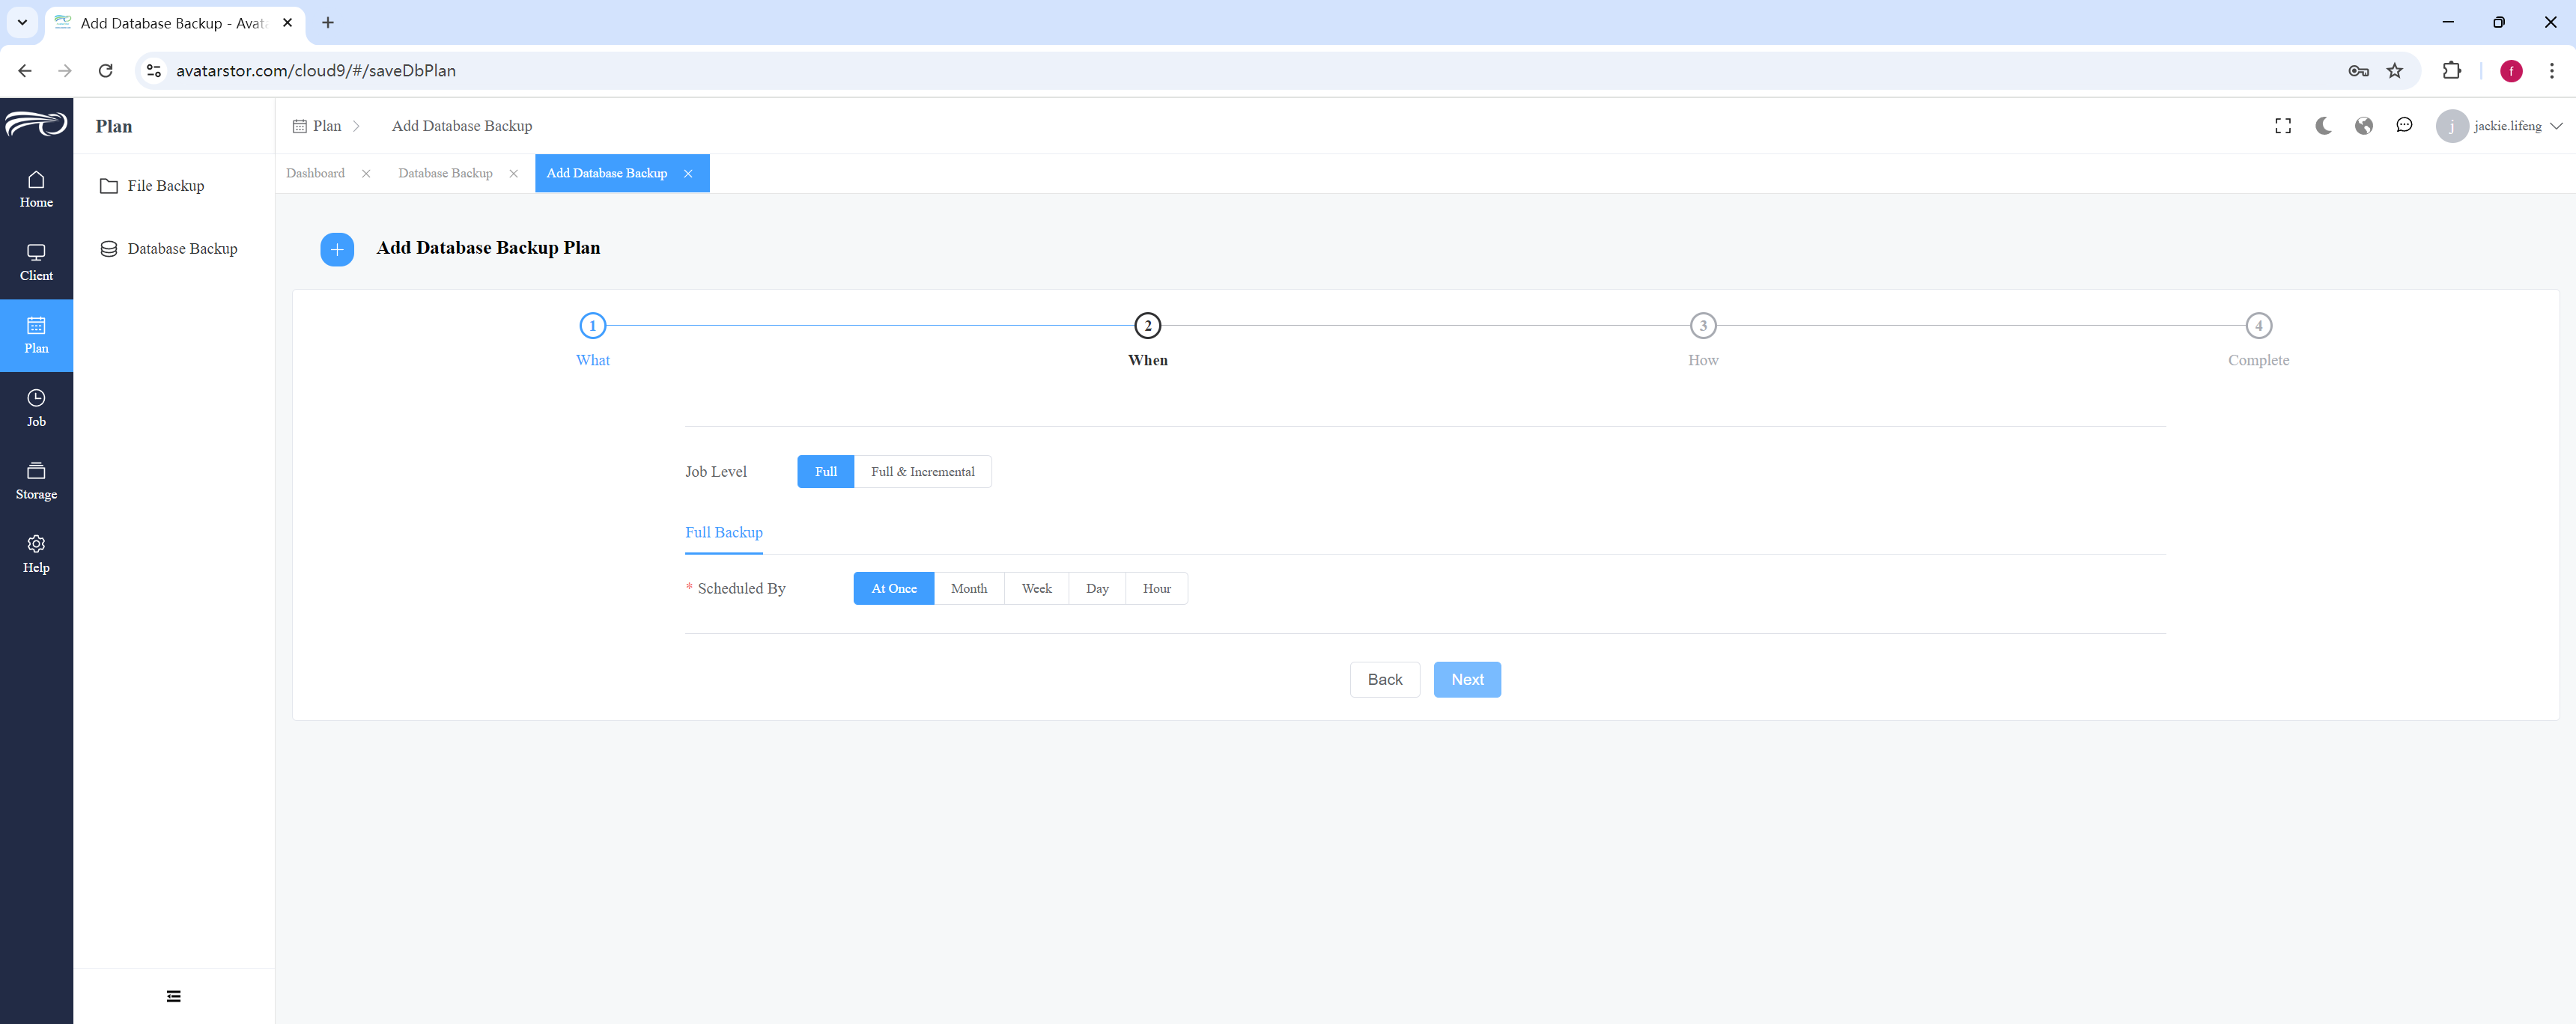
Refer to Chapter 4, Section 3, Automatic Trigger of Backup Plan to configure the trigger time of the plan.
For MySql instance level backups , you can choose either "Full" only or "Full + Incremental";
For MySQL database level backups , only full backups can be selected, please choose according to your needs.
Click [Next] to continue:
3rd step, advanced options:
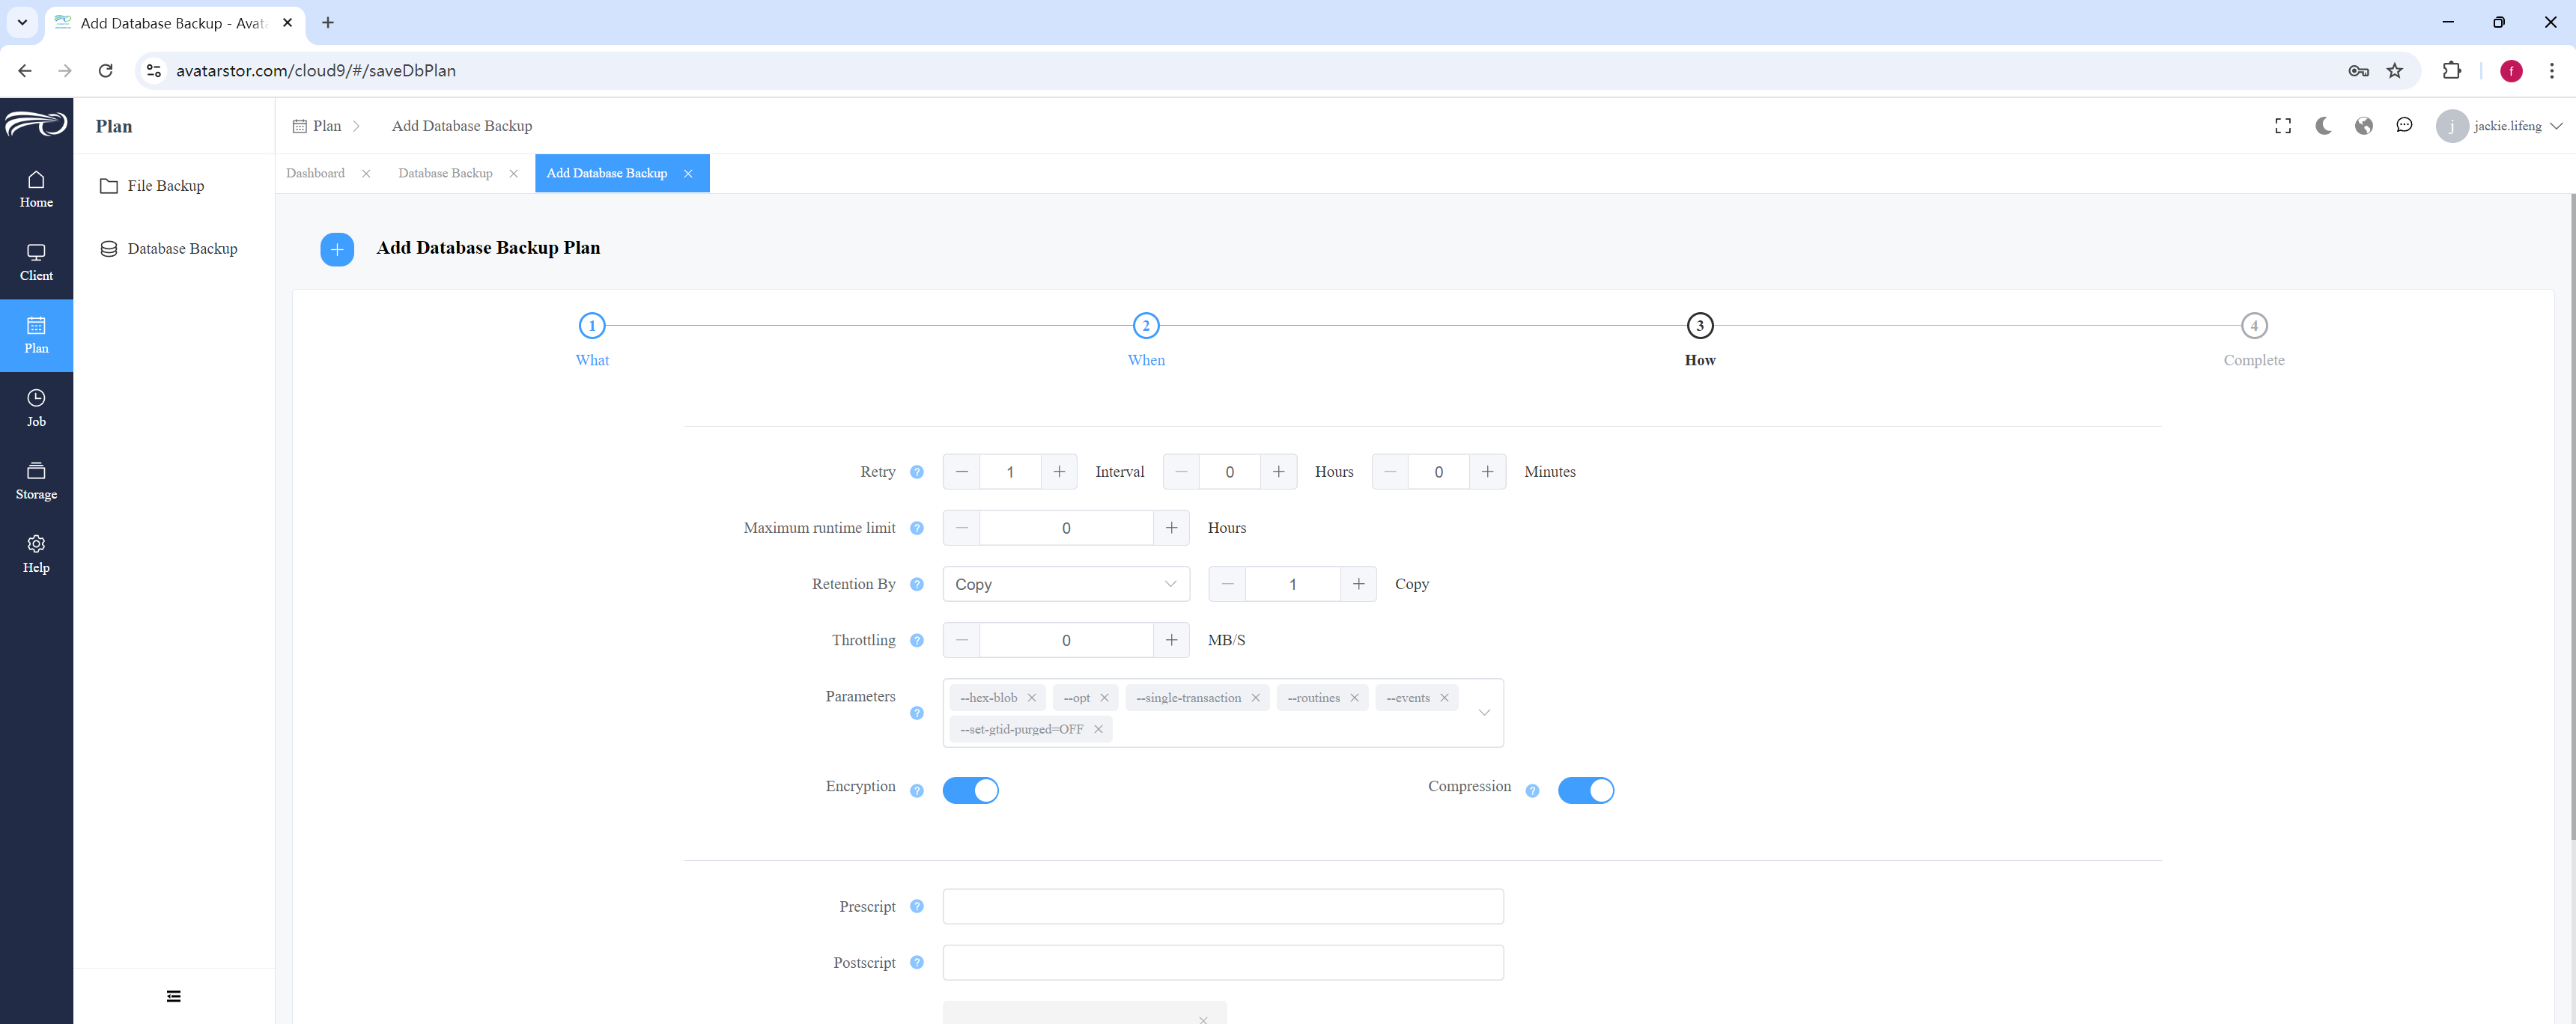
Please refer to Chapter 4, Section 6, Advanced options for backup plans and Section 7, before and after scripts to check.
There are several specific parameters for MySQL backups:
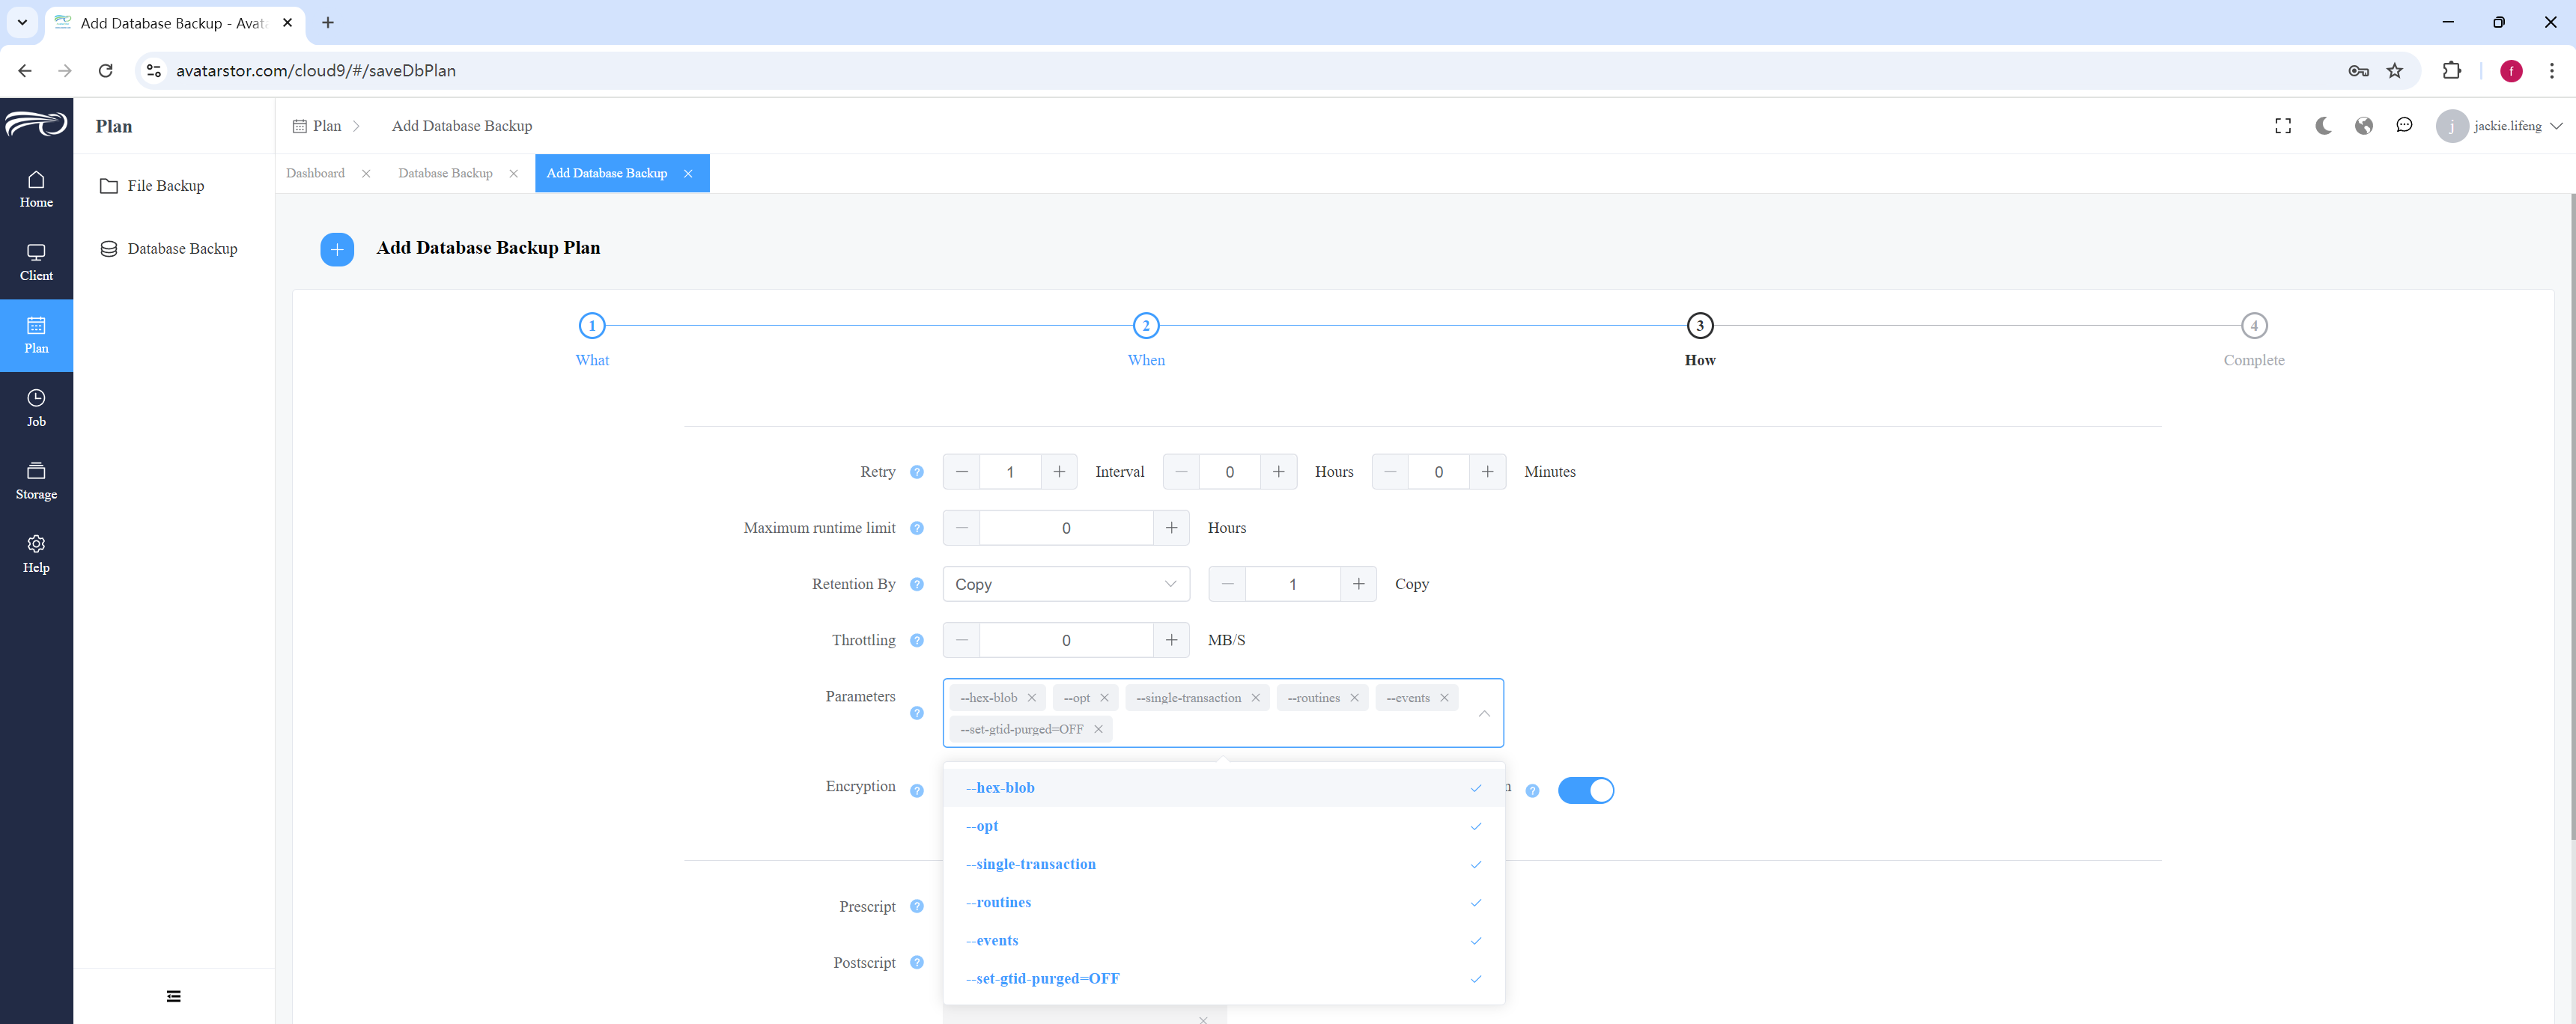
The --hex-blob, --opt, and --single-transaction parameters are enabled by default. --routines --events and --set-gtid-purged=OFF parameters are also provided for selection.
|
Particular Attention for MySQL Master-Master and Master-Slave Cluster Backups For MySQL Master-Master or Master-Slave cluster backups, it’s crucial to check whether GTID (Global Transaction Identifier) has been enabled on the data source. If GTID is enabled, we recommend selecting the --set-gtid-purged=OFF option. If you don't choose this option, the restore process may fail due to GTID issues. To check if GTID is enabled, you can use the following command: |
|
Bash |
|
mysqldump is a utility provided by MySQL for database backups. When using mysqldump, you can add various parameters to control the details of the backup. Below is a detailed explanation of some commonly used parameters: --hex-blob Function: Dumps BLOB fields (such as binary data, images, etc.) in hexadecimal format. Usage: Ensures that binary data is not corrupted during the dump and restore process due to character set issues. --opt Function: Enables various optimization options to improve the speed of backups and restores. Specifically includes --add-drop-table, --add-locks, --create-options, --quick, --extended-insert, --lock-tables, and --set-charset. Usage: Enabled by default and suitable for efficient backups in most cases. Note: From MySQL 5.6.6 onwards, --opt is enabled by default. It can be disabled using --skip-opt. --single-transaction Function: Dumps data within a single transaction to ensure data consistency. Usage: Suitable for InnoDB tables, allowing a consistent backup without locking the tables. This is especially useful for large databases. Note: Not applicable for MyISAM tables that require table locks. --routines Function: Includes routines such as stored procedures and functions in the dump. Usage: Ensures that all database logic, including stored procedures and functions, is included in the backup. --events Function: Includes events from the event scheduler in the dump. Usage: Ensures that all scheduled tasks and events are included in the backup. --set-gtid-purged=OFF Function: Controls whether GTID (Global Transaction Identifiers) information is included during export. Usage: For GTID replication clusters, if set to OFF, the SET @@GLOBAL.GTID_PURGED statement is not included. If set to ON or AUTO, it is either included or automatically determined based on the situation. |
Explanation of Results:
The value of gtid_mode should be either ON or OFF. If it is ON, the GTID feature is enabled.
The value of enforce_gtid_consistency should be ON, indicating that MySQL enforces GTID consistency.
The output of SHOW STATUS LIKE 'Gtid%'; will display GTID-related status variables, which help confirm if GTID is currently active.
Click [Submit] to save the plan in the 4th step.
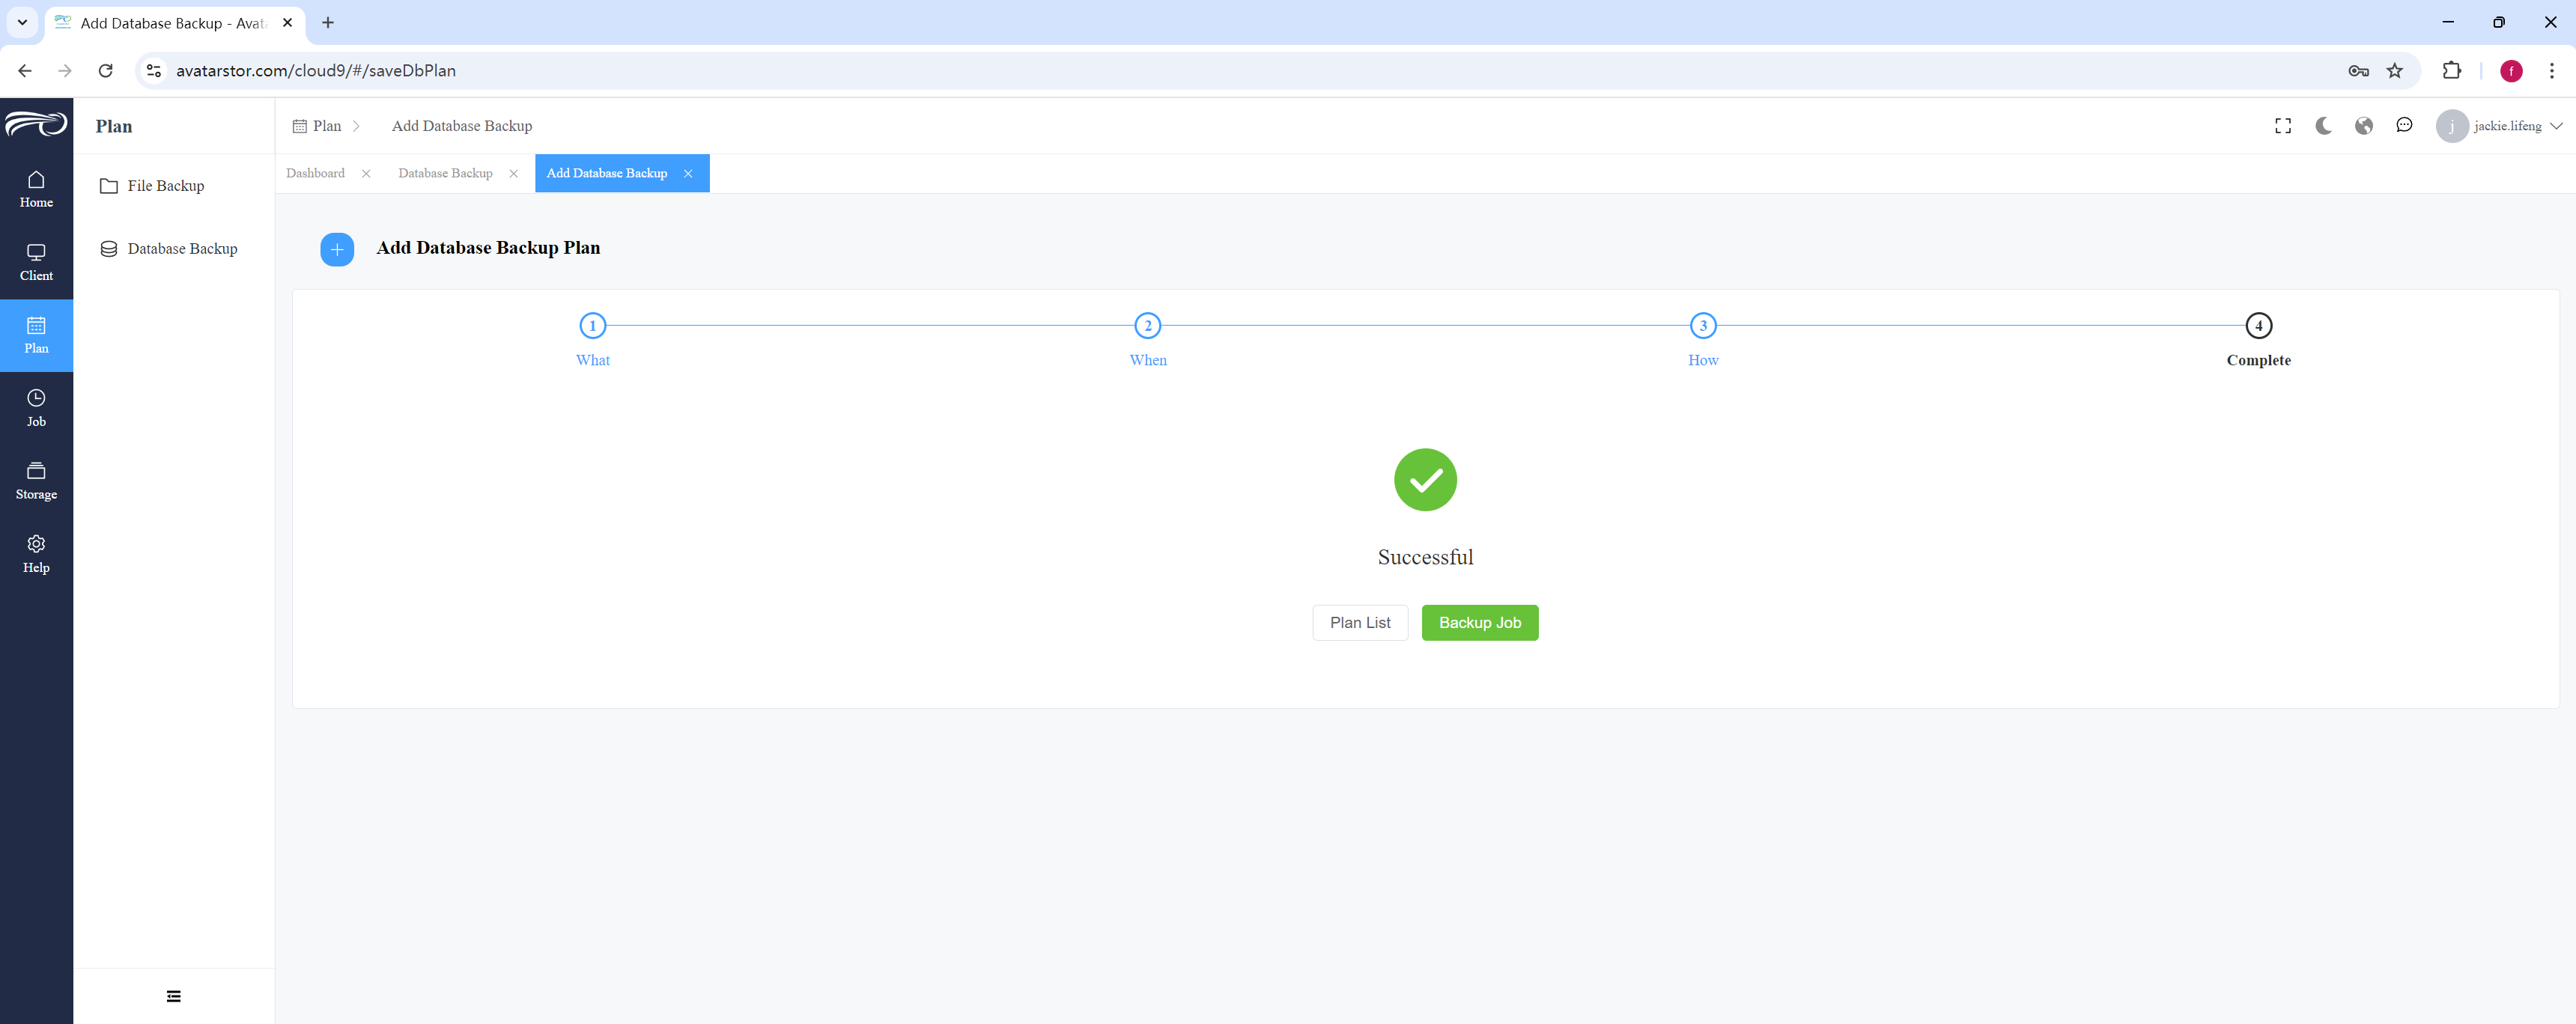
You can then refer to Chapter 4, Section 4, Manual Trigger of Backup Plan to run the plan manually. You can also wait for the scheduled automatic trigger of the plan.
4.11.2 MySql Restore
Launch a restore wizard and give the recovery job a name:
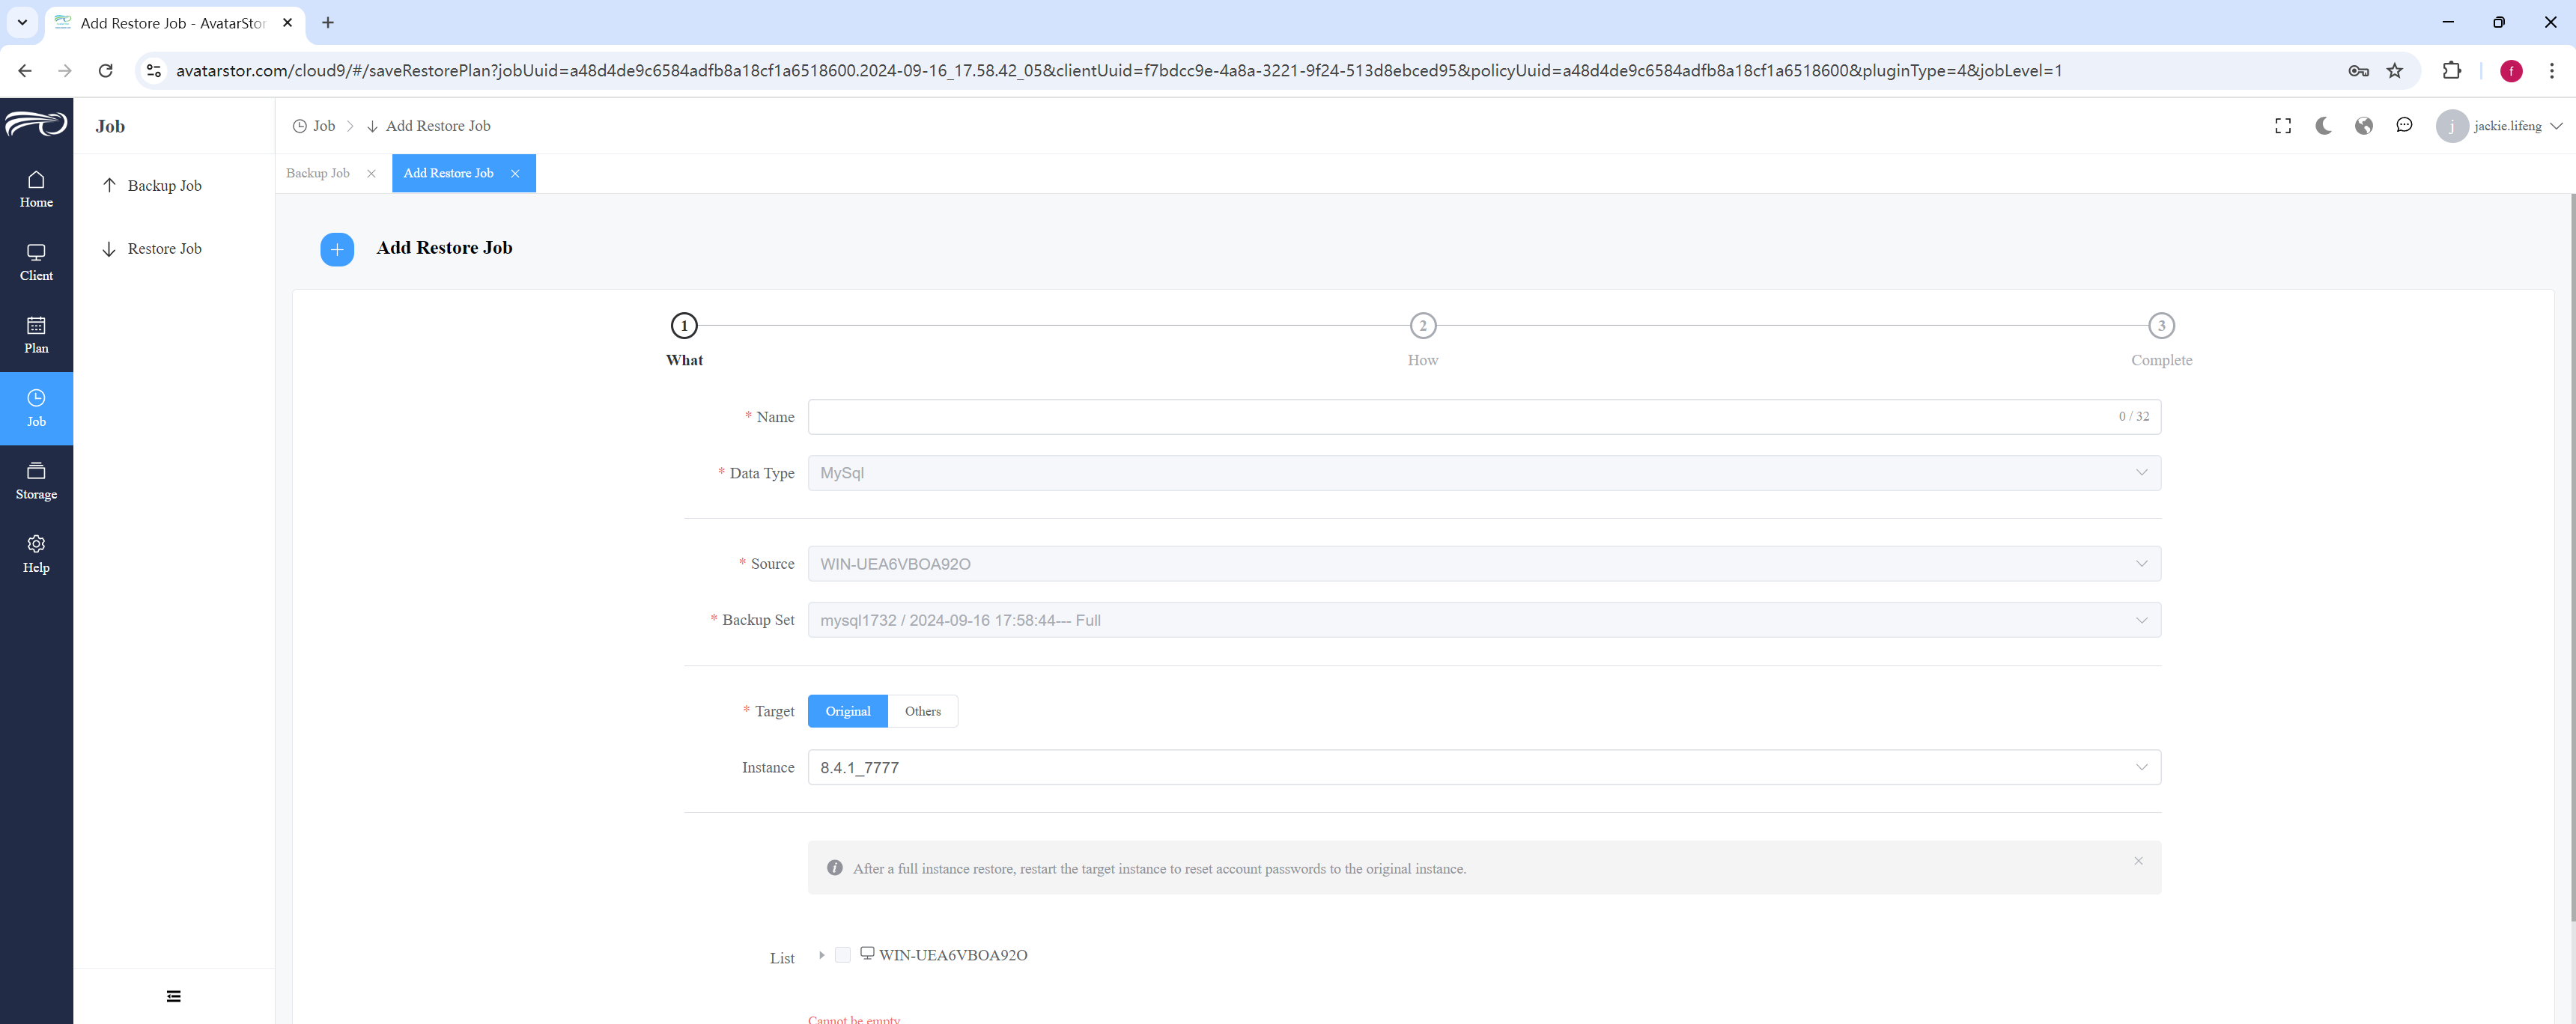
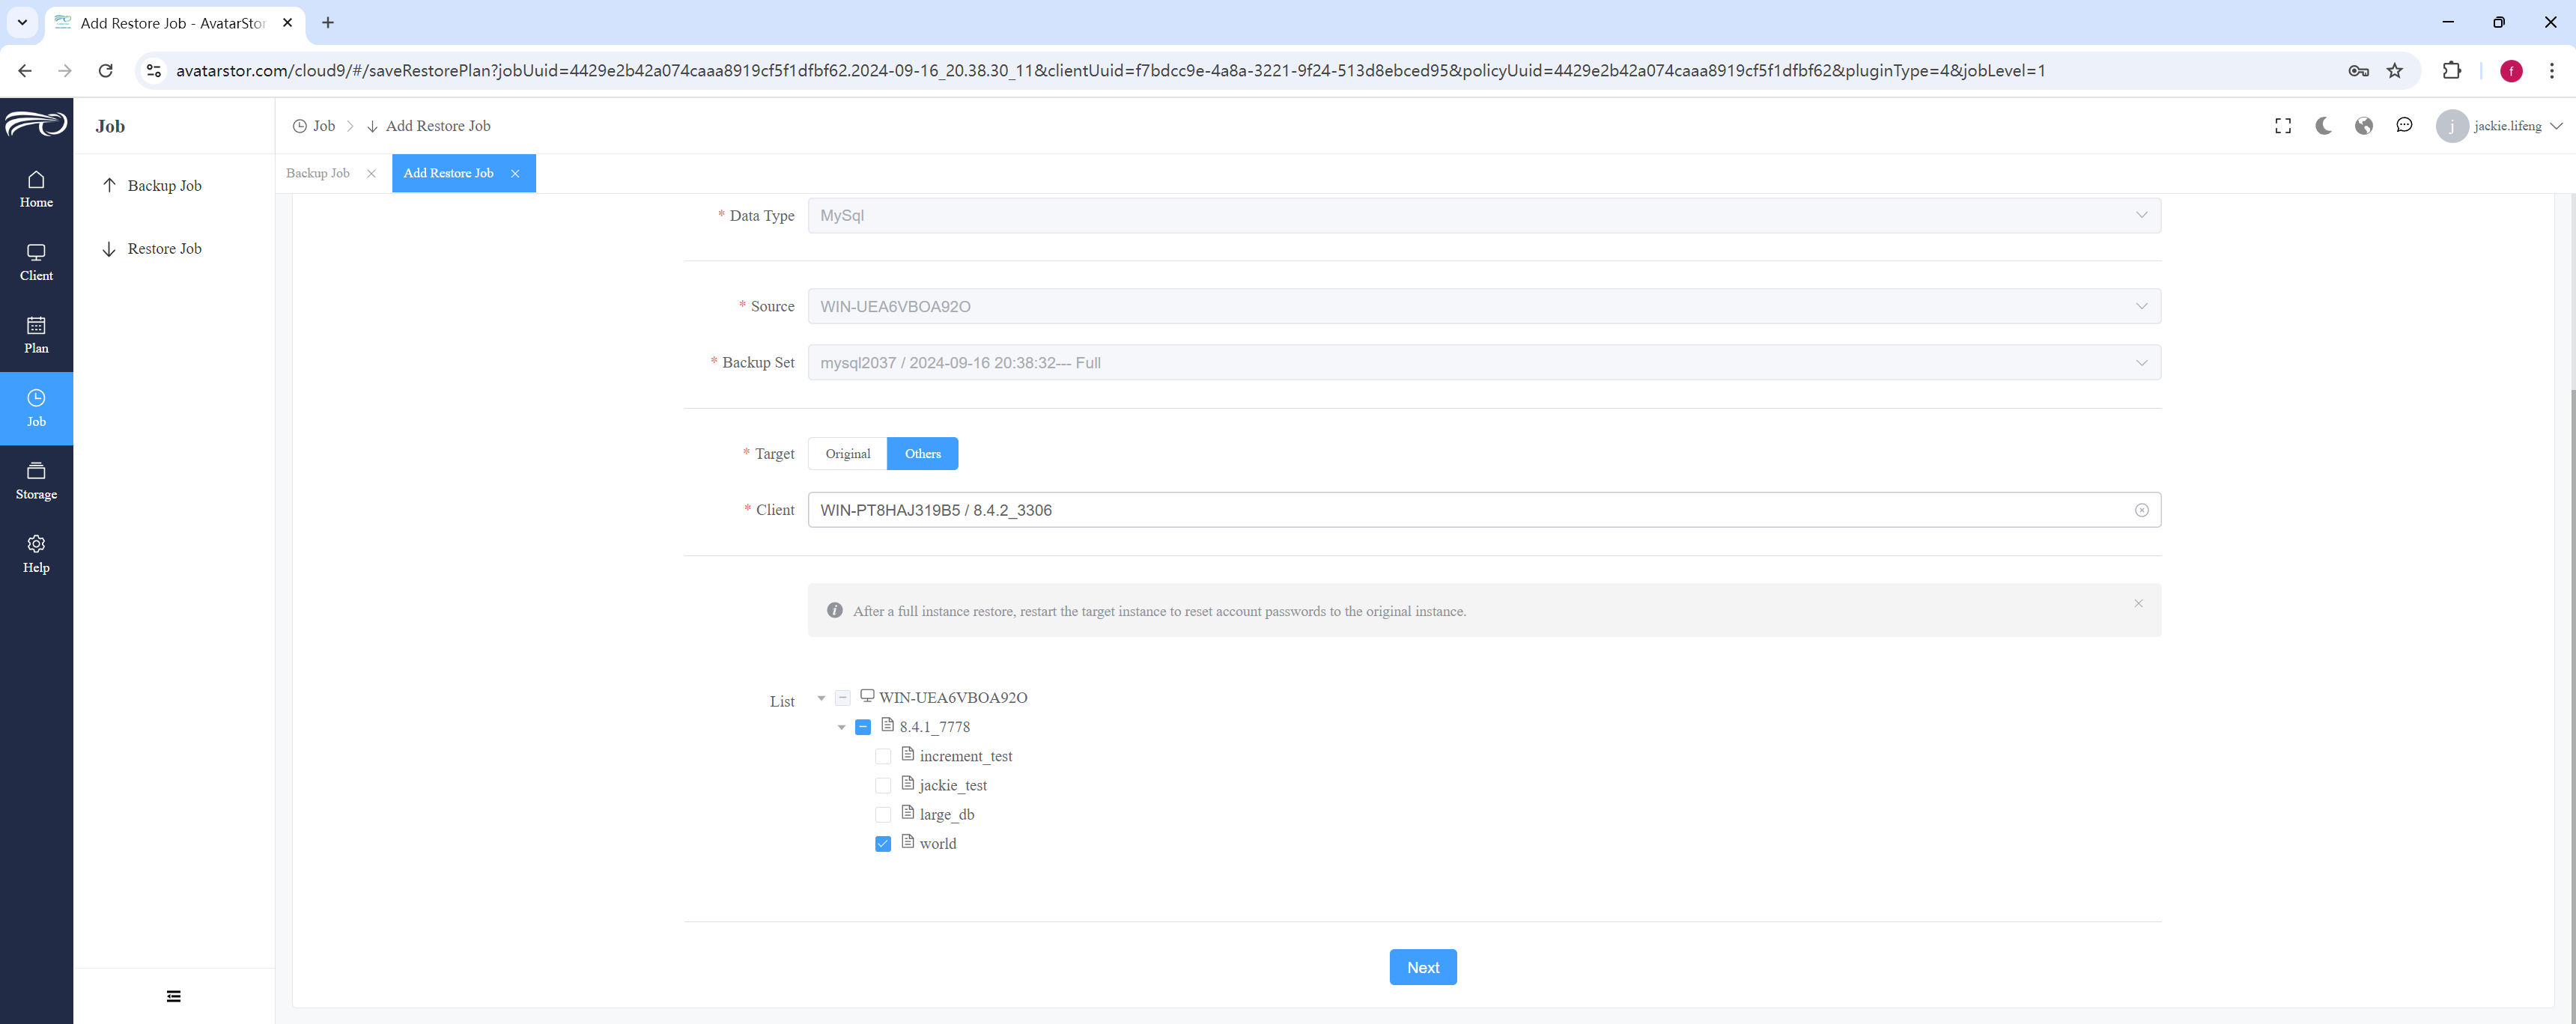
Select local restore or remote restore , select the target instance to be restored, and expand the content to be restored:
|
Note that if the original backup job is an instance-level backup , the recovery content can only be expanded to the instance; if the original backup job is a database-level backup , it can be expanded to a specific database here. |
|
Note that for MySQL remote restore, the target client must also be instance configured first. |
|
There is a risk of data loss with instance-level original client local restore!! |
|
Ensure the target instance does not have a database with the same name!!! Alternatively, select a new database name during recovery. When renaming the database, note that MySQL has specific requirements for database names: MySQL Database Naming Requirements: Length Limit: The maximum length for a database name is 64 characters. Allowed Characters: Database names can contain letters (a-z, A-Z), numbers (0-9), and underscores (_). MySQL distinguishes between uppercase and lowercase characters. Forbidden Characters: Database names cannot include special characters such as: Slash (/), backslash (), colon (:), asterisk (*), question mark (?), double quotes ("), less-than (<), greater-than (>), pipe (|), comma (,), semicolon (;), single quote ('), space ( ), exclamation mark (!), and the "@" symbol. Starting Character: Database names can start with either a letter or a number, but it is recommended to start with a letter to avoid potential compatibility issues. Case Sensitivity: Whether MySQL distinguishes between uppercase and lowercase in database names depends on the underlying file system: In most Linux systems, database names are case-sensitive. On Windows, database names are typically case-insensitive. **Use of Backticks ()**: If you need to use special characters that don't meet the naming rules (e.g., spaces), you can enclose the database name in backticks (). For example, to create a database with a space in the name: CREATE DATABASE My Database;. However, it is not recommended to use such complex naming conventions as it complicates database management. Summary: It is recommended to use simple names consisting of letters, numbers, and underscores to ensure compatibility and ease of use. Avoid using special characters and reserved keywords. |
|
The version of the recovery instance must match the major version of the target instance. For example, restoring from "5.7" to "5.7" is allowed, but "5.7" to "8.4" is not. However, restoring between minor versions like "8.4.1" to "8.4.2" is acceptable. If the instances are not compatible, the recovery log will show an error similar to the following, causing the recovery job to fail immediately: "The version is incompatible and cannot be restored (57 != 84)." |
Click [Next] to continue:
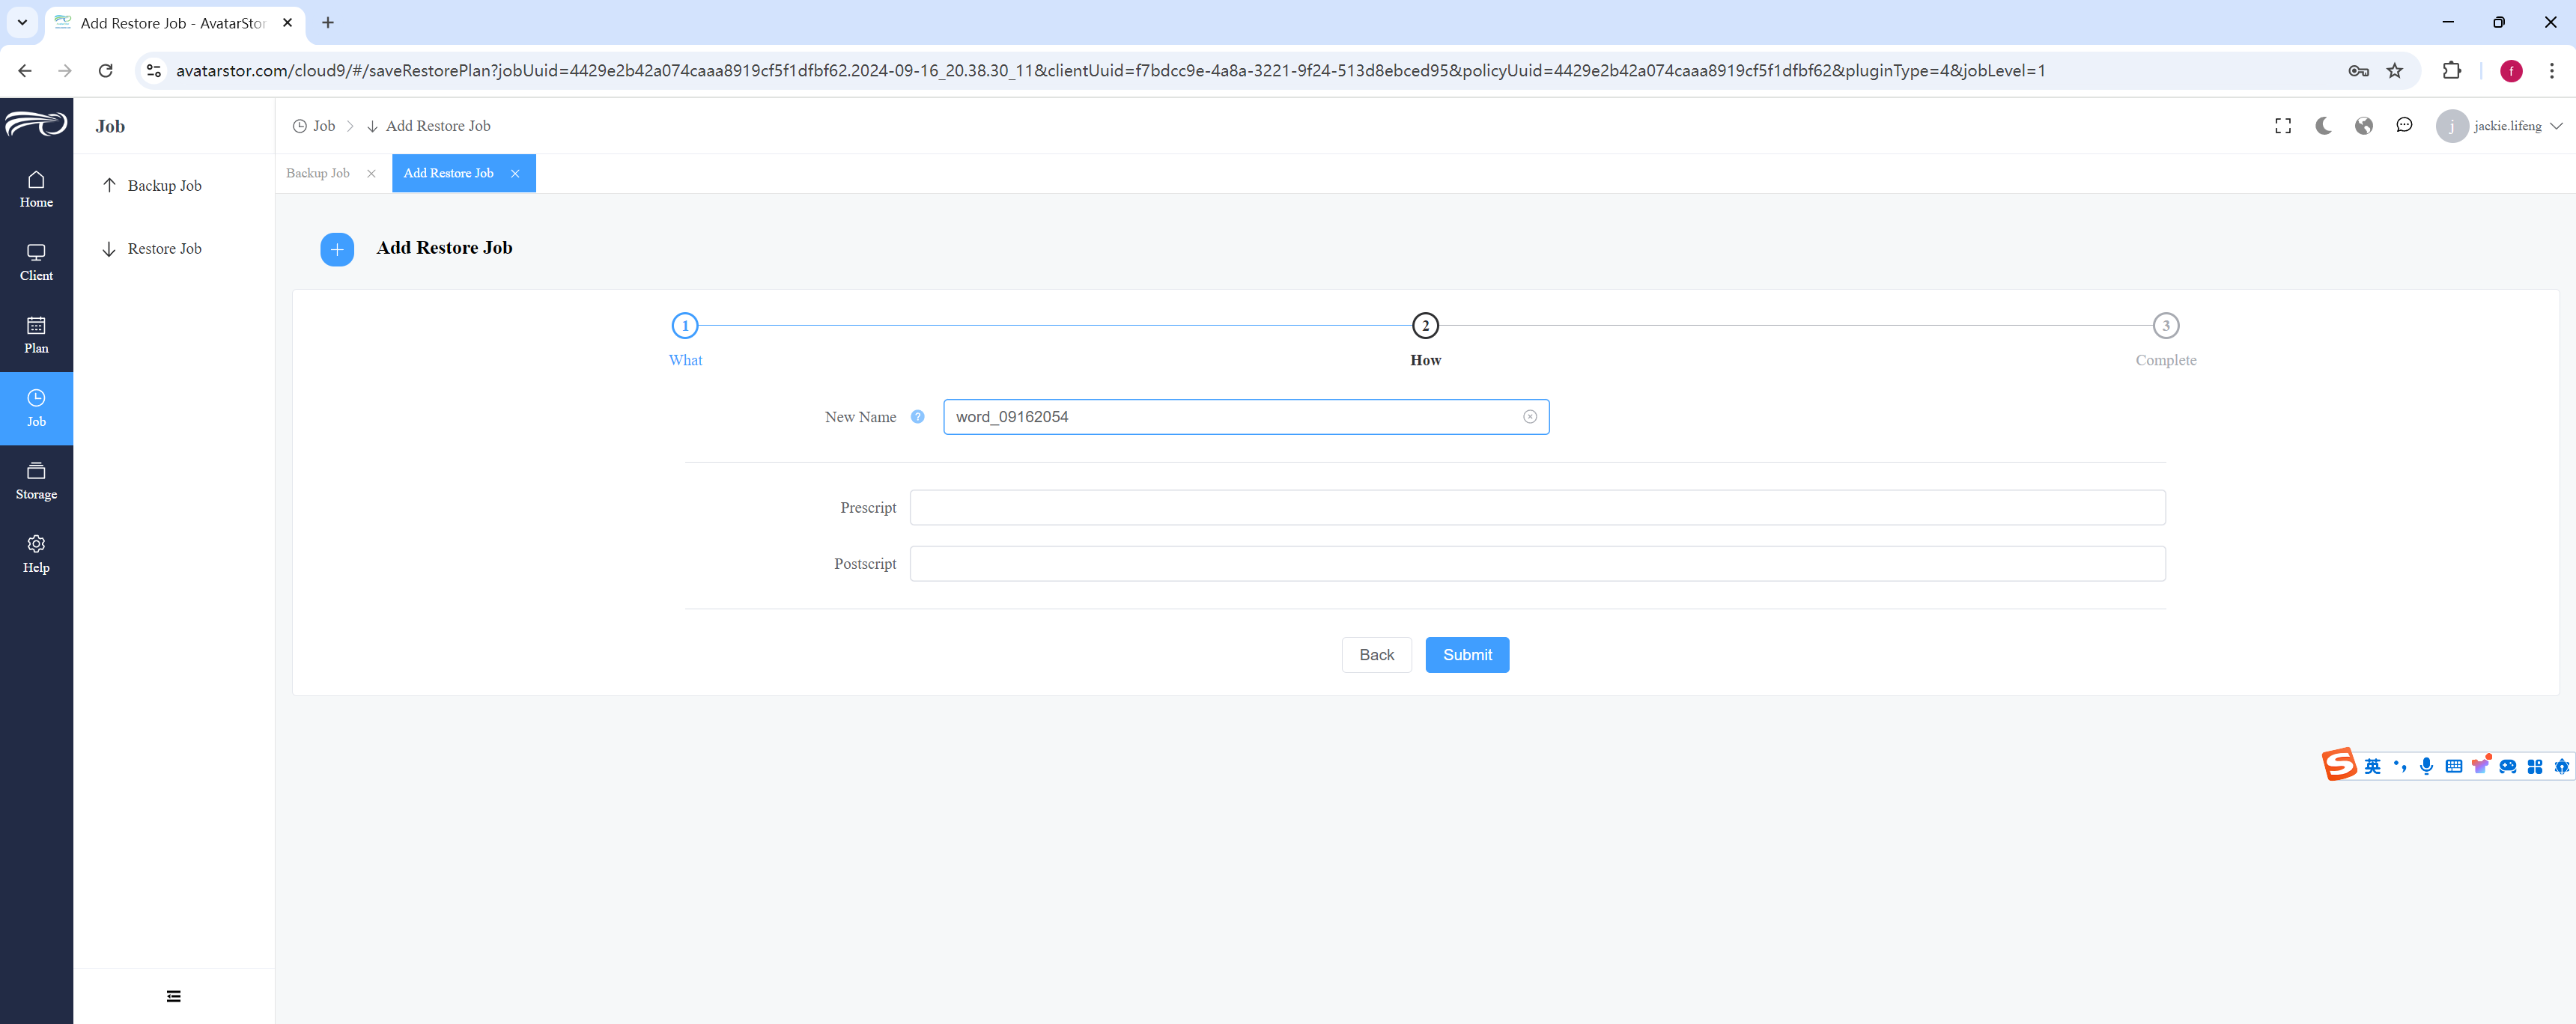
Although less commonly used, recovery jobs do support pre- and post-script .
Click [Submit] to save the recovery job.
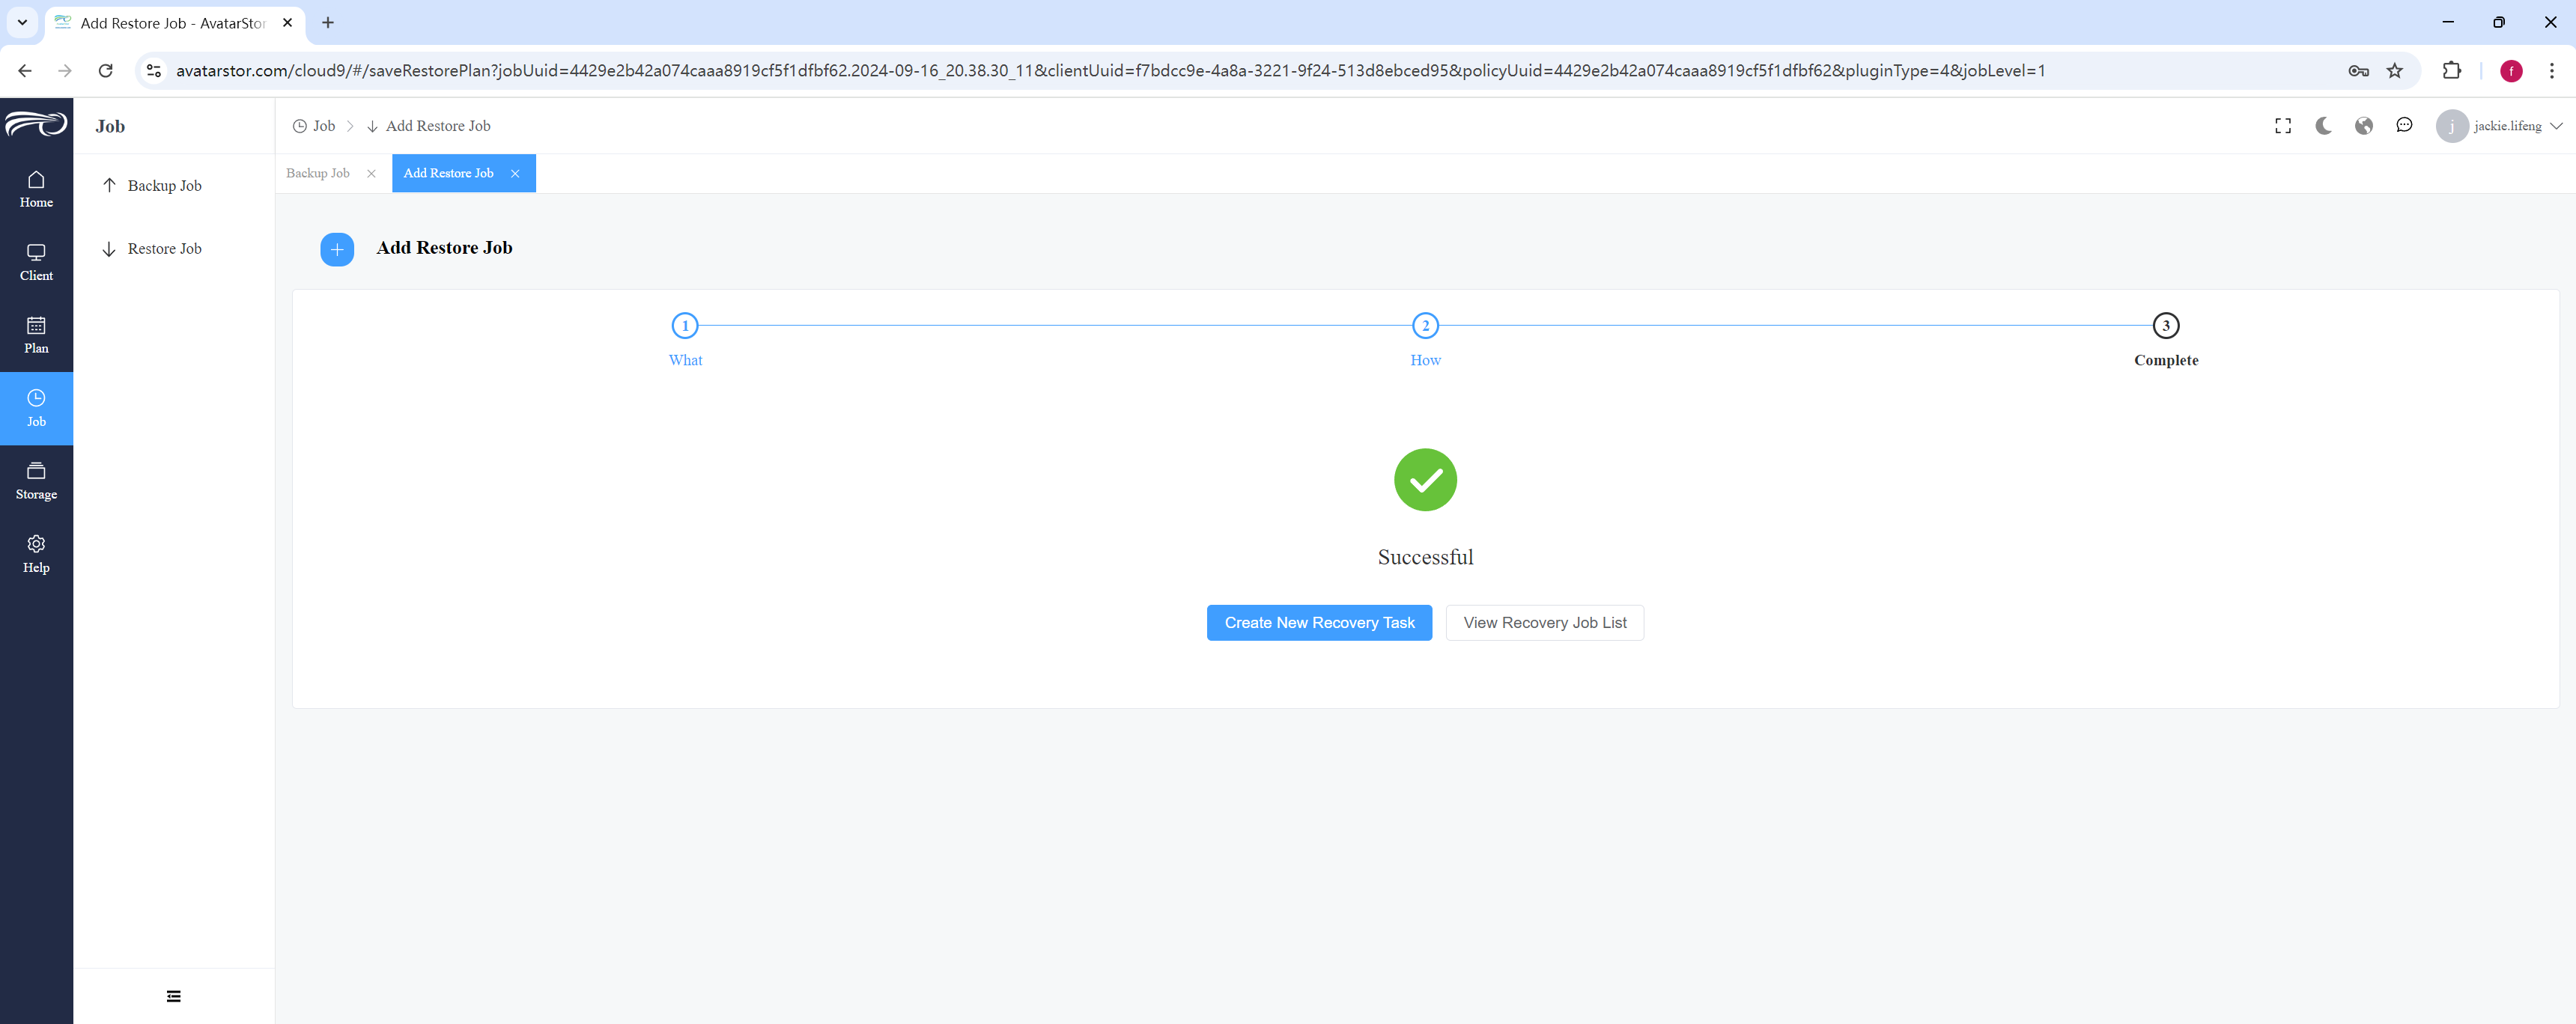
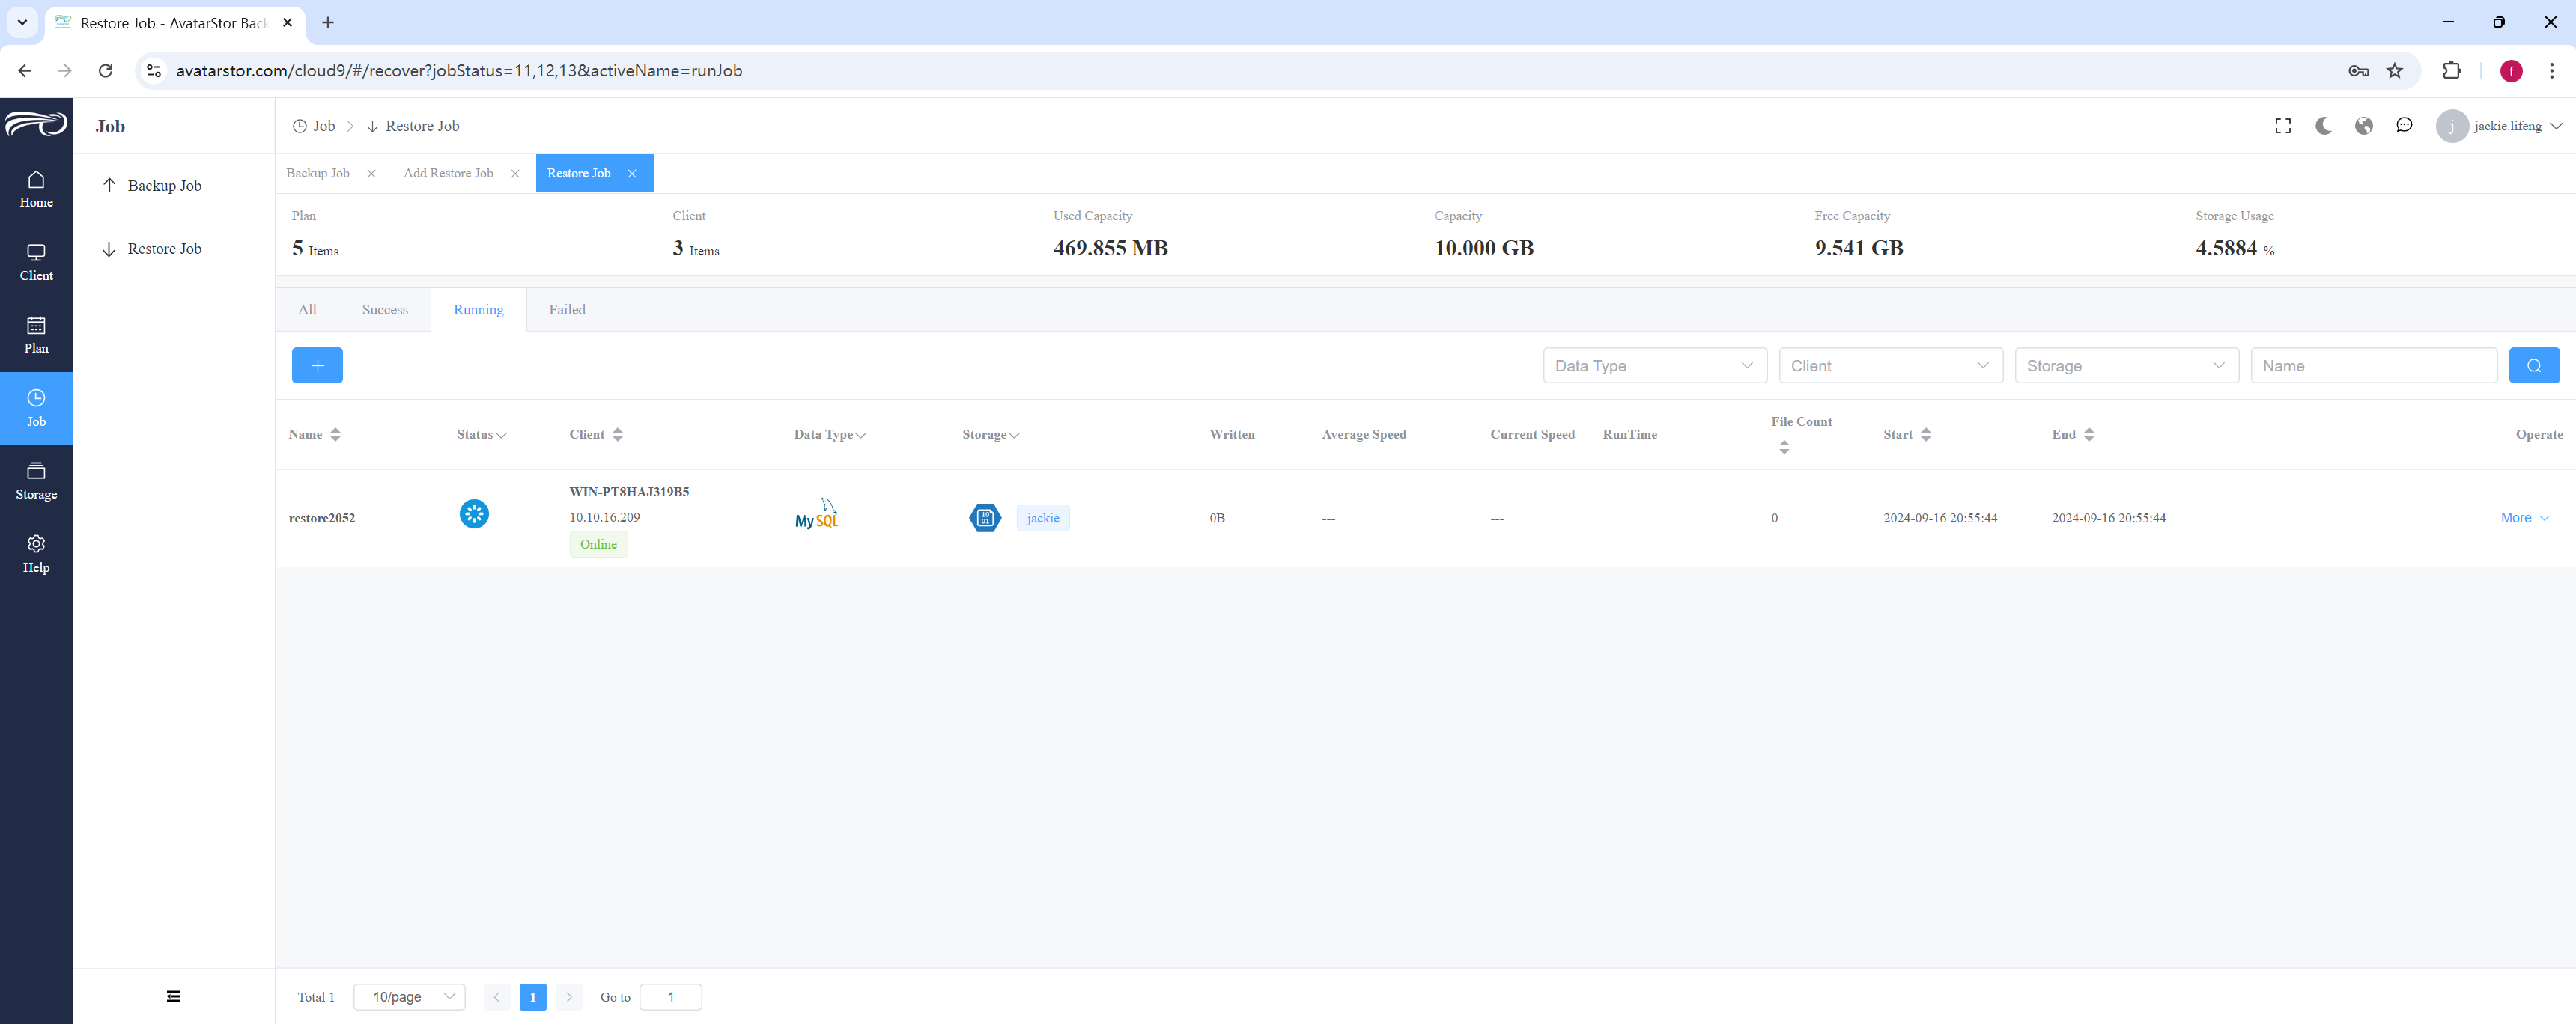
Click [View Recovery Job List] to go to [Job] - [Recovery Job] - [Running] to view the jobs being restored.
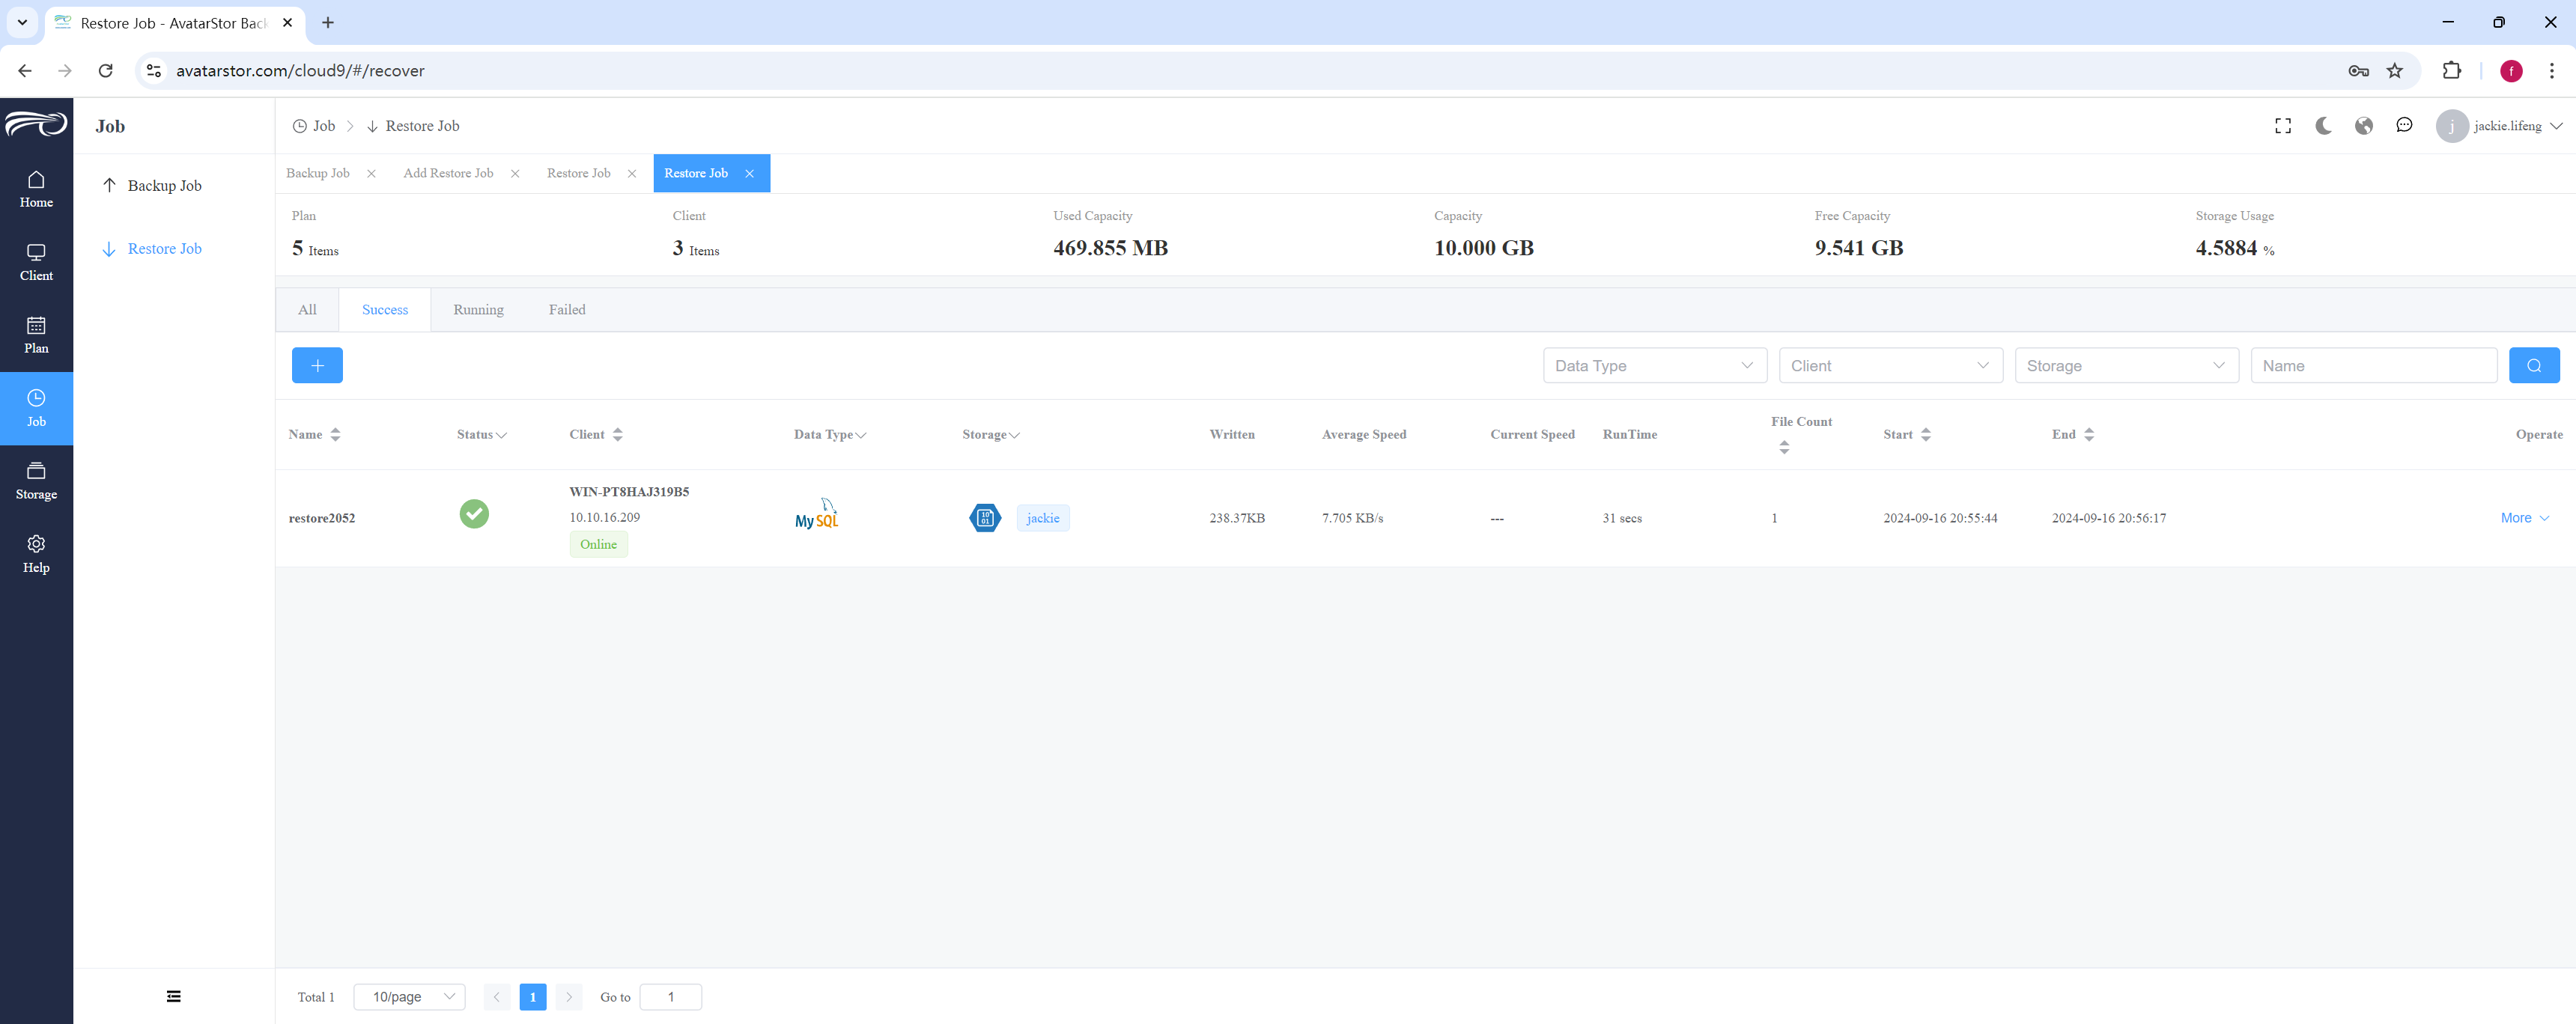
4.12 SqlServer backup and restore
4.12.1 SqlServer backup
First, please refer to Chapter 3 to configure the corresponding SqlServer instance information for the source client. If the same client has multiple SqlServer instances, you can configure them multiple times. You can also manually query the SqlServer parameters to verify the automatic scan results.
Log in to SqlServer Managerment studio:
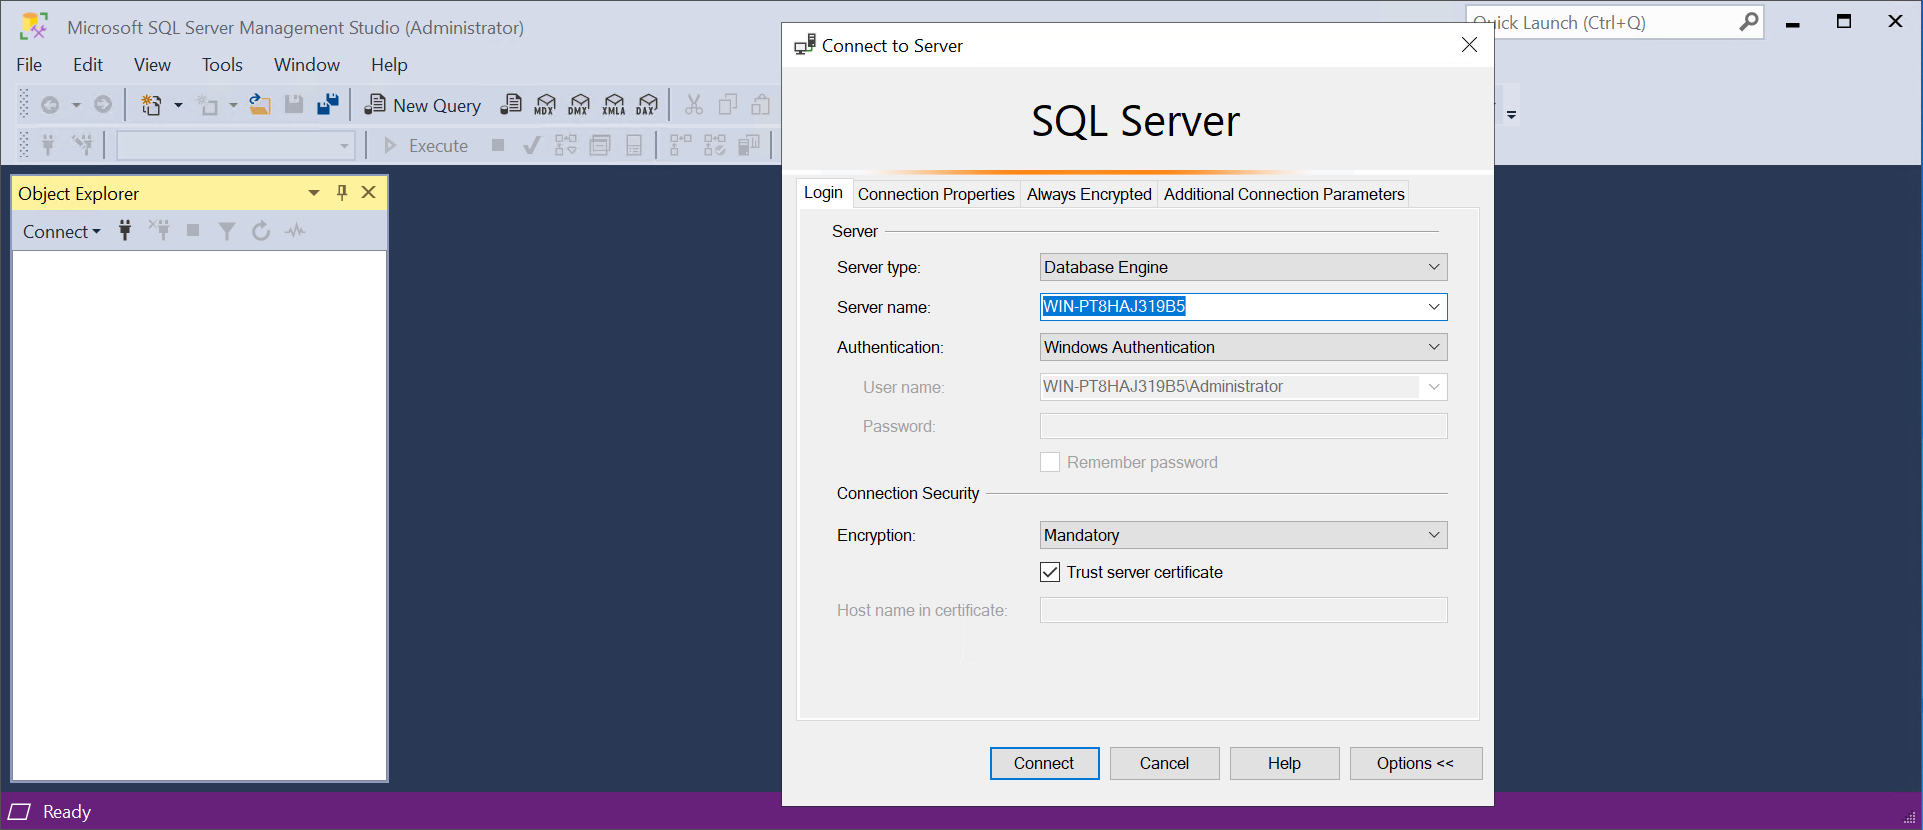
After entering the account password, connect and create a new query.
|
There are two authentication methods in SQL Server: Windows Authentication and SQL Server Authentication. Windows Authentication: This method does not require a username and password. SQL Server Authentication: This method requires logging in with the sa account and password. You can choose either method as you prefer. |
|
SQL |
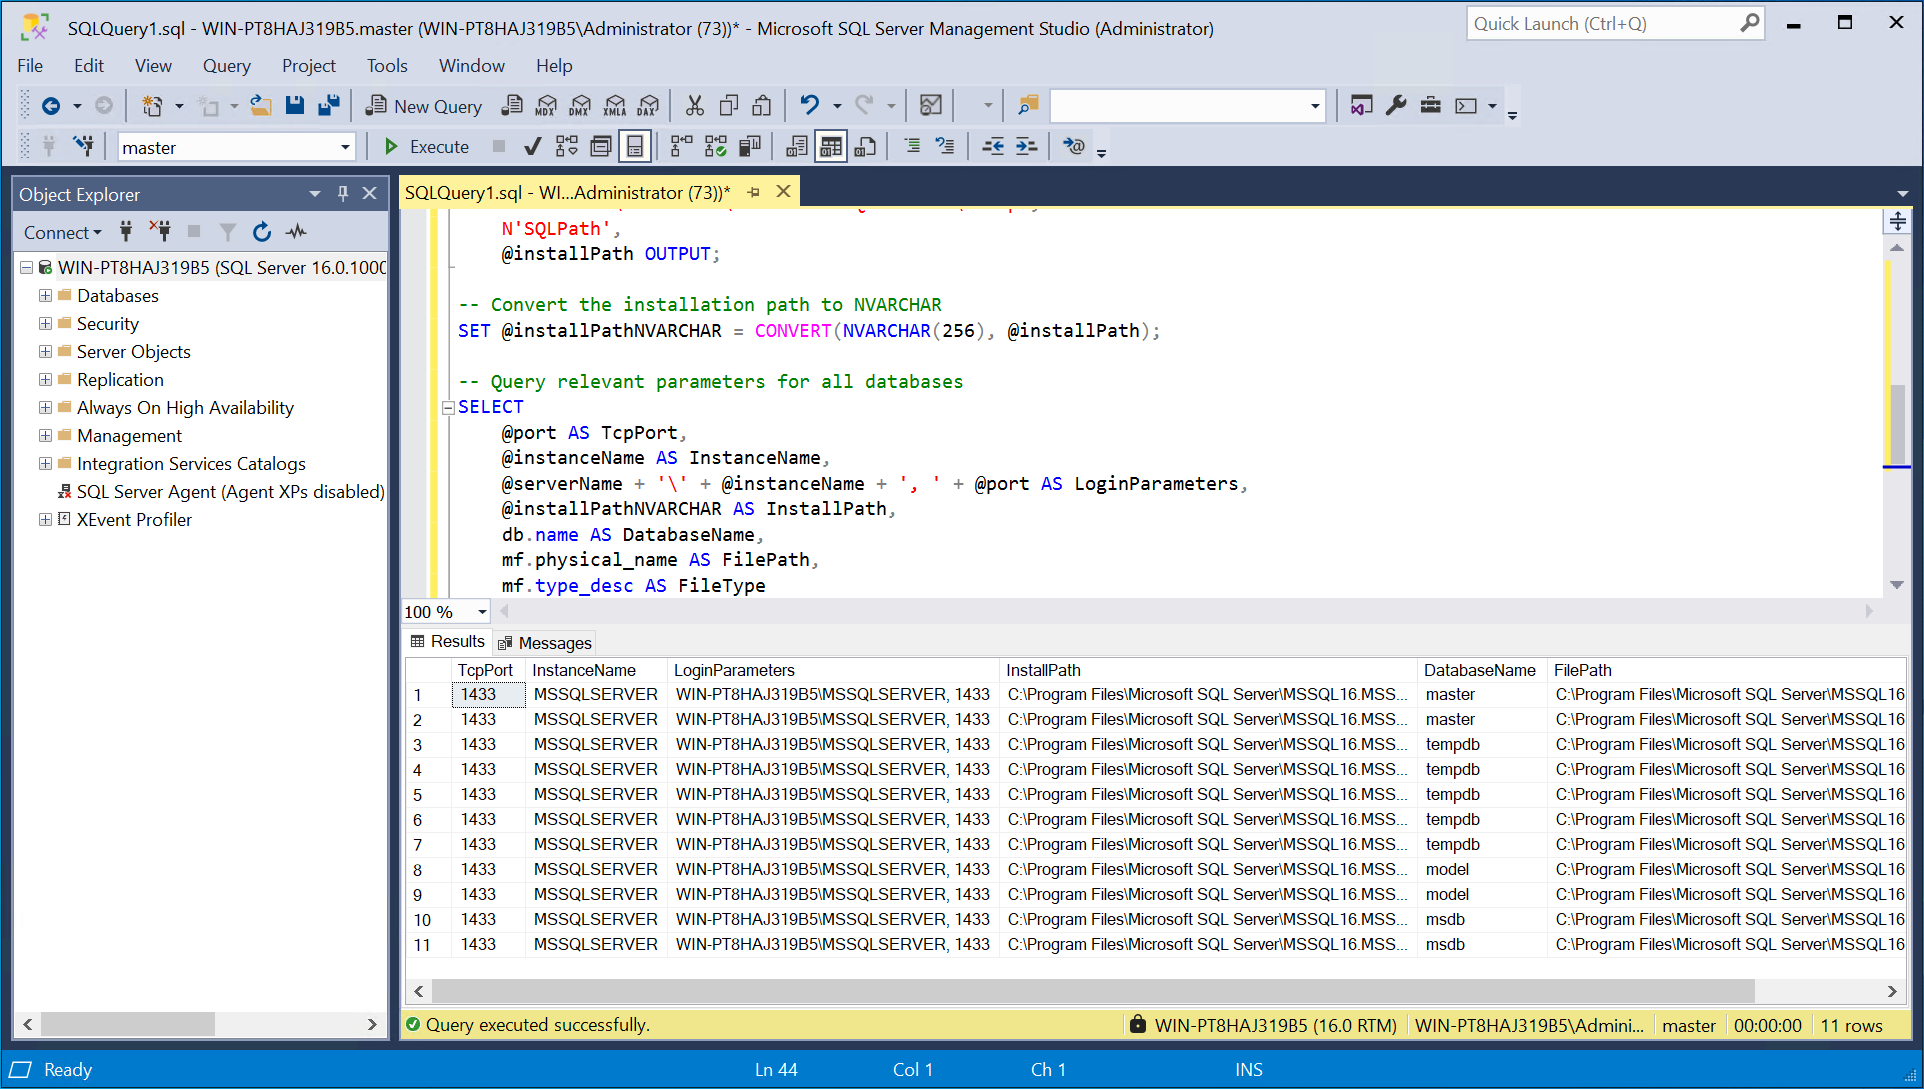
Note that this is only the query result for one SQL Server instance. If you have multiple instances, you need to log in to each instance separately and perform the queries multiple times.
|
To switch between different instances, you can modify the server name in the Management Studio login box. Typically, the format is server_name\instance_name, port_number, which corresponds to the LoginParameters column in the query results. For example, WIN-UEA6VBOA92O\MSSQLSERVER, 1433 and WIN-UEA6VBOA92O\MYSQLSERVER, 1444 represent two different instances on the same client. You can also use sqlcmd to log in: Open Command Prompt as an administrator and execute: sqlcmd -S localhost\MSSQLSERVER,1433 -U sa -P 123456 |
You can compare the results obtained with this method to those from automatic scans, with the query results taking precedence.
After configuring the instance:
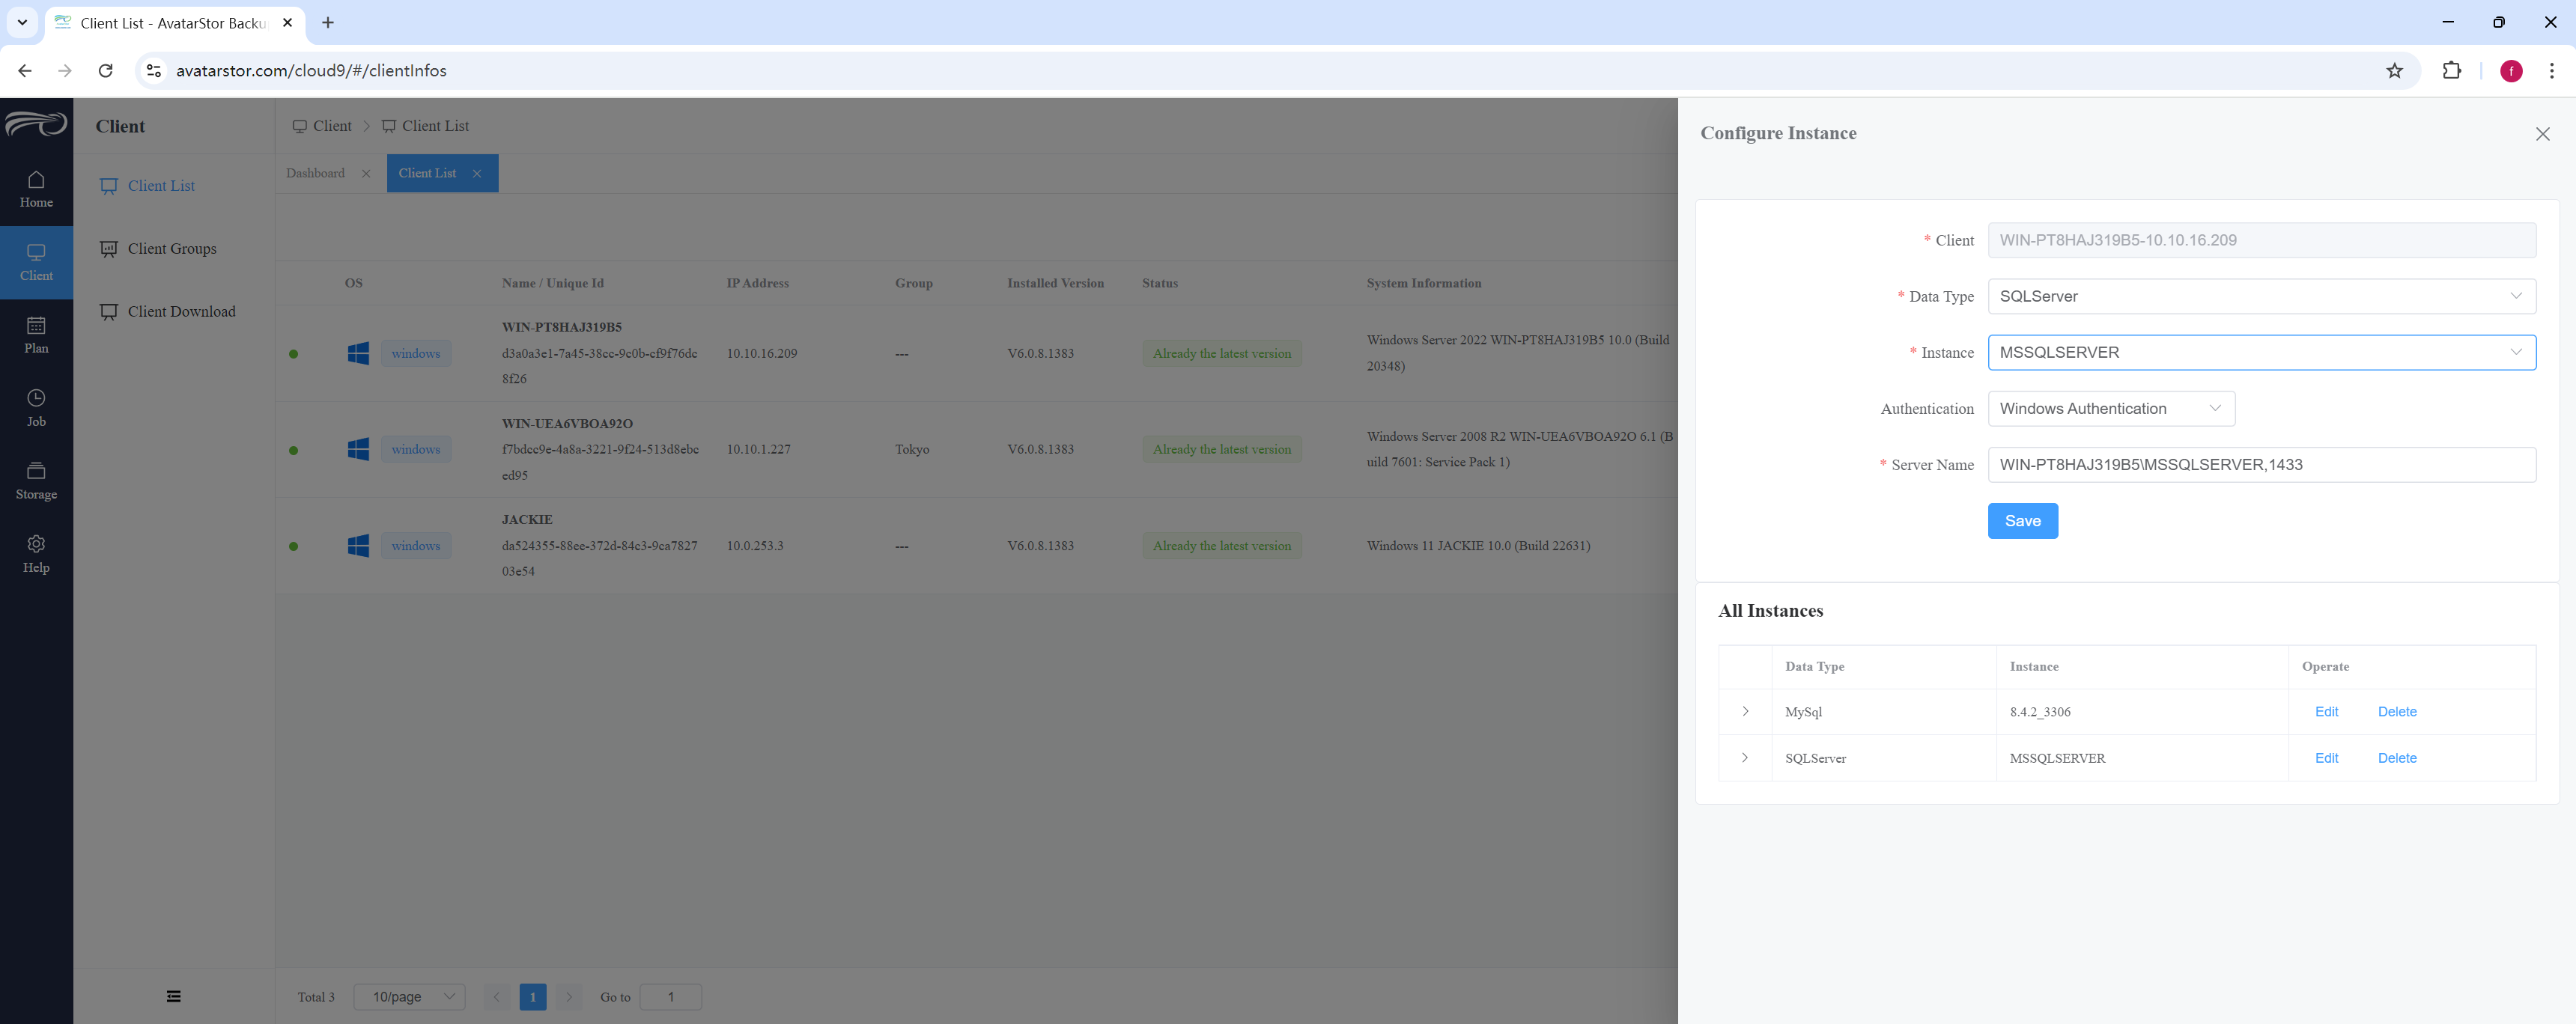
|
Whether it's a default instance or a named instance, it's a good idea to check the TCP protocol settings to ensure that it's listening on the correct port. This helps avoid connection issues and ensures that the service is running properly. The following points are worth noting: Default Instance: The default instance typically listens on TCP port 1433, but you should still verify the TCP/IP settings in SQL Server Configuration Manager to ensure that the port is correctly configured and enabled. Named Instance: Named instances don't use a fixed port number and usually rely on dynamic ports. To ensure that clients can connect properly, you can configure a fixed TCP port and make sure it's enabled. How to Check: In SQL Server Configuration Manager, locate the TCP/IP protocol for the instance and ensure that the protocol is enabled. Check the IP Addresses tab to confirm that the listening port is correctly configured (for named instances, you can manually set a static port). |
|
In SQL Server, the login accounts for the two authentication modes are different. Windows authentication uses the NT AUTHORITY\SYSTEM account, while SQL Server authentication uses the sa account. These accounts have different server role properties: the NT account has only the public role and lacks the sysadmin role, whereas the sa account has both the public and sysadmin roles. It is important to note that backups require the sysadmin role. Therefore, if you choose to log in using Windows authentication, be sure to grant the NT account the sysadmin role to ensure proper permissions for backup operations. |
|
SQL Server Authentication Mode: SQL Server can be configured to use Windows Authentication only or Mixed Mode Authentication (both SQL Server and Windows). If the server is configured to only allow Windows Authentication, sa (which is a SQL Server account) won't be able to log in. Solution: Enable Mixed Mode Authentication: Open SQL Server Management Studio (SSMS) as an administrator. Right-click the server instance and select Properties. Go to the Security tab, and ensure SQL Server and Windows Authentication mode is selected. Restart the SQL Server instance after making the change. |
Start creating a new SQL Server plan from the left navigation bar [Plan] - [Database Backup] - [+], in 4 steps:
The first step is to select the destination storage and data content.Give the plan a name, select the data type SQL Server, select Client and instance, and the system will automatically scan all databases under that instance (note that the system databases of SQL Server such as master/model/msdb/tempdb have been hidden). The backup data list can be expanded later.
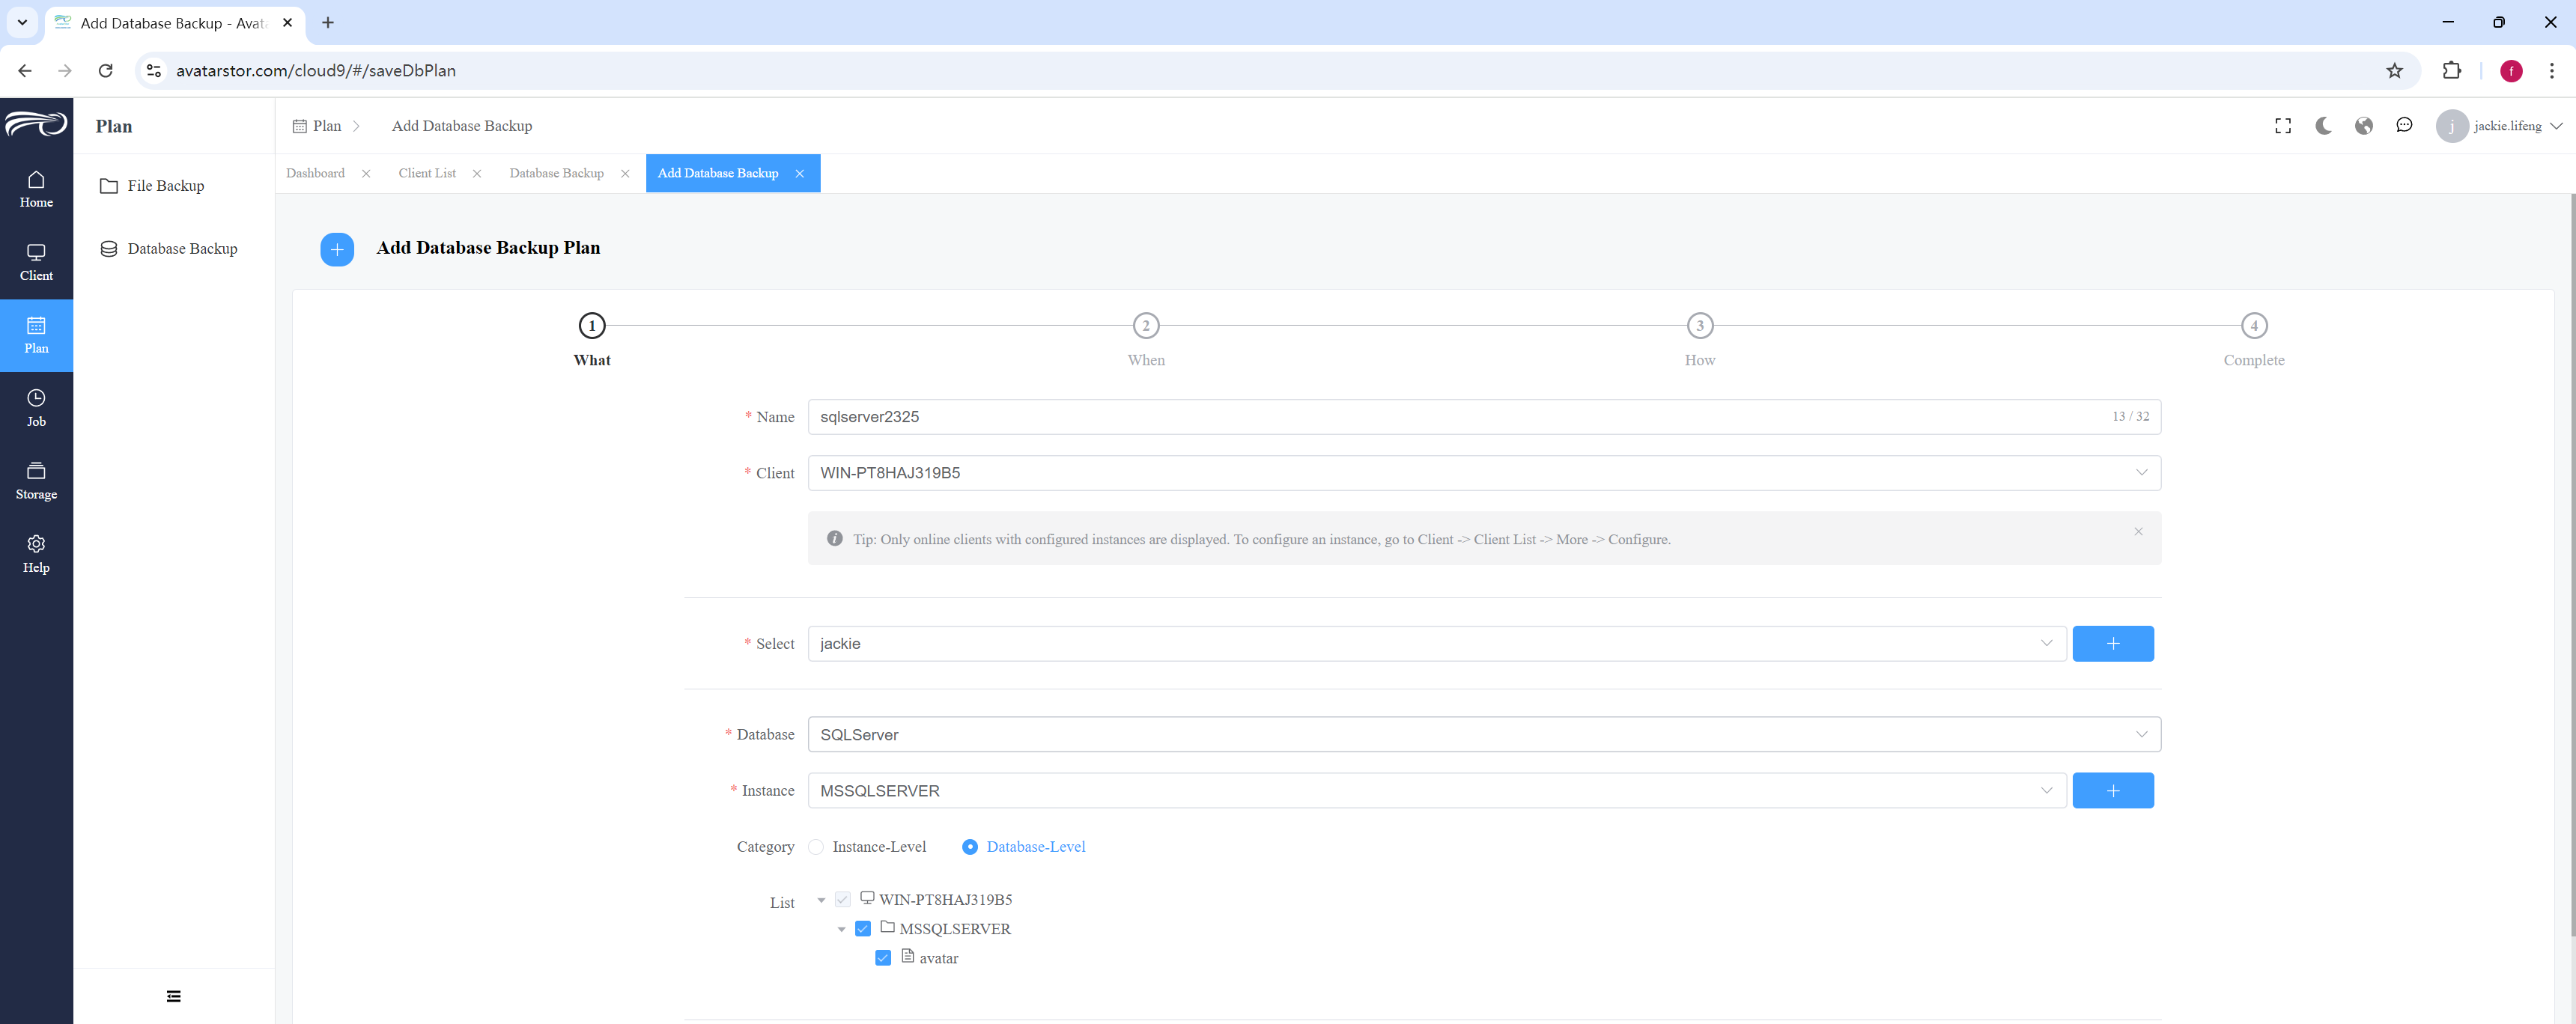
After selecting the database you need to backup, click [Next]:
|
Note that in SQL Server, data selection can be done at both the instance level and the database level. When selecting data content, you can either select all or choose individual databases. Unlike MySQL, both methods in SQL Server allow for full, differential, and log backups. Additionally, instance-level backups in SQL Server can automatically include newly added databases in the backup plan. |
Step two, set the scheduled trigger time.
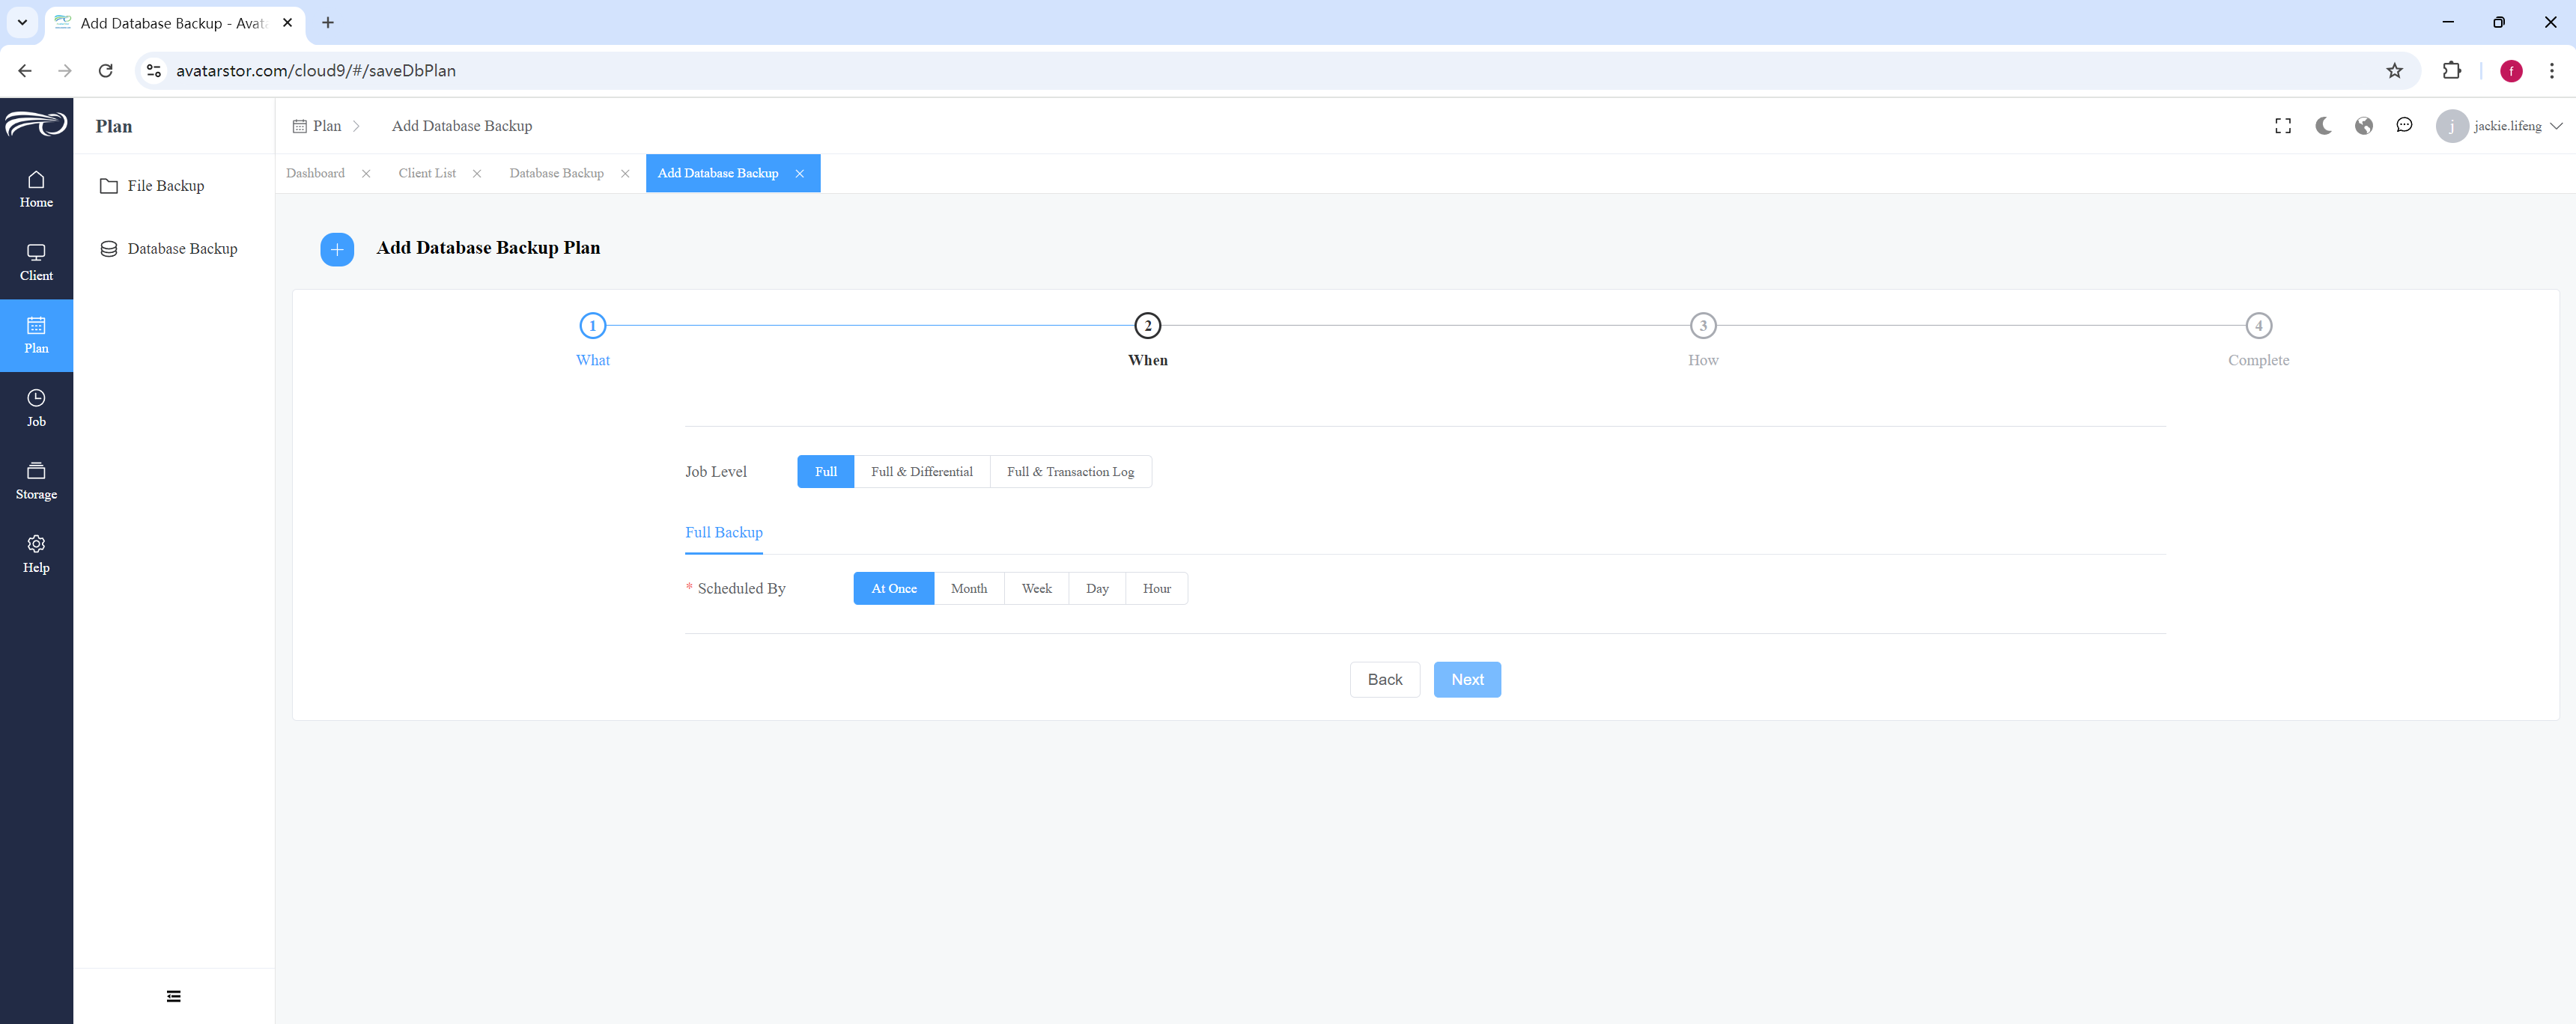
Refer to Chapter 4, Section 3, Automatic Trigger of Backup Plan to configure the trigger time of the plan.
|
SQL Server allows for the combination of three backup strategies: "Full only," "Full + Differential," and "Full + Transaction Log." SQL Server provides three main types of backups: Full Backup, Differential Backup, and Transaction Log Backup. Each type has its unique purpose and advantages, catering to different backup strategies and recovery needs. Full Backup Definition Characteristics Contains all the data in the database and part of the transaction log. Can be restored independently without needing other backup files. Typically the largest in size, with the longest backup and restore times. Use Cases Periodic (e.g., weekly or monthly) backups to ensure a complete snapshot of the database. When an independent backup file is needed to restore the entire database. Differential Backup Definition Characteristics Smaller than a full backup, but grows over time. Relies on the most recent full backup for restoration. Requires the latest full backup and the most recent differential backup to restore. Use Cases When more frequent backups are needed but full backups are not desired every time. For smaller, faster backups between full backups and restores. Transaction Log Backup Definition Characteristics The smallest in size, with the fastest backup and restore speeds. Requires an unbroken chain of logs, with no gaps. Allows for point-in-time recovery (PITR). Requires the latest full backup and all transaction log backups to restore. Use Cases When frequent backups are needed to achieve a shorter recovery point objective (RPO). When you need the ability to restore the database to a specific point in time after a failure.
|
Click [Next] to continue:
4th step, advanced options:
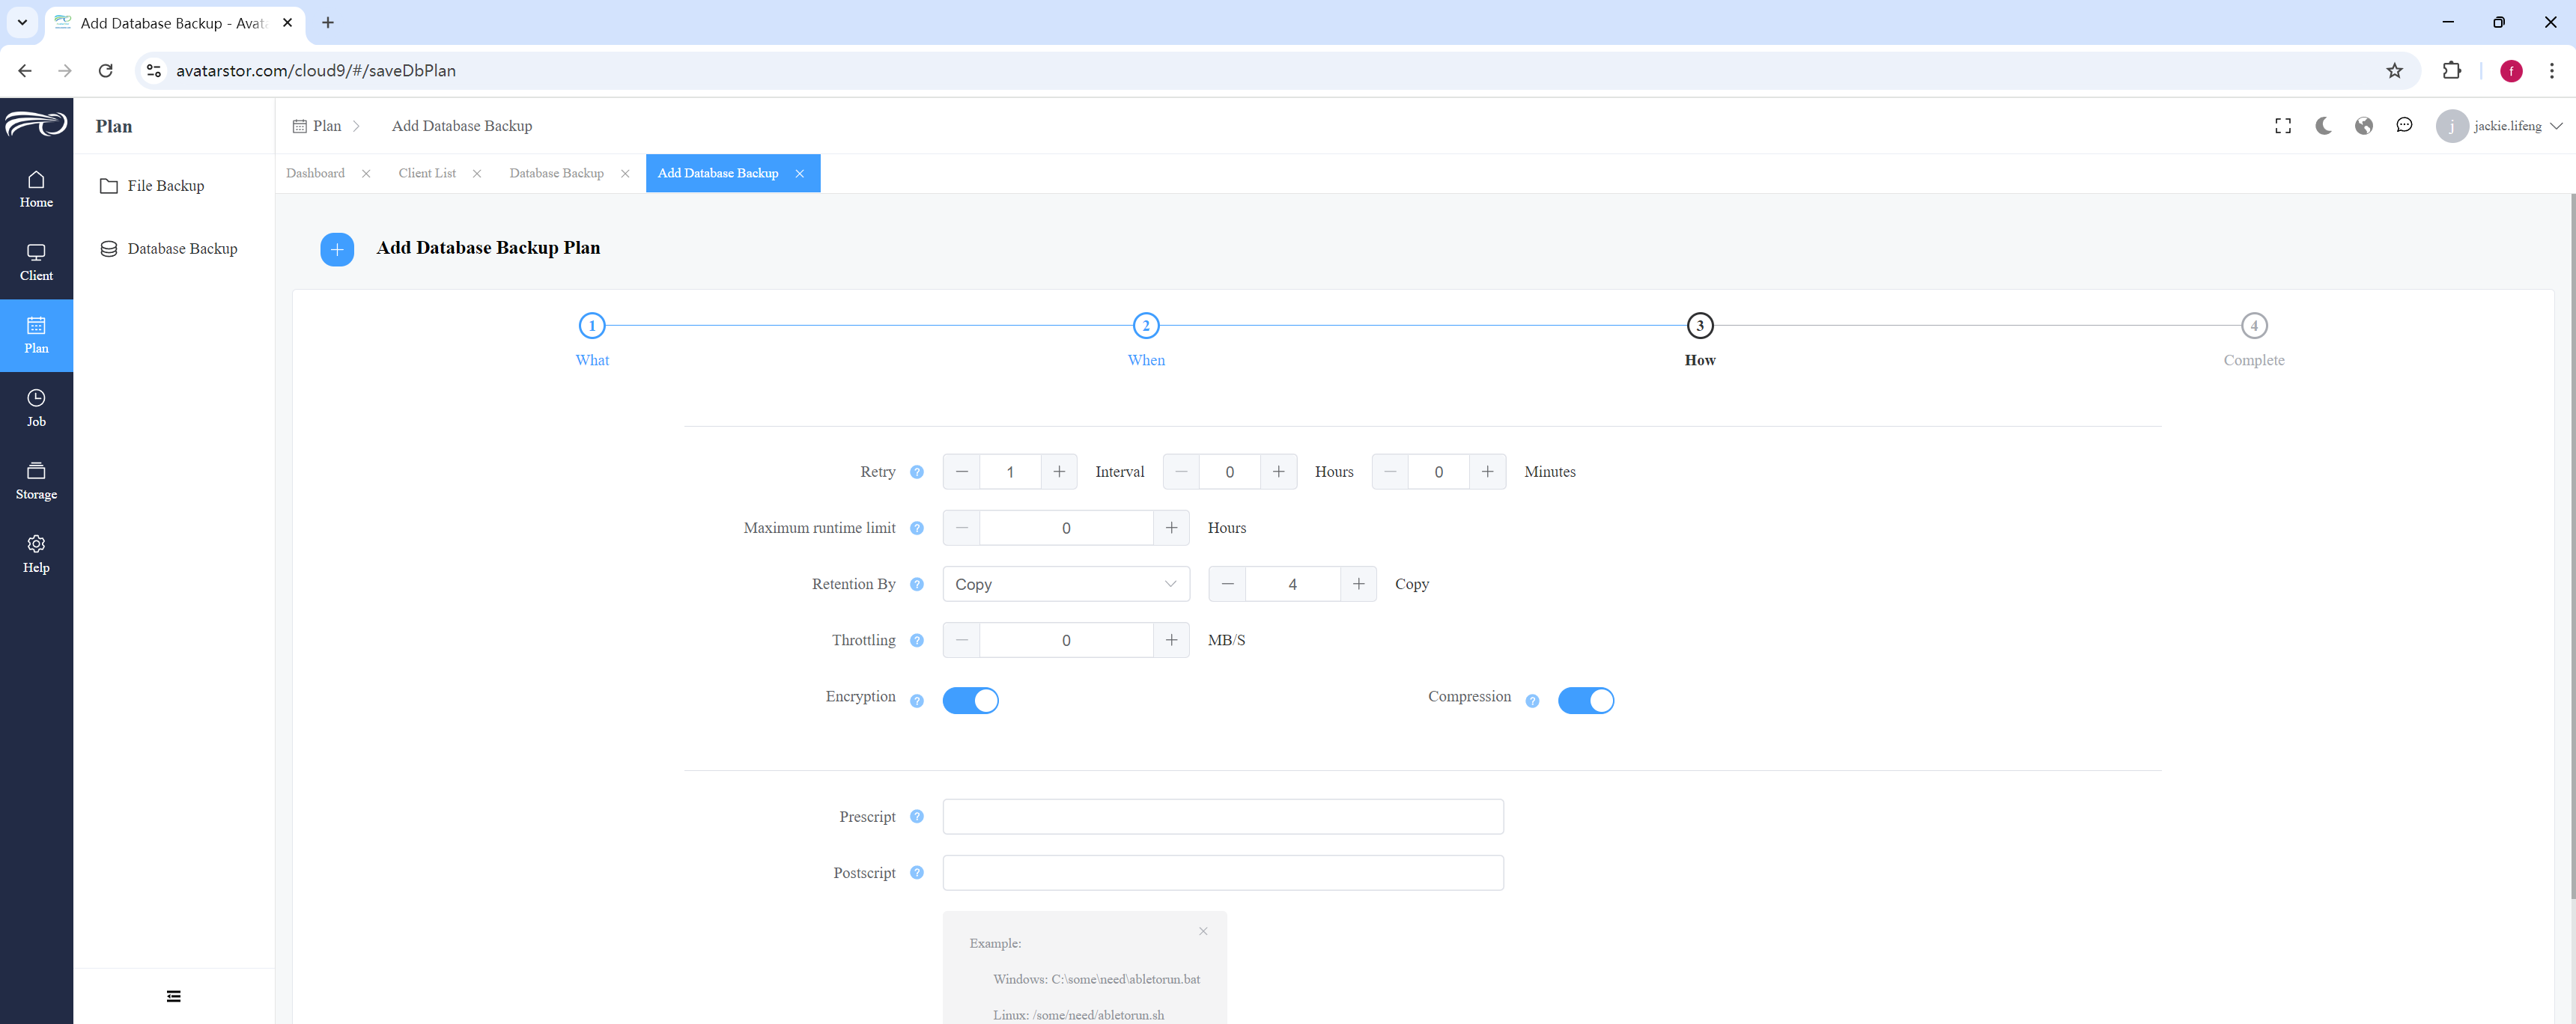
Please refer to Chapter 4, Section 6, Advanced options for backup plans and Section 5, before and after scripts to check.
Click [Submit] to save the policy in the last step.
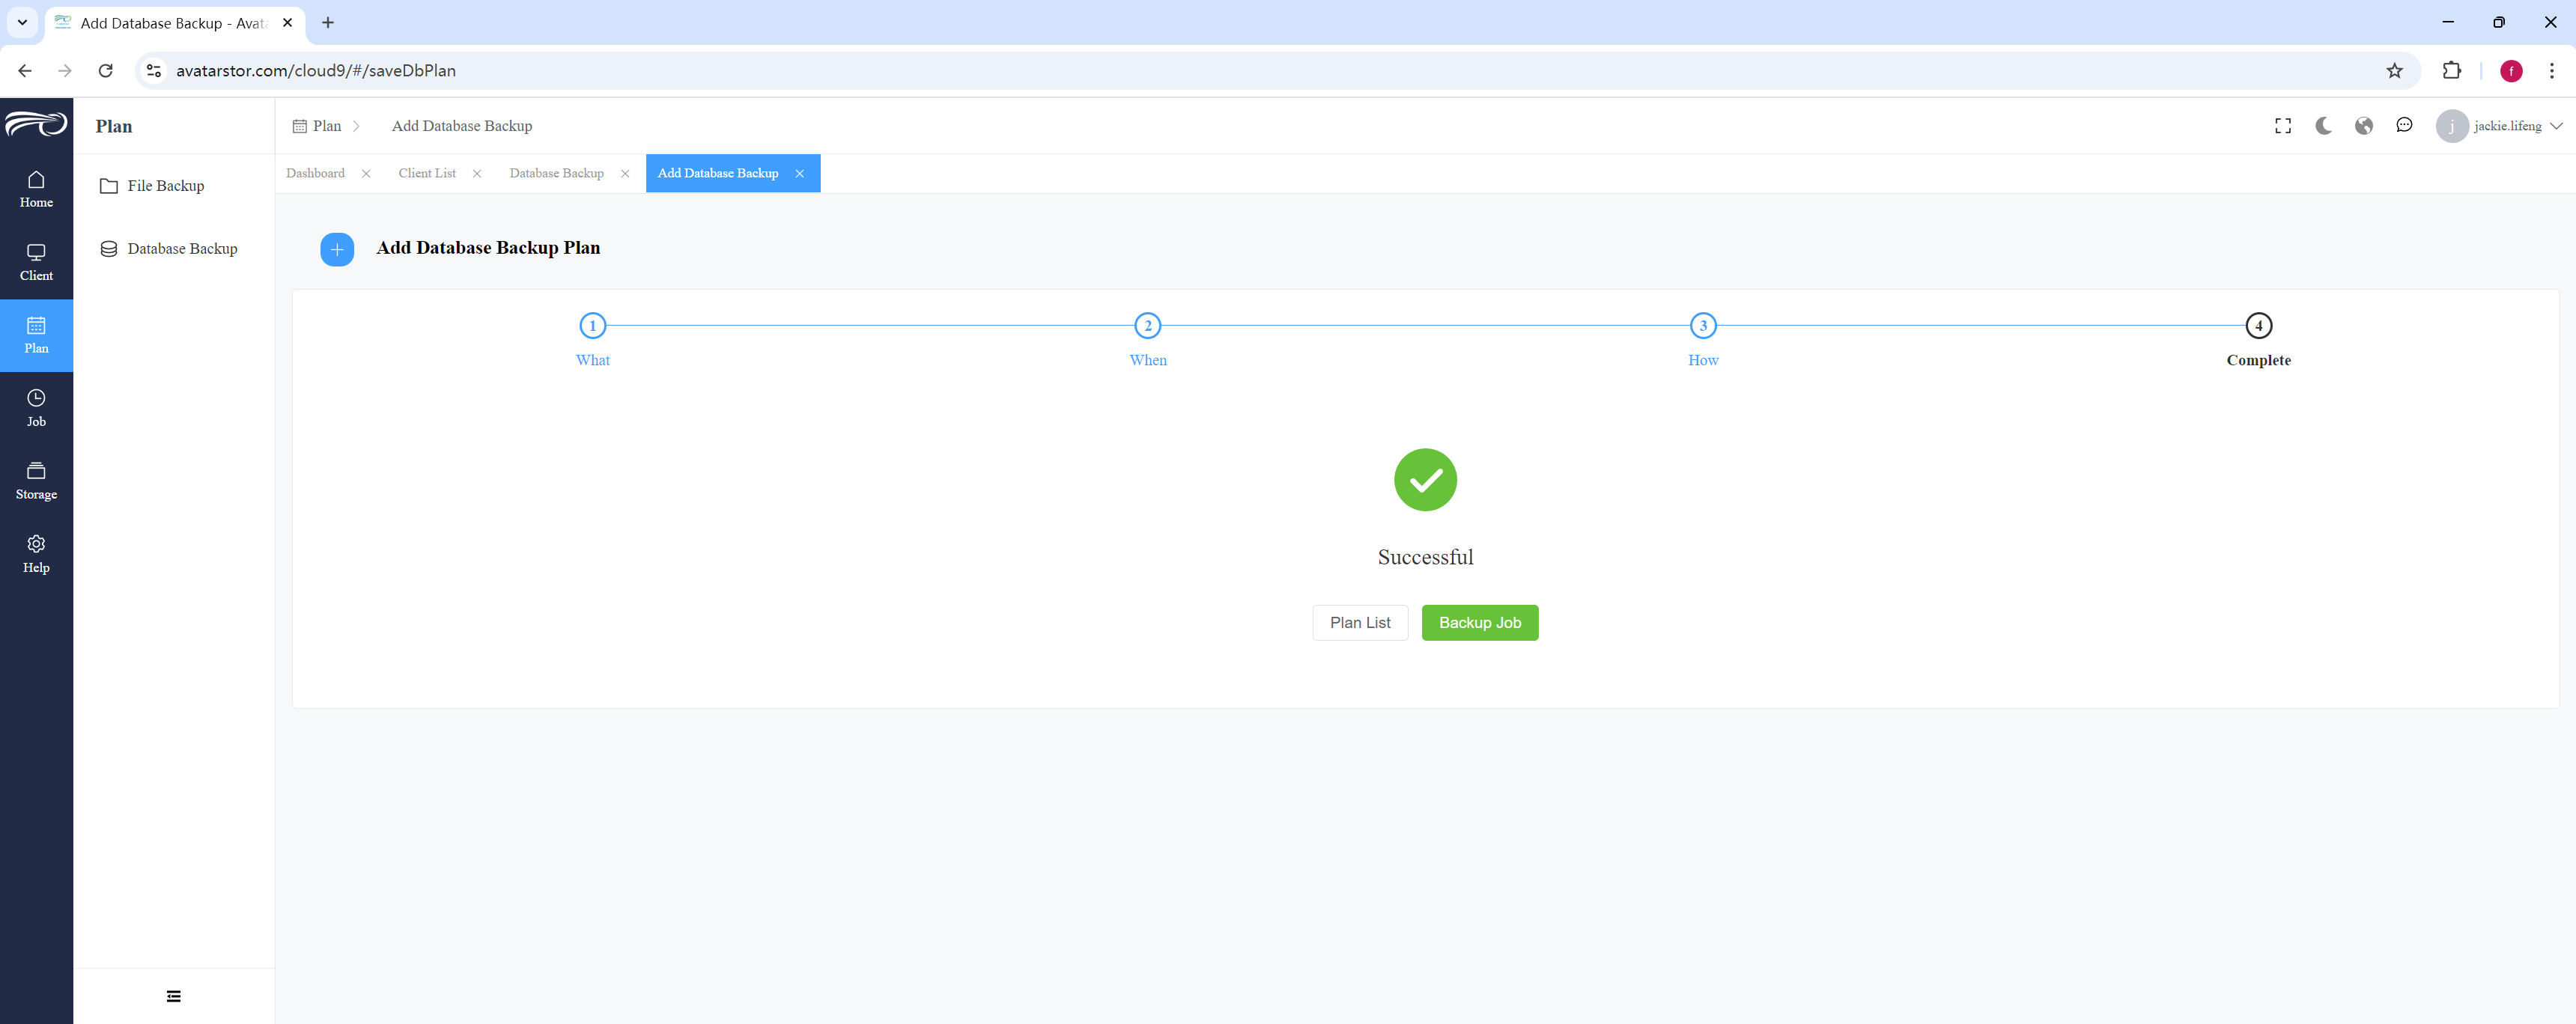
You can then refer to Chapter 4, Section 4, Manual Trigger of Backup Plan to run the plan manually. You can also wait for the scheduled automatic trigger of the plan.
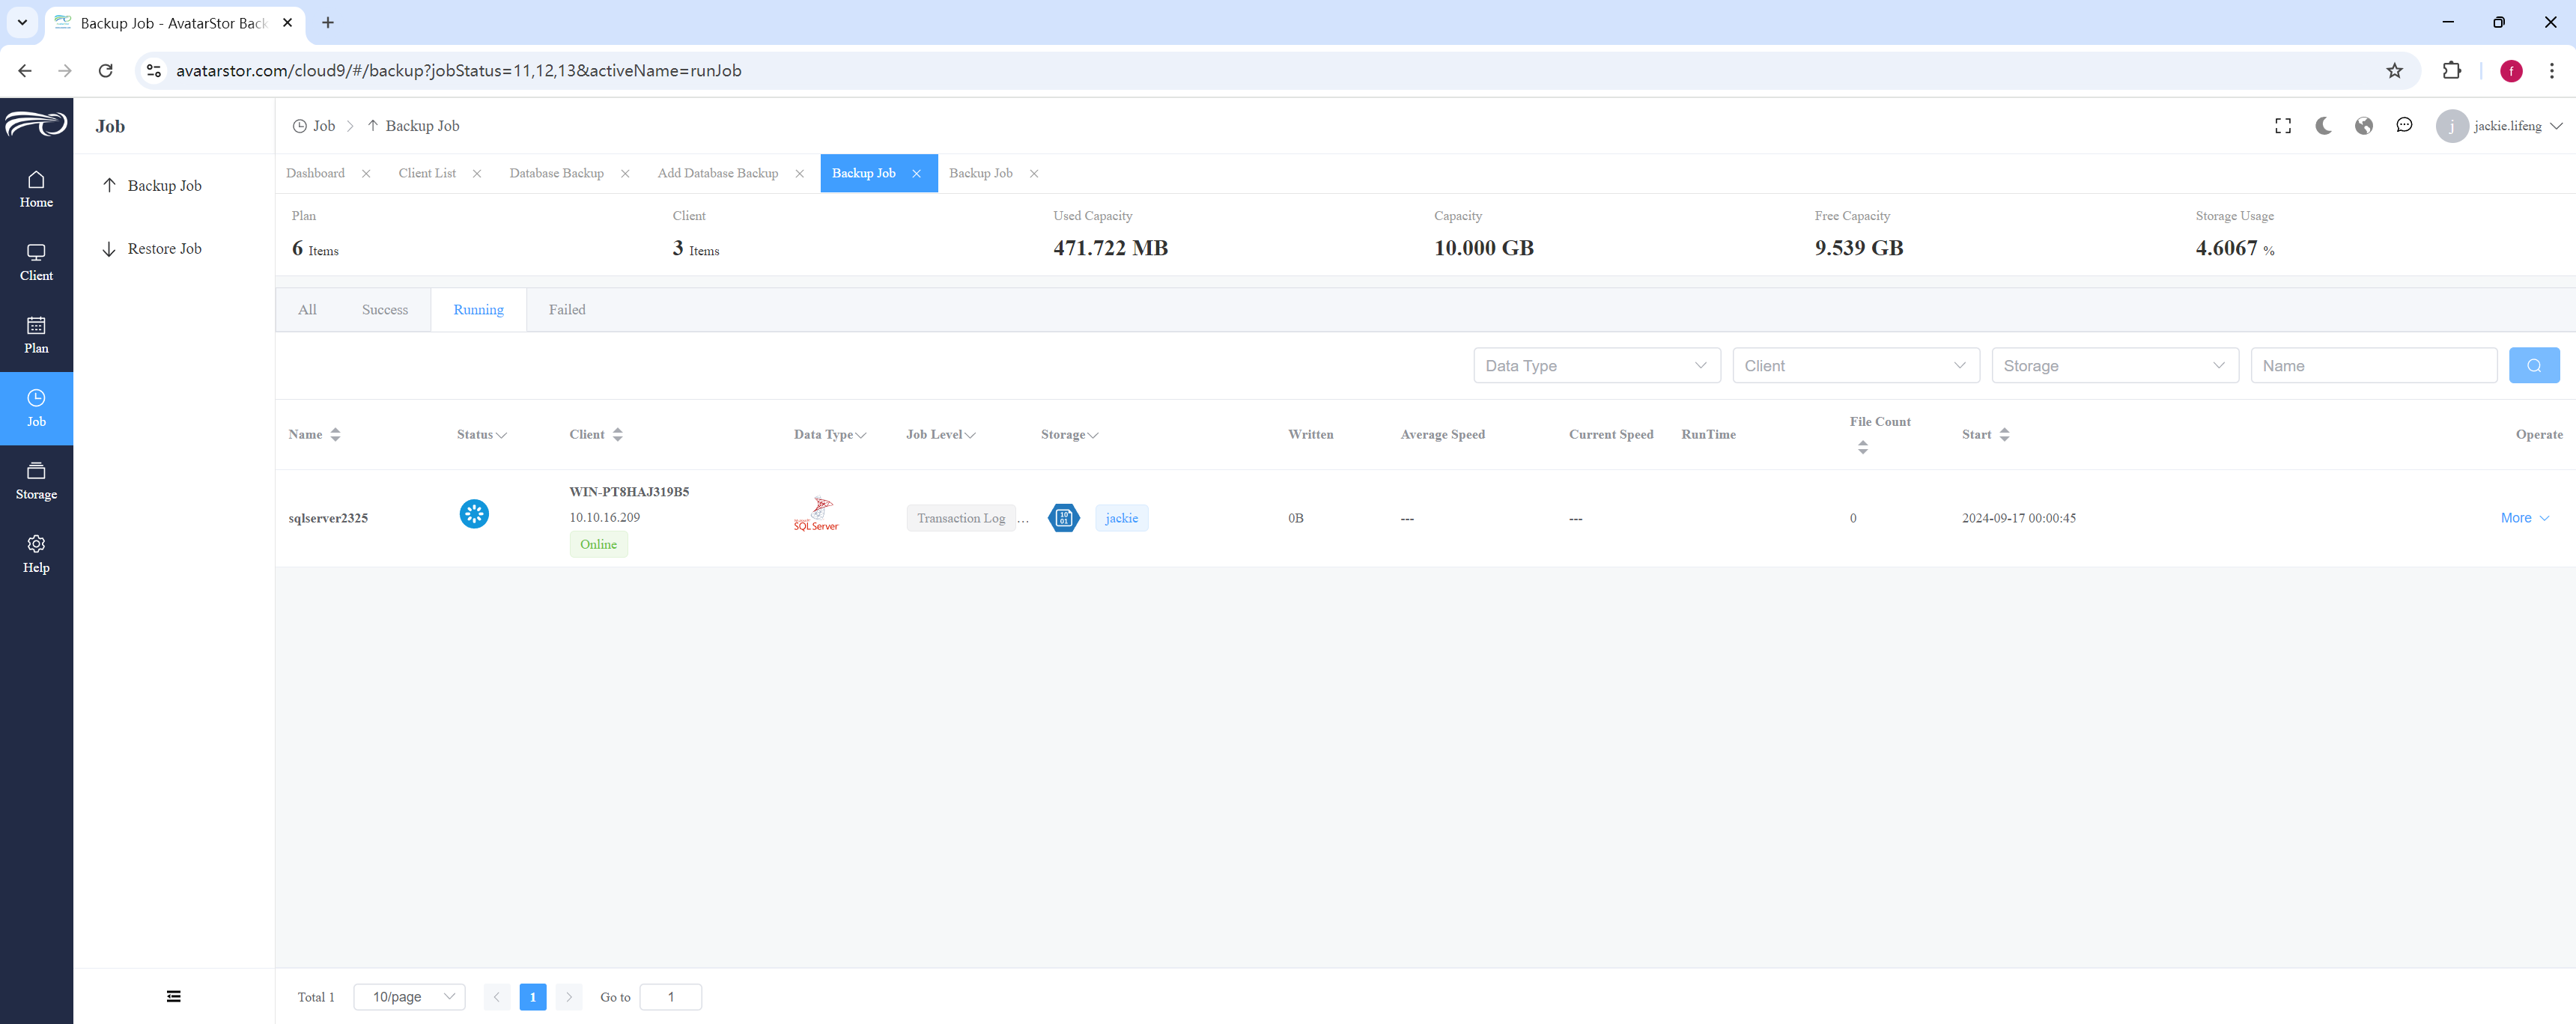
|
When using SQL Server for backups, if multiple backup strategies (such as using AvatarStor backup software and SQL Server's own backup task schedule) run concurrently, it may lead to confusion in the backup chain, especially in the case of differential and transaction log backups. Backup Chain Full Backup: Captures a complete snapshot of the database. Differential Backup: Captures all changes made since the last full backup. Transaction Log Backup: Captures all transaction log records since the last transaction log backup. Potential Issues If you have two backup strategies running concurrently (e.g., AvatarStor backup software and SQL Server task scheduling), both performing full and differential backups, the following issues may arise: Backup Chain Breakage: Differential and transaction log backups depend on the previous full backup. If a scheduled full backup is inserted between AvatarStor's full and differential backups, it may lead to issues with differential and transaction log backups, as they will refer to the latest full backup, which may not be the one you expect. Restore Problems: When restoring a database, you must follow the correct backup chain. If the chain is interrupted by different full backups, the restoration process may become complicated or even fail. Backup Chain Example Assume the following backup chain: AvatarStor Full Backup (Full Backup 1) AvatarStor Differential Backup (Differential Backup 1) SQL Server Scheduled Full Backup (Full Backup 2) AvatarStor Differential Backup (Differential Backup 2) AvatarStor Transaction Log Backup (Log Backup 1) In this case, if you need to restore the latest data, you must: Restore Full Backup 2 You cannot use Differential Backup 2 (as it's based on Full Backup 1) Solutions To avoid such issues, you can take the following actions: Use a Single Backup Strategy: Avoid running multiple backup strategies in parallel. Choose one method (e.g., AvatarStor backup software or SQL Server's task scheduler) and stick to it. Coordinate Backup Schedules: If multiple strategies must be used, ensure they are properly coordinated to avoid simultaneous full backups. For example, schedule AvatarStor backups and SQL Server task schedules at different times. Monitor and Manage Backups: Regularly check and verify backup files to ensure the backup chain is intact and the files can be restored properly. If Conflict Occurs: AvatarStor automatically upgrades relevant incremental backups to full backups to resolve baseline discrepancies. |
You can also use the following SQL query to check the current backups on your SQL Server system:
|
SQL |
Query Explanation:
msdb Database: One of SQL Server’s system databases, storing information about backups and maintenance plans.
backupset Table: Contains information about each backup operation.
backupmediafamily Table: Contains information about backup media.
type Column: Indicates the backup type (D = Full Backup, I = Differential Backup, L = Log Backup).
physical_device_name Column: Displays the path or device name of the backup file.
Steps:
Log into SQL Server: Open SQL Server Management Studio (SSMS) or use command-line tools (e.g., sqlcmd) to log into SQL Server.
Run the Query: Paste the above SQL query into a new query window in SSMS, or save the query as a .sql file and execute it using sqlcmd.
Sample Output:
|
database_name |
backup_start_date |
backup_finish_date |
backup_type |
physical_device_name |
|
MyDatabase |
2023-07-01 02:00:00.000 |
2023-07-01 02:15:00.000 |
Full |
C:\Backups\MyDatabase_Full.bak |
|
MyDatabase |
2023-07-02 02:00:00.000 |
2023-07-02 02:05:00.000 |
Differential |
C:\Backups\MyDatabase_Diff.bak |
|
MyDatabase |
2023-07-02 04:00:00.000 |
2023-07-02 04:01:00.000 |
Log |
C:\Backups\MyDatabase_Log.trn |
|
... |
|
|
|
|
Check cross backup
By looking at the backup_start_date and backup_finish_date , you can check if there are any crossovers.
physical_device_name Can help you identify whether the backup file was generated by AvatarStor.
4.12.2 SqlServer restore
Launch a restore wizard and give the restore job a name:
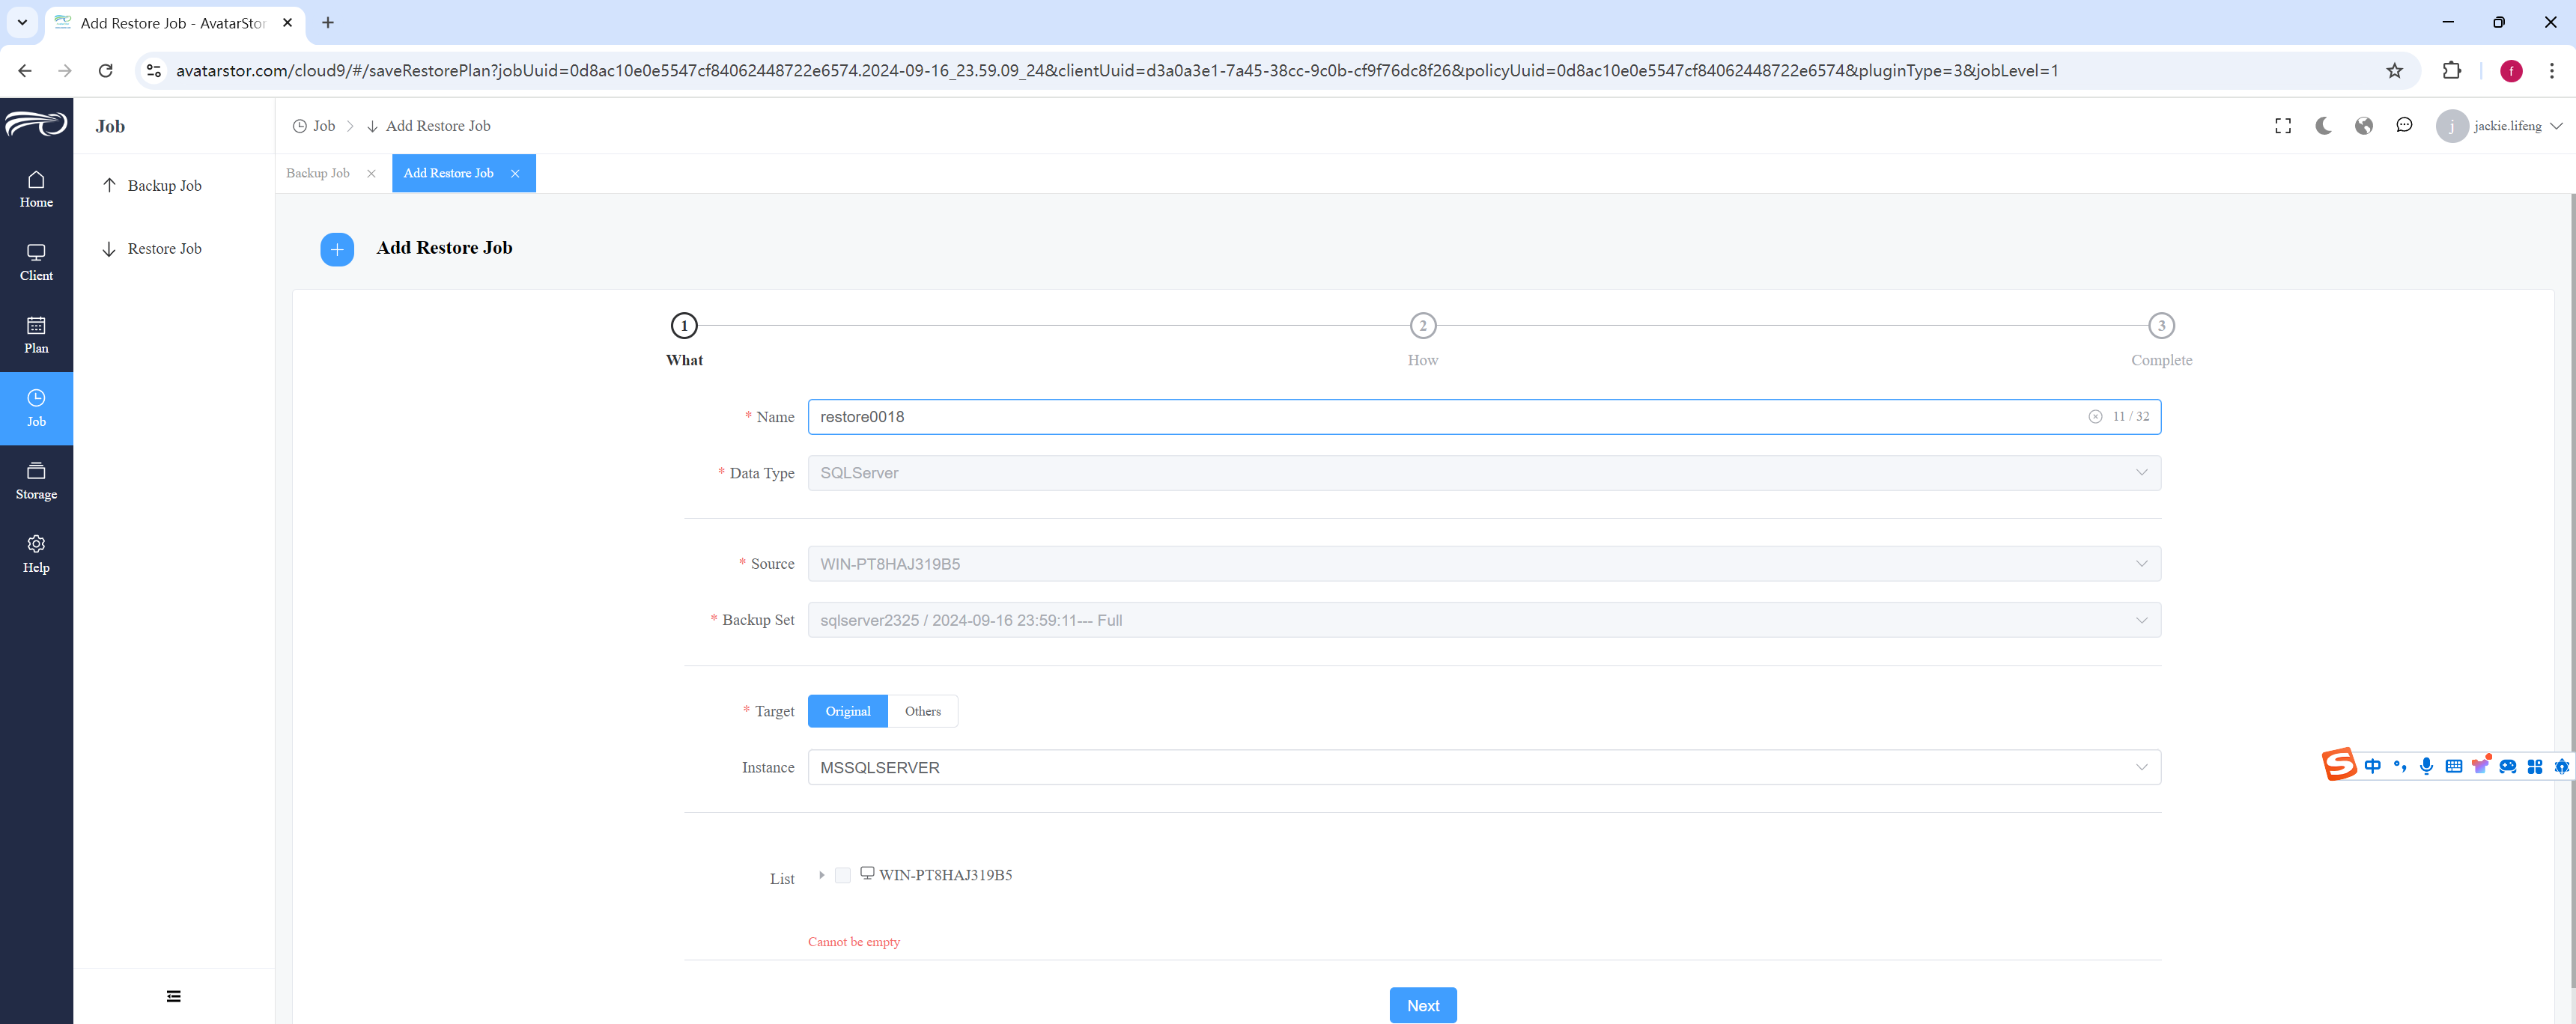
Select local restore or remote restore , select the target instance to be restored, and expand the content to be restored:
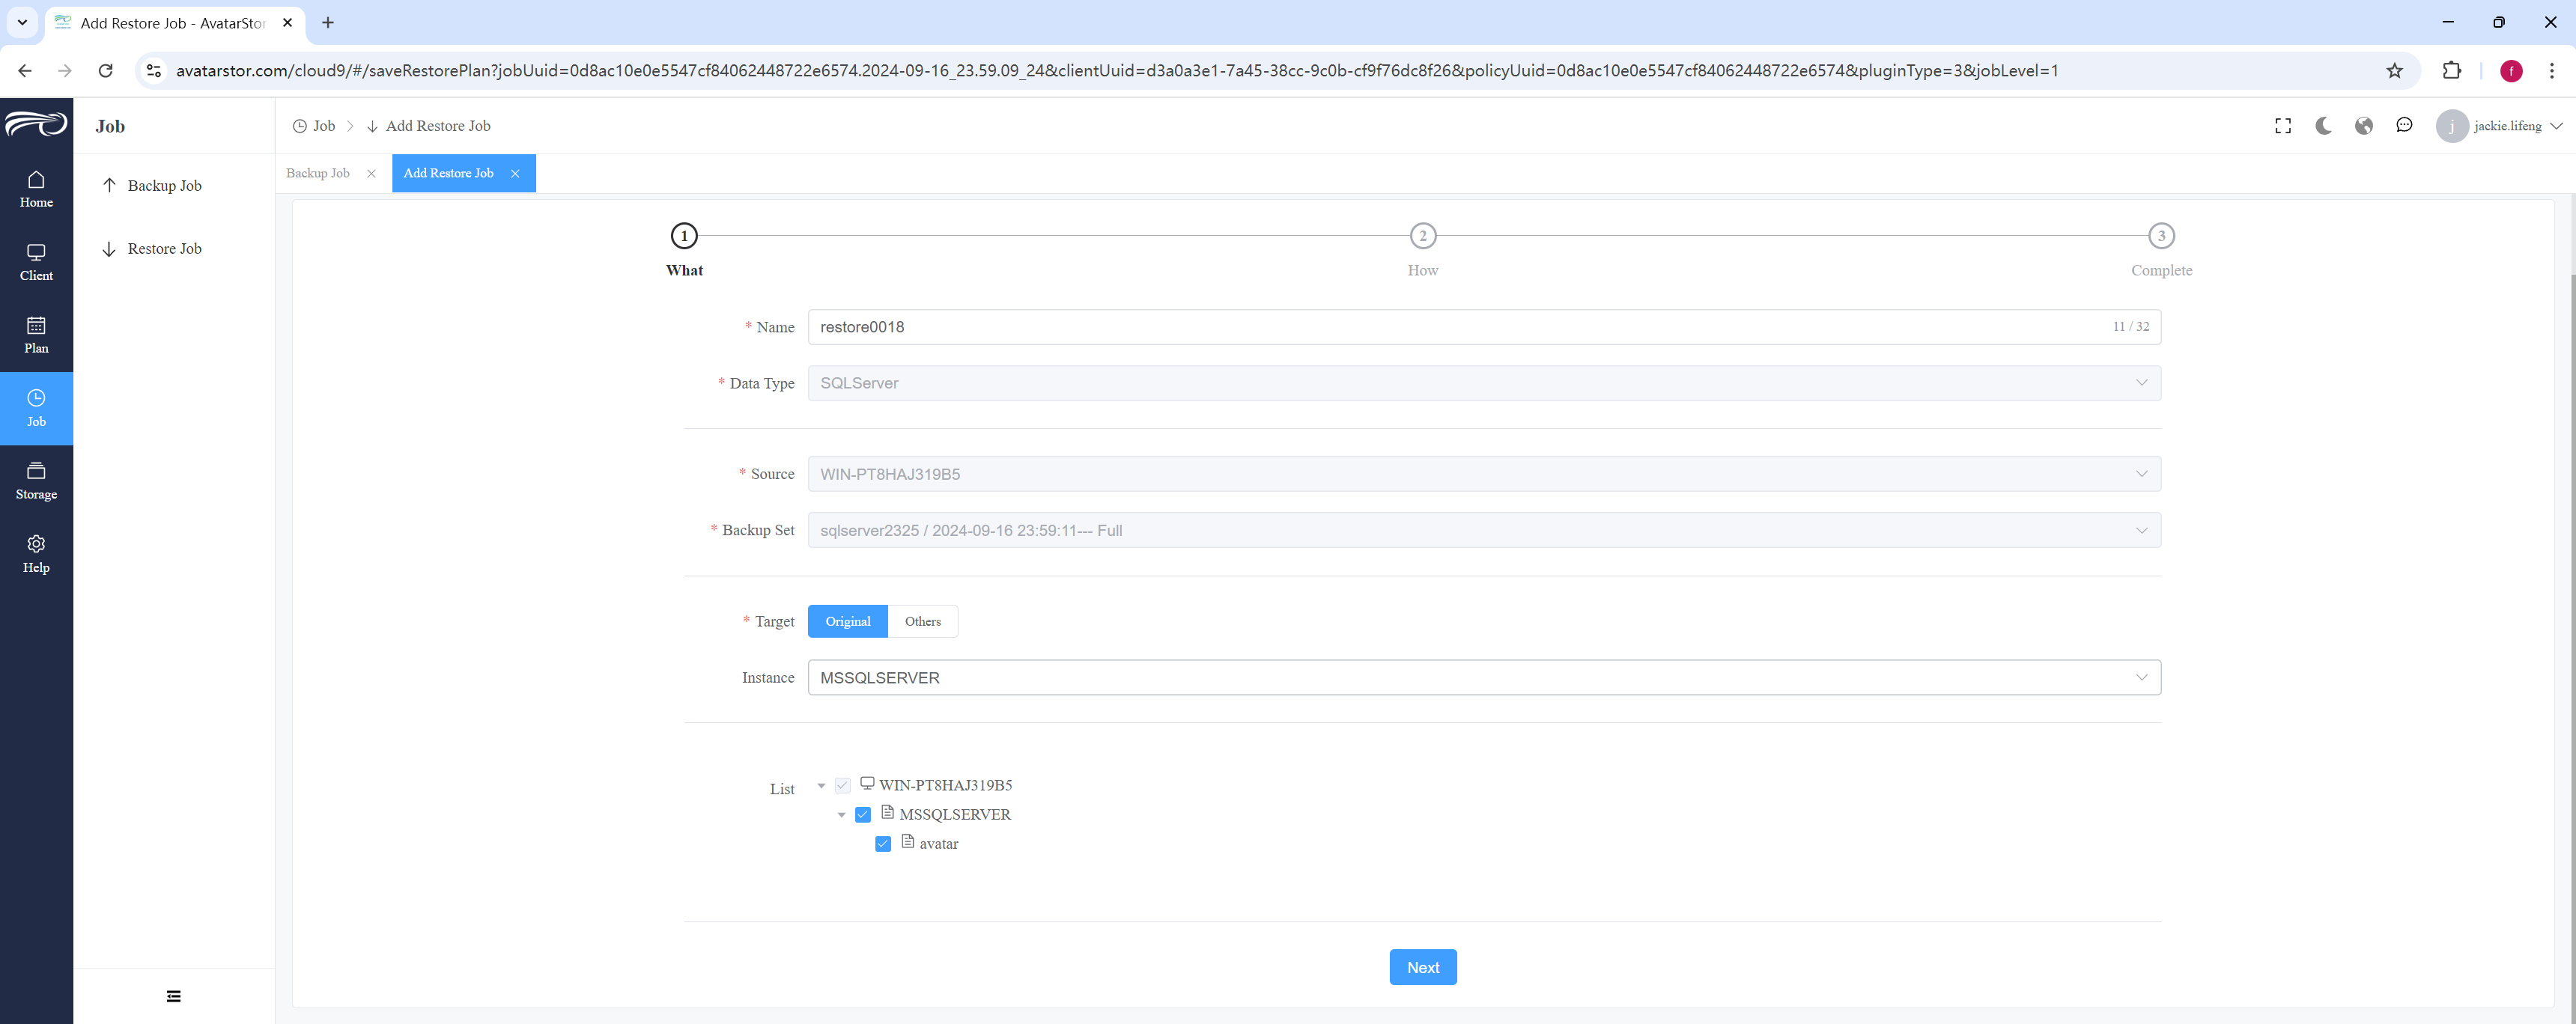
|
Note that if the original backup job is an instance-level backup, the restore can only be expanded to the instance level. If the original backup job is a database-level backup, it can be expanded to a specific database during the restore process. |
|
Note For SQL Server remote restore, the target client must also be instance configured first. |
|
There is a risk of data loss when restoring on the original client!! |
|
Be sure that no databases with the same name exist on the target instance! Alternatively, choose a new database name during the restoration process. In SQL Server, user-defined database names must adhere to specific rules and restrictions. Here are some key requirements: Length Limit The database name cannot exceed 128 characters. First Character Requirement The name must not start with a number. The first character must be a letter, underscore (_), or @. Allowed Characters The name can include letters, numbers, underscores (_), the @ symbol, dollar sign ($), and hash (#). It’s recommended not to use SQL Server keywords as database names. Forbidden Characters The following special characters are not allowed in database names: slash (/), backslash (), colon (:), asterisk (*), question mark (?), double quotes ("), less-than (<), greater-than (>), vertical bar (|), comma (,), semicolon (;), single quotes ('), and spaces. Other Considerations If the database name contains spaces or special characters like hyphens (-), you can enclose the name in square brackets ([]), for example, [My Database]. Summary Although SQL Server allows the use of many symbols in database names, it's recommended to use simple names without special characters to avoid potential issues and ensure readability. |
|
SQL Server supports cross-version database restoration, but certain requirements and limitations must be considered. Below are some key points: Main Principles Restoring from an older version to a newer version: You can restore a database from an older (lower) version of SQL Server to a newer (higher) version. For example, you can restore a SQL Server 2012 database to a SQL Server 2019 instance. Restoring from a newer version to an older version: You cannot directly restore a database from a newer (higher) version to an older (lower) version of SQL Server. For example, you cannot directly restore a SQL Server 2019 database to SQL Server 2012. Specific Requirements and Considerations for Cross-Version Restoration Backup and Restore Version Compatibility: Backup files from older versions can be restored on newer SQL Server versions, but they cannot be restored on lower versions. For example, a SQL Server 2014 backup can be restored on SQL Server 2016 but not on SQL Server 2012. Database Compatibility Level: After restoration, the database’s compatibility level may need to be adjusted to align with the features and performance improvements of the newer SQL Server version. Feature and Performance Differences: Newer versions of SQL Server may contain new features and performance enhancements. After restoration, applications need to be tested and validated for compatibility with the new version. Database Integrity Check: After restoring to a newer SQL Server version, you may need to run DBCC CHECKDB to verify database consistency and address any issues that may arise. Upgrade Scripts and Stored Procedures: During the restoration process, you might need to update scripts and stored procedures to ensure they work correctly in the new version of SQL Server. |
You can use the following command to check and change the database compatibility level:
|
SQL |
Use DBCC to check the database.
|
SQL |
Click [Next] to continue:
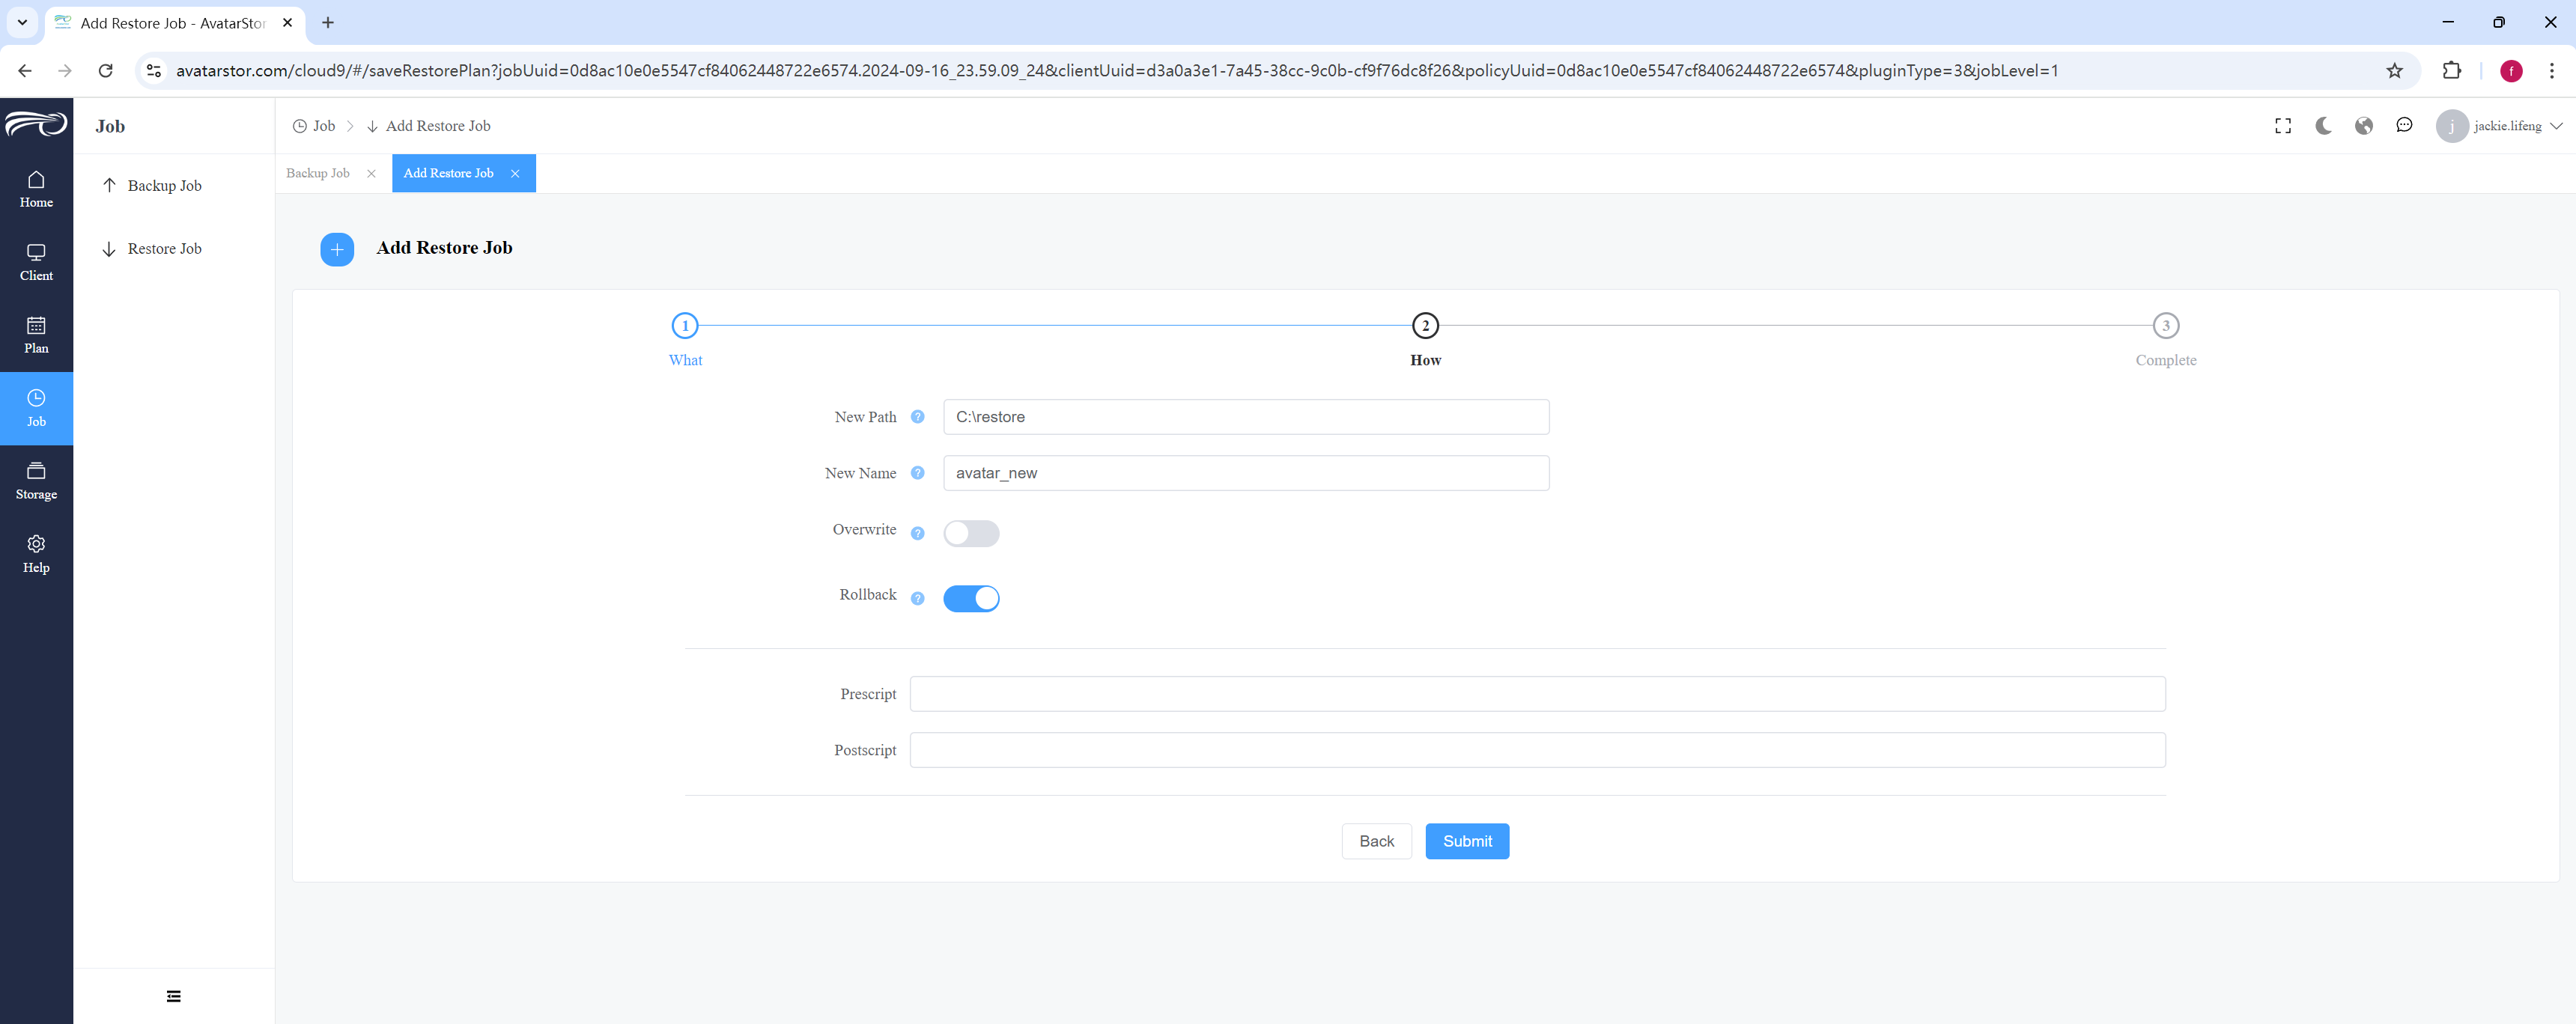
Restore to a specified path: If this field is left blank, the database will be restored to the original path from the backup environment by default.
For example, if the original data file path was:
C:\Program
Files\Microsoft SQL
Server\MSSQL10_50.MSSQLSERVER\MSSQL\DATA\,
then the restore
process will also restore the files to this path by default.
|
Note that if it is a local restore, this usually isn't a major issue as the path often exists. However, for a remote restore, the path may not always be present. Therefore, for remote restore, it is recommended to specify the path explicitly in this field. |
|
Restore to a new database name: This option is only available when one database is selected for restore. |
|
Overwrite refers to replacing an existing database with the same name. In order to proceed with an overwrite, all access connections to the database must be completely terminated. After the overwrite, all pre-existing data in the database with the same name will be lost. One way to ensure that all access connections are interrupted is to set the database to the offline state: |
|
SQL |
|
Rollback refers to whether or not to apply the transaction logs. There are two options: rollback or no rollback. Typically, if a SQL Server backup follows this sequence: FullBackup 1 IncrementalBackup 1 LogBackup 1 LogBackup 2 To restore to the latest state, you should first restore 1, then restore 2, followed by 3 without rolling back, and finally restore 4 with rollback. Once the rollback operation is performed, no further restore operations can be carried out. In other words, rollback marks the end of the restore process. Generally, the "no rollback" option is used when restoring transaction logs in sequence. However, with AvatarStor backup software, these restoration processes are fully automated. You can choose to start the restoration from any transaction log or differential backup, and the software will automatically complete all necessary restore operations, eliminating the need to follow the traditional sequence of full backup, differential backup, and then transaction log restore. |
Although less commonly used, restore jobs do support pre- and post-script .
Click [Submit] to save the restore job.
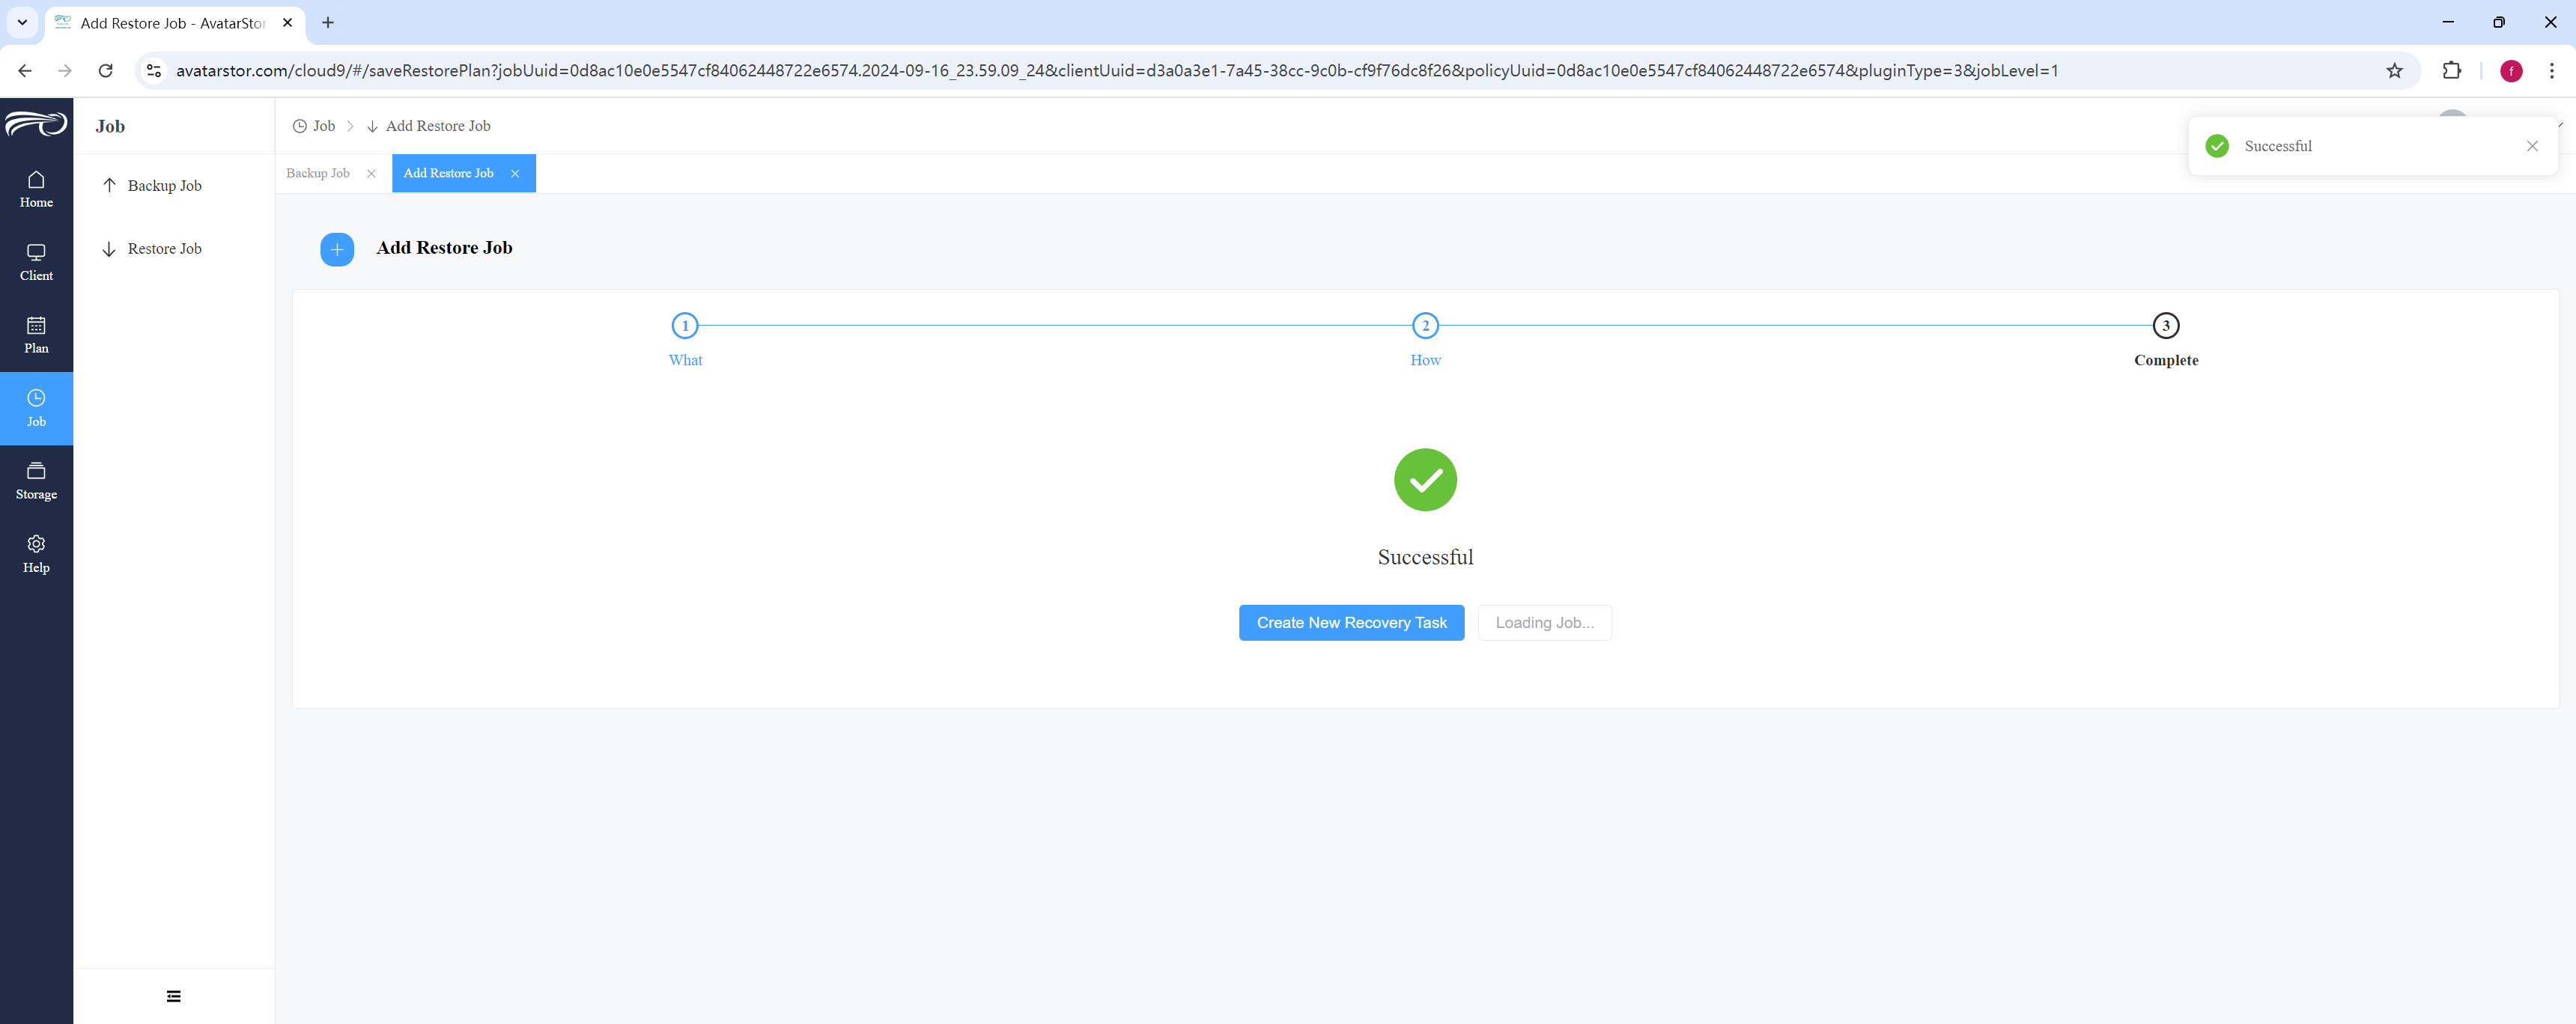
Click [View Recovery Job List] to go to [Job] - [Recovery Job] - [Running] to view the jobs being restored.
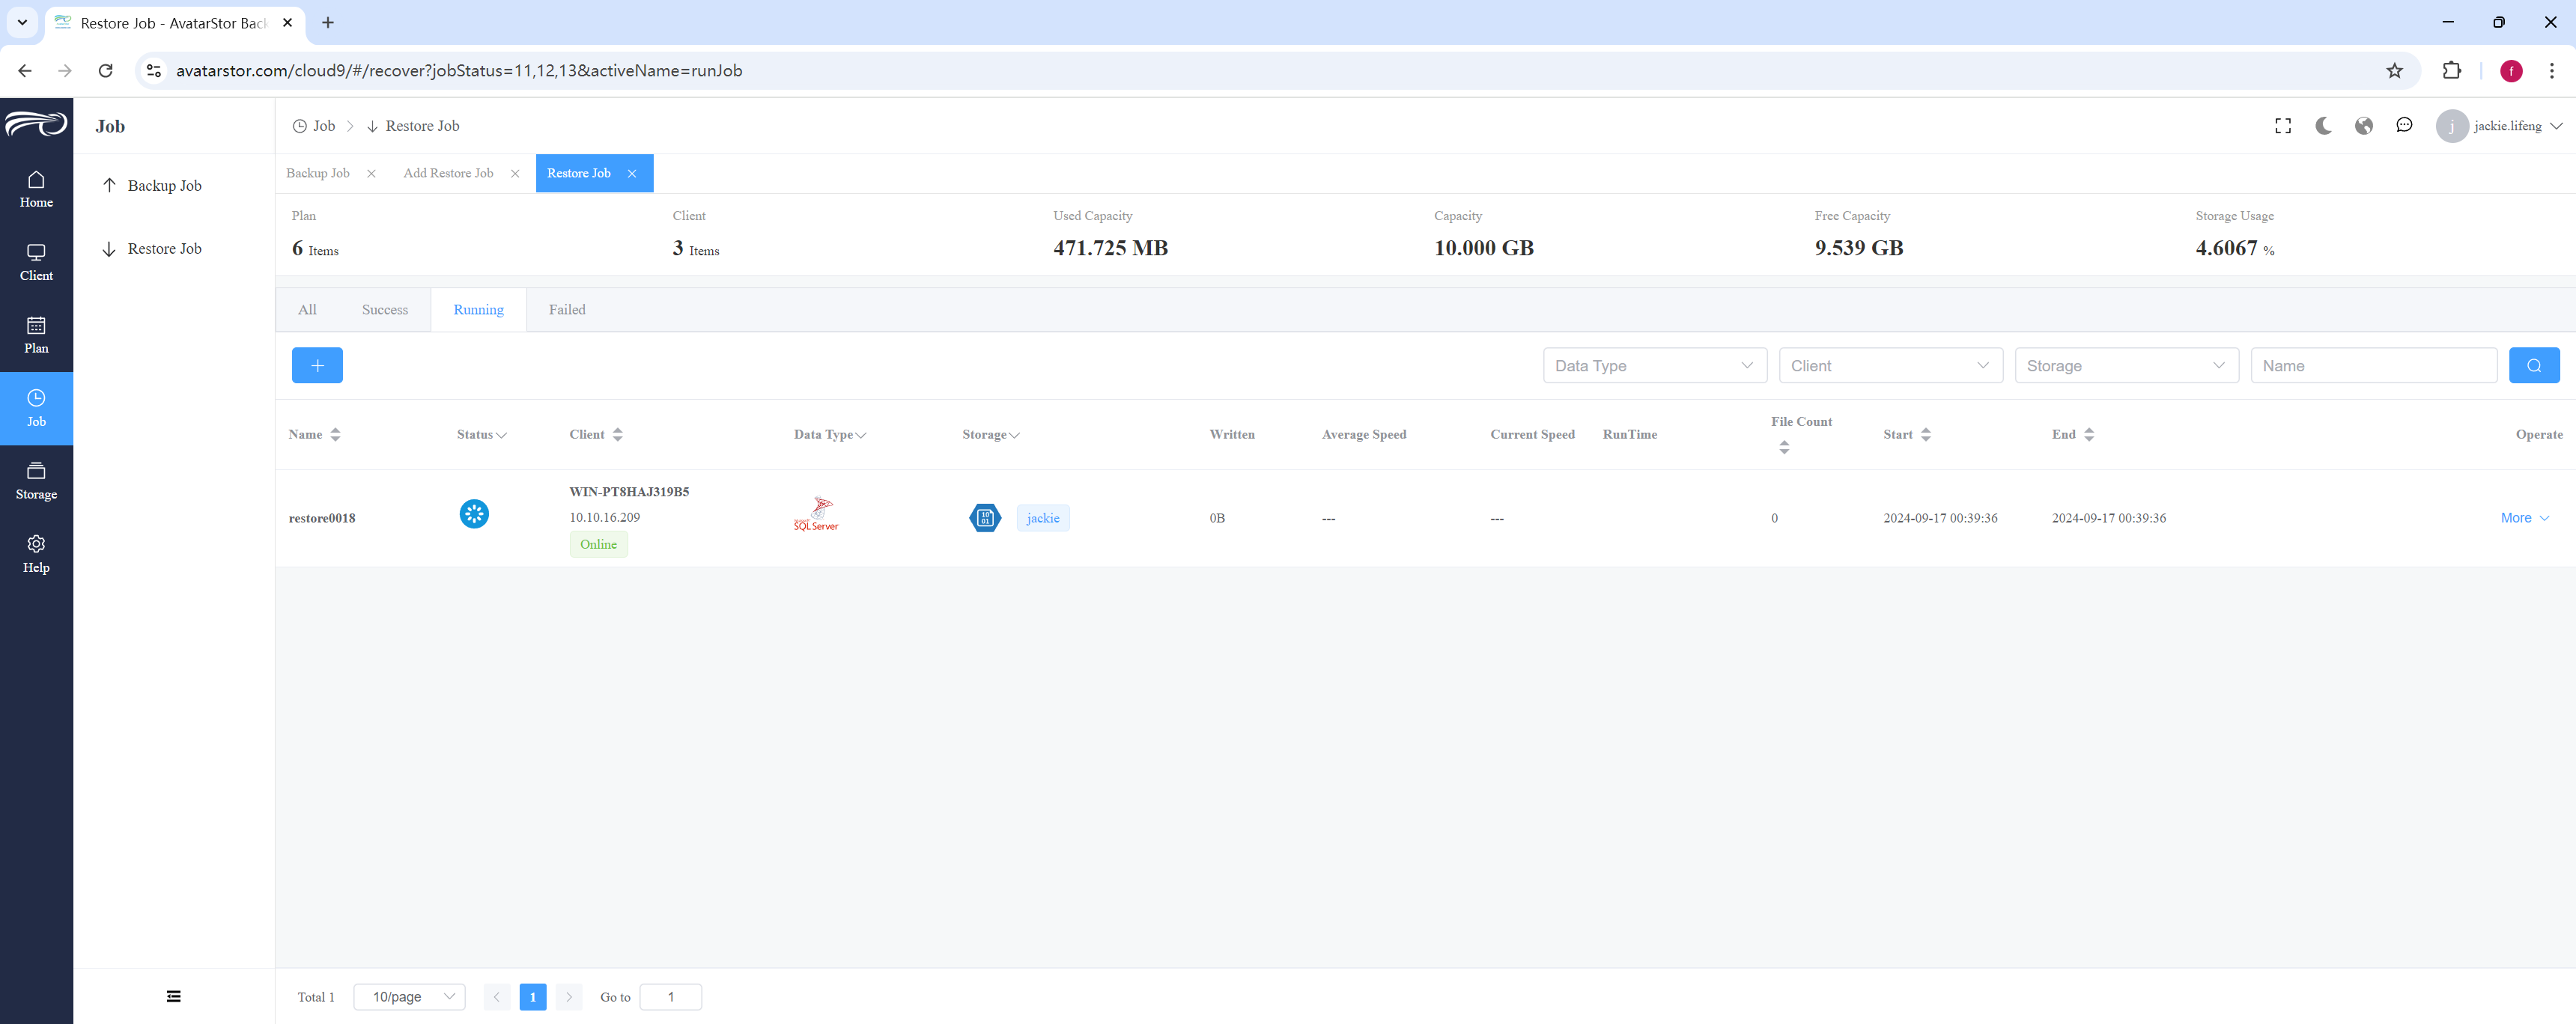
4.13 Oracle backup and restore
4.13.1 Oracle Backup
First, please refer to Chapter 3 to configure the corresponding Oracle instance information for the source client. If the same client has multiple Oracle instances, you can configure them multiple times. You can also manually query the Oracle parameters to verify the automatic scan results.
For Oracle, we primarily use RMAN for backup and recovery tasks. The Oracle Home directory and Oracle Instance name are the parameters we need to obtain.
To log in to Oracle and query the Oracle Home directory and Oracle Instance name, you can follow these steps:
Log in to the Oracle Database
First, you need to log in to the Oracle database using SQL*Plus or other Oracle client tools:
|
Bash |
Or log in by specifying the username and password:
|
Bash |
Query the Oracle Instance Name
After logging in, you can use the following SQL query to find the current Oracle instance name (ORACLE_SID):
|
SQL |
This will display the name of the current instance.
Query the Oracle Home Directory
To find the Oracle Home directory, you can run the following query, which will show the database settings, including the Oracle Home path:
|
SQL |
This will output the Oracle Home path.
Another very important thing is to ensure that the database is in archive mode before performing the Oracle backup.
To verify whether Oracle has Archive Log Mode enabled, and how to enable it if it's not, follow these steps:
Log in to the Oracle database and check the archive mode status.
Log in using SQL*Plus:
|
Bash |
Query the current archive mode status:
|
SQL |
If the result is ARCHIVELOG, the archive mode is enabled.
If the result is NOARCHIVELOG, archive mode is not enabled.
If Oracle is in NOARCHIVELOG mode, follow these steps to enable archive mode:
Shut down the database:
|
SQL |
Start the database in mount mode (without fully opening it):
|
SQL |
Enable archive mode:
|
SQL |
Open the database:
|
SQL |
Verify That Archive Mode Is Enabled
Check again if the database has been switched to archive mode:
|
SQL |
The result should now show ARCHIVELOG.
Optional: Specify the Archive Log Destination
You can check or set the location where the archive logs are stored to ensure there is enough space.
Query the current archive log destination:
|
SQL |
Set the archive log destination:
|
SQL |
Check the Archive Log Status
Ensure that Oracle is correctly configured to generate archive logs:
|
SQL |
The Purpose of Archive Mode:
Archive Mode: In archive mode, Oracle copies redo logs to the archive location when they are full, allowing you to perform incremental backups, point-in-time recovery, and more.
Non-Archive Mode: Redo logs are not archived, and old redo logs are overwritten. This limits recovery options.
After configuring the instance:
Start creating a new Oracle plan from the left navigation bar [Plan] - [Database Backup] - [+], in 4 steps:
The first step is to select the destination storage and data content.Give the plan a name, select the data type Oracle, select Client and instance, and the system will automatically scan all spfile,controfile,datafile and logs under that instance . The backup data list can be expanded later.
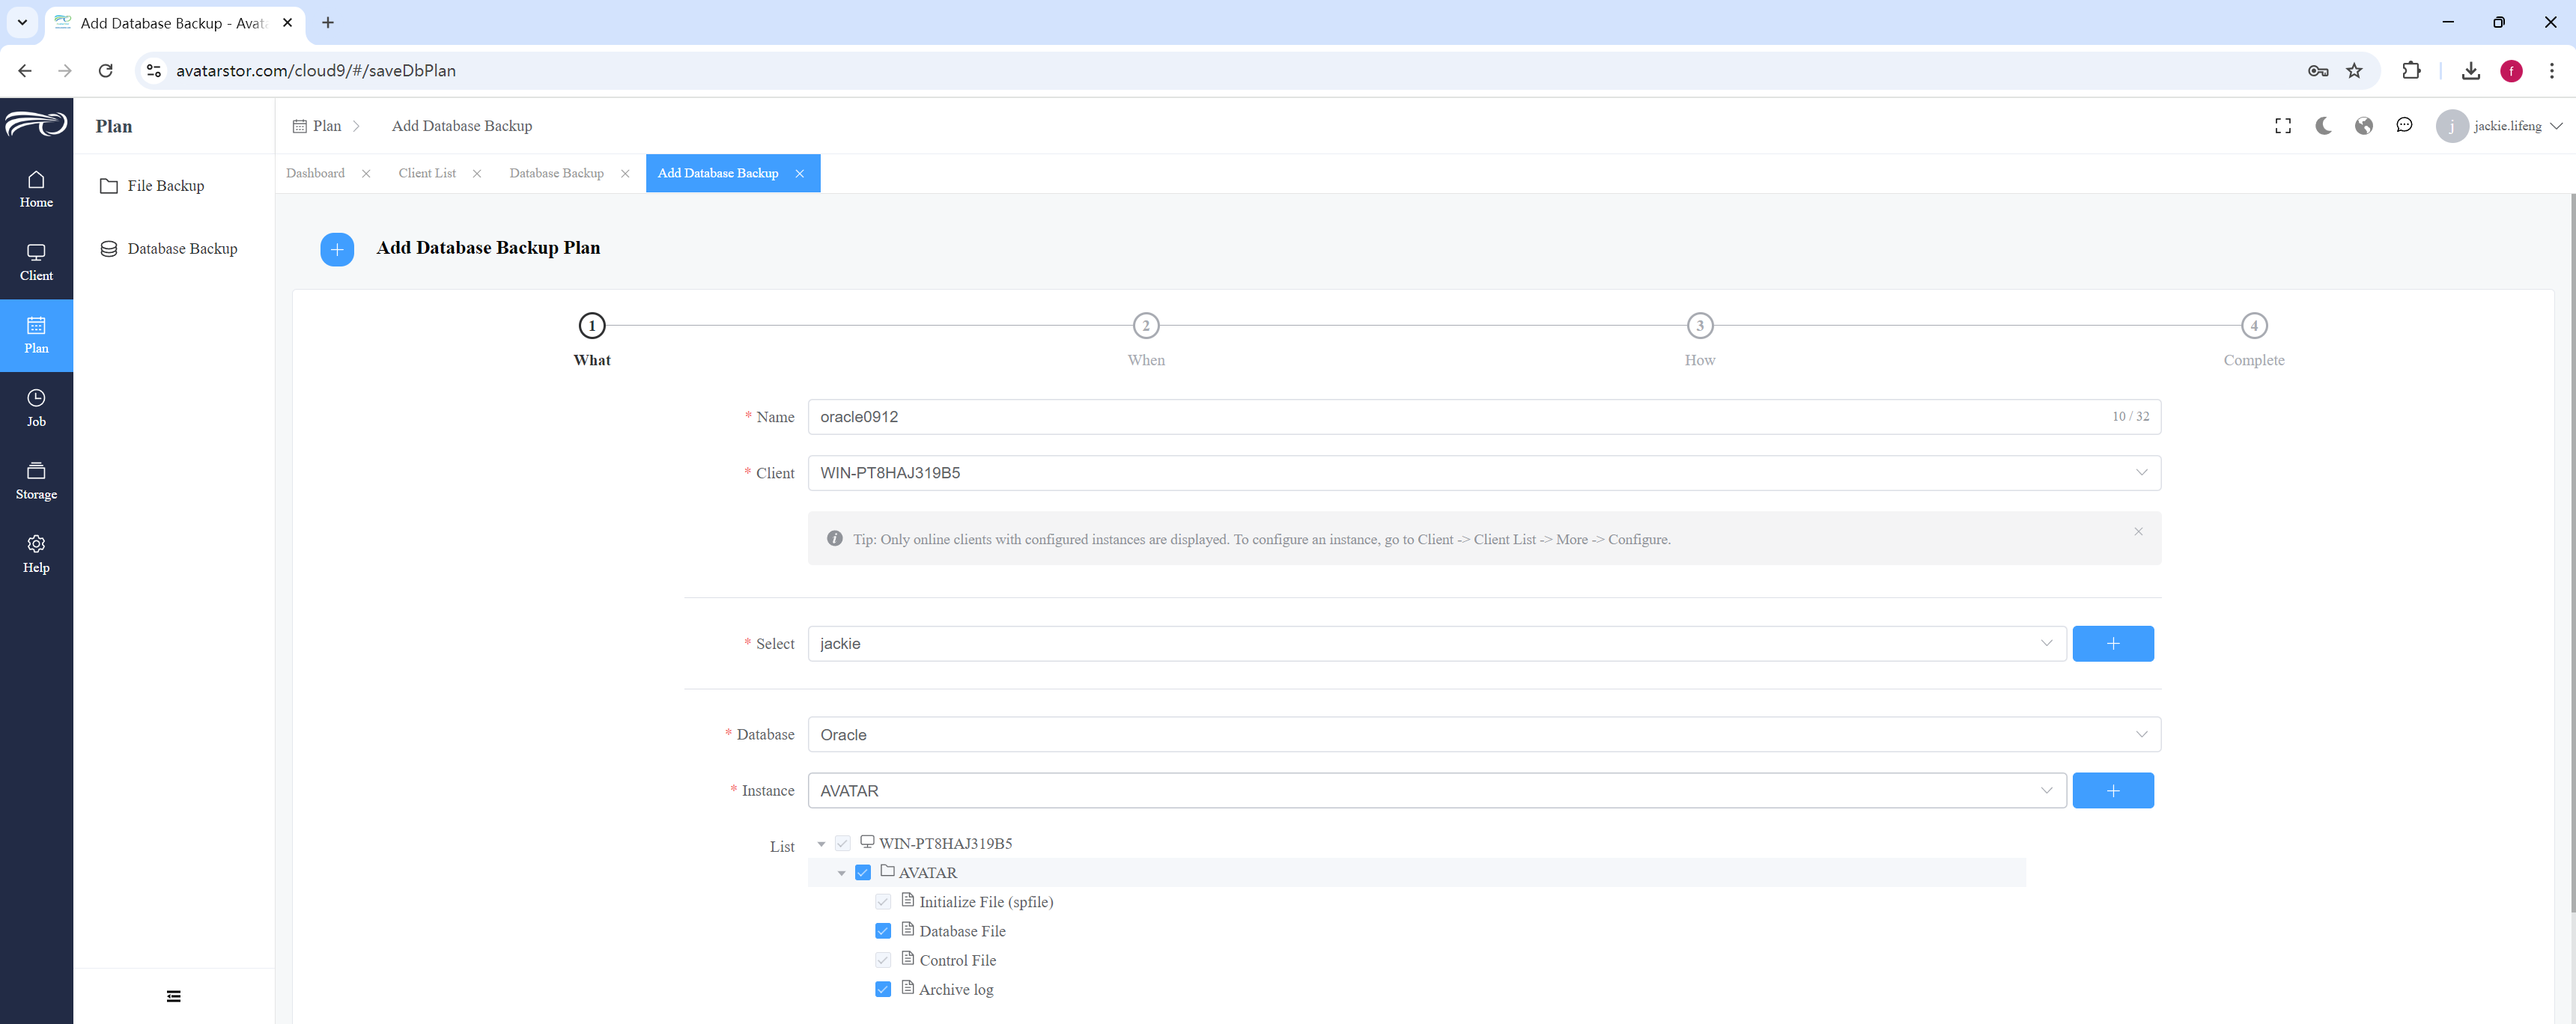
After selecting the content you need to backup, click [Next]:
|
In RMAN (Recovery Manager) backups for Oracle, it is generally recommended to include SPFILE, Controlfile, Datafiles, and Archived Logfiles for a comprehensive backup. Here's why each is important: SPFILE (Server Parameter File): Contains the configuration parameters of the Oracle database. Without it, the database might not start with the correct settings. Controlfile: Keeps track of the physical structure of the database (datafiles, redo logs, etc.). It is crucial for database recovery, and losing it means you can't restore the database properly. Datafiles: Store the actual database data. Without datafiles, there is no database to restore. Logfiles: Including archived redo logs ensures you can perform point-in-time recovery by replaying the changes that occurred after the datafile backups. In most cases, it's safer to include all these in your RMAN backup to ensure that, in the event of a failure, the database can be restored fully and consistently. |
Step two, set the scheduled trigger time.
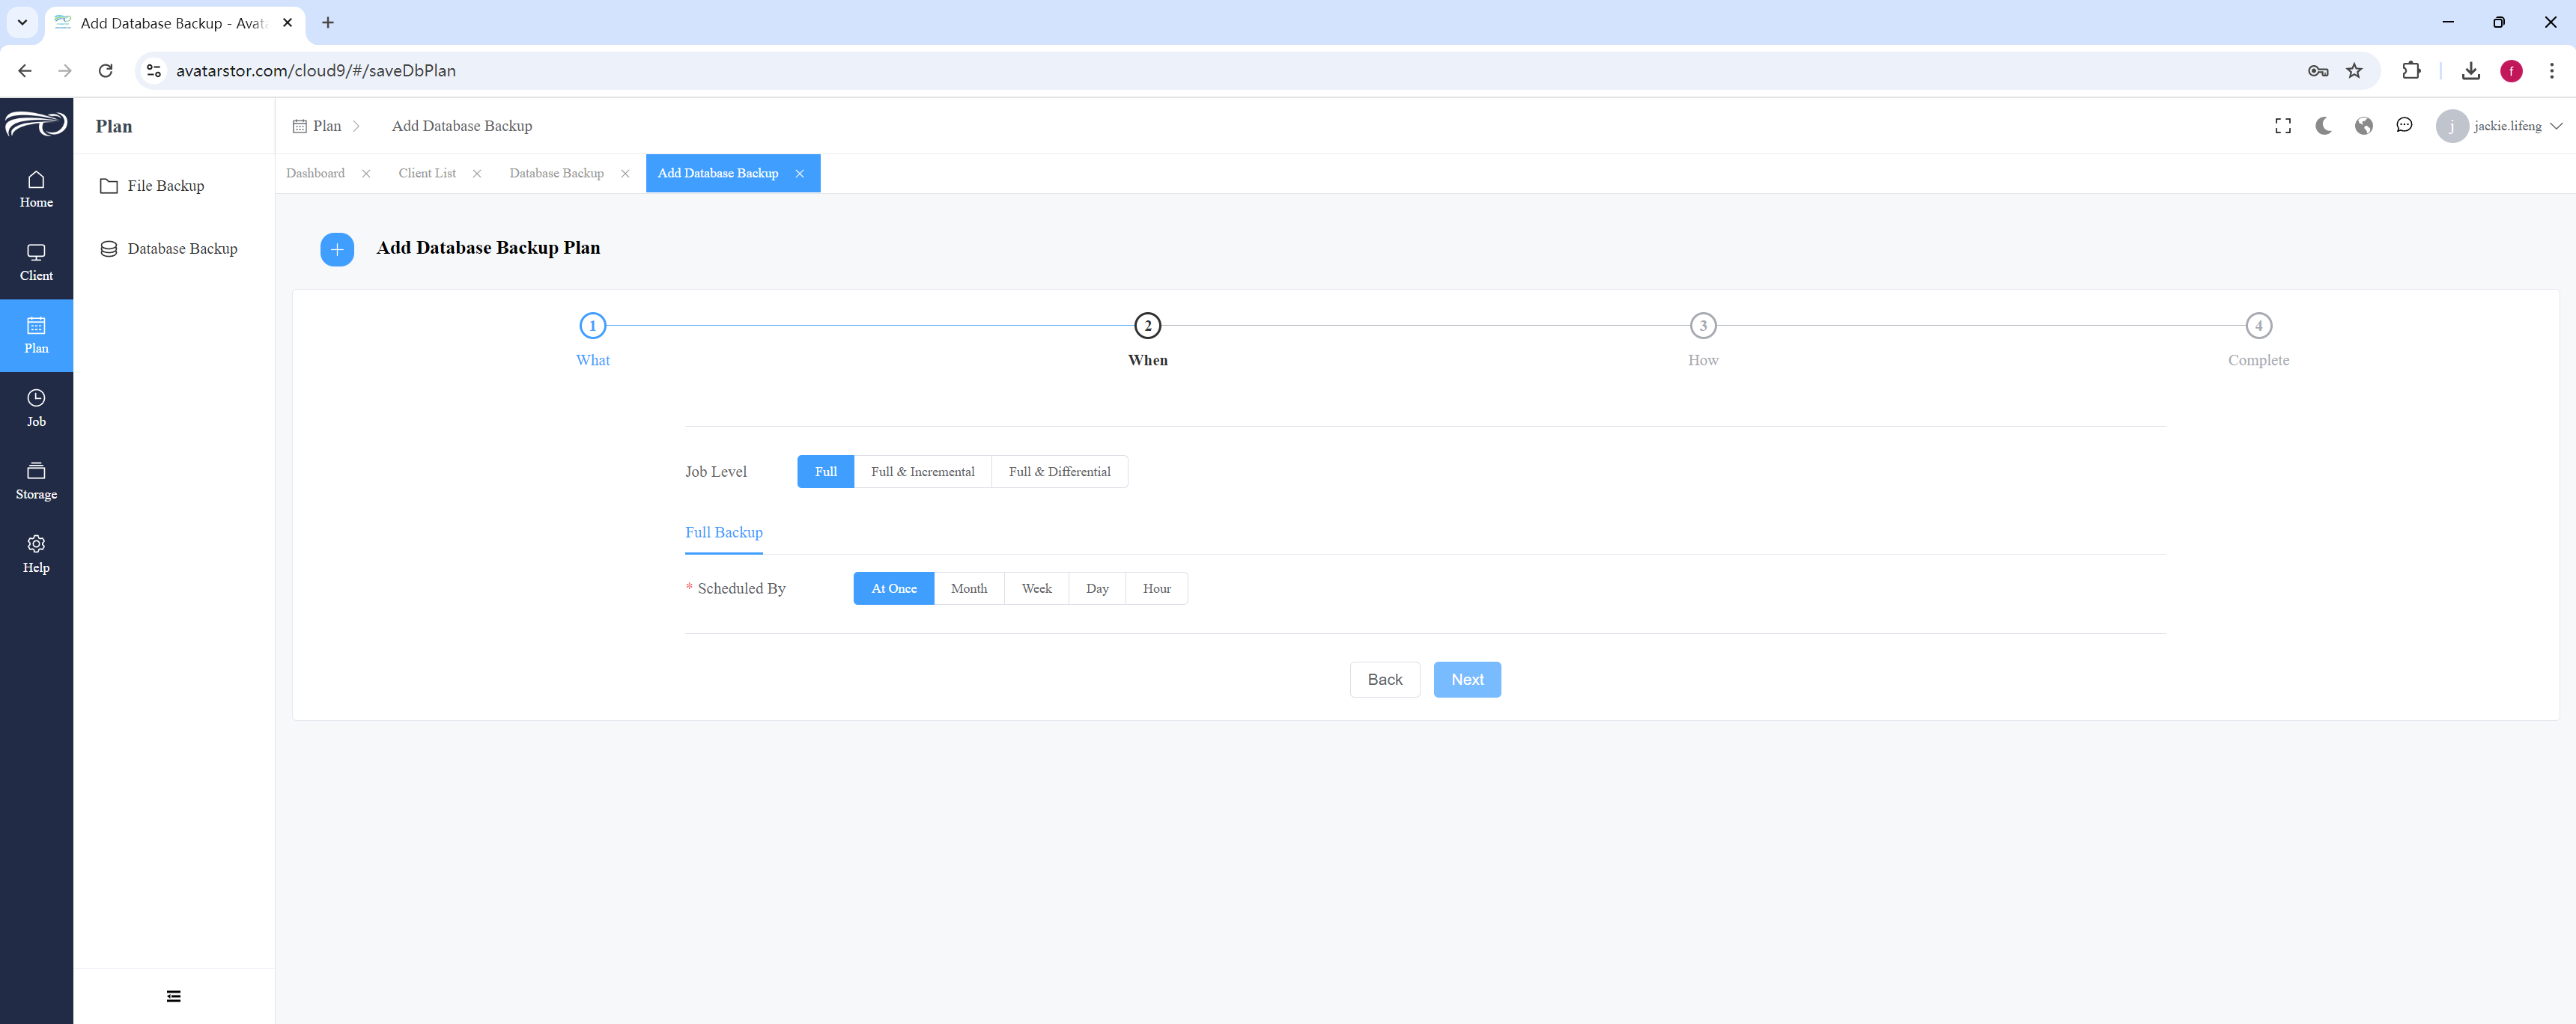
Step three,set advanced options:
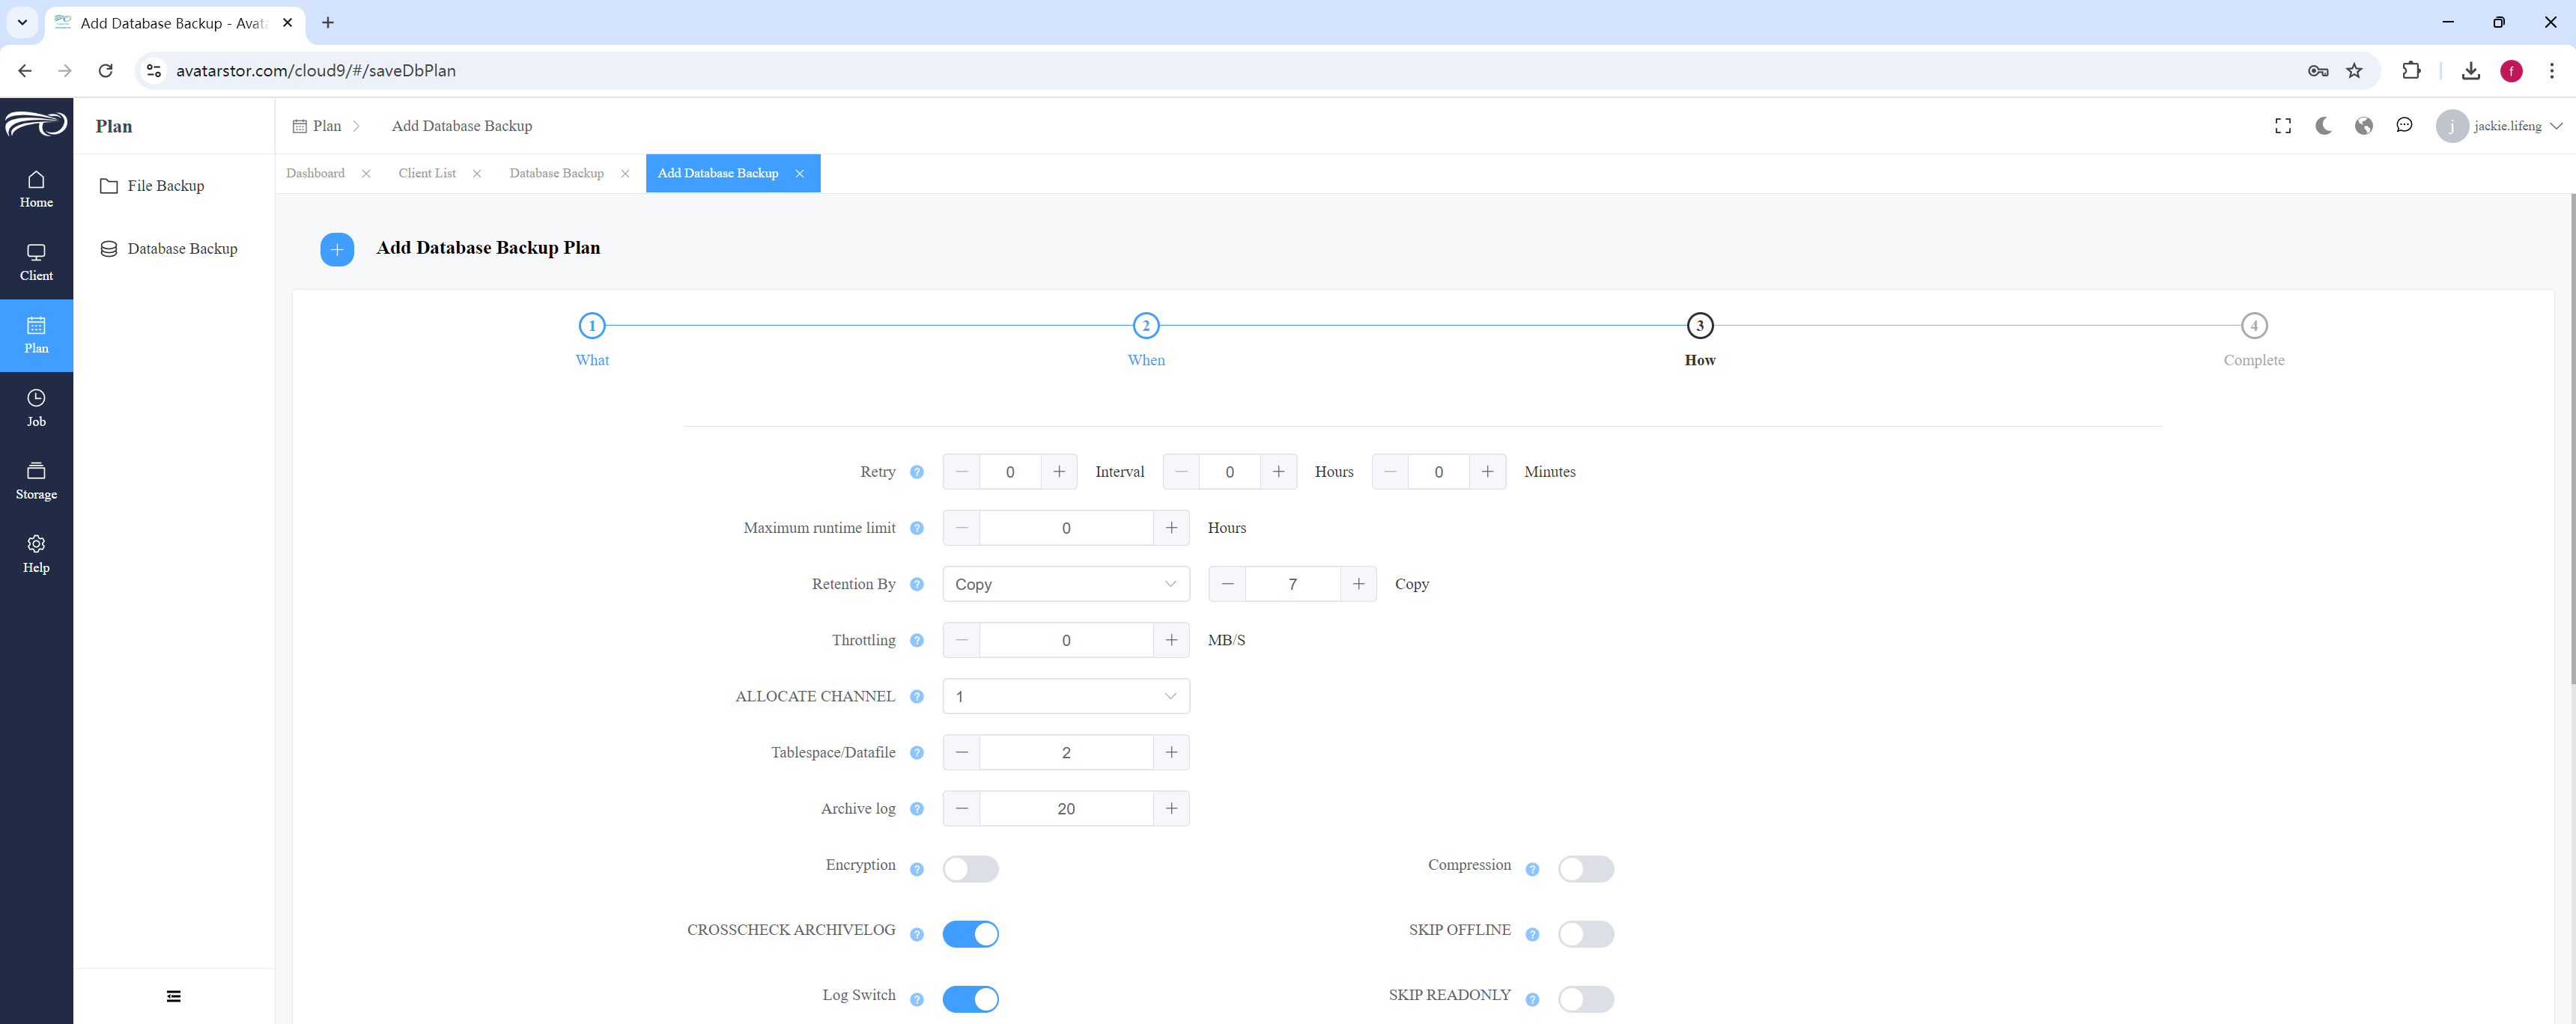
In addition to the standard advanced parameters, Oracle also has some specialized parameters:
ALLOCATE CHANNEL
This command assigns a specific channel (which represents a connection between RMAN and the database) for a backup or restore operation. Channels allow parallelism during backup or restore, meaning you can allocate multiple channels for better performance. Defaults 1,you can change to 2 or more.
Tablespace/Datafile
When you specify 2 tablespaces or datafiles, RMAN processes these files as backup pieces within a backup set. A single backup set can contain multiple tablespaces or datafiles.
Archive Log
When you specify 20 archive logs, RMAN processes these files as backup pieces within a backup set. A single backup set can contain multiple archive logs.
CROSSCHECK ARCHIVELOG
This command verifies that all archive logs listed in the RMAN repository exist in the specified location. It helps maintain consistency between the RMAN repository and the physical storage.
SKIP OFFLINE
When this option is specified, RMAN skips any datafiles or tablespaces that are offline, meaning they are not currently accessible for backup.
Log Switch
A log switch forces the database to stop writing to the current redo log and switch to the next one. This action is important for making sure that all changes are archived before a backup.
SKIP READONLY
This option tells RMAN to skip backing up read-only tablespaces. Since these tablespaces don’t change, backing them up every time is unnecessary unless their status changes.
SKIP UNREADABLE
Instructs RMAN to skip any files that it cannot read during the backup process. It can be used when you want to skip corrupted files during a backup operation.
Generate Script
This will regenerate the script each time it runs. If you need to customize the script, you should disable this option.
Compress
This option enables RMAN to compress backups, saving disk space but potentially using more CPU resources. It's useful for optimizing storage without losing backup data.
Delete backed-up archive logs
After successfully backing up archive logs, this command deletes the backed-up logs to free up storage space. This ensures that you don’t run out of space due to accumulated logs.
Please refer to Chapter 4, Section 6, Advanced options for backup plans and Section 5, before and after scripts to check.
Click [Submit] to save the policy in the last step.
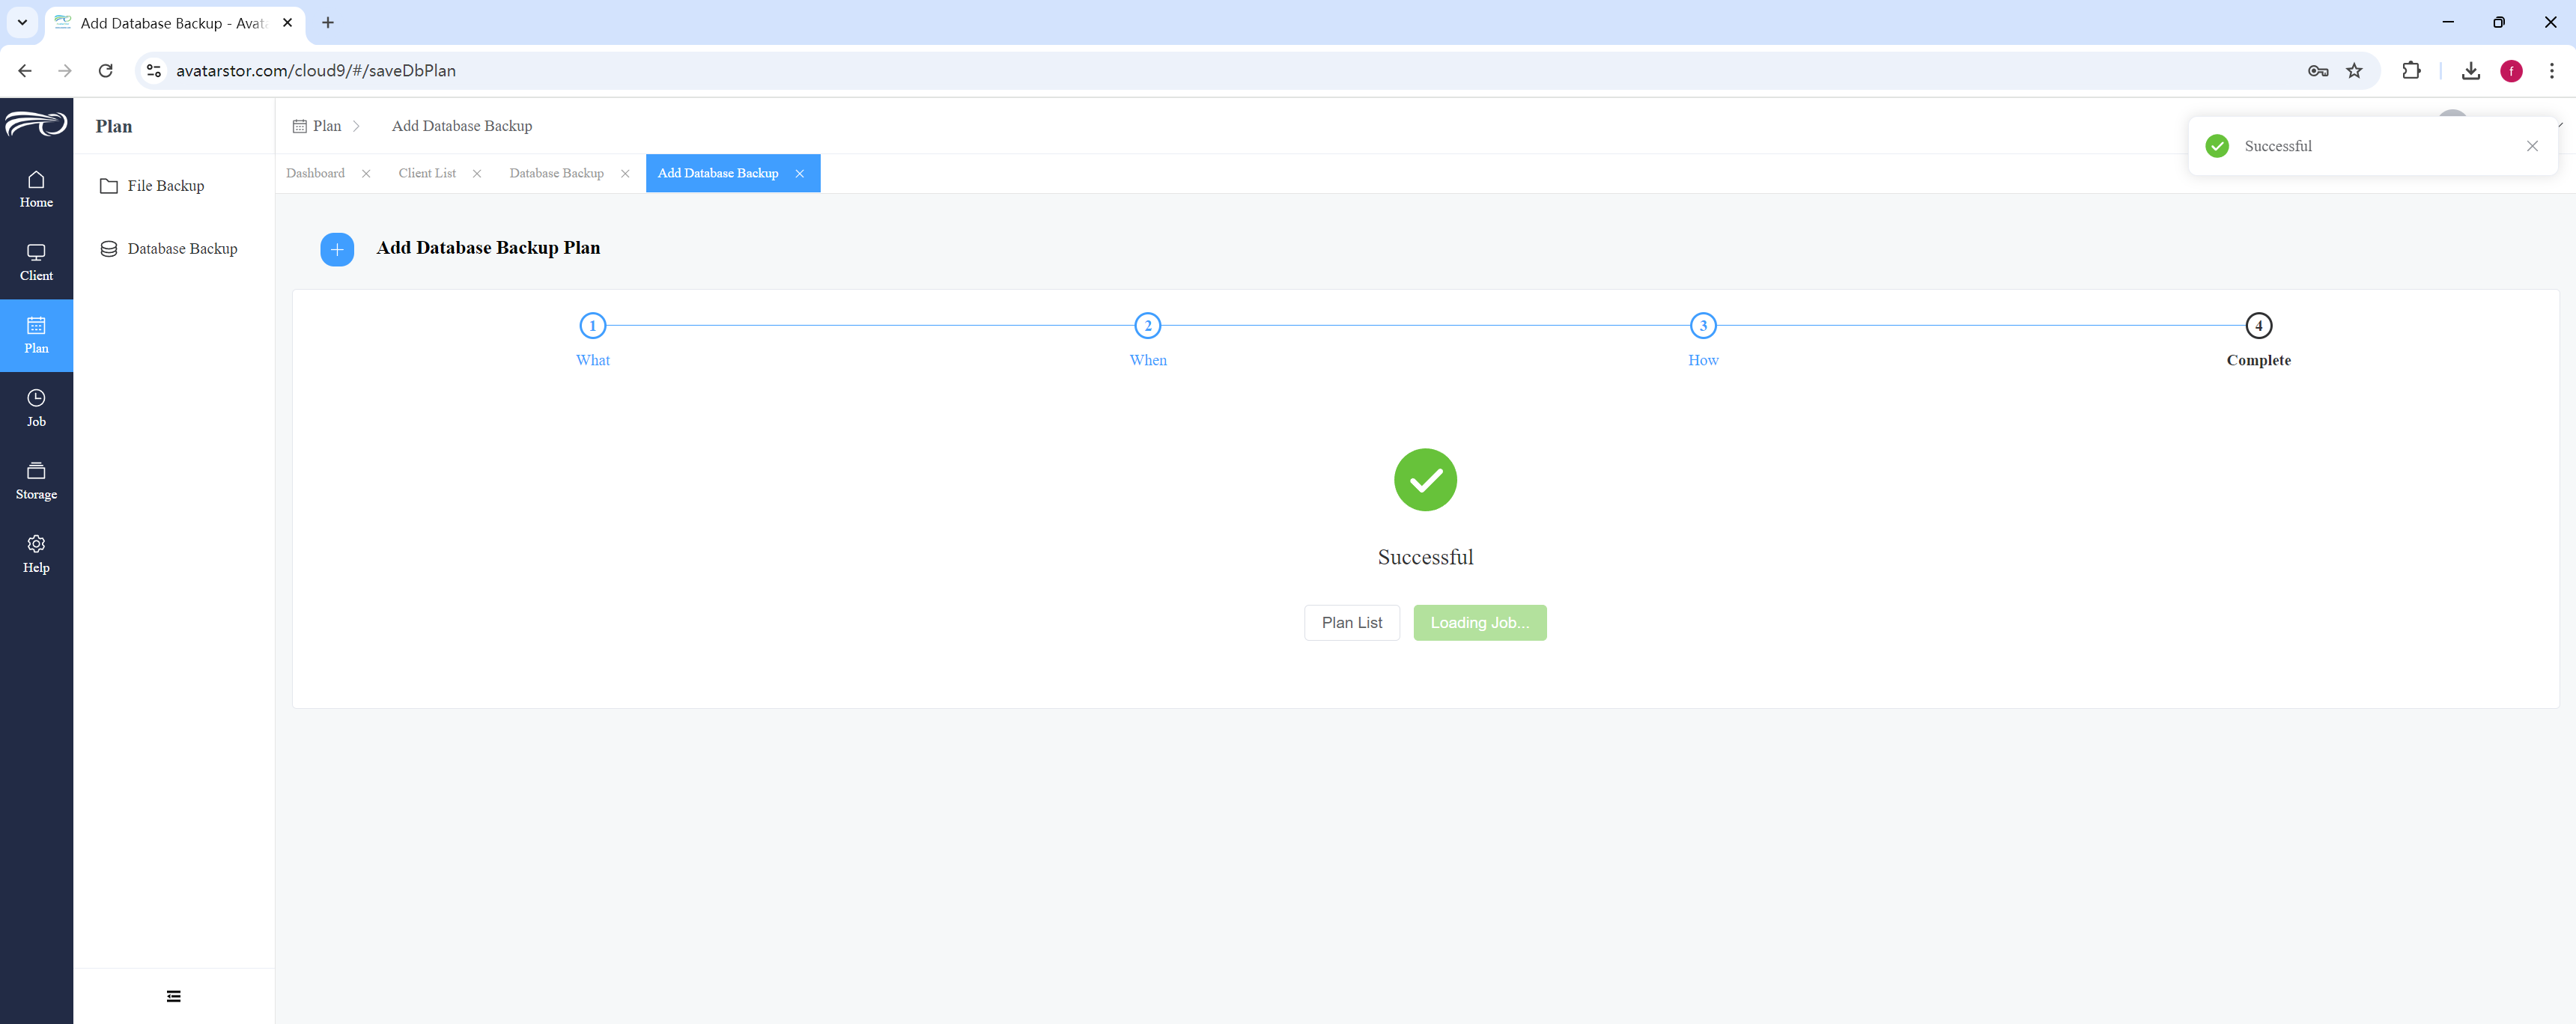
You can then refer to Chapter 4, Section 4, Manual Trigger of Backup Plan to run the plan manually. You can also wait for the scheduled automatic trigger of the plan.
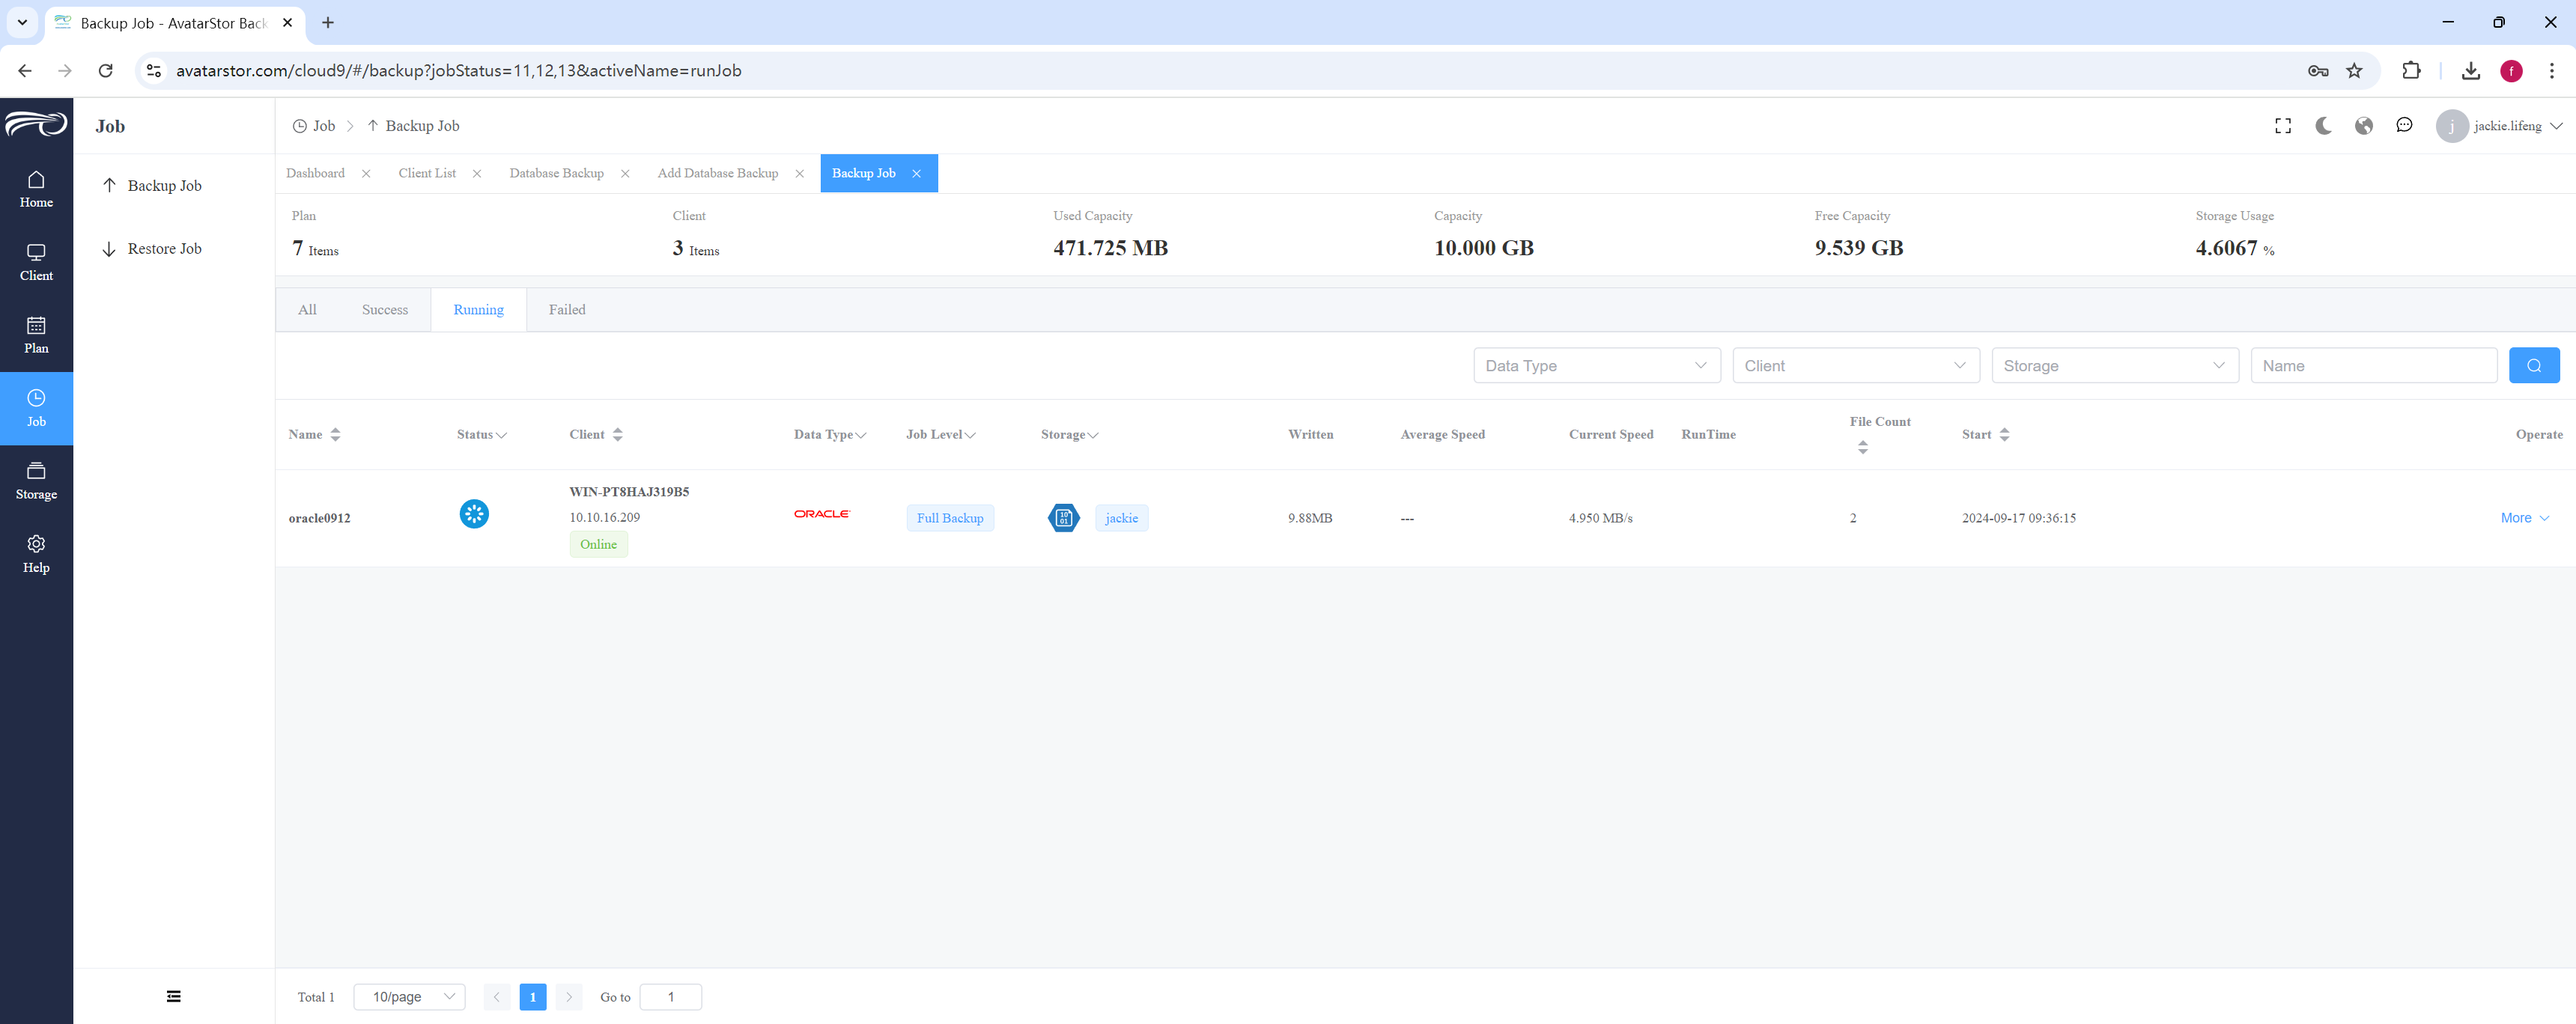
4.13.2 Oracle Restore
Launch a restore wizard and give the restore job a name:
|
The target instance for Oracle recovery must have the same instance name as the original backup instance. |
To switch oracle to nomount states:
|
PowerShell |
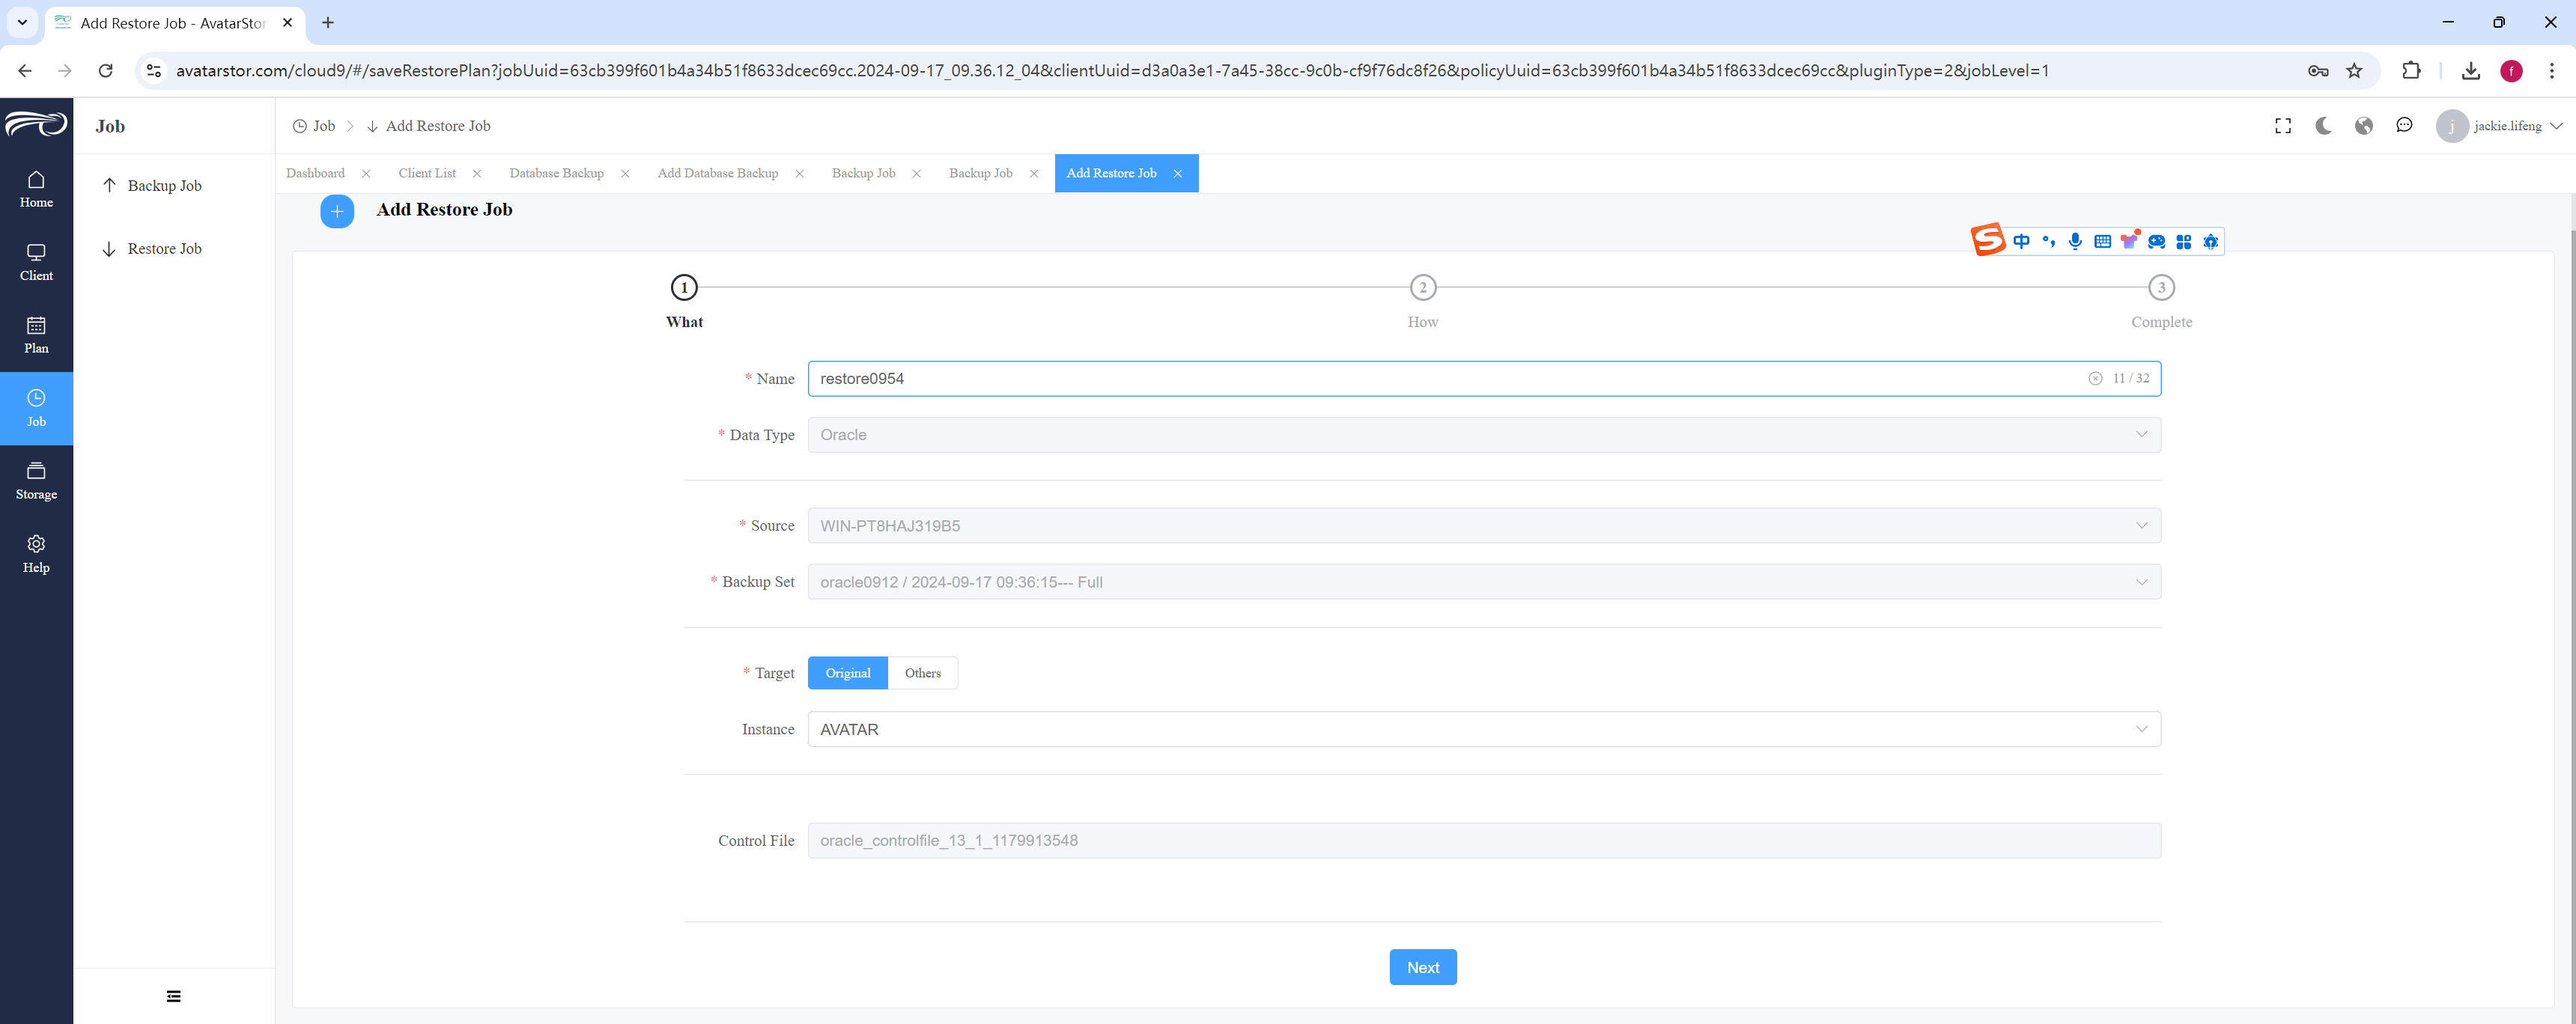
Select local restore or remote restore , select the target instance to be restored, and expand the content to be restored,click [Next]:
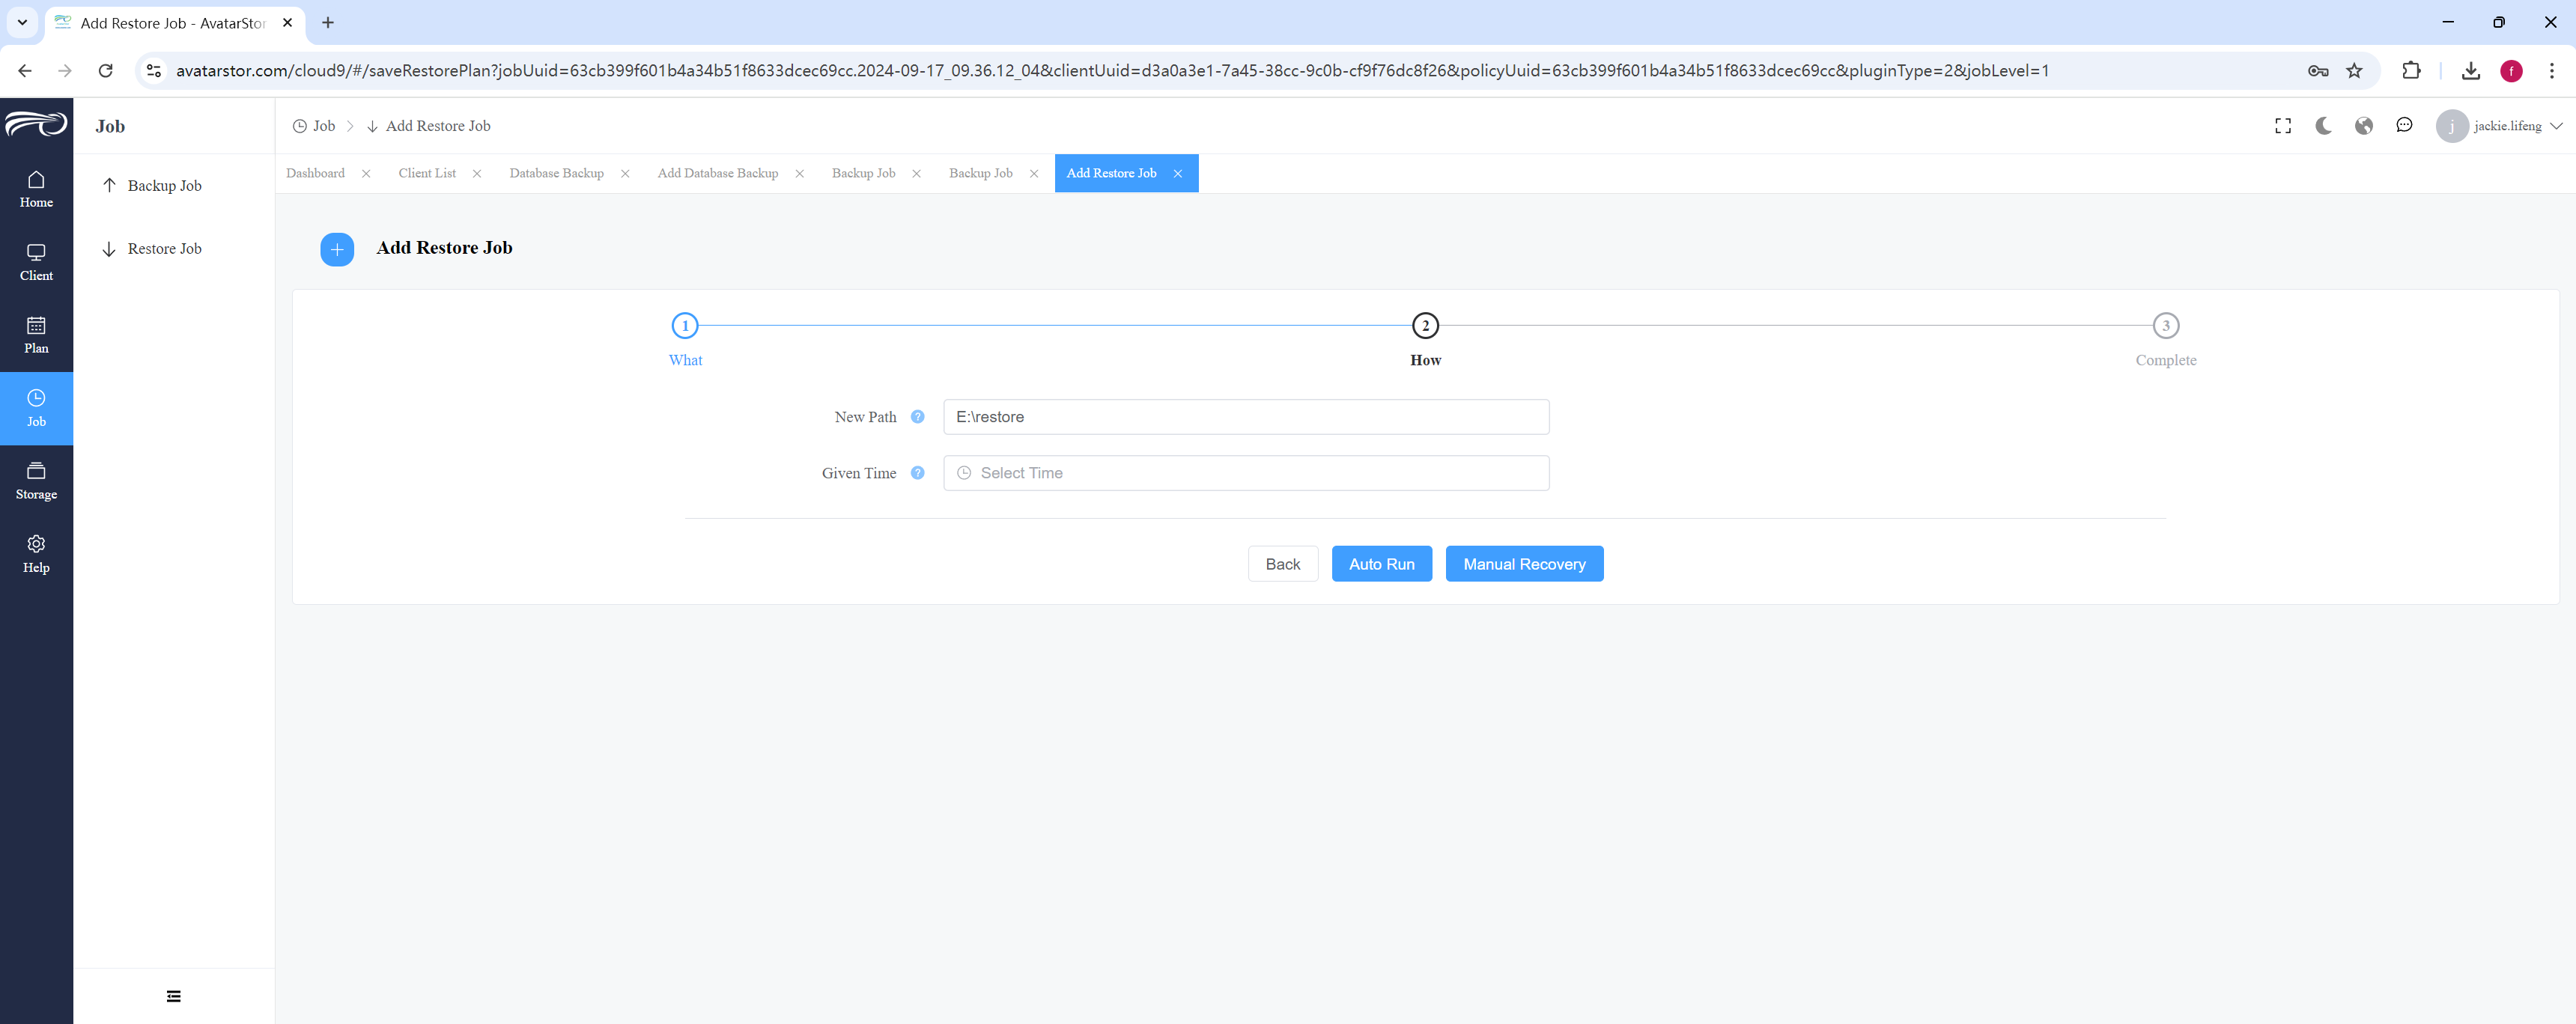
Select the target path for the restore; optionally, you can restore to a specific point in time.
|
Note that the specified point in time must fall between the end of the last full backup and the end of the current incremental backup. |
|
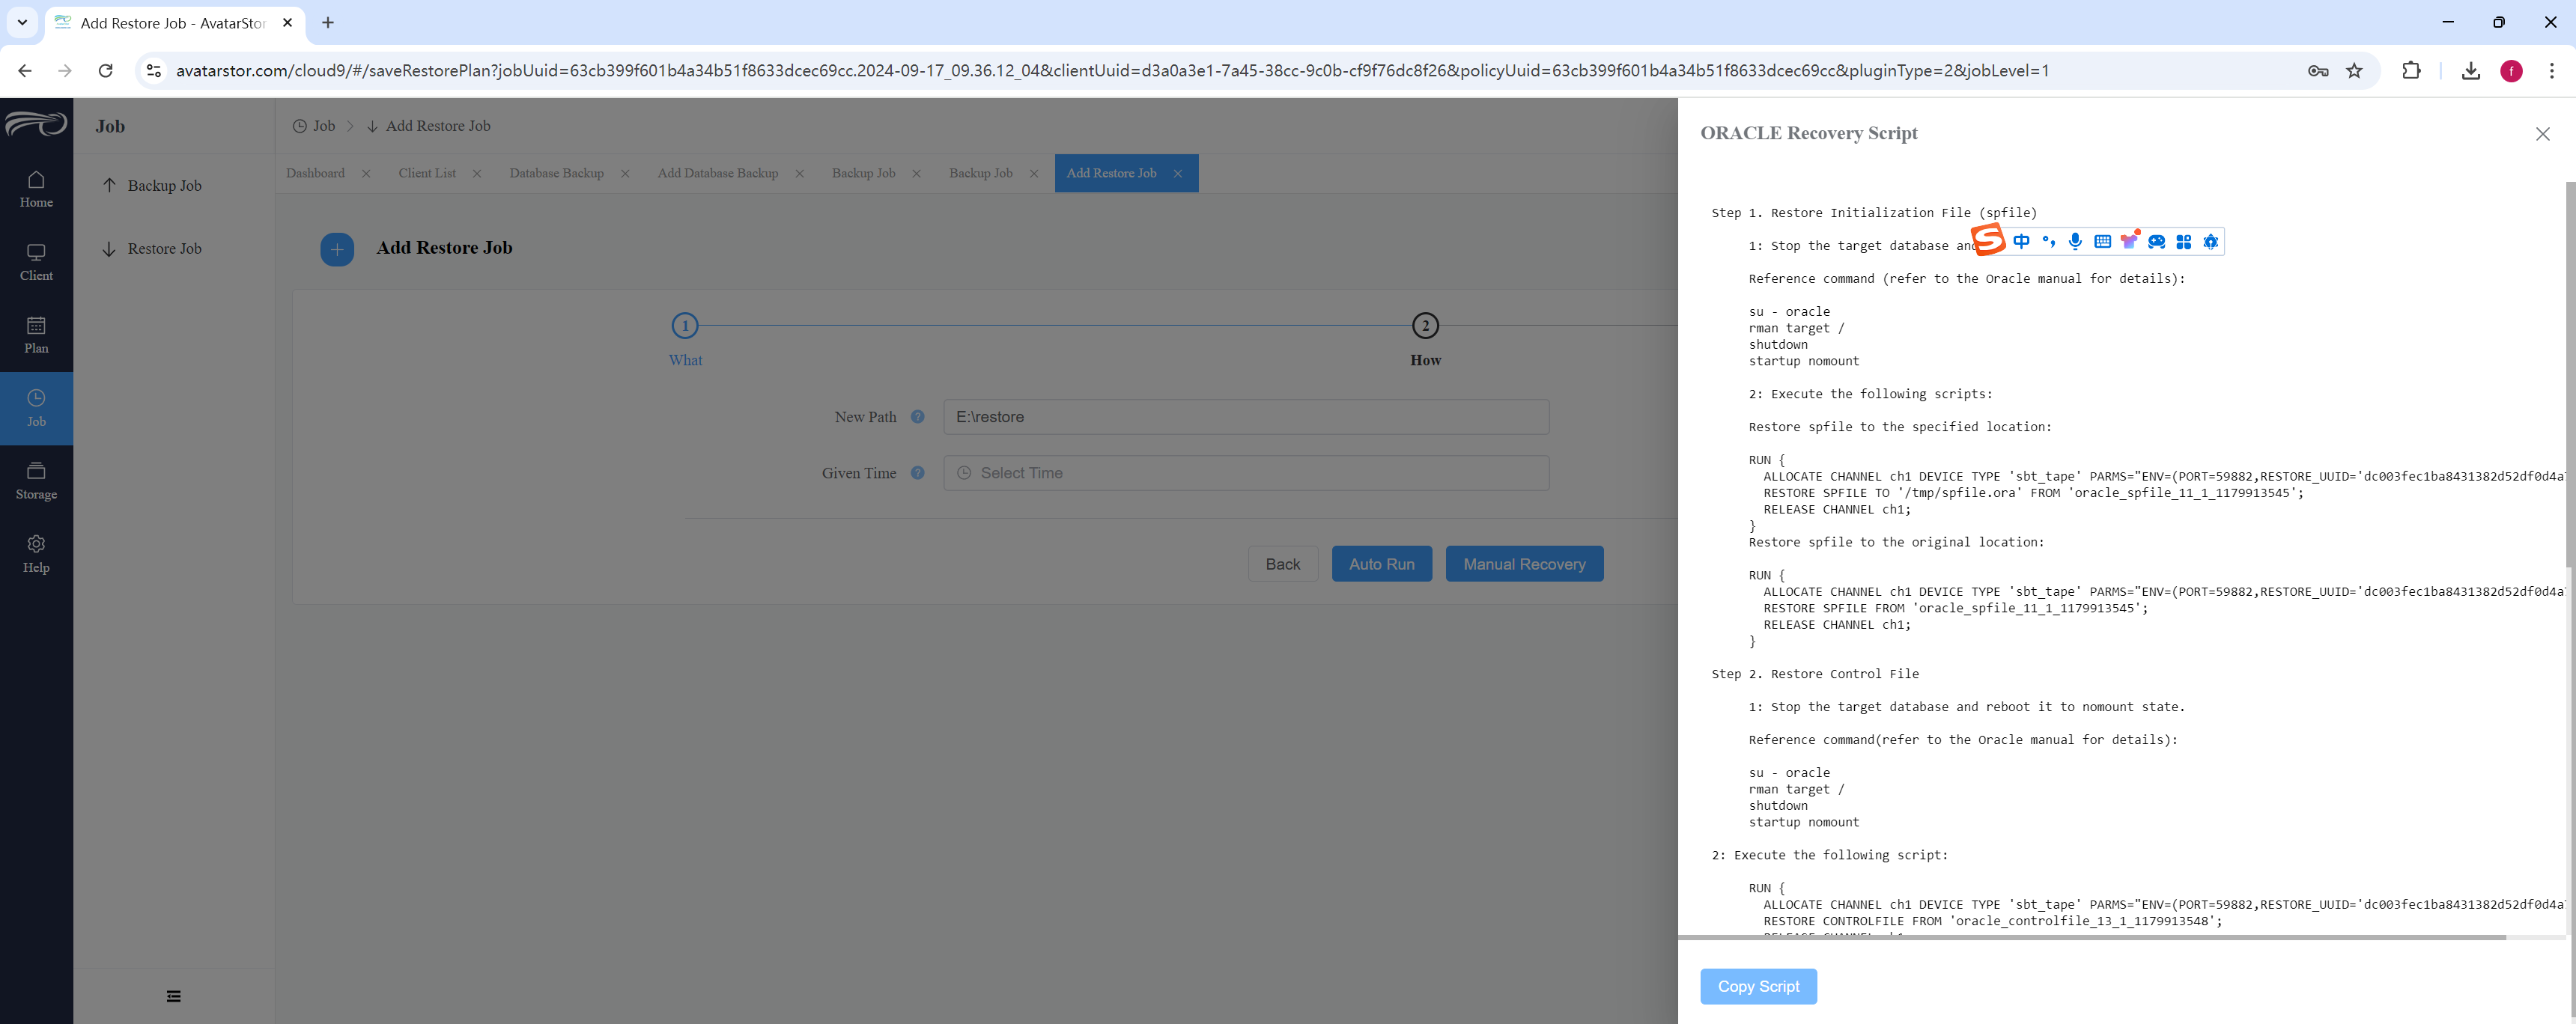
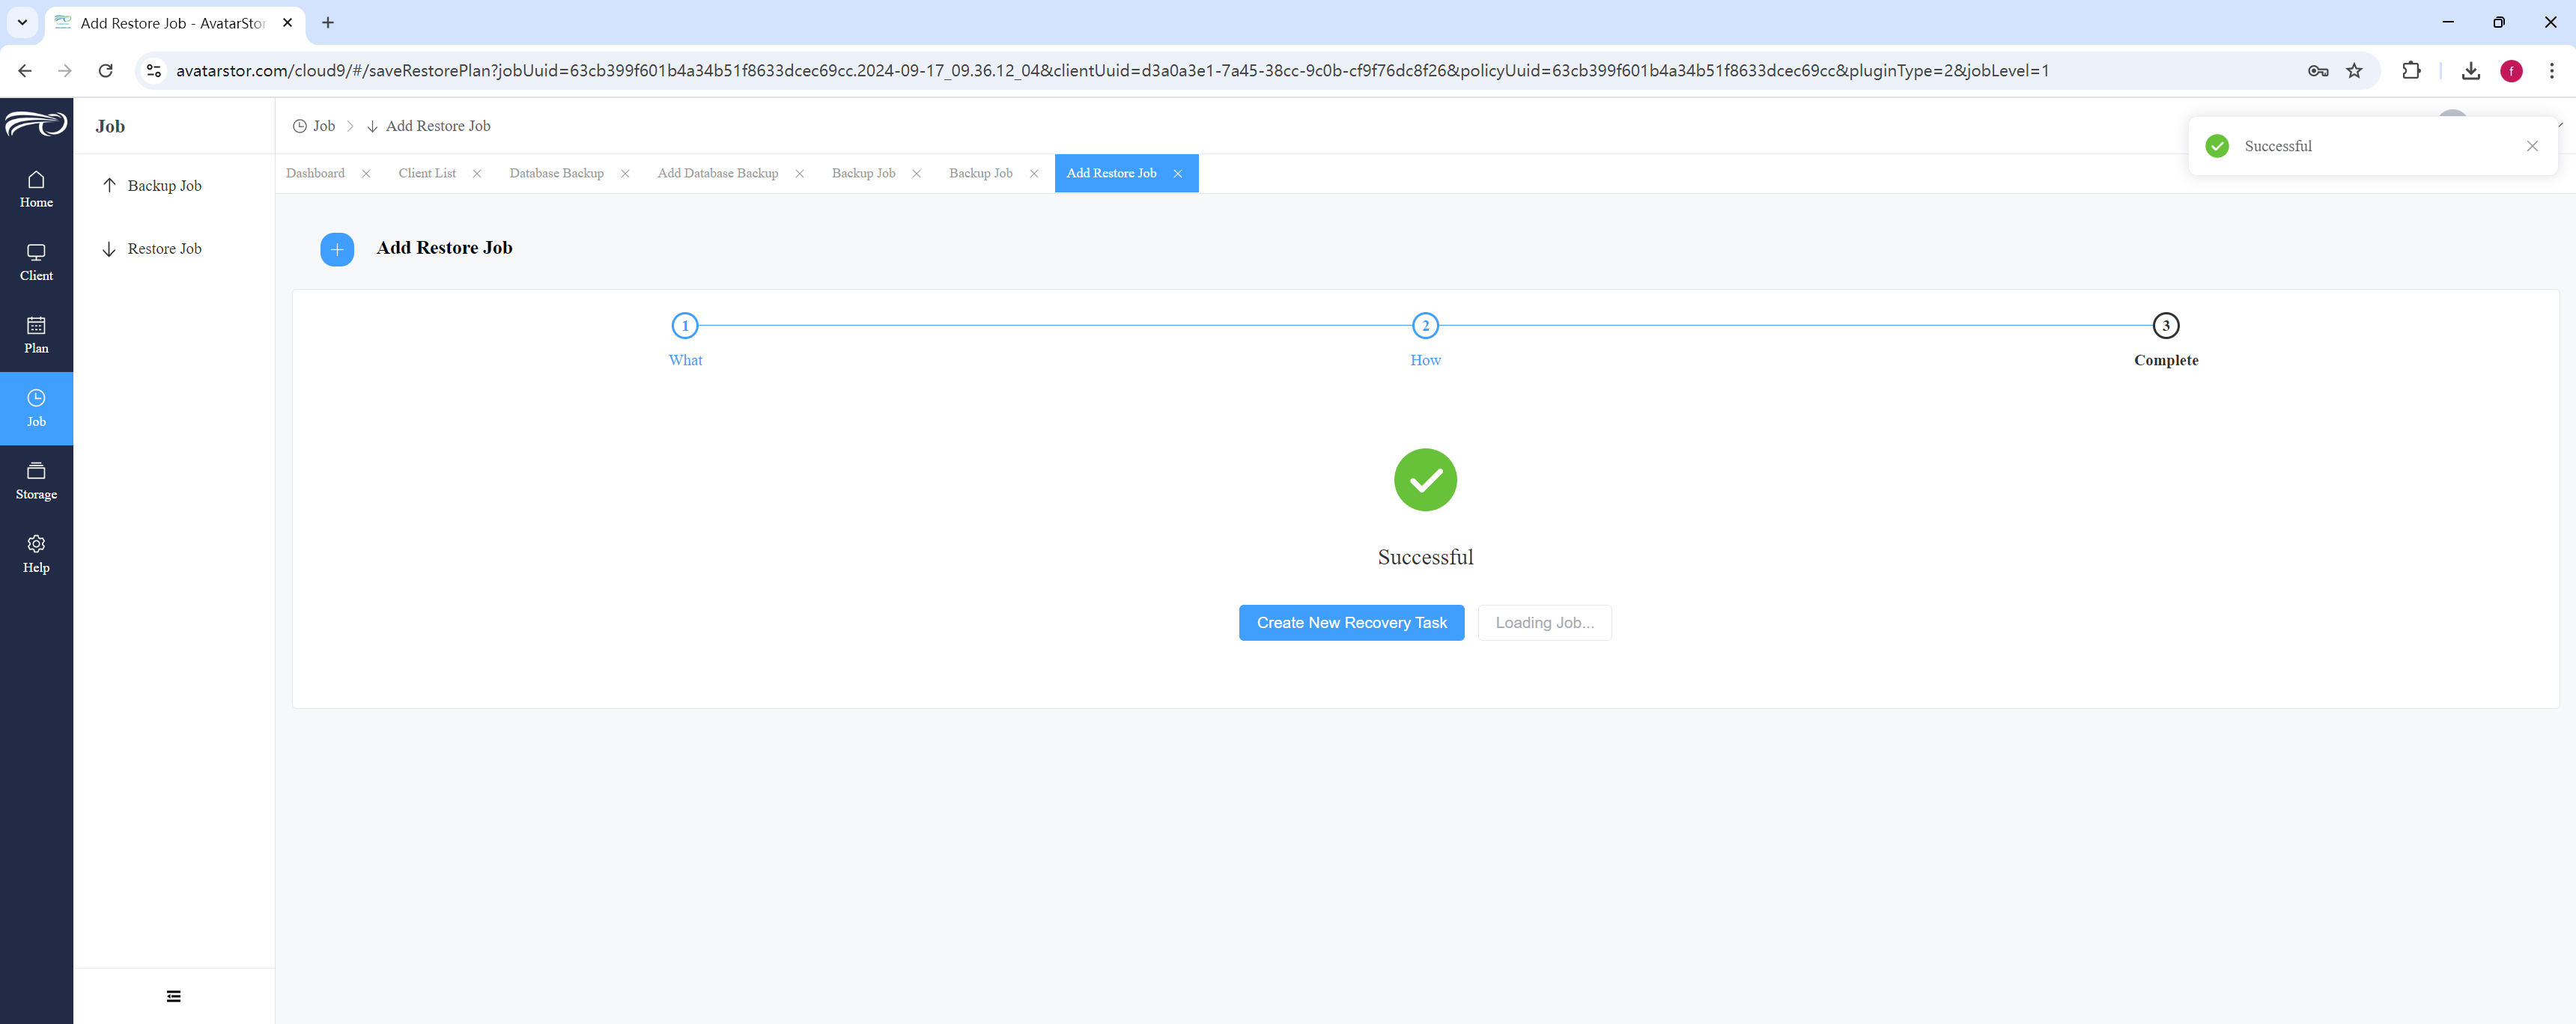
Auto run will automatically execute the RMAN recovery process for you, provided your target instance is in the startup nomount state. Manual mode, on the other hand, will generate all the recovery scripts for you, which you can execute manually via RMAN. |
|
SQL |
4.14 Other plugins
Currently We are planning Postgresql, MongoDB, Redis, Vmware, HyperV, Docker, Object Storage (S3 compatible), etc. Coming soon.
5. Data Management and Space Recovery
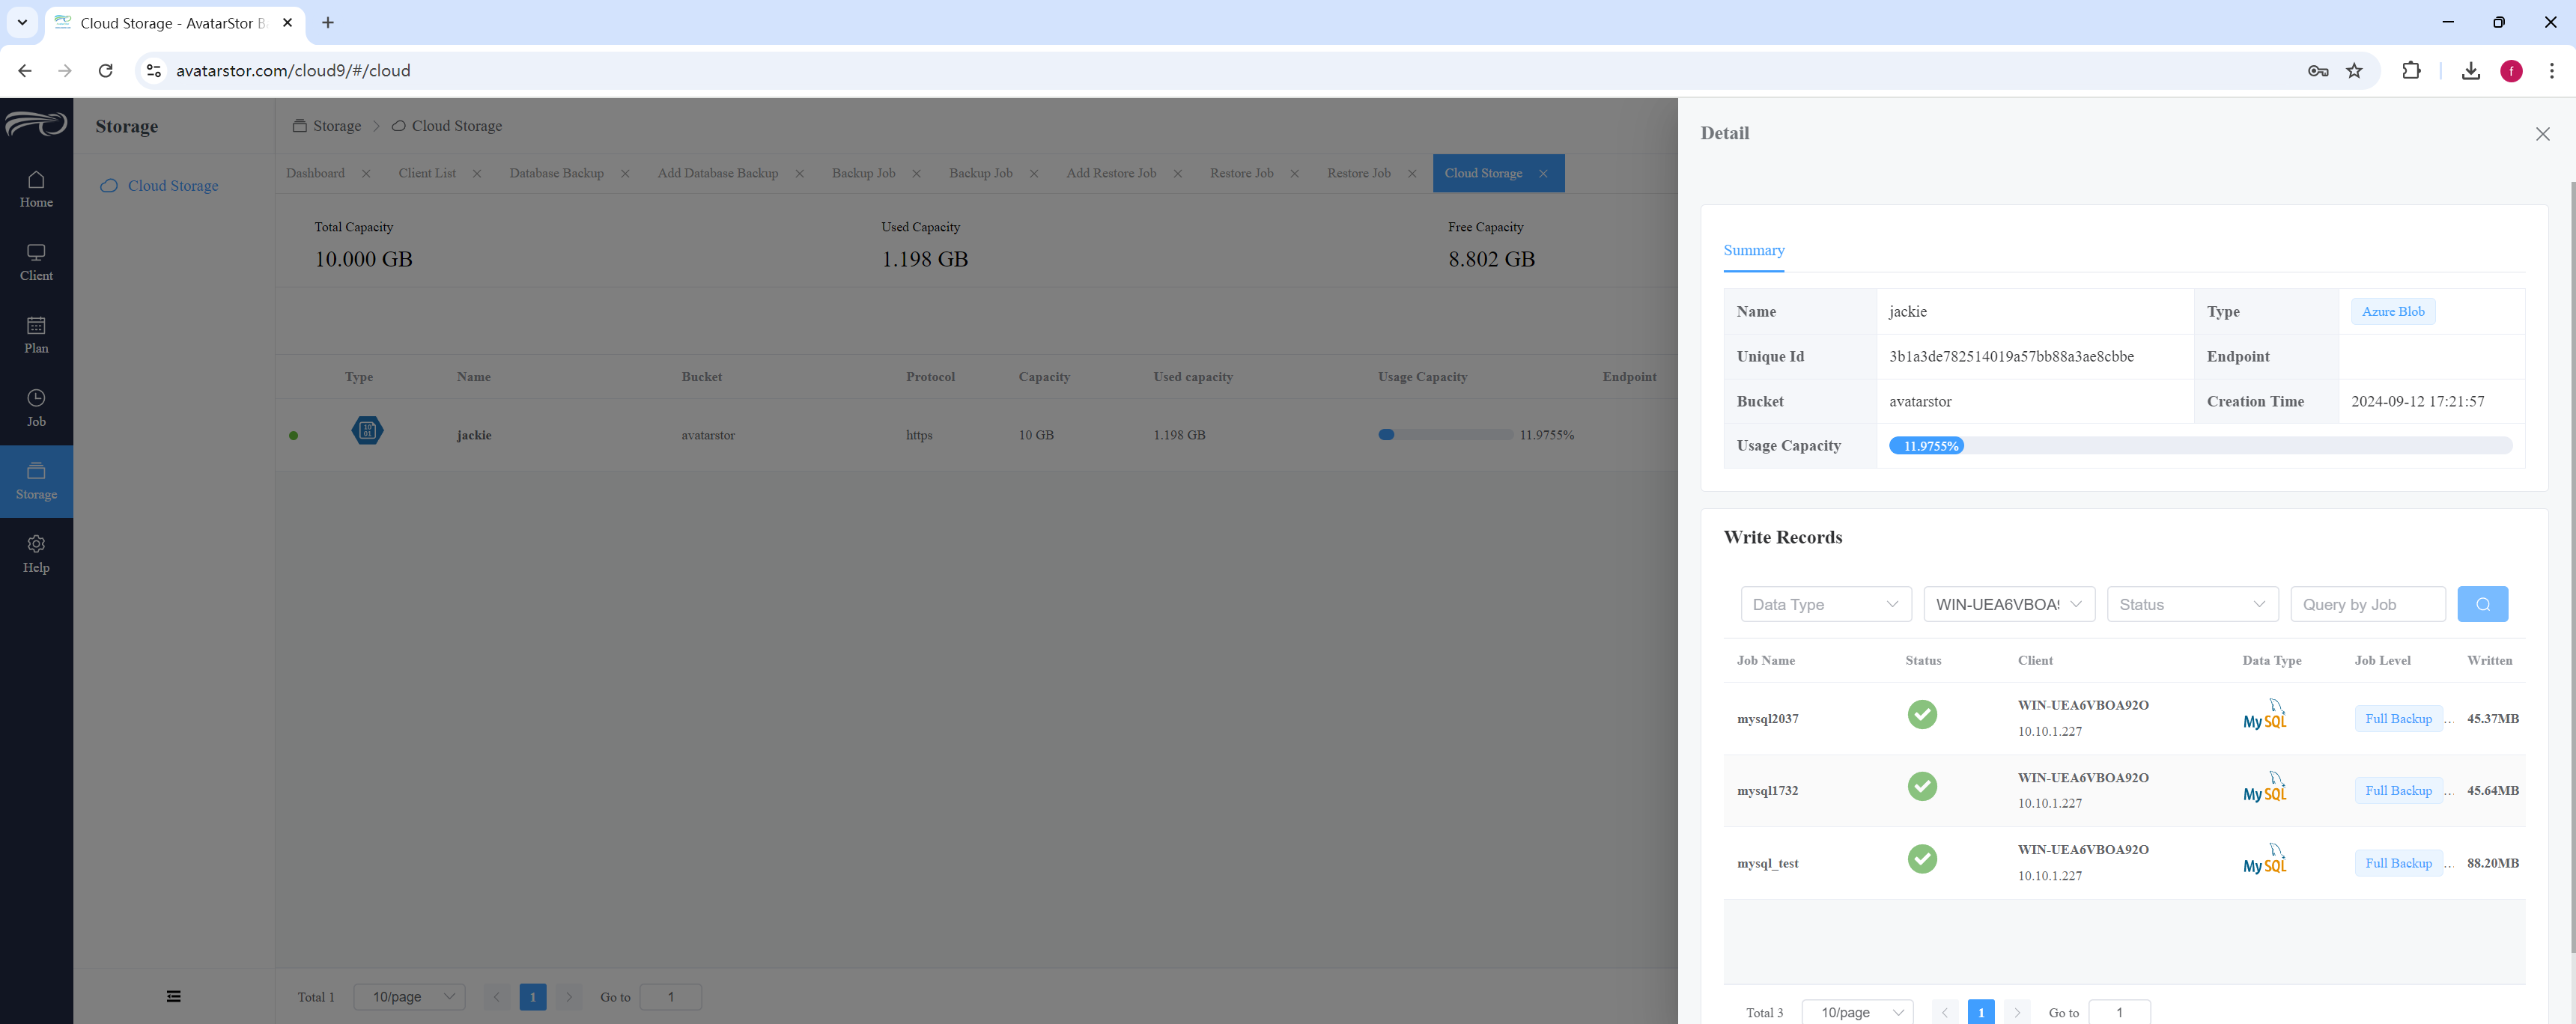
From the left navigation bar, go to [Storage] - [Cloud Storage]. On the far right, you can view, delete, edit, and recycle the storage resources created during the policy creation process.
5.1 View Storage
View the storage UUID, bucket name, and related backup tasks.
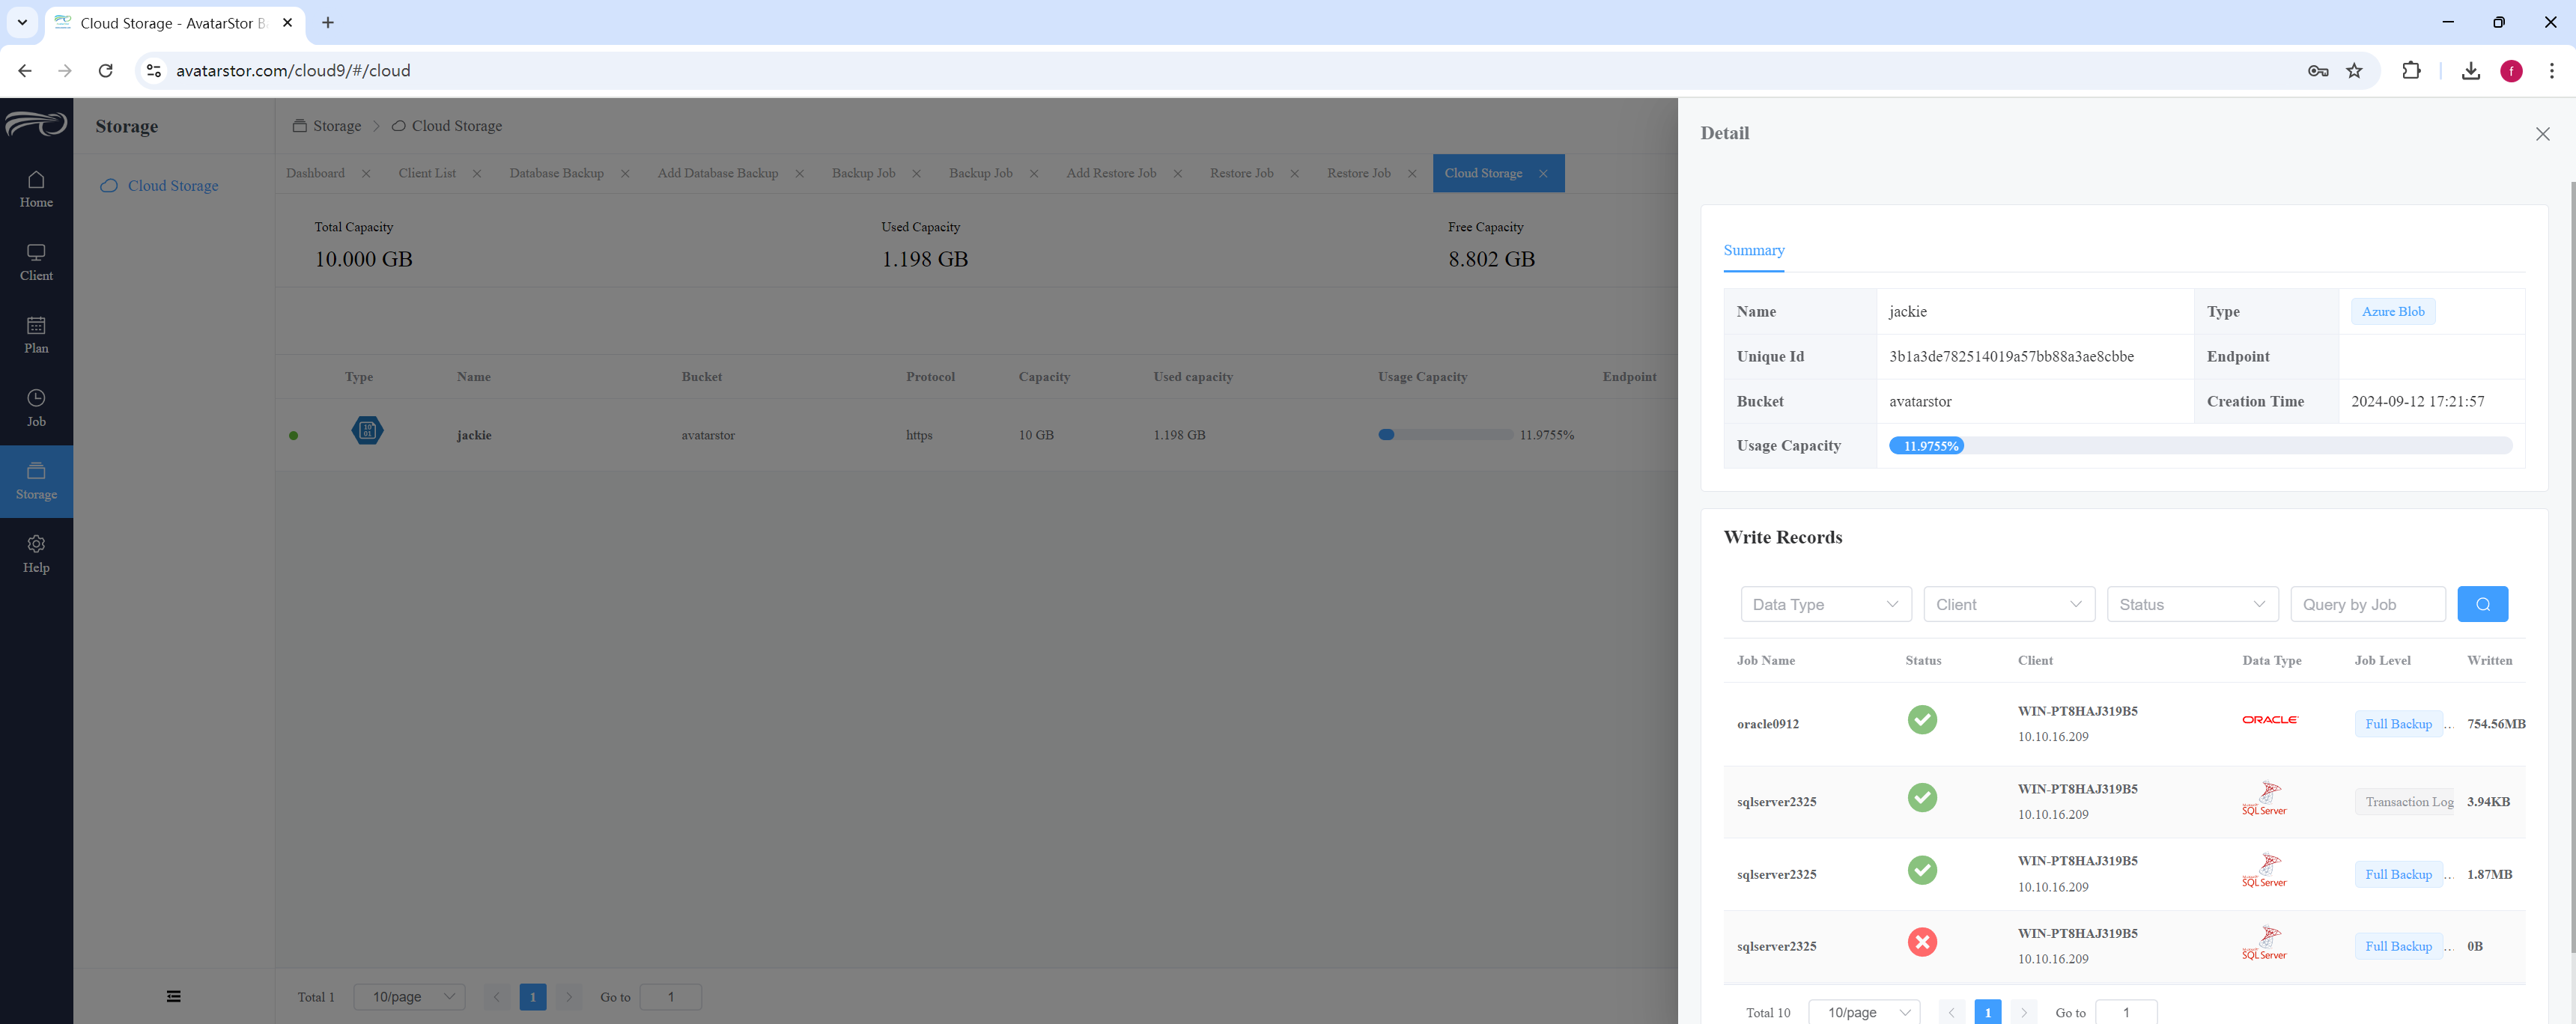
Filter tasks by client:
5.2 Delete,edit,and recycle storage
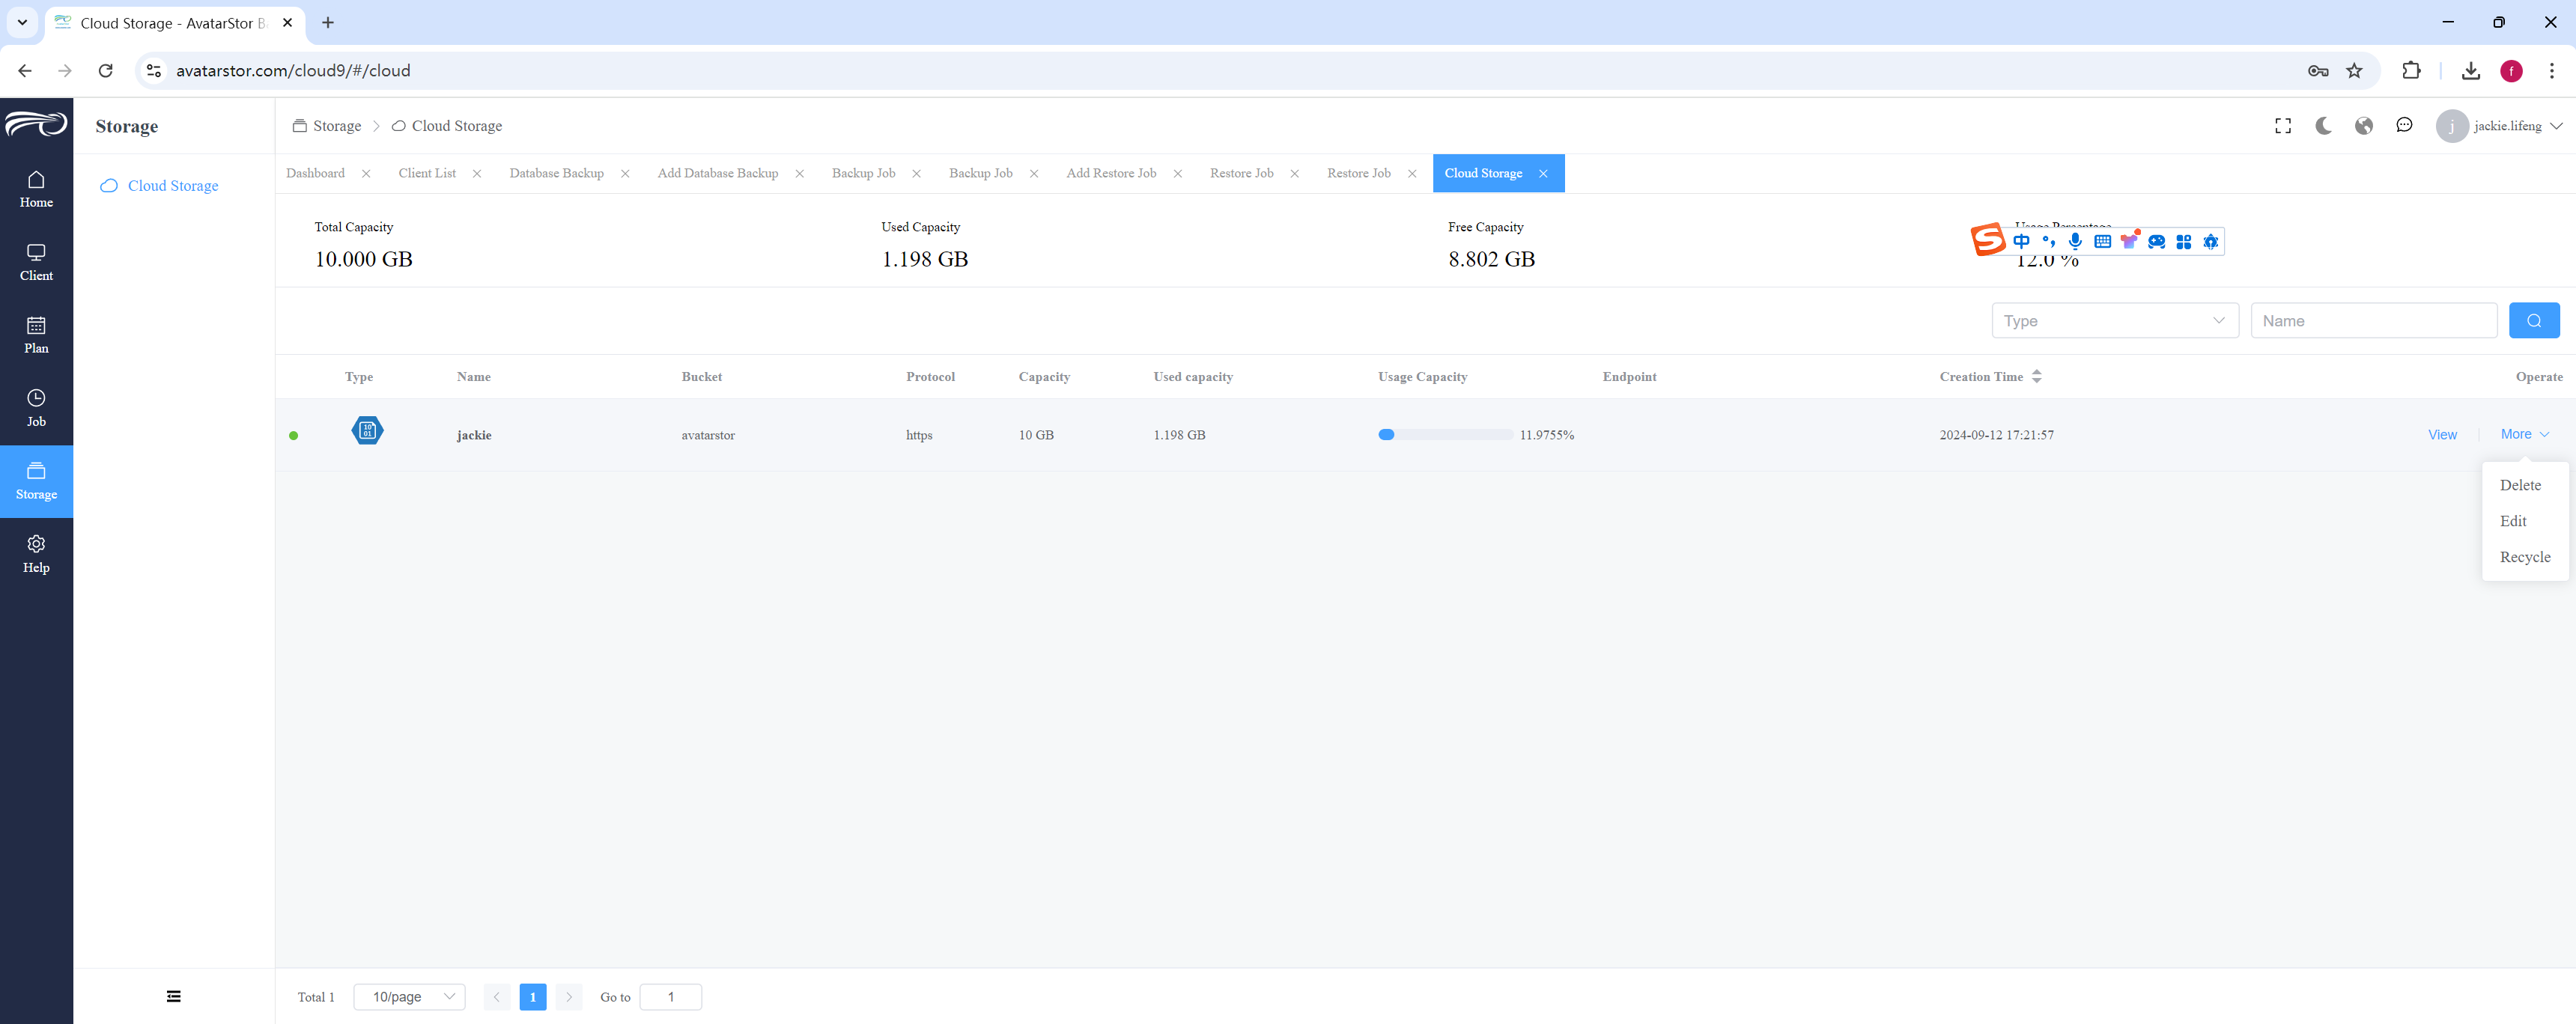
On the far right,go to [more],you can [delete],[edit] and [recycle]:
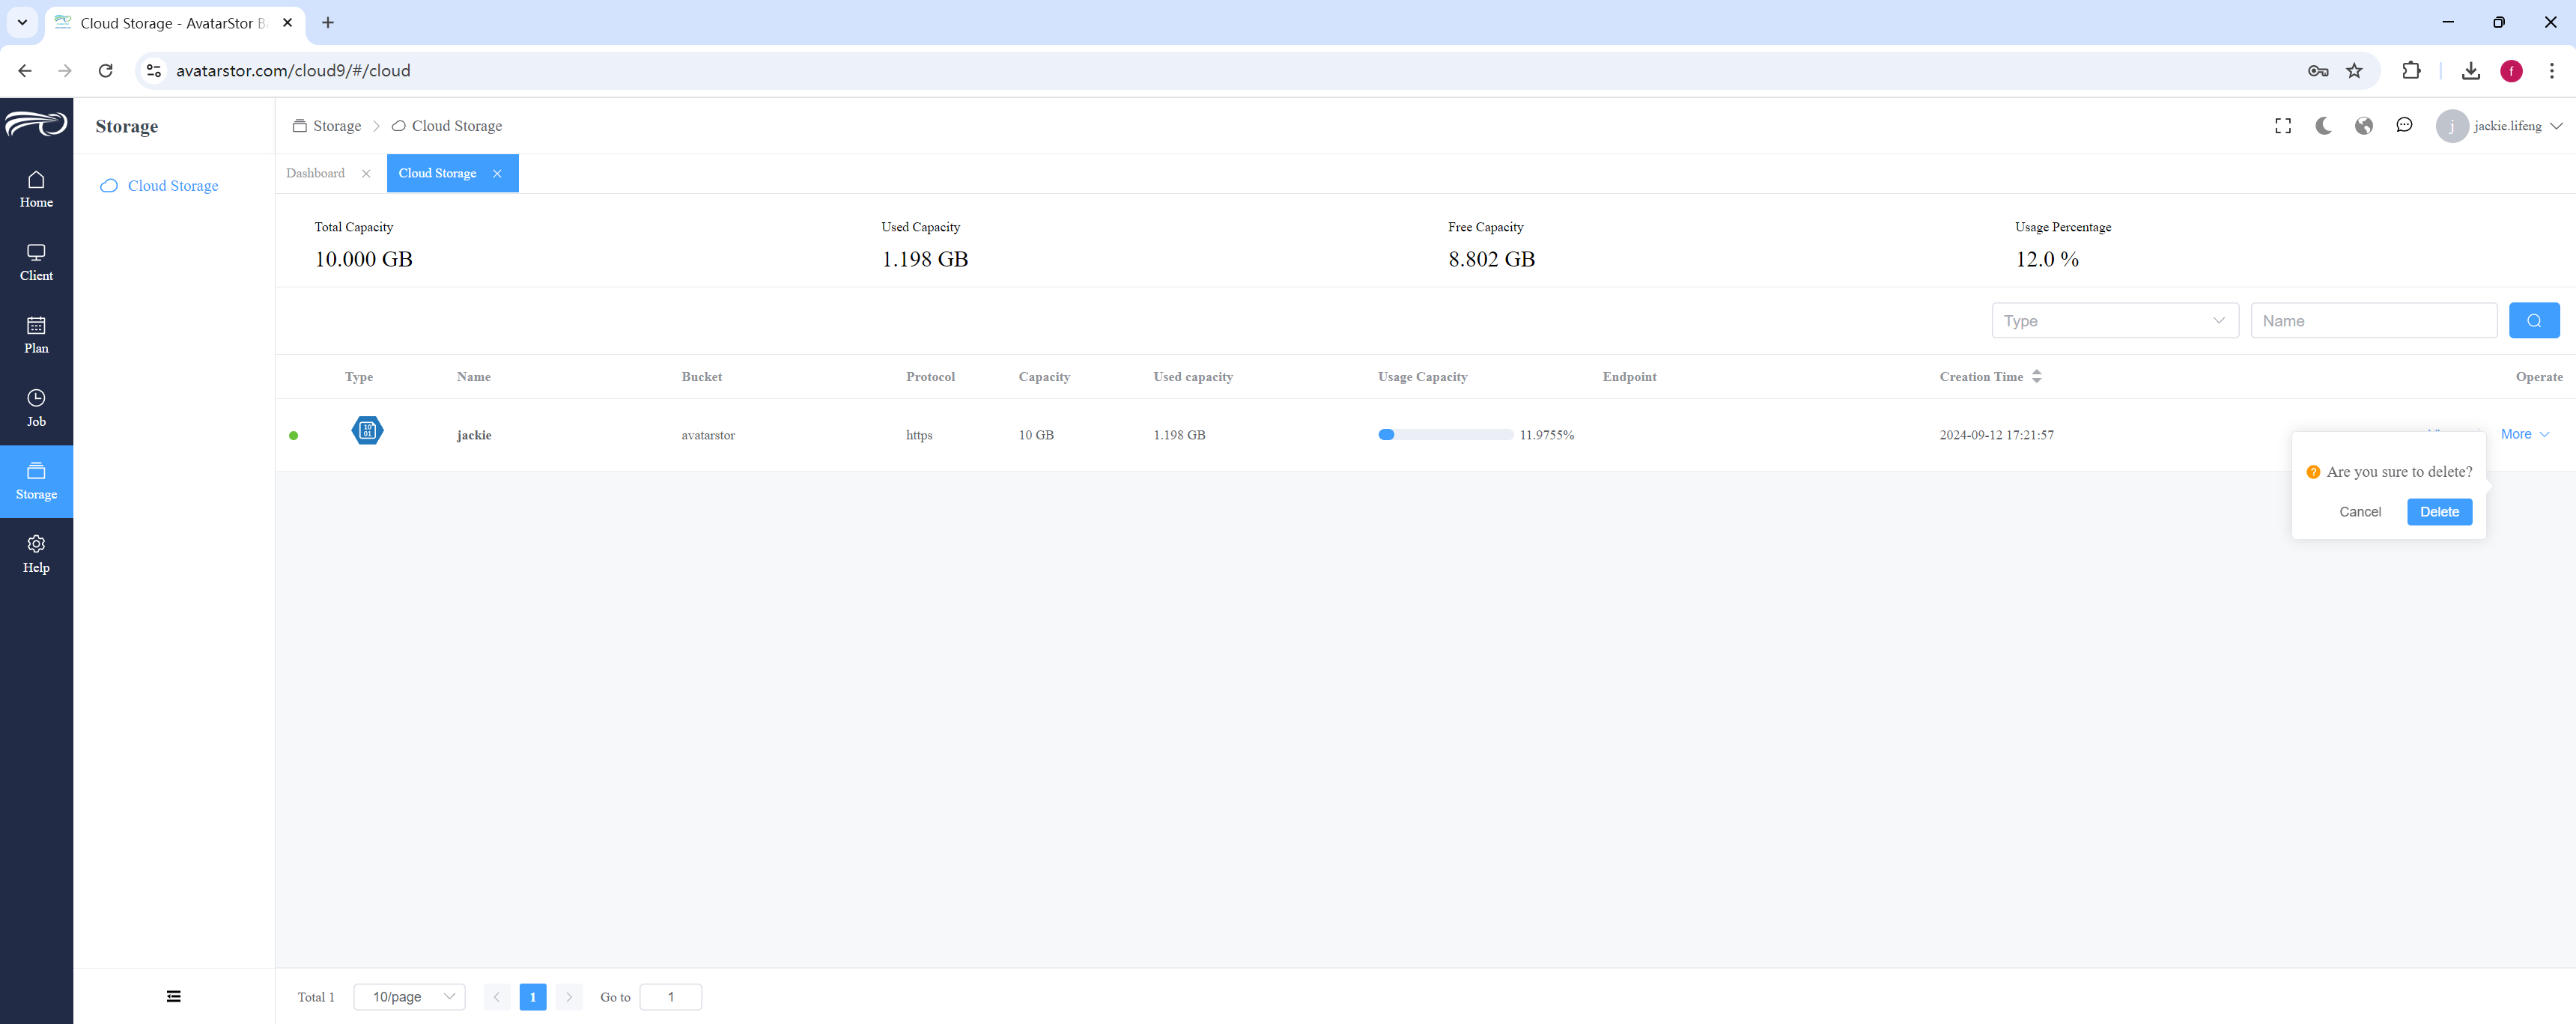
Delete:
|
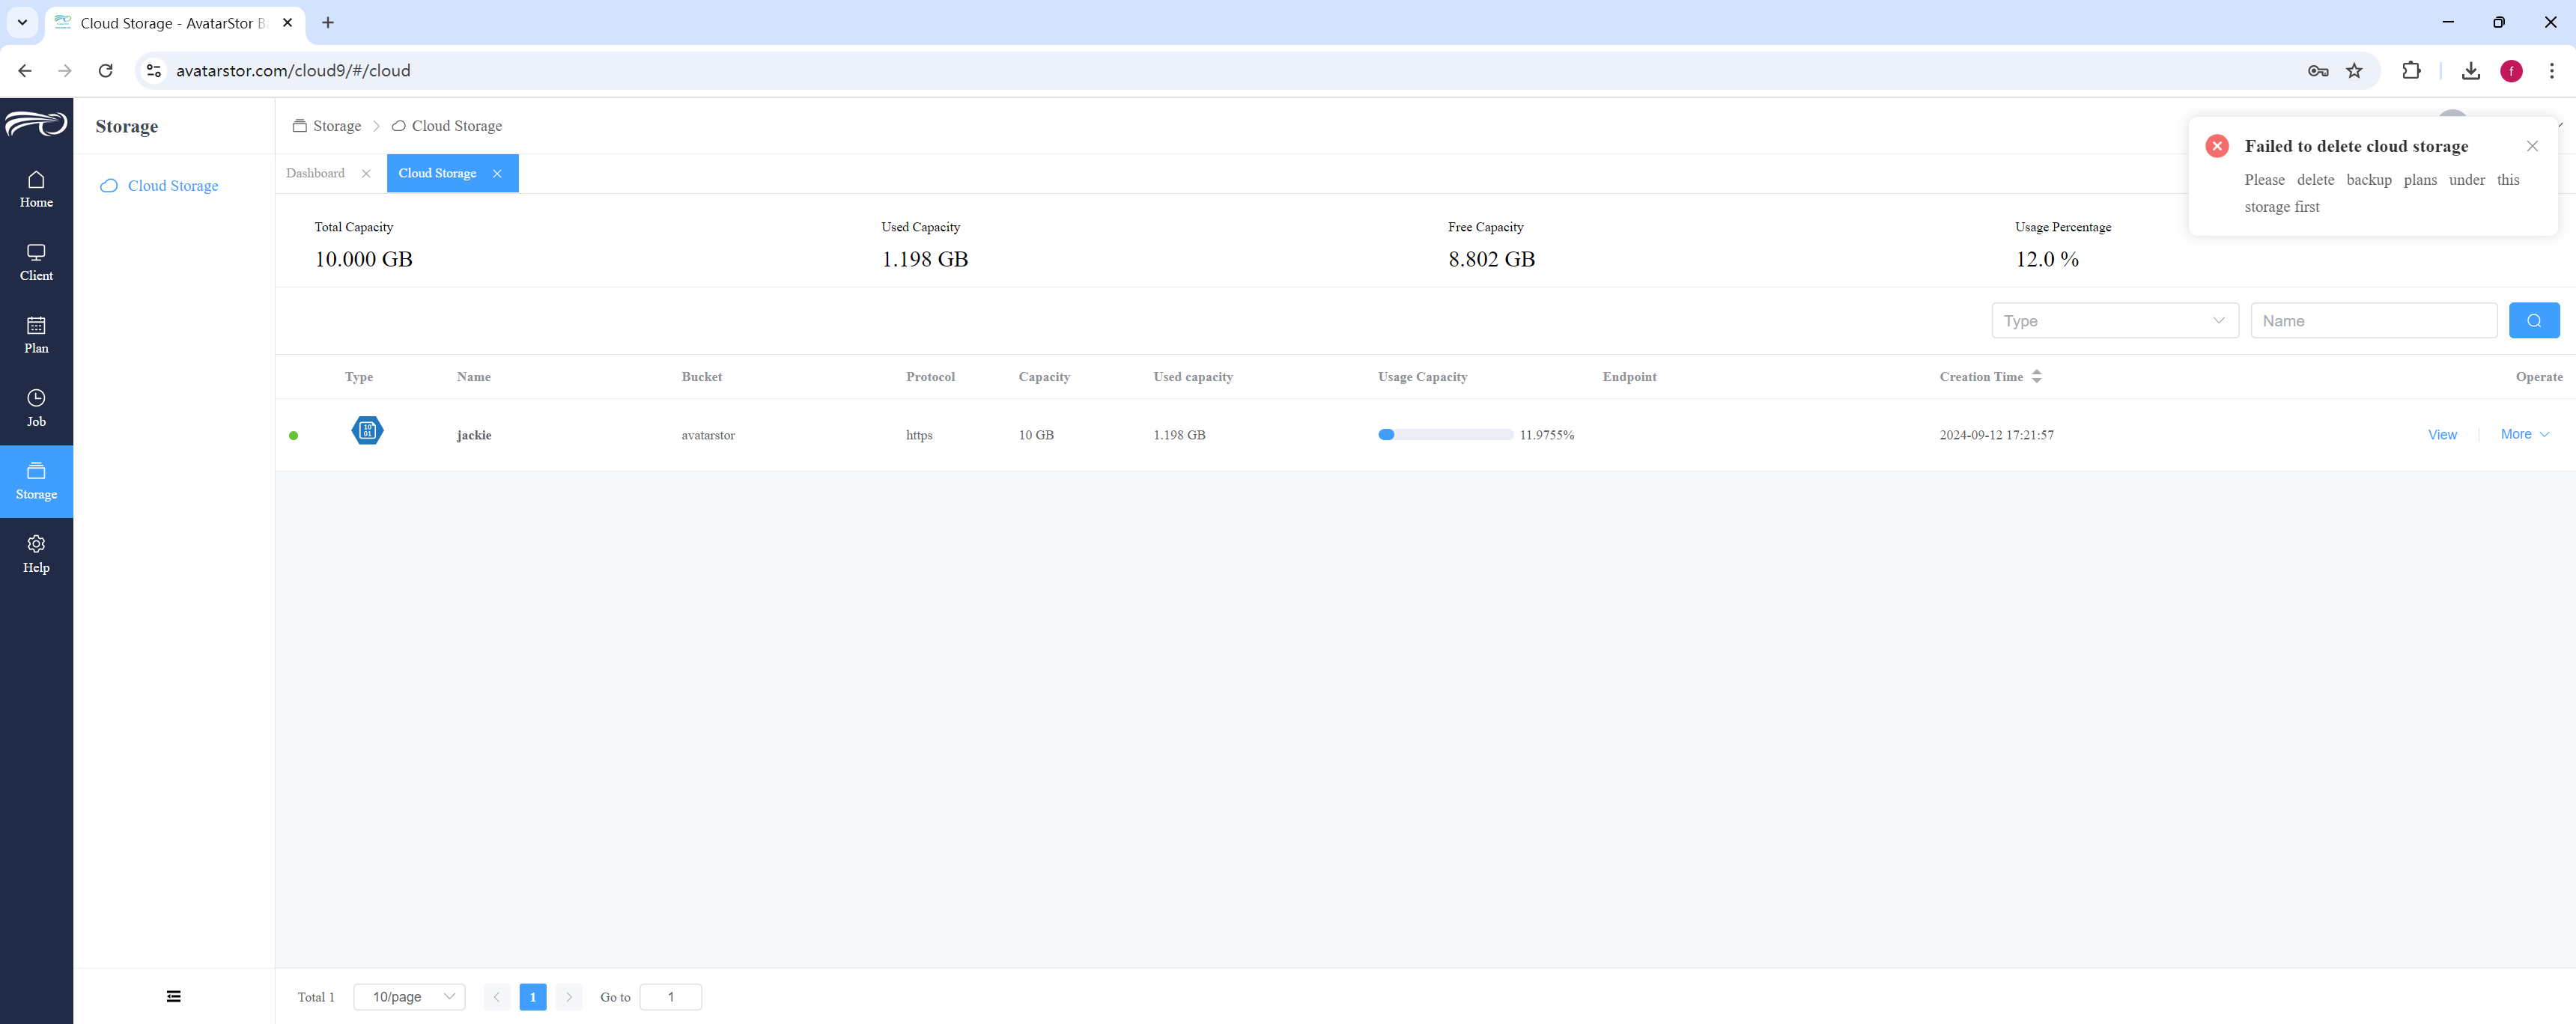
Only empty storage without any backup sets can be deleted. This is to prevent you from accidentally deleting backup data. |
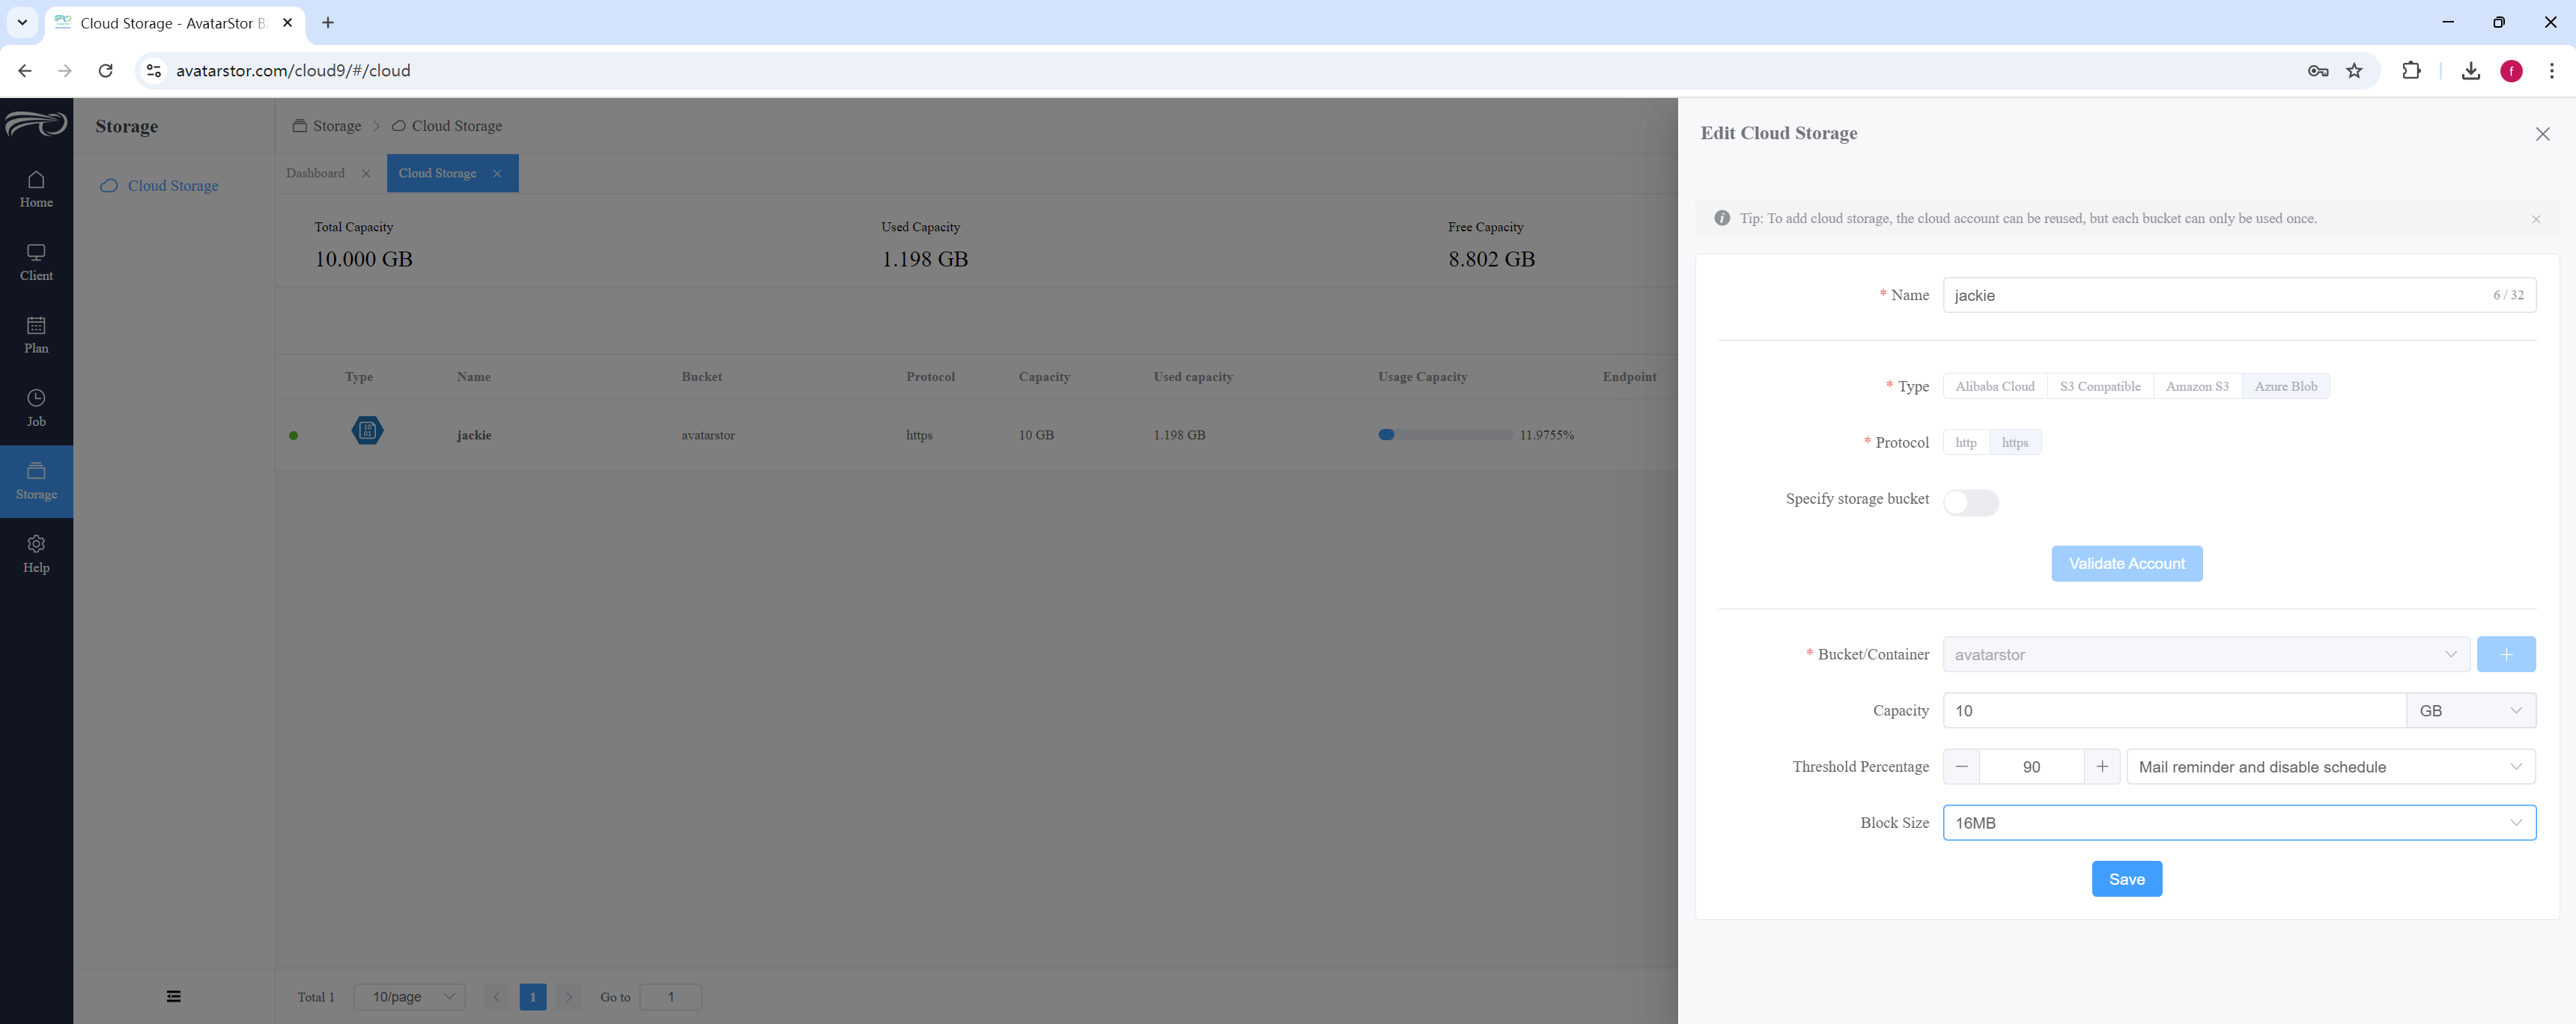
Edit:
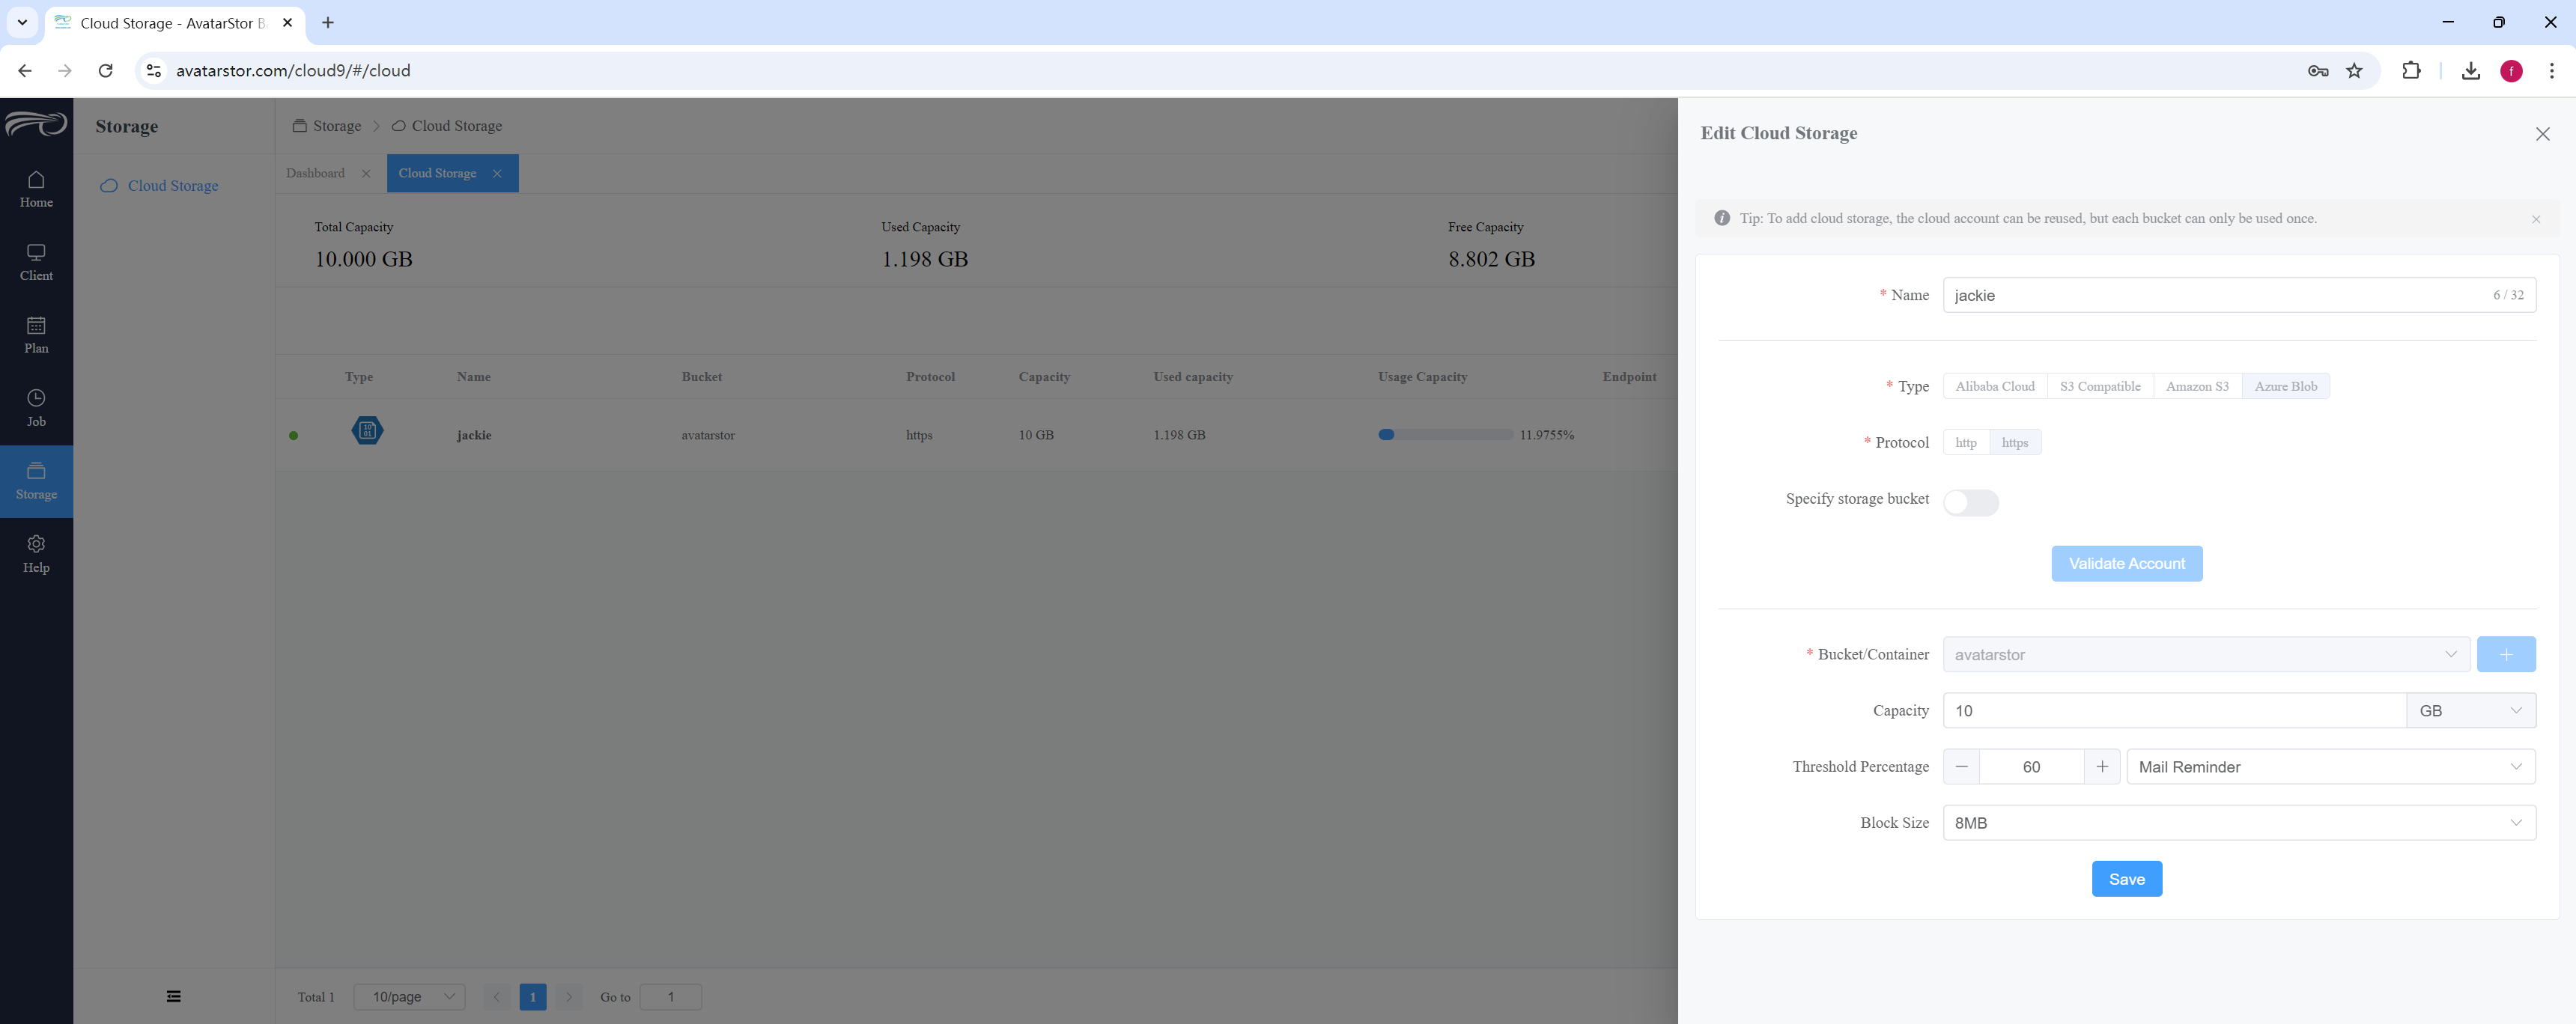
Modify the capacity threshold to 90, set the action to email notification, disable the policy, and change the block size to 16MB:
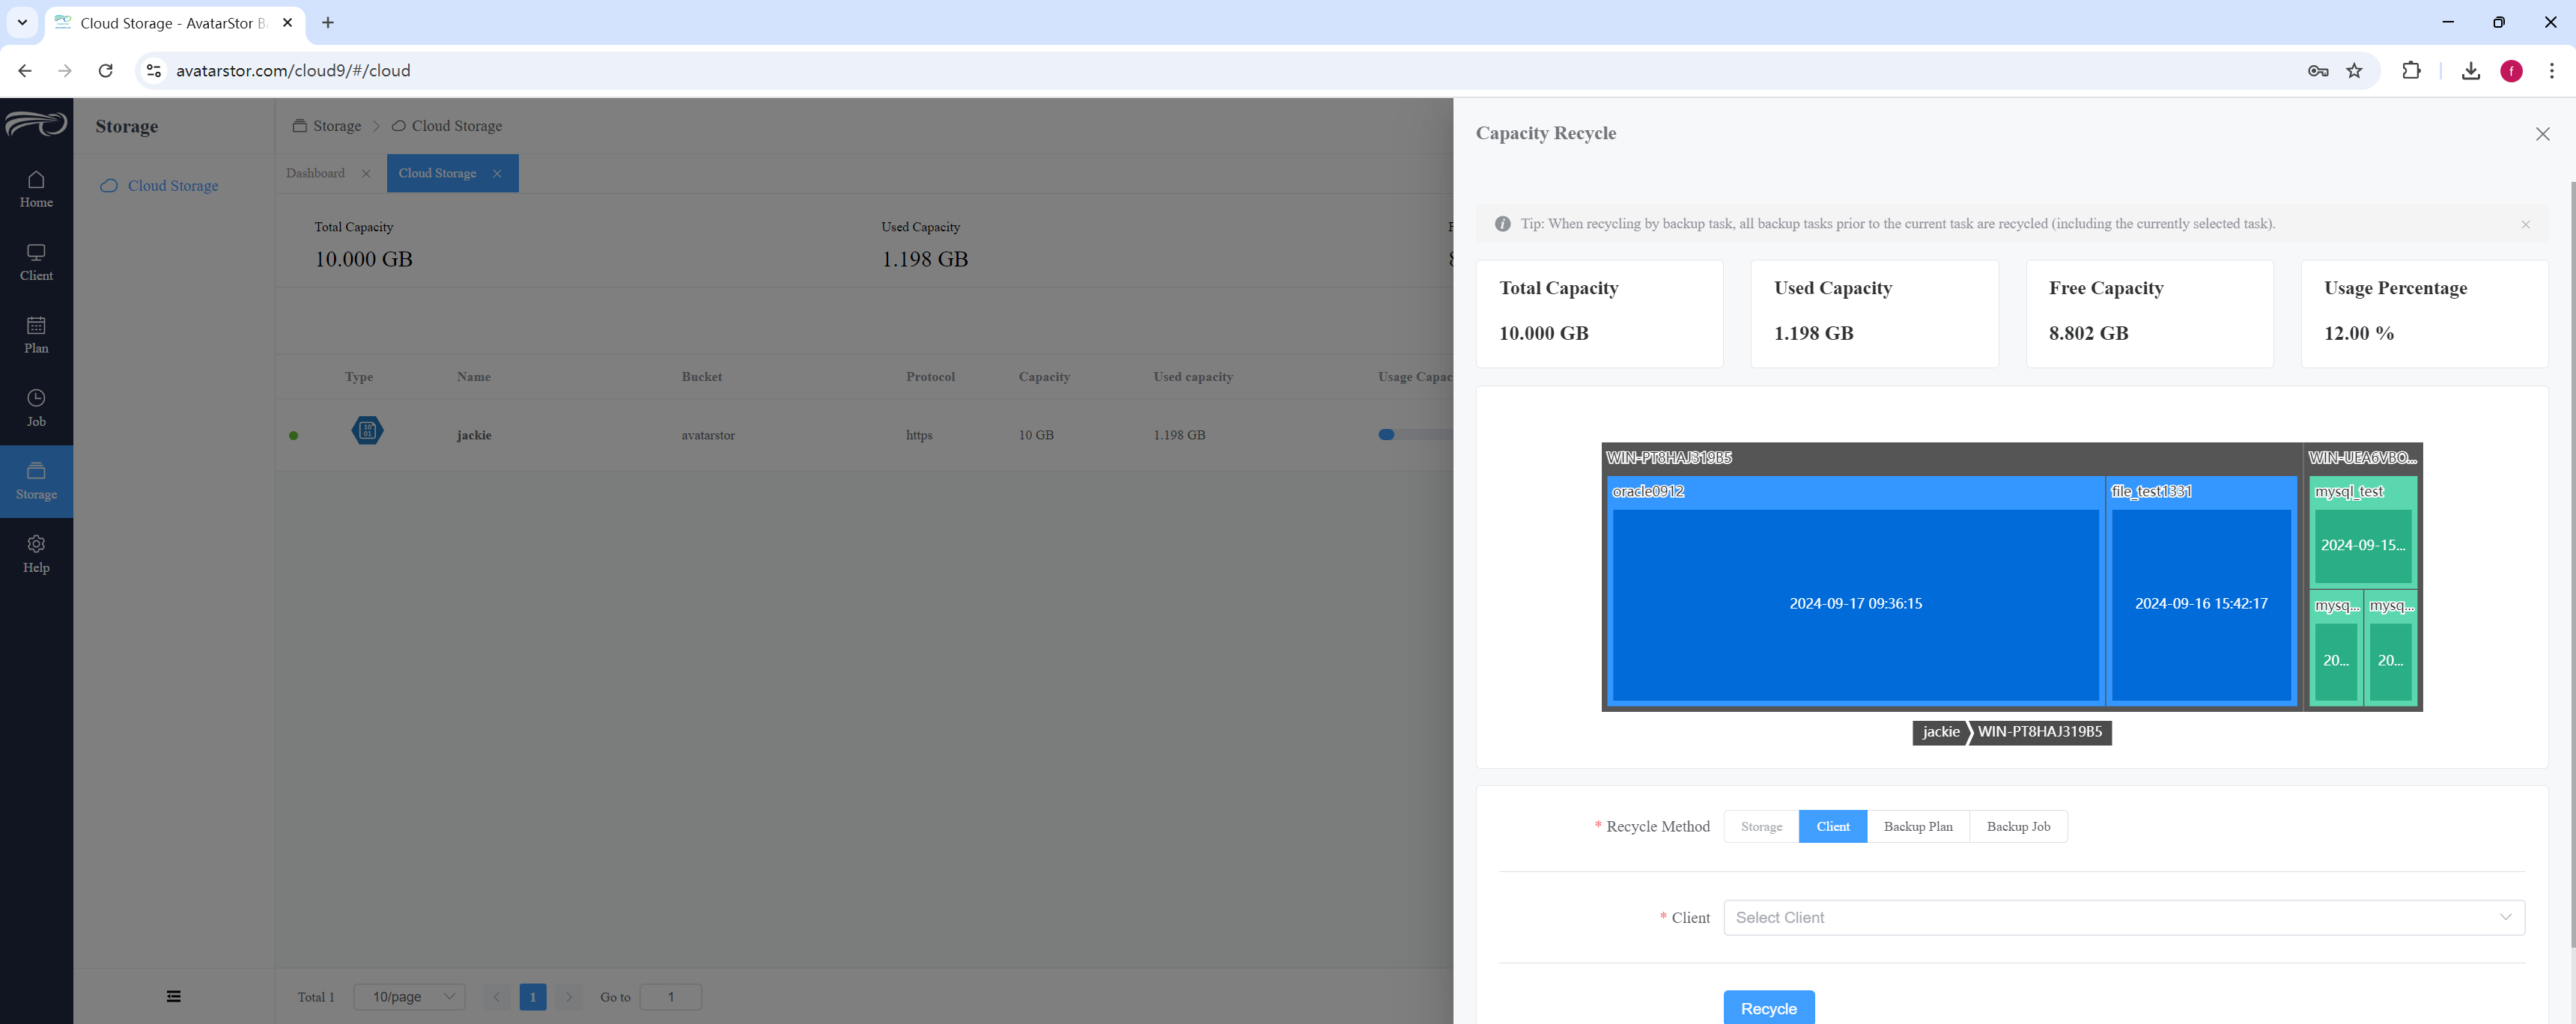
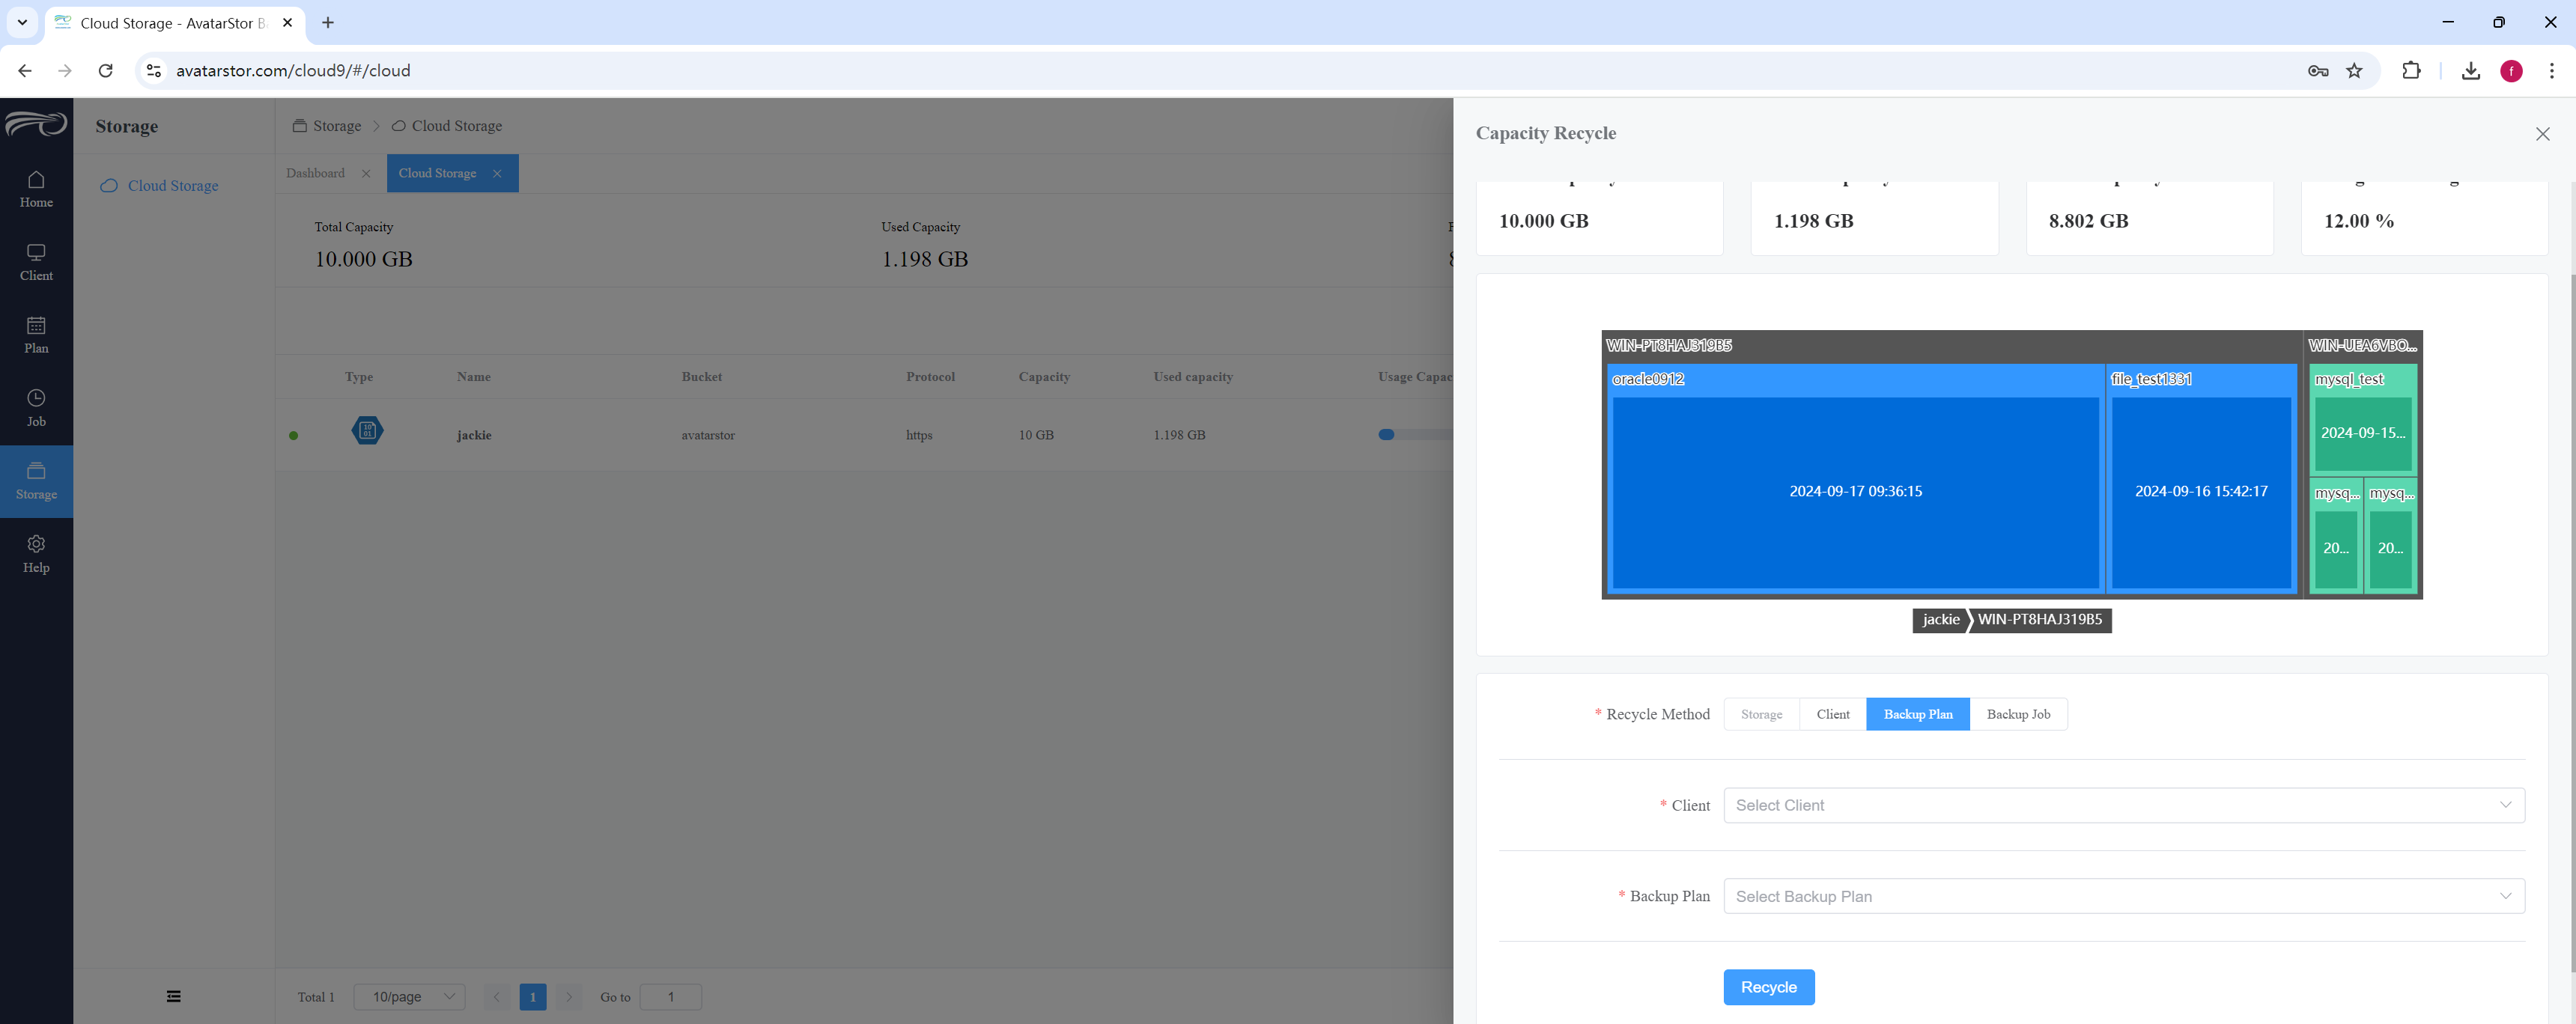
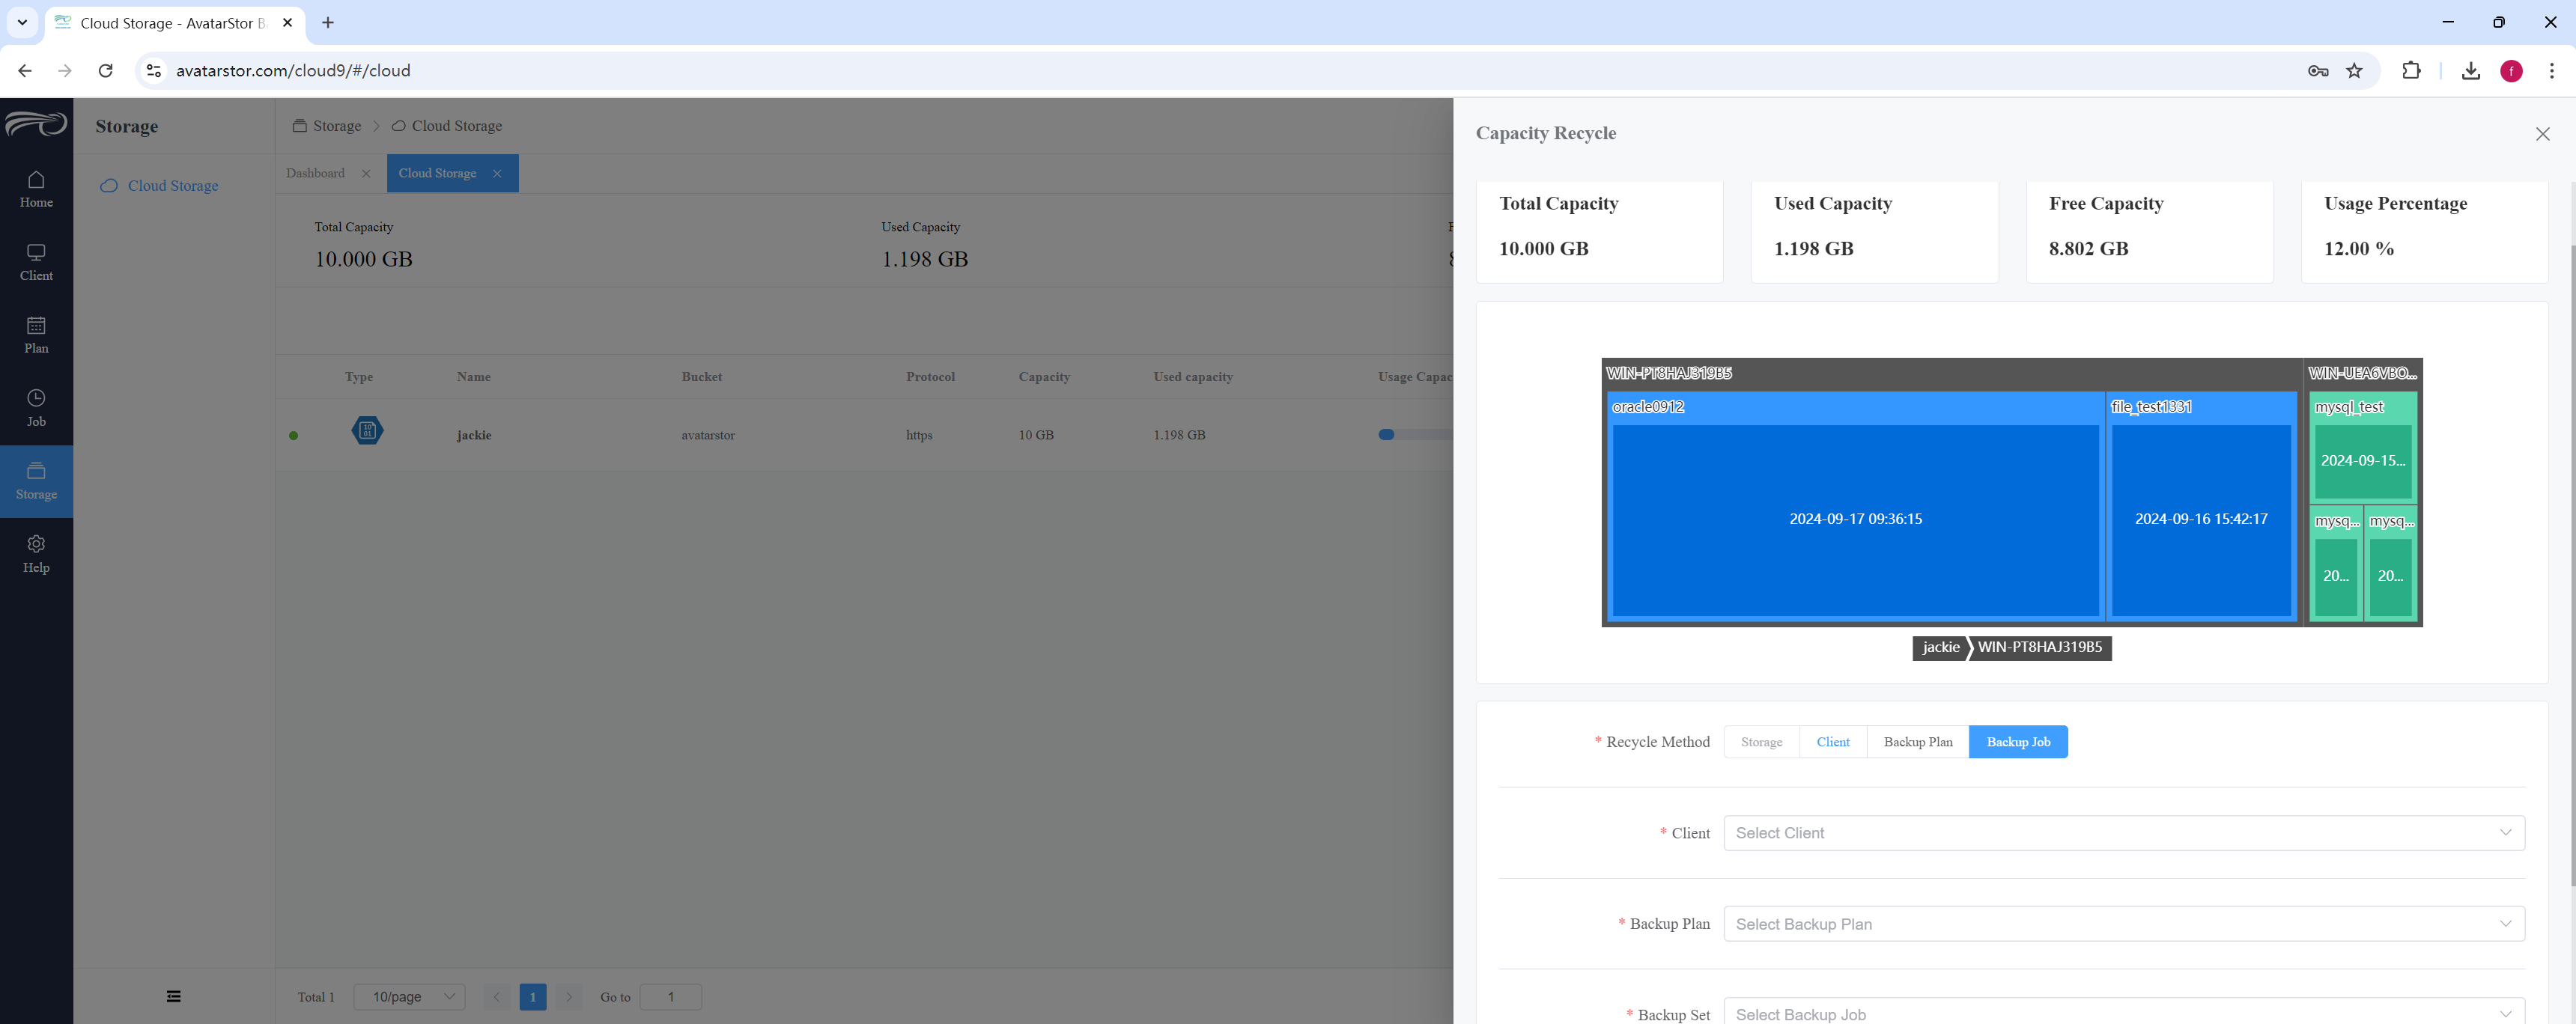
Recycle:When your storage space is insufficient, you can choose to reclaim storage space. You can reclaim by client, by backup plan, or by specific backup jobs.
6. Frequently Asked Questions
If you encounter any problems during the use of the product, you can refer to this document.
6.1 General problem
Problem description:
What should I do if I forget my login password?
Solution:
Click on the main login page [Forgot Password] and follow the wizard instructions:
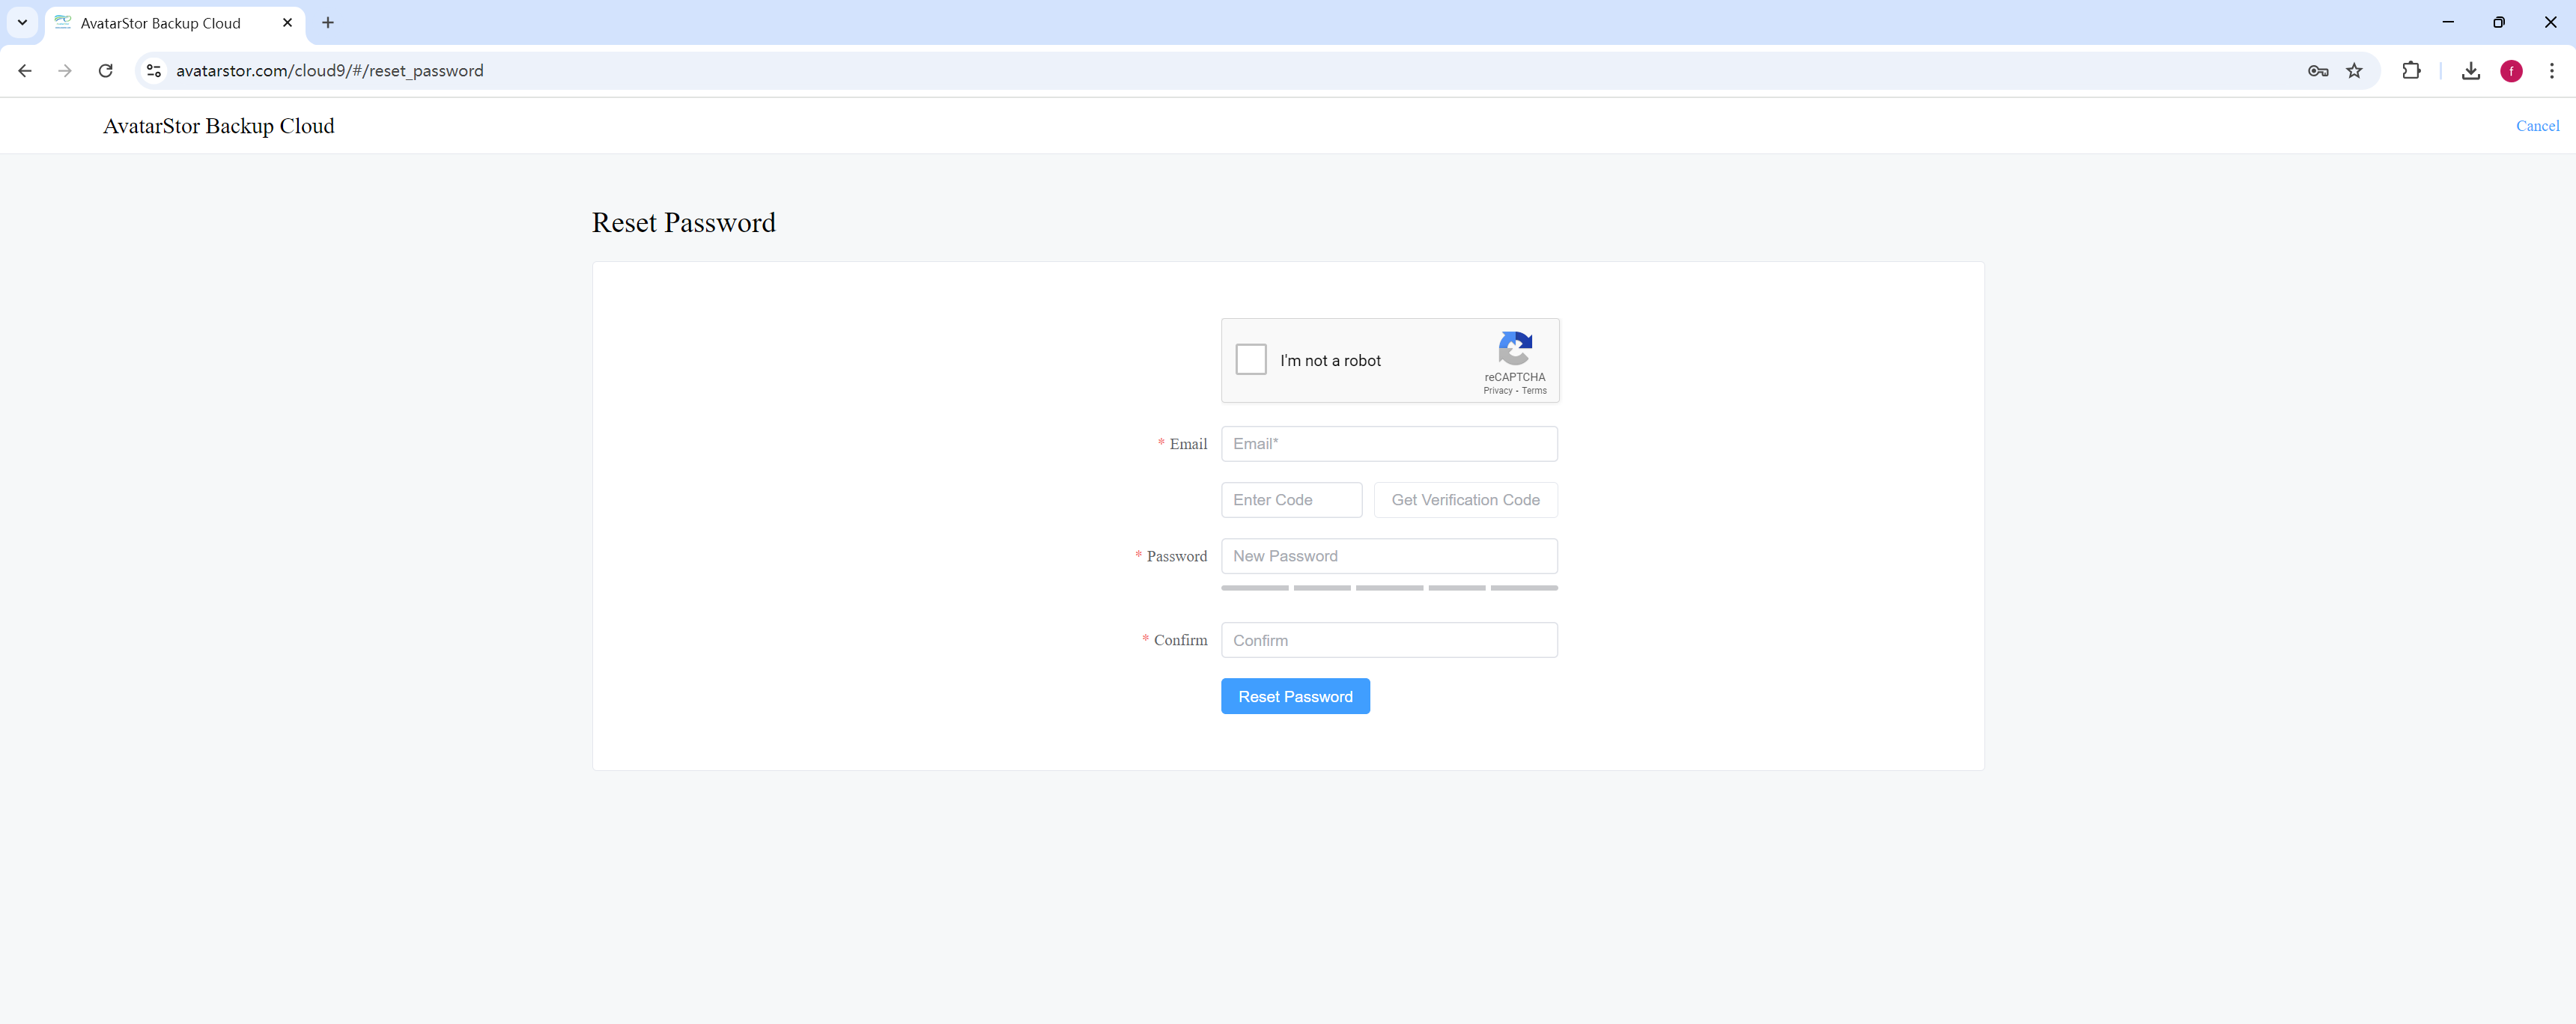
Problem description:
How to view Client logs?
Solution:
Windows system: Logs are located at [installdir] AvatarStor\ log
Linux system: The log is located under [installdir] Avs\ {role}\ log, where role: {client, master, storage}
In addition, the log.ini file can adjust the log level.
[Cfg]
log_level = 3 (0:Info 1:Warning 2:Error 3:Debug 4:Trace)
save_days = 1
The information increases sequentially from 0 to 4.
Problem description:
Why is there no client to choose from when restoring a different machine?
Solution:
The different machines must have the same operating system as the original machine. For example, if the original machine is a MySQL database under Linux, and the different machine does not have a Linux system but only a Windows system, then you cannot pull it down to select a client when restoring a different machine.
Problem description :
10 clients are located in the LAN and cannot access the public network, but these 10 clients are connected to the same server that can access the public network. Can AvatarStor cloud backup be used?
Solution :
Deploy port forwarding software on this server that can access the public network, and "map" the public network port of AvatarStor to the local LAN for other clients to access. The simple diagram is as follows:
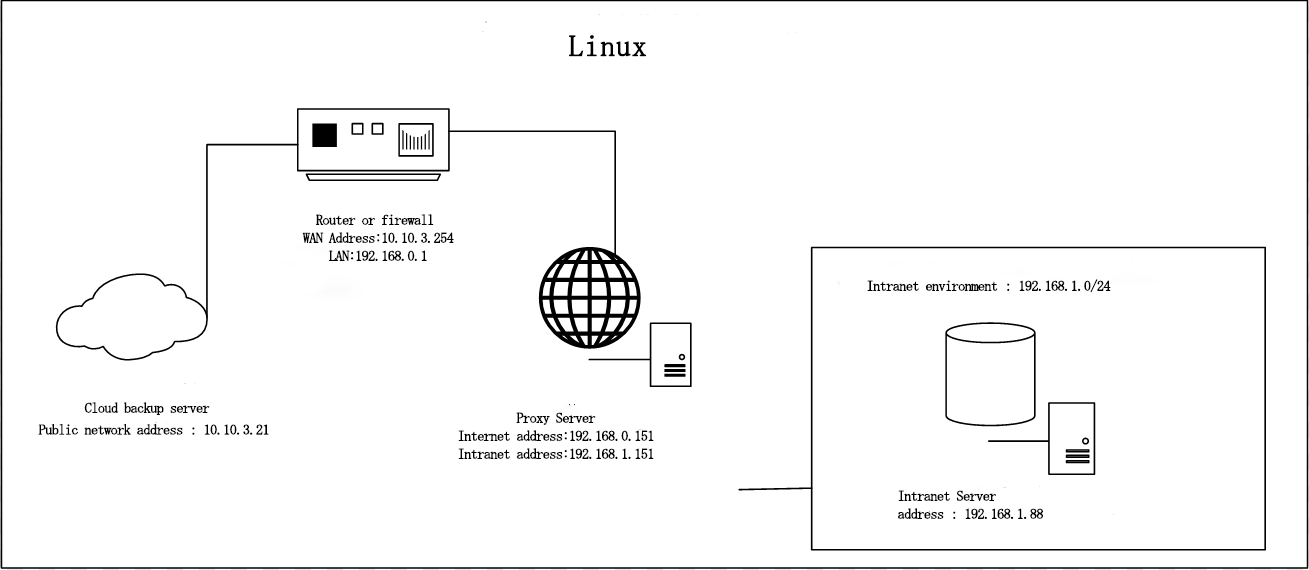
We recommend using rinetd + linux forwarding server. The deployment steps are as follows:
Rinetd is a simple and efficient port forwarding tool that forwards network traffic from one IP address and port to another. Here are the steps to deploy rinetd port forwarding software:
Install rinetd
On most Linux publish versions, you can install rinetd through the package manager.
On Debian/Ubuntu
|
Bash |
On CentOS/RHEL
First, you need to enable the EPEL repository because rinetd is in the EPEL repository:
|
Bash |
Configure rinetd
The rinetd configuration file is usually located in /etc/rinetd.conf . Edit this file to set port forwarding rules.
|
Bash |
The file format is as follows:
|
Plaintext |
For example, if you want to forward all traffic from 0.0.0.0 port 8080 to 192.168.1.100 port 80, you can add the following line:
|
Plain Text |
Start rinetd
After configuration is complete, you can start rinetd .
On Debian/Ubuntu
|
Bash |
On CentOS/RHEL
|
Bash |
Verify configuration
Make sure rinetd is working properly and check that port forwarding is working as expected. You can use the netstat or ss command to verify port forwarding:
|
Bash |
Or:
|
Bash |
You can also try connecting to the forwarded port from the outside to see if you can successfully connect to the destination address and port.
Other configurations (optional)
Rinetd 's configuration file also has some other options, such as logging and binding to specific network interfaces, which can be configured as needed.
For example, enable logging:
|
Bash |
Bind to a specific network interface.
|
Bash |
Firewall configuration
Ensure that the firewall allows relevant traffic to pass through. For example, allow traffic on port 8080 in iptables :
|
Bash |
Configure in firewalld :
|
Bash |
With the above steps, you should be able to successfully deploy rinetd and implement port forwarding. Adjust the profile and firewall settings as needed to suit your specific needs.
6.2 File Backup FAQs
Problem description :
Solution :
6.3 SqlServer FAQs
Problem description :
SqlServer backup report has no permission.
Solution :
NT_AUTHORITY/SYSTEM users with public and sysadmin permissions.
|
SQL |
Problem description:
How to confirm Sqlserver instance Port Number?
Solution:
The default instance Port Number of SqlSever is 1433. If multiple SqlServers are installed on a client, the following methods can be used to confirm their respective instance Port Numbers:
SQL Server Configuration Manager :
Open SQL Server Configuration Manager.
Locate SQL Server Network Configuration > Confirm the protocol (such as TCP/IP) for the corresponding instance.
Right-click on TCP/IP and select "Properties".
In the "IP Address" tab, you can see the Port Number corresponding to each IP address.
Using SQL Server Management Studio (SSMS) :
Connect to the SQL Server instance.
Execute the following SQL query to obtain the Port Number of the instance:
|
SQL |
View the SQL Server error log :
SQL Server records port information in the error log when it starts. You can use the following query to obtain the path of the error log:
|
SQL |
Find the row containing "Server is listening on", which lists the Port Number of the instance.
6.4 MySql FAQs
Problem description :
MySQL recovery failed, the log prompt is similar to:
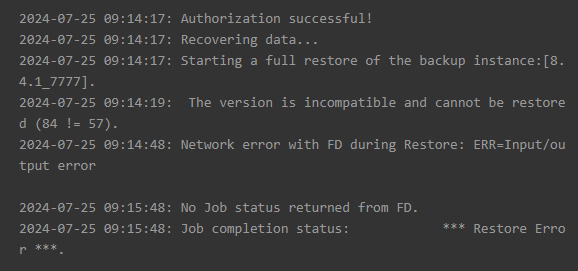
Solution :
The main version of Mysql on the target and backup sides should be consistent, and there is no requirement for the minor version. For example, Mysql5.7 cannot be restored to Mysql8.4. However, Mysql8.4.1 can be restored to Mysql8.4.2
Problem description:
Mysql 8.0 adds caching_sha2_password password authentication mode, does AvatarStor support it?
Solution:
Early AvatarStor did not support caching_sha2_password, but the current version already supports it. And it automatically determines the verification mode without user selection.
|
Tip There are two different authentication modes for MySql account passwords, one is mysql_native_password and the other is caching_sha2_password. Login to MySql and execute (using querying the root account as an example):
mysql> select user,host,plugin from mysql.user where user="root"; +------+-----------+-----------------------+ | user | host | plugin | +------+-----------+-----------------------+ | root | localhost | caching_sha2_password | +------+-----------+-----------------------+ 1 row in set (0.03 sec) The plugin column is the password authentication mode used by the current root. |
Problem description:
Does AvatarStor support MySQL physical backup?
Solution:
Stay tuned for AvatarStor's Xtrabackup for MySQL.
Problem description:
Mysql recovery error, the log is similar to:
[11:26:54.129]|[10680]|[d:\01.work\cloudbackup\trunk\backup\window\src\win32\filed\plugins\common\redirectoutput.cpp:41]|[Error]|[LogHandler::CheckScriptStatus]|ERROR 2013 (HY000) at line 938392: Lost connection to MySQL server during query
Solution:
One possibility is that the target MySQL max_allowed_packet is set too small.
To set the MySQL max_allowed_packet option to 1GB, you need to modify the MySQL configuration file (my.cnf or my.ini) and then restart the MySQL server. Here are the detailed steps:
Find the MySQL configuration file
MySQL configuration files are usually located at:
Linux : /etc/mysql/my.cnf or /etc/my.cnf
Windows: C:\ProgramData\MySQL\MySQL Server 5.7\my.ini
Edit configuration file
Open the configuration file with a text editor. You need to add or modify max_allowed_packet settings in the [mysqld] section.
|
Plain Text |
Restart the MySQL server
After saving the changes to the configuration file, restart the MySQL server to apply the new settings.
Linux:
|
Bash |
Windows : You can restart the MySQL service using the Service Management Console ( services.msc ) or via the command line:
|
Bash |
6.5 Oracle FAQs
Problem description :
Solution :
7. Appendix
7.1 Compatibility list
7.1.1 Operating system
| Op | Version |
|---|---|
| Windows | Windows7 Windows8/8.1 Windows 10 Windows11 |
| Windows Server | Windows Server 2008/2012/2016/2019/2022 |
| RHEL | RHEL/CentOS/Rocky/Oracle 6.x 7.x 8.x 9.x |
| SUSE | SUSE 12spX-15spX |
| Debian | Debian 10 11 12 |
| Ubuntu | Ubuntu 18 20 22 24 |
7.1.2 Database
| Op | Version |
|---|---|
| Windows Server | MySQL:5.5、5.7、8.0 SQLServer(SQLServerAlwaysOn)2008、2012、2014、2016、2019 Oracle(RAC):11g、12c、19c |
| Linux | MySQL:5.5、5.6、5.7、8.0 Oracle(RAC):11g、12c、18c、19c |
7.1.3 Virtualization
Coming soon.
7.2 Error code query
Coming soon.